Vue
Only focus on layers: HTML+CSS+JS
- Network communication: axios
- Page Jump: Vue router
- Status management: vuex
- Vue-UI: ice.work
Front end UI framework
- bootstrap
- Ant-Design
- ElementUI,iview,ice
- AmazeUI
management tool
- npm: similar to maven
1, Hello Vue
Develop using IDEA
Create new HTML and add cdn
<script src="https://cdn.jsdelivr.net/npm/vue@2.5.16/dist/vue.js"></script>
html file:
<!DOCTYPE html>
<html lang="en">
<head>
    <meta charset="UTF-8">
    <title>Title</title>


</head>
<body>
<div id="hello">
    {{massage}}
</div>
<script src="https://cdn.jsdelivr.net/npm/vue@2.5.16/dist/vue.js"></script>
<script>
    var vm = new Vue({
        el : "#hello",
        data : {
            massage:"hello vue!"
        }
    });
</script>
</body>
</html>
After running, you can use VM. Mass = "any value" on the console to test and find that it will change in real time. This is two-way binding
2, Basic grammar
1. Judgment statement
<!DOCTYPE html>
<html lang="en">
<head>
    <meta charset="UTF-8">
    <title>Title</title>


</head>
<body>
<div id="hello">
    <h1 v-if="massage==='A'">A</h1>
    <h1 v-else-if="massage==='B'">B</h1>
    <h1 v-else-if="massage==='C'">C</h1>
    <h1 v-else>Nothing</h1>
</div>
<script src="https://cdn.jsdelivr.net/npm/vue@2.5.16/dist/vue.js"></script>
<script>
    var vm = new Vue({
        el : "#hello",
        data : {
            massage:"hello vue!"
        }
    });
</script>
</body>
</html>
2. Circular statement
<!DOCTYPE html>
<html lang="en">
<head>
    <meta charset="UTF-8">
    <title>Title</title>
</head>
<body>
<div id="hello">
  <ul>
    <li v-for="item in items">
      {{item.massage}}
    </li>
  </ul>
</div>
<script src="https://cdn.jsdelivr.net/npm/vue@2.5.16/dist/vue.js"></script>
<script>
  var vm = new Vue({
    el : "#hello",
    data : {
      items: [
        {massage:"item1"},
        {massage:"item2"},
        {massage:"item3"}
      ]
    }
  });
</script>
</body>
</html>
3. Binding events
<!DOCTYPE html>
<html lang="en">
<head>
    <meta charset="UTF-8">
    <title>Title</title>
</head>
<body>


<div id="hello">
  <ul>
    <li v-for="item in items">
      {{item.massage}}
    </li>
  </ul>
  <button v-on:click="sayHi">click Me</button>
</div>


<script src="https://cdn.jsdelivr.net/npm/vue@2.5.16/dist/vue.js"></script>
<script>
  var vm = new Vue({
    el : "#hello",
    data : {
      items: [
        {massage:"item1"},
        {massage:"item2"},
        {massage:"item3"}
      ]
    },
    methods:{
      sayHi:function () {
        alert("hello vue!")
      }
    }
  });
</script>
</body>
</html>
3, Bidirectional binding MVVM and components
1. What is bidirectional binding?
View change < ---- > data change, the two affect each other synchronously
2. Realize bidirectional binding
Use the v-model attribute to bind the value attribute of DOM to the object in data.
<!DOCTYPE html>
<html lang="en">
<head>
    <meta charset="UTF-8">
    <title>bindmodel</title>
</head>
<body>
<div id="hello">
  Please enter data<input v-model="massage" placeholder="The data source is here" type="text">  {{massage}}
  <p>Please enter gender{{gender}}</p>
  <p><input type="radio" name="sex" value="male" v-model="gender">male</p>
  <p><input type="radio" name="sex" value="female" v-model="gender">female</p>


  Your hobbies
  <select v-model="hobby">
    <option value="" disabled>--Please select--</option>
    <option>money</option>
    <option>game</option>
    <option>code</option>
  </select>
  {{hobby}}
</div>

<script src="https://cdn.jsdelivr.net/npm/vue@2.5.16/dist/vue.js"></script>
<script>
  var vm = new Vue({
    el : "#hello",
    data : {
      massage:"",
      gender:'',
      hobby:''
    }
  });
</script>
</body>
</html>
3. Components
To put it bluntly, it is a template that allows you to customize labels
<!DOCTYPE html>
<html lang="en">
<head>
    <meta charset="UTF-8">
    <title>Title</title>
</head>
<body>
<div id="test">
    <!--Bind the values of other objects to properties-->
    <xiaowei v-for="item in items" v-bind:hobby="item"></xiaowei>
</div>


<script src="https://cdn.jsdelivr.net/npm/vue@2.5.16/dist/vue.js"></script>
<script>
    //The tag must be in the element bound by a new Vue object to take effect
    Vue.component("xiaowei",{
        //Multiple properties props can be customized in the component
        props: ['hobby'],//Now the xiaowei tag has the attribute "hobby"
        template: '<li>{{hobby}}</li>',//Only declared attributes can be used in a template
    });
    var vm = new Vue({
        el:"#test",
        data:{
            items: ['java','front end','linux']
        }
    });
</script>
</body>
</html>
4, Network communication
jQuery.ajax({}) [not recommended]
axios [recommended]
1. What is Axios?
The asynchronous communication of Ajax is realized
- Create from browser XMLHttpRequests
- Create from node.js http request
- support Promise API
- Intercept requests and responses
- Transform request and response data
- Cancel request
- Automatically convert JSON data
- Client support defense XSRF
2. Insert ajax asynchronous request with hook function
<!DOCTYPE html>
<html lang="en">
<head>
    <meta charset="UTF-8">
    <title>Title</title>
</head>
<body>


<div id="test">
  <h1>{{info.name}}</h1>
  <h1>{{info.page}}</h1>
  <h1>{{info.address.city}}</h1>
  <a v-bind:href="info.url"></a>
  <a v-for="item in info.links" v-bind:href="item.url">{{item.name}}</a>
</div>


<script src="https://cdn.jsdelivr.net/npm/vue@2.5.21/dist/vue.js"></script>
<script src="https://cdn.jsdelivr.net/npm/axios/dist/axios.min.js"></script>

<script>


  var vm = new Vue({
    el: "#test",

    data(){
      return{
        info:{
          name:'xiaowei',
          url:null,
          page:null,
          address: {
            stress:null,
            city:null,
          },
          links:[
            {
              name:null,
              url:null
            },
            {
              name:null,
              url:null
            },
            {
              name:null,
              url:null
            }
          ]
        }
      }
    },
    mounted(){
      axios.get('../data.json').then(response=>(this.info=response.data))
    }
  });
</script>

</body>
</html>
After learning this, we should know that there are several cases when all attributes in Vue object / template are bound to HTML pages:
- When directly taken out as text, just two curly braces, {mask}}
- However, you need to use v-bind:properties when you need to bind to the tag's properties.
- Only custom attributes can be used in the template, and external v-bind binding is required
5, Calculation properties
<!DOCTYPE html>
<html lang="en">
<head>
    <meta charset="UTF-8">
    <title>Title</title>
</head>
<body>
<div id="hello">
  {{massage}}
  <p>{{nowTime()}}</p>
  <p>{{nowTimeC}}</p>
</div>
<script src="https://cdn.jsdelivr.net/npm/vue@2.5.16/dist/vue.js"></script>
<script>
  var vm = new Vue({
    el : "#hello",
    data : {
      massage:"hello vue!"
    },
    methods: {
      nowTime: function () {
          return Date.now();
      }
    },
    computed: {
        nowTimeC: function () {
            this.massage;
            return Date.now();
        }
    }
  });
</script>
</body>
</html>
Calculation properties can easily save the calculation results to the cache. If the value inside is not refreshed, the calculation attribute will not change
6, Slot
<!DOCTYPE html>
<html lang="en">
<head>
    <meta charset="UTF-8">
    <title>Title</title>
</head>
<body>
<div id="hello">
    <main-my>
        <main-title slot="main-title" :title="ltitle"></main-title>
        <main-list slot="main-list" v-for="lesson in llist" :item="lesson" ></main-list>

    </main-my>


</div>


<script src="https://cdn.jsdelivr.net/npm/vue@2.5.16/dist/vue.js"></script>
<script>
    Vue.component("main-my",{
        template:'\
            <div>\
                <slot name="main-title"></slot>\
                <ul>\
                    <slot name="main-list"></slot>\
                </ul>\
            </div>\
            \
            '
    })
    Vue.component("main-title",{
        props:['title'],
        template: '\
        <h1>{{title}}</h1>\
        \
        '
    })
    Vue.component("main-list",{
        props:['item'],
        template: '\
        <li>{{item}}</li>\
        \
        '
    })
    var vm = new Vue({
        el : "#hello",
        data : {
            massage:"hello vue!",
            ltitle:"Xiao Wei learning",
            llist:['java','vue','linux']
        }

    });
</script>
</body>
</html>
7, Custom event
<!DOCTYPE html>
<html lang="en">
<head>
    <meta charset="UTF-8">
    <title>Title</title>
</head>
<body>
<div id="hello">
    <main-my>
        <main-title slot="main-title" :title="ltitle"></main-title>
        <main-list slot="main-list" v-for="(lesson,index) in llist" :item="lesson"
                    v-on:remove="removeItem(index)"
                    :index="index"></main-list>

    </main-my>


</div>


<script src="https://cdn.jsdelivr.net/npm/vue@2.5.16/dist/vue.js"></script>
<script>
    Vue.component("main-my",{
        template:'\
            <div>\
                <slot name="main-title"></slot>\
                <ul>\
                    <slot name="main-list"></slot>\
                </ul>\
            </div>\
            \
            '
    })
    Vue.component("main-title",{
        props:['title'],
        template: '\
        <h1>{{title}}</h1>\
        \
        '
    })
    Vue.component("main-list",{
        props:['item','index'],
        template: '\
        <li>{{item}} <button @click="remove">delete</button></li>\
        \
        ',
        methods: {
            remove:function (index) {
                //Call custom event
                console.log('Event deleted')
                this.$emit('remove',index);
            }
        }
    })
    var vm = new Vue({
        el : "#hello",
        data : {
            massage:"hello vue!",
            ltitle:"Xiao Wei learning",
            llist:['java','vue','linux']
        },
        methods:{
            removeItem:function (index) {
                console.log('Deleted'+this.llist[index].toString())
                this.llist.splice(index, 1);
            }
        }

    });
</script>
</body>
</html>
Principle:
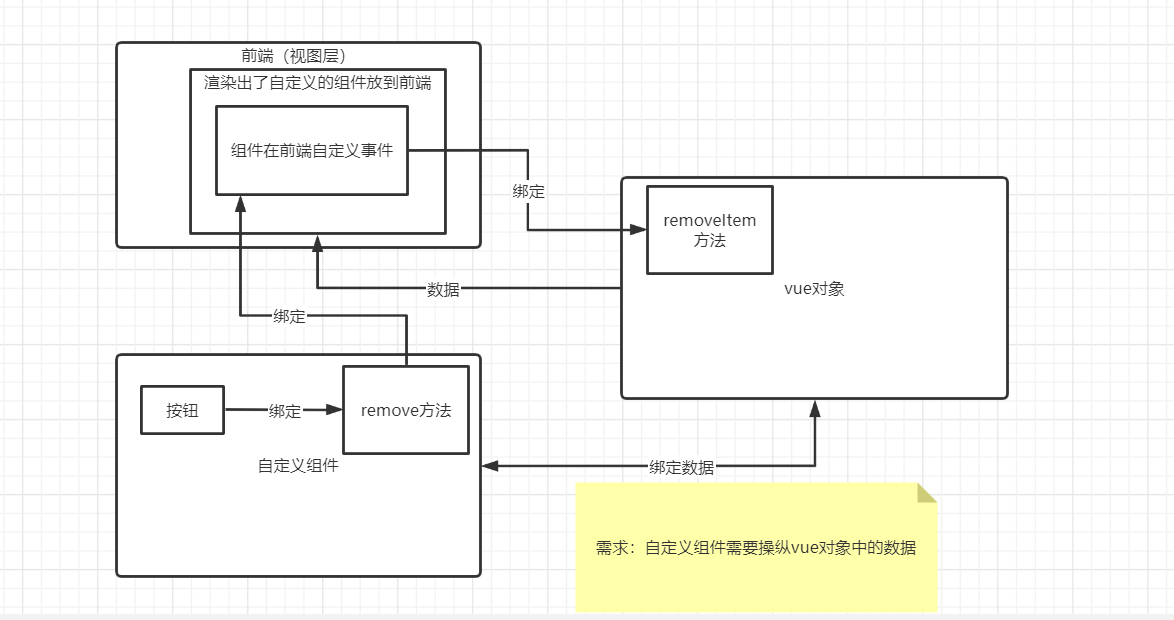
Component binding custom event: this.$emit
Custom event binding vue object event: v-on: removffunc: vue object method
8, First Vue cli project
-
Interactive project scaffolding through @ vue/cli.
-
Zero configuration prototype development through @ Vue / cli + @ Vue / cli service global.
-
A runtime dependency(
@vue/cli-service
), the dependency:
- Upgradeable;
- Build based on webpack with reasonable default configuration;
- It can be configured through the configuration file in the project;
- It can be extended through plug-ins.
-
A rich collection of official plug-ins, integrating the best tools in the front-end ecosystem.
-
A fully graphical user interface for creating and managing Vue.js projects.
1. Install Node.js
-
Download address: https://nodejs.org/en/download/
-
Mindless next step
-
Open the command line when the installation is complete
- node -v check whether the version certificate is installed
- npm -v check if npm is installed
-
Configure Taobao image:
-
Command line input
-
npm install cnpm -g
-
-
Installing Vue cli
-
Command line input
-
cnpm install vue-cli -g
-
2. Create vue project
-
Command line input
vue init webpack myvue
-
Whether the following contents are basically:
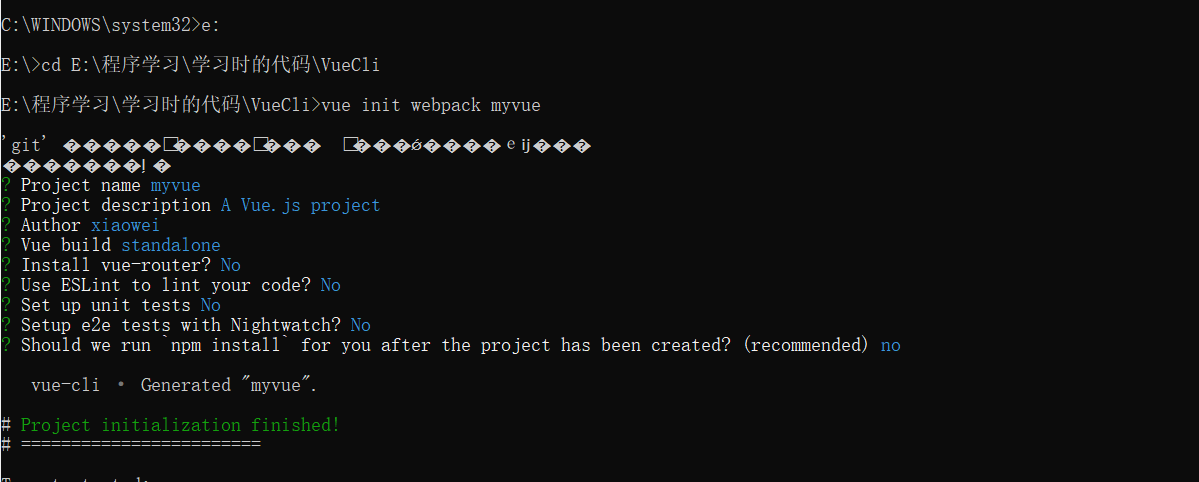
3. Initialize and run
cd myvue
npm install
npm run dev
Open myvue folder with idea
Open your front-end project at localhost:8080!
9, webpack installation and use
Installation:
npm install webpack -g
npm install webpack -cli -g
Test installation succeeded
webpack -v
webpack -cli -v
Modular development ↓
Exposed object
//Exposure variable
exports.sayHi = function(){
    document.write("<h1>Hello</h1>")
}
Receiving object
//Get the interface
var hi = require("./hello");
hi.sayHi();
Packing ↓
webpack.config.js
module.exports = {
    entry: './modules/main.js',
    output: {
        filename: '.js/bundle.js'
    }
}
Command line:
webpack
use
<script src="./dist/.js/bundle.js"></script>
10, Vue router routing
Used for page Jump
1. Installation
cnpm install vue-router --save-dev
2. Configure routing
Create a router folder and put the index.js file into it. The configuration file for routing is as follows
import Vue from 'vue'
import VueRouter from 'vue-router'
// Introduction component
import Content from '../components/Content'
import Main from '../components/Main'
import Wei from "../components/Wei"

Vue.use(VueRouter)

export default new VueRouter({
  routes: [
    {
      // Routing path
      path: '/content',
      name: 'content',
      // Jump assembly
      component: Content
    },
    {
      // Routing path
      path: '/main',
      name: 'main',
      // Jump assembly
      component: Main
    },
    {
      // Routing path
      path: '/xiaowei',
      name: 'xiaowei',
      // Jump assembly
      component: Wei
    }
  ]
})
3. Route usage
Install the route in the JavaScript file of the main entry
// The Vue build version to load with the `import` command
// (runtime-only or standalone) has been set in webpack.base.conf with an alias.
import Vue from 'vue'
import App from './App'
import router from './router'

Vue.config.productionTip = false

/* eslint-disable no-new */
new Vue({
  el: '#app',
  router,
  components: { App },
  template: '<App/>'
})
Use routing labels in components
Router link: link
Router view: display
<template>
  <div id="app">
    <router-link to="/main">home page</router-link>
    <router-link to="/content">Content page</router-link>
    <router-link to="/xiaowei">name</router-link>
    <router-view></router-view>
  </div>
</template>

<script>

export default {
  name: 'App',
  components: {
  }
}
</script>

<style>
#app {
  font-family: 'Avenir', Helvetica, Arial, sans-serif;
  -webkit-font-smoothing: antialiased;
  -moz-osx-font-smoothing: grayscale;
  text-align: center;
  color: #2c3e50;
  margin-top: 60px;
}
</style>
11, vue+ElementUI actual combat
node.js version 12. *, otherwise sass won't work
1. New project
-
New folder
-
init vue project
vue init webpack
-
Install routing
cnpm install vue-router --save-dev
-
Installing element UI
cnpm i element-ui -S
-
Installation dependency
cnpm install
-
Installing the SASS loader
cnpm install sass-loader node-sass --save-dev
-
Start test
cnpm run dev
2. Open project
Use idea
Make the directory structure like this
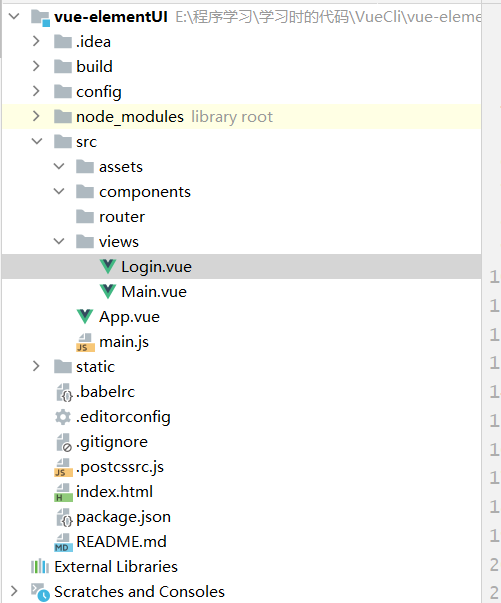
3. Create basic engineering
<template>
  <div>
    <el-form ref="loginForm" :model="form" :rules="rules" label-width="80px" class="login-box">
      <h3 class="login-title">Welcome to login</h3>
      <el-form-item label="account number" prop="username">
        <el-input type="text" placeholder="Please enter the account number" v-model="form.username"/>
      </el-form-item>
      <el-form-item label="password" prop="password">
        <el-input type="password" placeholder="Please input a password" v-model="form.password"/>
      </el-form-item>
      <el-form-item>
        <el-button type="primary" v-on:click="onSubmit('loginForm')">Sign in</el-button>
      </el-form-item>
    </el-form>

    <el-dialog
      title="reminder"
      :visible.sync="dialogVisible"
      width="30%"
      :before-close="handleClose">
      <span>Please enter your account and password</span>
      <span slot="footer" class="dialog-footer">
        <el-button type="primary" @click="dialogVisible = false">determine</el-button>
      </span>
    </el-dialog>
  </div>
</template>

<script>
  export default {
    name: "Login",
    data() {
      return {
        form: {
          username: '',
          password: ''
        },

        // For form validation, you need to add prop attribute in El form item element
        rules: {
          username: [
            {required: true, message: 'Account number cannot be empty', trigger: 'blur'}
          ],
          password: [
            {required: true, message: 'Password cannot be empty', trigger: 'blur'}
          ]
        },

        // Dialog box display and hide
        dialogVisible: false
      }
    },
    methods: {
      onSubmit(formName) {
        // Bind validation function for form
        this.$refs[formName].validate((valid) => {
          if (valid) {
            // Using Vue router to route to the specified page is called programmatic navigation
            this.$router.push("/main");
          } else {
            this.dialogVisible = true;
            return false;
          }
        });
      }
    }
  }
</script>

<style lang="scss" scoped>
  .login-box {
    border: 1px solid #DCDFE6;
    width: 350px;
    margin: 180px auto;
    padding: 35px 35px 15px 35px;
    border-radius: 5px;
    -webkit-border-radius: 5px;
    -moz-border-radius: 5px;
    box-shadow: 0 0 25px #909399;
  }

  .login-title {
    text-align: center;
    margin: 0 auto 40px auto;
    color: #303133;
  }
</style>
12, Nested routing
router configuration
import Vue from "vue";
import Router from "vue-router";
import Main from "../views/Main";
import Login from "../views/Login";
import List from "../views/user/List";
import Info from "../views/user/Info";

Vue.use(Router);

export default new Router({
  routes: [
    {
      path: '/main',
      component: Main,
      children:[
        {path:'/user/list',component:List},
        {path:'/user/info',component:Info}
      ]
    },
    {
      path: '/login',
      component: Login

    }
  ]
});
Nested interfaces:
<template>
  <div>
    <h1>home page</h1>
    <router-link to="/user/info">information</router-link>
    <router-link to="/user/list">list</router-link>
    <router-view></router-view>
  </div>


</template>

<script>
export default {
  name: 'Main'
}
</script>

<style scoped>

</style>
13, Parameter passing and redirection
Parameter transfer
Routing configuration
import Vue from "vue";
import Router from "vue-router";
import Main from "../views/Main";
import Login from "../views/Login";
import List from "../views/user/List";
import Info from "../views/user/Info";

Vue.use(Router);

export default new Router({
  routes: [
    {
      path: '/main',
      component: Main,
      children:[
        {path:'/user/list',component:List},
        {path:'/user/info/:id',name:'Par',component:Info,props:true}
      ]
    },
    {
      path: '/login',
      component: Login

    }
  ]
});
Front end receiving parameters
<template>
  <div>
    <h1>home page</h1>
    <router-link to="/user/list">list</router-link>
    <router-link :to="{name:'Par',params:{id:1}}" >information</router-link>
    <router-view></router-view>
  </div>


</template>

<script>
export default {
  name: 'Main'
}
</script>

<style scoped>

</style>
Component receives by configuring custom properties
<template>
  <div><h1>User information</h1>{{id}}</div>

</template>

<script>
export default {
  name: "Info",
  props:['id']
}
</script>

<style scoped>

</style>
redirect
{
  path: '/main',
  name: 'Main',
  component: Main
},
{
  path: '/goHome',
  redirect: '/main'
}