Vue learning notes
1. MVVM mode and the first Vue program
Learning course of java according to ecstasy
What is MVC?
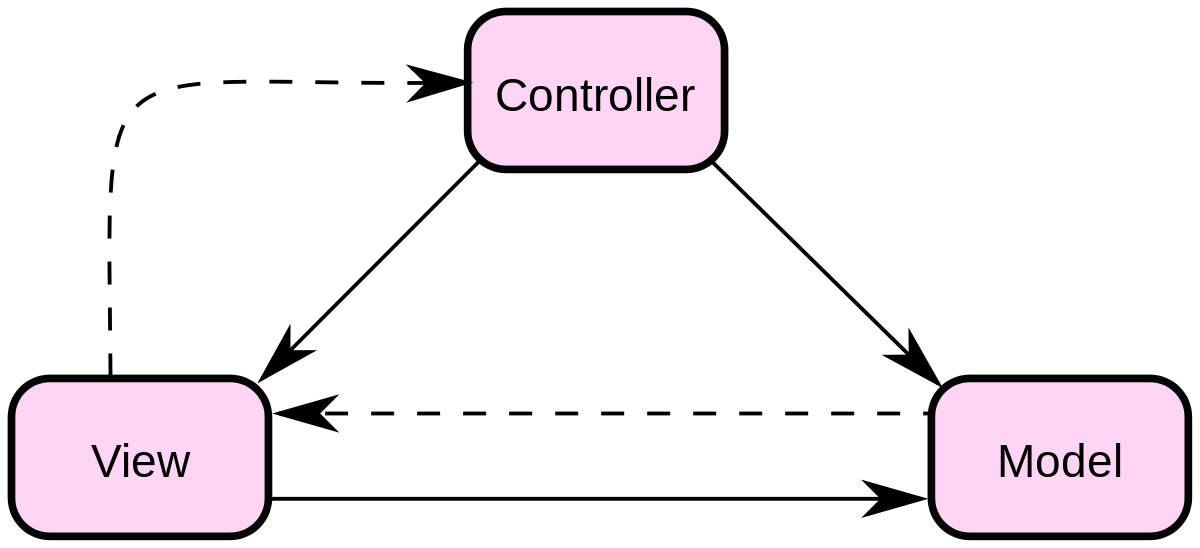
MVC mode represents model view controller mode. This pattern is used for hierarchical development of applications.
- Model - a model represents an object or JAVA POJO that accesses data. It can also have logic to update the controller when data changes.
- View - a view represents the visualization of the data contained in the model.
- Controller - the controller acts on the model and view. It controls the flow of data to model objects and updates the view as the data changes. It separates the view from the model.
What is MVVM
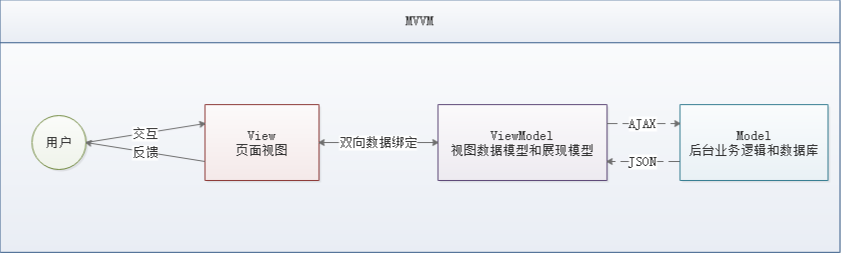
MVVM (Model view view Model) is a kind of software architecture design pattern. MVVM originates from the classic MVC (Model view controller) pattern. The core of MVVM is the ViewModel layer, which is responsible for transforming data objects in the Model to make data easier to manage and use. Its functions are as follows:
- This layer performs bidirectional data binding with view layer upward
- Downward data interaction with Model layer through interface request
MVVM is quite mature, mainly used but not only in network application development. The current popular MVVM frameworks include Vue.js and AngularJS.
Why use MVVM
MVVM pattern is the same as MVC pattern. Its main purpose is to separate View and Model. There are several benefits
- Low coupling: View can be independent of Model changes and modifications. A ViewModel can be bound to different views. When the View changes, the Model can remain unchanged. When the Model changes, the View can also remain unchanged.
- Reusable: you can put some View logic in a View model, and let many views reuse this View logic.
- Independent development: developers can focus on business logic and data development (ViewModel), designers can focus on page design.
- Testable: the interface is always more difficult to test, but now the test can be written for ViewModel.
Components of MVVM
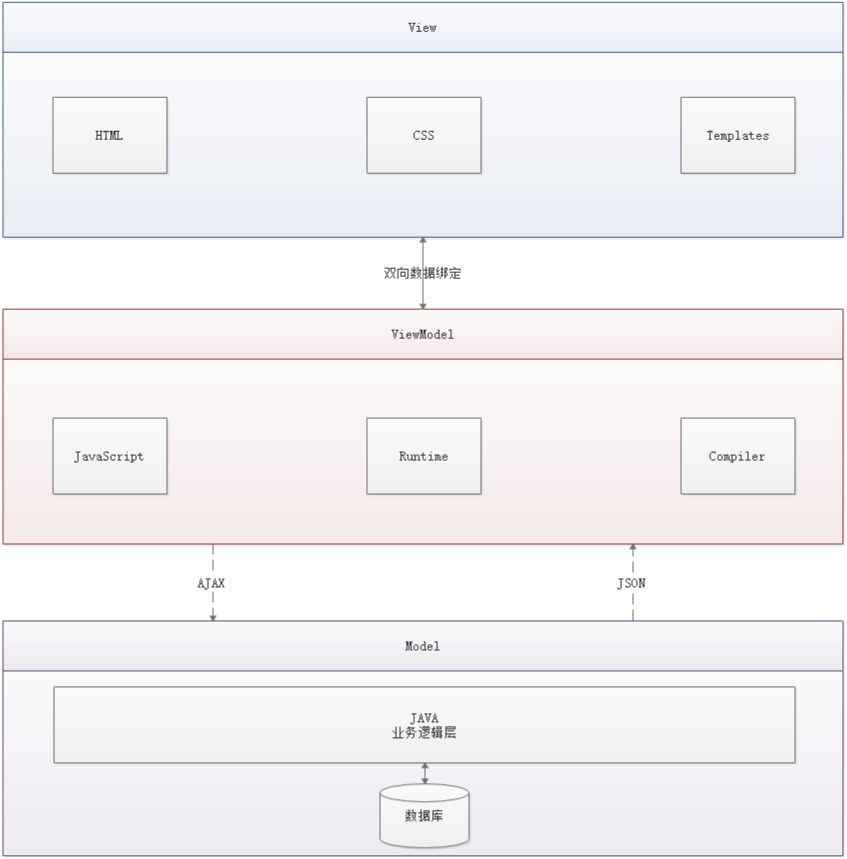
- View
View is the view layer, that is, the user interface. The front-end is mainly constructed by HTML and CSS. In order to display the data of ViewModel or Model layer more conveniently, various front and back template languages have been produced, such as FreeMarker, Thymeleaf, etc. all MVVM frameworks, such as Vue.js, AngularJS, EJS, etc., also have their own built-in template languages for building user interface.
Model refers to the data model, which generally refers to various business logic processing and data manipulation carried out by the back end, mainly around the database system. The difficulty here lies in the need for unified interface rules with front-end conventions
ViewModel is a View data layer that is generated and maintained by front-end developers. In this layer, the front-end developers transform the Model data obtained from the back-end, and make secondary encapsulation to generate the View data Model that meets the expectation of View layer.
It should be noted that the data Model encapsulated by ViewModel includes two parts: view state and behavior, while the data Model of Model layer only contains state
- For example, what is displayed in this part of the page and what is displayed in that part belong to view state (display)
- What happens when the page is loaded in, what happens when you click this block, and what happens when you scroll this block are all view behaviors (interactions)
View state and behavior are encapsulated in the ViewModel. This encapsulation enables the ViewModel to fully describe the view layer. Because of the implementation of two-way binding, the content of ViewModel will be displayed in the view layer in real time, which is exciting, because the front-end developers no longer need to inefficiently and troublesome update the view by manipulating the DOM.
MVVM framework has done a good job of the most dirty and tiring part. Our developers only need to deal with and maintain the ViewModel, and the updated data view will be updated automatically, so as to realize event driven programming.
The View layer shows not the data of the Model layer, but the data of the ViewModel. The ViewModel is responsible for the interaction with the Model layer, which completely decouples the View layer and the Model layer. This decoupling is very important. It is an important part of the implementation of the front-end and back-end separation scheme.
Vue
Vue (pronunciation / vju ː /, similar to view) is a set of progressive framework for building user interface, which was released in February 2014. Unlike other large frameworks, Vue is designed for bottom-up, layer by layer applications. Vue's core library only focuses on visual layers, which is not only easy to use, but also easy to integrate with third-party libraries (such as Vue router, Vue resource, vuex) or existing projects.
Implementer of MVVM pattern
- Model: model layer, where JavaScript objects are represented
- View: view layer, which represents DOM (element of HTML operation)
- ViewModel: a middleware connecting views and data. Vue.js is the implementer of ViewModel layer in MVVM
In MVVM architecture, data and view are not allowed to communicate directly, only through ViewModel, which defines an Observer of Observer
- ViewModel can observe the change of data and update the corresponding content of view
- ViewModel is able to monitor changes in views and notify data of changes
At this point, we can see that Vue.js is the implementer of MVVM, whose core is to realize DOM monitoring and data binding
Why use Vue.js
- Lightweight, small size is an important indicator. Vue.js only has more than 20 KB after compression (56kb + after Angular compression, 44kb + after React compression)
- Mobile first. More suitable for mobile terminals, such as Touch events on mobile terminals
- Easy to use, stable learning curve, complete documents
- It absorbs the advantages of modular and React, and has its own unique functions, such as computing attributes
- Open source, high community activity
- ...
First Vue program
[note] IDEA can install plug-ins of Vue!
Note: Vue does not support IE8 and below because Vue uses ECMAScript 5 features that IE8 cannot simulate. But it supports all ECMAScript 5 compatible browsers.
Download address
- Development version
- Includes full warning and debug mode: https://vuejs.org/js/vue.js
- Removed warning, 30.96KB min + gzip: https://vuejs.org/js/vue.min.js
- CDN
- <script src="https://cdn.jsdelivr.net/npm/vue@2.5.21/dist/vue.js"></script>
- <script src="https://cdn.jsdelivr.net/npm/vue@2.5.21/dist/vue.min.js"></script>
Code writing
The core of Vue.js is to realize the MVVM mode. Her role is the ViewModel layer. So the so-called first application is to show her data binding function. The operation process is as follows:
1. Create an HTML file
2. Introducing Vue.js
<script src="https://unpkg.com/vue/dist/vue.js"></script
3. Create an instance of Vue
<script type="text/javascript">
    var vm = new Vue({
        el: '#vue',
        data: {
            message: 'Hello Vue!'
        }
    });
</script>
Explain:
- El: "" app ": ID of binding element
- data:{message: "hello,vue"}: there is a property named message in the data object, and the initial value Hello Vue is set!
4. Binding data to page elements
<div id="app">
    {{message}}

</div>
Note: you only need to use double curly braces to wrap the message attribute created by Vue in the bound element to realize the data binding function and the effect required by the ViewModel layer. Is it very similar to the EL expression?
Full HTML
<!DOCTYPE html>
<html lang="en">
<head>
    <meta charset="UTF-8">
    <title>Title</title>
</head>
<body>

<!--view layer templete-->
<div id="app">
    {{message}}

</div>
<script src="https://unpkg.com/vue/dist/vue.js"></script>

<script>

    //The viewModel implementation binds with the Model in two directions and updates the view dynamically
    var vm = new Vue({
        el:"#app",
        // model: Data
        data:{
            message: "hello,vue"
        }
    });
</script>
</body>
</html>
test
In order to experience the data binding function brought by Vue more intuitively, we need to test it in the browser. The operation process is as follows:
1. Run the first Vue application on the browser and enter the developer tool
2. Enter vm.message = 'hello,vue' in the console, and then press enter. You will find that the content displayed in the browser will directly become hello,vue
At this time, you can directly input vm.message in the console to modify the value, and data can be omitted in the middle. In this operation, I did not actively operate DOM, so the content of the page changed, which is realized by the data binding function of Vue. In MVVM mode, the ViewModel layer is used to monitor and bind data, To make the data and view respond quickly.
2. Basic grammar
v-bind
<div id="app">
  <span v-bind:title="message">
    Hover for a few seconds to see the dynamic binding prompt here!
  </span>
</div>
The v-bind and so on that you see are called instructions. Instructions are prefixed with V - to indicate that they are special features provided by Vue. As you might have guessed, they apply special reactive behavior to the rendered DOM. In this case, the directive means "keep the title attribute of this element node consistent with the message attribute of the Vue instance".
If you open the browser's JavaScript console again and type app.message = 'new message', you will see that the HTML with the title feature has been updated again.
v-if,v-else
<div id="app">
  <h2 v-if="ok">Yes</h2>
  <h2 v-else>No</h2>

</div>
<script src="https://unpkg.com/vue/dist/vue.js"></script>

<script>

    //The viewModel implementation binds with the Model in two directions and updates the view dynamically
    var vm = new Vue({
        el:"#app",
        // model: Data
        data:{
            ok: true
        }
    });
</script>
v-for
<div id="vue">
    <li v-for="item in items">
        {{ item.message }}
    </li>
</div>
Note: items is an array, and item is the alias of array element iteration.
<div id="app">
  <li v-for="item in items">
      {{item.message}}
  </li>

</div>

<script src="https://unpkg.com/vue/dist/vue.js"></script>

<script>

    //The viewModel implementation binds with the Model in two directions and updates the view dynamically
    var vm = new Vue({
        el:"#app",
        // model: Data
        data: {
            items: [
                {message: "Li Zeyu's examination of Western electricity"},
                {message: "Li Zeyu accepted by XD"},
                {message: "It's a very stable landing this year"}
            ]
        }
    });
</script>
v-on
<div id="app">
  <button v-on:click="sayHello">Point me</button>

</div>

<script src="https://unpkg.com/vue/dist/vue.js"></script>

<script>

    //The viewModel implementation binds with the Model in two directions and updates the view dynamically
    var vm = new Vue({
        el:"#app",
        data: {
            message : "Li Zeyu's examination of Western electricity"
        },
        methods: {
            sayHello : function() {
                alert(this.message);
            }
        }
    });
</script>
v-on listening events
Events have Vue events, and some events of the front-end page itself! click here is the event of Vue, which can be bound to the method event in methods in Vue!
3. Form double binding and components
What is bidirectional data binding
Vue.js is an MVVM framework, that is, data bidirectional binding, that is, when the data changes, the view changes, and when the view changes, the data will change synchronously. This is the essence of vue.js.
It is worth noting that the data bi-directional binding we mentioned must be for UI controls, and non UI controls will not involve data bi-directional binding. One way data binding is the premise of using state management tools. If we use vuex, the data flow is also single, and there will be conflicts with bidirectional data binding.
Using two-way data binding in forms
You can use the v-model instruction to create a two-way data binding on the form < input >, < textarea > and < Select > elements. It automatically selects the correct method to update the element based on the control type. In spite of some magic, v-model is essentially just a grammar sugar. It is responsible for listening to the user's input events to update the data, and some special processing for some extreme scenarios.
Note: v-model ignores the initial values of the value, checked, and selected attributes of all form elements and always uses the data of the Vue instance as the data source. You should declare the initial value in the data option of the component through JavaScript!
- Single line text
<div id="app">
  input:<input type="text" v-model="message">{{message}}

</div>

<script src="https://unpkg.com/vue/dist/vue.js"></script>

<script>

    //The viewModel implementation binds with the Model in two directions and updates the view dynamically
    var vm = new Vue({
        el:"#app",
        data: {
            message : ""
    },
    });
</script>
- Multiline text
<div id="app"> //Multiline text:<textarea v-model="message"></textarea> Multiline text is:{{message}} </div> <script src="https://unpkg.com/vue/dist/vue.js"></script> <script> //The viewModel implementation binds with the Model in two directions and updates the view dynamically var vm = new Vue({ el:"#app", data: { message : "" } }); </script>
- Single check box
<div id="app"> //Single check box: <input type="checkbox" id="checkbox" v-model="checked"> {{checked}} </div> <script src="https://unpkg.com/vue/dist/vue.js"></script> <script> //The viewModel implementation binds with the Model in two directions and updates the view dynamically var vm = new Vue({ el:"#app", data: { checked : false } }); </script>
<div id="app">
    Drop-down box:
    <select v-model="selected">
        <!--<option disabled value="">Please choose</option>-->
        <option>A</option>
        <option>B</option>
        <option>C</option>
    </select>
    <span>Selected value: {{ selected }}</span>

</div>

<script src="https://unpkg.com/vue/dist/vue.js"></script>

<script>

    //The viewModel implementation binds with the Model in two directions and updates the view dynamically
    var vm = new Vue({
        el:"#app",
        data: {
            selected : false
        }
    });
</script>
Note: if the initial value of the v-model expression does not match any options, the element will be rendered as unchecked. In iOS, this prevents the user from selecting the first option. Because in this case, iOS will not trigger the change event. Therefore, it is more recommended to provide a disable option with a null value as above.
What is a component
The component is a reusable Vue instance. To put it bluntly, it is a set of reusable templates, which is similar to JSTL's custom tag, Thymeleaf's th:fragment and other frameworks. Usually an application is organized in the form of a nested component tree:
[failed to transfer and save the pictures in the external link. The source station may have anti-theft chain mechanism. It is recommended to save the pictures and upload them directly (img-qs2p42bi-1579785514897) (https://blog.kungstudy.com/usr/uploads/2019/10/1384909422. PNG))
For example, you might have page headers, sidebars, content areas and other components, each of which contains other components such as navigation links and blog posts.
First Vue component
Note: in the actual development, we will not develop components in the following ways, but in the way of creating. vue template files by vue cli. The following methods are just for you to understand what components are.
Use the Vue.component() method to register the component in the following format:
<script type="text/javascript">
    // Register components first
    Vue.component('my-component-li', {
        template: '<li>Hello li</li>'
    });

    // Re instantiate Vue
    var vm = new Vue({
        el: '#vue'
    });
</script>

<div id="vue">
    <ul>
        <my-component-li></my-component-li>
    </ul>
</div>
Explain:
- Vue.component(): register components
- My component Li: name of custom component
- Template: template of component
Passing parameters using props property
There's no point in using components like above, so we need to pass parameters to components. Now we need to use props attribute!
Note: the value in props attribute cannot be uppercase by default;
<div id="app">
    <ul>
        <my_component_li v-for="item in items" v-bind:item="item"></my_component_li>
    </ul>


</div>

<script src="https://unpkg.com/vue/dist/vue.js"></script>

<script>

    Vue.component(
        'my_component_li',{
            props: ['item'], //Through looping through the item, bind the attribute, and this attribute 'item' is passed to the template as the medium
            template:'<li>{{item}}</li>'
        }
    );

    //The viewModel implementation binds with the Model in two directions and updates the view dynamically
    var vm = new Vue({
        el:"#app",
        data: {
            items: ["Li Zeyu's examination of Western electricity","West power must go ashore","I'm here"]
        }
    });
</script>
Explain:
- v-for="item in items": traverses the array named items defined in the Vue instance, and creates an equivalent number of components
- v-bind:item="item": bind the traversed item item to the item attribute defined by props in the component; the item on the left side of the = sign is the attribute name defined by props, and the item on the right side is the value of the traversed item in items
4. Axis asynchronous communication
What is Axios
Axios is an open-source asynchronous communication framework that can be used in browser and NodeJS. Its main function is to realize AJAX asynchronous communication. Its functional features are as follows:
- Create XMLHttpRequests from the browser
- Create http request from node.js
- Support Promise API [JS chained programming]
- Intercept requests and responses
- Transform request data and response data
- Cancellation request
- Automatically convert JSON data
- Client supports XSRF defense (Cross Site Request Forgery)
GitHub: https://github.com/axios/axios
Chinese document: http://www.axios-js.com/
<script src="https://unpkg.com/axios/dist/axios.min.js"></script>
Why use Axios
Because Vue.js is a view layer framework and the author (you Yuxi) strictly abides by the SoC (separation of concerns principle), Vue.js does not contain AJAX communication function. In order to solve the communication problem, the author developed a plug-in named Vue resource separately. However, after entering version 2.0, the maintenance of the plug-in was stopped and the Axios framework was recommended. Use jQuery less because it operates Dom too often!
First Axios application
Most of the interfaces we developed are in JSON format. You can first simulate a section of JSON data in the project. The data content is as follows: create a file named data.json, fill in the above content, and put it in the root directory of the project
{
  "name": "The Spirit says Java",
  "url": "https://blog.kuangstudy.com",
  "page": 1,
  "isNonProfit": true,
  "address": {
    "street": "Light gate",
    "city": "Xi'an, Shaanxi",
    "country": "China"
  },
  "links": [
    {
      "name": "bilibili",
      "url": "https://space.bilibili.com/95256449"
    },
    {
      "name": "Crazy saying java",
      "url": "https://blog.kuangstudy.com"
    },
    {
      "name": "Baidu",
      "url": "https://www.baidu.com/"
    }
  ]
}
Test code
<!DOCTYPE html>
<html lang="en" xmlns:v-bind="http://www.w3.org/1999/xhtml">
<head>
    <meta charset="UTF-8">
    <title>The Spirit says Java</title>
    <!--v-cloak Solve flicker problem-->
    <style>
        [v-cloak] {
            display: none;
        }
    </style>
</head>
<body>

<div id="vue" v-cloak>
    <div>Name:{{info.name}}</div>
    <div>Address:{{info.address.country}}-{{info.address.city}}-{{info.address.street}}</div>
    <div>Links:<a v-bind:href="info.url" target="_blank">{{info.url}}</a> </div>
</div>

<!--Introduce JS file-->
<script src="https://cdn.jsdelivr.net/npm/vue@2.5.21/dist/vue.js"></script>
<script src="https://unpkg.com/axios/dist/axios.min.js"></script>
<script type="text/javascript">
    var vm = new Vue({
        el: '#vue',
        data() {
            return {
                info: {
                    name: null,
                    address: {
                        country: null,
                        city: null,
                        street: null
                    },
                    url: null
                }
            }
        },
        mounted() { //Hook function
            axios
                .get('data.json')
                .then(response => (this.info = response.data));
        }
    });
</script>

</body>
</html>
Explain:
- Here, v-bind is used to bind the attribute value of a:href to the data in the Vue instance
- Using the get method of axios framework to request AJAX and automatically encapsulate the data into the data object of Vue instance
- Our data structure in data must match the data format returned by Ajax response!
The life cycle of Vue
Official documents: https://cn.vuejs.org/v2/guide/instance.html - life cycle diagram
Vue instances have a complete life cycle, that is, a series of processes, such as creating, initializing data, compiling templates, mounting DOM, rendering → updating → rendering, uninstalling, etc., which we call the life cycle of Vue. Generally speaking, it is the process from creation to destruction of Vue instances, which is the life cycle.
In the whole life cycle of Vue, it provides a series of events. It allows us to register JS methods when the event is triggered. It allows us to control the whole situation with our own registered JS methods. In these event response methods, this directly points to the instance of Vue.
[failed to transfer and save the pictures in the external link. The source station may have anti-theft chain mechanism. It is recommended to save the pictures and upload them directly (img-e1pkxqkn-1579785514898) (https://blog.kuangstudy.com/usr/uploads/2019/10/157948219. JPG))
5. Calculation properties, content distribution, custom events
What is calculation property
The emphasis of computing attribute lies in the two words of attribute (attribute is noun). Firstly, it is an attribute. Secondly, this attribute has the ability to compute (computation is verb). Here, computing is a function. Simply speaking, it is a attribute that can cache the results of computing (convert behavior into static attribute), that's all. It can be imagined as caching!
Upper Code:
<!DOCTYPE html>
<html>
<head>
    <meta charset="UTF-8">
    <title>The Spirit says Java</title>
    <script src="https://cdn.jsdelivr.net/npm/vue@2.5.21/dist/vue.js"></script>
</head>
<body>

<div id="vue">
    <!--Note that one is the method and the other is the property-->
    <p>Method to call the current time:{{currentTime1()}}</p>
    <p>Calculation properties of current time:{{currentTime2}}</p>
</div>

<script type="text/javascript">
    var vm = new Vue({
        el: '#vue',
        data: {
            message: 'Hello Vue'
        },
        methods: {
            currentTime1: function () {
                return Date.now();
            }
        },
        computed: {
            //currentTime2, this is a property! Not method
            currentTime2: function () {
                this.message;
                return Date.now();
            }
        }
    });
</script>
</body>
</html>
Note: things in methods and computed cannot have the same name
Explain:
- methods: define the method, and call the method with currentTime1(), which needs to be bracketed
- Calculated: define the calculation property, and call the property using currentTime2 without parentheses; this.message is to enable currentTime2 to observe the data changes
- How to change the value in the method, the cache will refresh! You can use vm.message="qinjiang" in the console to change the value of the data and test the observation effect again!
Conclusion:
When a method is called, it needs to be calculated every time. Since there is a calculation process, there must be system overhead, what if the result is not always changing? At this point, we can consider caching the result, which can be easily achieved by using the calculation attribute. The main feature of the calculation attribute is to cache the calculation result that does not change frequently, so as to save our system overhead;
content distribution
In Vue.js, we use the < slot > element as the exit to host the distribution content. The author calls it slot, which can be applied in the scenario of composite components;
test
For example, we are going to make a todo component, which is composed of todo title and todo items. But these three components are independent of each other. How to operate?
Step 1: define a to-do component
<div id="vue">
    <todo></todo>
</div>

<script type="text/javascript">
    Vue.component('todo', {
        template: '<div>\
                    <div>To-do list</div>\
                    <ul>\
                        <li>Study the theory of ecstasy Java</li>\
                    </ul>\
               </div>'
    });
</script>
Step 2: we need to dynamically bind the title and value of the to-do items. What can we do? We can leave a slot!
1-leave a slot for the above code, i.e. slot
Vue.component('todo', {
    template: '<div>\
                    <slot name="todo-title"></slot>\
                    <ul>\
                        <slot name="todo-items"></slot>\
                    </ul>\
               </div>'
});
2-define a to-do Title component named todo title and a to-do content component named todo items
Vue.component('todo-title', {
    props: ['title'],
    template: '<div>{{title}}</div>'
});
//The index here is the subscript of the array. When you use for loop to traverse, you can loop it out!
Vue.component('todo-items', {
    props: ['item', 'index'],
    template: '<li>{{index + 1}}. {{item}}</li>'
});
3 - instantiate Vue and initialize data
var vm = new Vue({
    el: '#vue',
    data: {
        todoItems: ['The Spirit says Java', 'Operation and maintenance', 'Front end of madness theory']
    }
});
4-insert these values through the slot
<div id="vue">
    <todo>
        <todo-title slot="todo-title" title="Teacher Qin series of courses"></todo-title>
        <todo-items slot="todo-items" v-for="(item, index) in todoItems" v-bind:item="item" v-bind:index="index" :key="index"></todo-items>
    </todo>
</div>
Note: our todo title and todo items components are distributed to the todo title and todo items slots of the todo components respectively
Custom events
It is not difficult to find through the above code that the data item is in the instance of Vue, but the deletion operation needs to be completed in the component. How can the component delete the data in the instance of Vue? At this point, parameter passing and event distribution are involved. Vue provides us with the function of user-defined events to help us solve this problem. Using this.$emit('user defined event name', parameter), the operation process is as follows:
1-in the instance of vue, the methods object is added and a method named removeTodoItems is defined
    var vm = new Vue({
        el: '#vue',
        data: {
            title: "Teacher Qin Series 1",
            todoItems: ['The Spirit says Java', 'Operation and maintenance', 'Front end of madness theory']
        },
        methods: {
            // This method can be triggered by custom events in the template
            removeTodoItems: function (index) {
                console.log("delete " + this.todoItems[index] + " Success");
                // The splice() method adds / deletes items to / from the array, and then returns the deleted items, where index is the location of the added / deleted items, and 1 is the number of deleted items
                this.todoItems.splice(index, 1);
            }
        }
    });
2 - modify the code of todo items to-do content component, add a delete button, and bind events!
    Vue.component('todo-items', {
        props: ['item', 'index'],
        template: '<li>{{index + 1}}. {{item}}  <button @click="remove_component">delete</button></li>',
        methods: {
            remove_component: function (index) {
                // Here, remove is the name of the custom event, which needs to be assigned in HTML in the way of v-on:remove
                this.$emit('remove', index);
            }
        }
    });
3 - modify the HTML code of todo items to-do content component, add a custom event, such as remove, which can be bound to the method of the component, and then bound to the method of vue!
<!--Increased v-on:remove="removeTodoItems(index)" Custom event, which calls Vue The name defined in the instance is removeTodoItems Method-->
<todo-items slot="todo-items" v-for="(item, index) in todoItems"
            v-bind:item="item" v-bind:index="index" :key="index"
            v-on:remove="removeTodoItems(index)"></todo-items>
Logical understanding
[failed to transfer the pictures in the external link. The source station may have anti-theft chain mechanism. It is recommended to save the pictures and upload them directly (img-geiv0b1j-1579785514900) (https://blog.kungstudy.com/usr/uploads/2019/10/2041589231. PNG))
Vue introduction summary
Core: data driven, componentized
Advantages: referring to the modular development of AngulaJS and the virtual Dom of React, virtual Dom is to put Dom operations into memory for execution;
Common attributes:
- v-if
- v-else-if
- v-else
- v-for
- v-on binding events, short for@
- v-model data bidirectional binding
- v-bind binds parameters to components
Component-based:
- Combined component slot
- This $emit ("event name", parameter) is required for internal binding events of components;
- Features of computing properties, caching computing data
Following the principle of separation of SoC concerns, Vue is a pure view framework and does not include communication functions such as Ajax. In order to solve communication problems, we need to use the Axios framework for asynchronous communication;
Explain
Vue development is based on NodeJS. Vue cli scaffolding development, Vue router routing, and vuex status management are used in the actual development. Vue UI, we generally use element UI (hungry product) or ice (Alibaba product!) to quickly build front-end projects~
Official website:
6. vue-cli
A scaffold officially provided by vue cli is used to quickly generate a project template of vue;
The pre-defined directory structure and basic code are just like we can choose to create a skeleton project when we create Maven project. This skeleton project is scaffolding, and our development is faster;
Main functions:
- Unified directory structure
- Local debugging
- Thermal deployment
- unit testing
- Integrated packaging Online
Environment needed
- Node.js : http://nodejs.cn/download/
The next step is to install it in your own environment directory - Git : https://git-scm.com/downloads
Mirror image: https://npm.taobao.org/mirrors/git-for-windows/
Confirm that nodejs is installed successfully:
- Under cmd, enter node-v to see if the publication number can be printed correctly!
- Input npm-v under cmd to see if the publication number can be printed correctly!
This npm is a package management tool, which is similar to the apt software installation under linux!
Install Node.js Taobao image accelerator (cnpm)
In this way, the download will be much faster~
# -g is the global installation
npm install cnpm -g

# Or use the following statements to solve the problem of slow npm speed
npm install --registry=https://registry.npm.taobao.org
The installation process may be a little slow ~, wait patiently! Although cnpm is installed, try to use as little as possible!
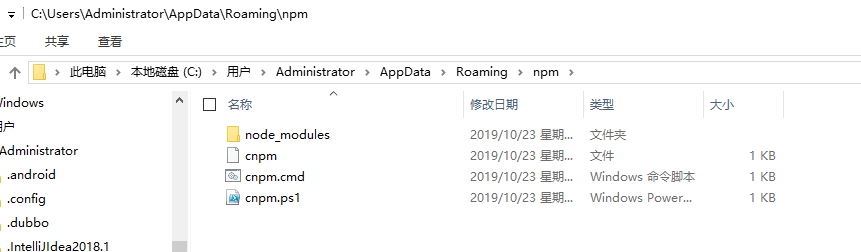
Installation location: C:\Users\Administrator\AppData\Roaming\npm
Install Vue cli
cnpm install vue-cli -g

# Test whether the installation is successful
# To see which templates can be used to create vue applications, we usually choose web pack
vue list
[failed to transfer and store the pictures in the external link. The source station may have anti-theft chain mechanism. It is recommended to save the pictures and upload them directly (img-i7q6tw49-1579785514902) (https://blog.kungstudy.com/usr/uploads/2019/10/1623428782. PNG))
First Vue cli application
-
To create a Vue project, we randomly create an empty folder on the computer. Here, I will create a new directory on disk D: D: \ project \ Vue study;
-
Create a vue application based on Web pack template
# myvue here is the project name, which can be named according to your own needs
vue init webpack myvue
Choose no all the way;
Explain:
- Project name: Project name. Enter by default
- Project description: Project description. Enter by default
- Author: Project author, default to enter
- Install Vue Router: whether to install Vue router or not, select n not to install (need to add manually later)
- Use ESLint to lint your code: whether to use ESLint for code checking, and choose n not to install (you need to add it manually later)
- Set up unit tests: unit tests are related. Select n not to install (add manually later)
- Setup e2e tests with Nightwatch: unit tests are related. Select n not to install (add manually later)
- Should we run npm install for you after the project has been created:!
[failed to transfer the pictures in the external link. The source station may have anti-theft chain mechanism. It is recommended to save the pictures and upload them directly (img-52heww7qe-1579785514904) (https://blog.kungstudy.com/usr/uploads/2019/10/1192113224. PNG))
Initialize and run
cd myvue
npm install
npm run dev
After execution, the directory has many more dependencies
After installation and running successfully, enter: http://localhost:8080
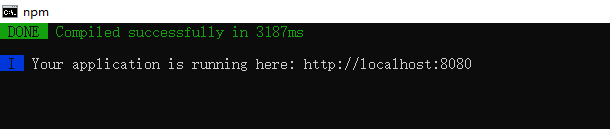
Effect:
[failed to transfer the pictures in the external link. The source station may have anti-theft chain mechanism. It is recommended to save the pictures and upload them directly (img-ehgc4ner-1579785514908) (https://blog.kungstudy.com/usr/uploads/2019/10/3761367777. PNG))
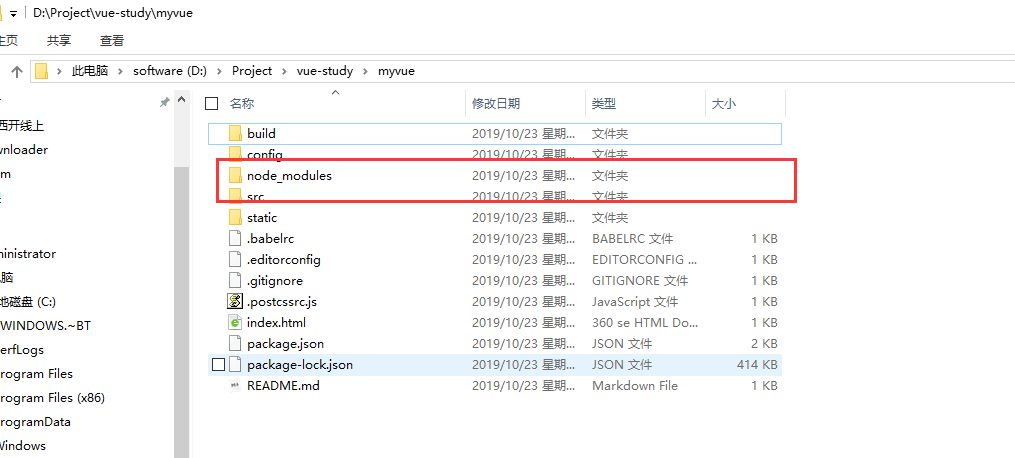
Vue cli directory structure
We use idea to open the project just now!
[failed to transfer the pictures in the external link. The source station may have anti-theft chain mechanism. It is recommended to save the pictures and upload them directly (img-hhshugw0-1579785514908) (https://blog.kungstudy.com/usr/uploads/2019/10/3943650778. PNG))
- build and config: WebPack configuration file
- node_modules: used to store the dependency files of npm install installation
- src: project source directory
- Static: static resource file
- . babelrc: Babel configuration file, mainly used to convert ES6 to ES5
- . editorconfig: Editor configuration
- eslintignore: syntax check profile to be ignored
- . gitignore: configuration file ignored by git
- . postcssrc.js: css related configuration file, in which internal module.exports is NodeJS modular syntax
- index.html: homepage, only used as template page, not used in actual development
- package.json: configuration file of the project
- Name: project name
- Version: project version
- Description: project description
- Author: Project author
- scripts: encapsulating common commands
- Dependencies: production environment dependencies
- Devdendependences: development environment dependencies
src directory
src directory is the source directory of the project. All code will be written here
[failed to transfer the pictures in the external link. The source station may have anti-theft chain mechanism. It is recommended to save the pictures and upload them directly (img-0nki3ij6-1579785514910) (https://blog.kungstudy.com/usr/uploads/2019/10/1887353409. PNG))
main.js
Project entry file, we know that all programs will have an entry
// The Vue build version to load with the `import` command
// (runtime-only or standalone) has been set in webpack.base.conf with an alias.
import Vue from 'vue'
import App from './App'

Vue.config.productionTip = false;

/* eslint-disable no-new */
new Vue({
  el: '#app',
  components: { App },
  template: '<App/>'
});
- import Vue from 'vue': ES6 writing, will be converted to require("vue"); (require is the module loader provided by NodeJS)
- import App from './App': the meaning is the same as above, but the search path is specified. / is the current directory
- Vue.config.productionTip = false: close the browser console for environment related prompts
-
new Vue({...}): instantiate Vue
- El: 'double app': find the element with id as app in index.html
- Template: '< app / > Replace with
- Components: {App}: import components, using the App components defined by import App from '. / App';
App.vue
<template>
  <div id="app">
    <img src="./assets/logo.png">
    <HelloWorld/>
  </div>
</template>

<script>
import HelloWorld from './components/HelloWorld'

export default {
  name: 'App',
  components: {
    HelloWorld
  }
}
</script>

<style>
#app {
  font-family: 'Avenir', Helvetica, Arial, sans-serif;
  -webkit-font-smoothing: antialiased;
  -moz-osx-font-smoothing: grayscale;
  text-align: center;
  color: #2c3e50;
  margin-top: 60px;
}
</style>
- Template: HTML code template, which will replace the content in
- import HelloWorld from '. / components/HelloWorld': introduce HelloWorld components to replace the
- export default{… }: export the NodeJS object, which can be imported through the import keyword
- Name: 'App': defines the name of the component
- Components: {HelloWorld}: define subcomponents
In hello,Vue, about
7. Webpack
WebPack is a module loader and packaging tool. It can process and use all kinds of resources, such as JS, JSX, ES6, SASS, LESS and pictures, as modules.
Installation:
npm install webpack -g
npm install webpack-cli -g
Test installation successful:
- webpack -v
- webpack-cli -v
[failed to transfer the pictures in the external link. The source station may have anti-theft chain mechanism. It is recommended to save the pictures and upload them directly (img-sen8irs9-15797855514912) (https://blog.kungstudy.com/usr/uploads/2019/10/2035564066. PNG))
To configure
Create webpack.config.js configuration file
- Entry: the entry file that specifies which file WebPack uses as the entry of the project
- Output: output, specifying that WebPack places the processed file in the specified path
- Module: module, used to process various types of files
- plugins: plug-ins, such as: Hot update, code reuse, etc
- resolve: set path to
- watch: monitor, used to set the file to be packaged directly after changing
module.exports = {
    entry: "",
    output: {
        path: "",
        filename: ""
    },
    module: {
        loaders: [
            {test: /\.js$/, loader: ""}
        ]
    },
    plugins: {},
    resolve: {},
    watch: true
}
Run the webpack command directly to pack
Using webpack
-
Create project
-
Create a directory named modules to place resource files such as JS modules
-
Create module files under modules, such as hello.js, to write JS module related code
//Exposing a method: sayHi
exports.sayHi = function () {
  document.write("<div>Hello WebPack</div>");
};
-
Create an entry file named main.js under modules to set the entry property when packaging
//If you need to import a module, you can call the methods in the module
var hello = require("./hello");
hello.sayHi();
-
Create the webpack.config.js configuration file in the project directory and package it with the webpack command
module.exports = {
    entry: "./modules/main.js",
    output: {
        filename: "./js/bundle.js"
    }
};
-
Create HTML pages in the project directory, such as index.html, and import the JS file packaged by WebPack
<!doctype html>
<html lang="en">
<head>
 <meta charset="UTF-8">
 <title>The Spirit says Java</title>
</head>
<body>
<script src="dist/js/bundle.js"></script>
</body>
</html>
-
Execute webpack directly in the IDEA console; if it fails, run it with administrator permission!
-
Run HTML to see the effect
Explain:
# Parameter -- watch is used to monitor changes
webpack --watch
8. Vue router
Explain
When learning, try to open official documents as much as possible
Vue Router is the official route manager of Vue.js. It is deeply integrated with the core of Vue.js, making it easy to build a single page application. The functions include:
- Nested route / view tables
- Modular, component-based routing configuration
- Routing parameters, queries, wildcards
- View transition effect based on Vue.js transition system
- Fine grained navigation control
- Links with automatically activated CSS class es
- HTML 5 history mode or hash mode, automatically degraded in IE9
- Custom scroll bar behavior
install
Test learning is based on the first Vue cli. First, check whether there is a Vue router in node modules
Vue router is a plug-in package, so we still need to use npm/cnpm to install it. Open the command line tool, enter your project directory, and enter the following command.
npm install vue-router --save-dev
If you use it in a modular project, you must explicitly install the routing feature through Vue.use():
import Vue from 'vue'
import VueRouter from 'vue-router'

Vue.use(VueRouter);
test
1. Delete the useless first
2. The components directory stores our own components
3. Define a component of Content.vue
<template>
  <div>
 <h1>Content page</h1>
  </div>
</template>

<script>
 export default {
     name: "Content"
 }
</script>
4. Install the route. In the src directory, create a new folder: router, which stores routes specially
import Vue from 'vue'
// Import routing plug in
import Router from 'vue-router'
// Import the components defined above
import Content from '../components/Content'
import main from '../components/main'
// Installation routing
Vue.use(Router);
// Configuration routing
export default new Router({
  routes: [
    {
      // Routing path
      path: '/content',
      // Routing name
      name: 'Content',
      // Jump to component
      component: Content
    }, {
      // Routing path
      path: '/main',
      // Routing name
      name: 'main',
      // Jump to component
      component: main
    }
  ]
});
5. Configure routing in main.js
import Vue from 'vue'
import App from './App'

// Import the route configuration directory created above
import router from './router'

//To turn off the prompts given in production mode
Vue.config.productionTip = false;

new Vue({
  el: '#app',
  // Configuration routing
  router,
  components: { App },
  template: '<App/>'
});
6. Use routing in App.vue
<template>
  <div id="app">
    <!--
      router-link:  By default, it will be rendered as a <a> Label, to Property is the specified link
      router-view:  Components used to render route matches to
    -->
    <router-link to="/">home page</router-link>
    <router-link to="/content">content</router-link>
    <router-view></router-view>
  </div>
</template>

<script>
export default {
  name: 'App'
}
</script>

<style>
  #app {
    font-family: 'Avenir', Helvetica, Arial, sans-serif;
    -webkit-font-smoothing: antialiased;
    -moz-osx-font-smoothing: grayscale;
    text-align: center;
    color: #2c3e50;
    margin-top: 60px;
  }
</style>
Start the test: npm run dev
9. Quick start in actual combat
We use the practical teaching mode and the element UI component library to apply the required knowledge points to practice, and lead you to master the use of Vue at the fastest speed;
Create project
Note: the command line should be run in administrator mode
1. Create a project named Hello Vue Vue init webpack Hello Vue
2. To install dependency, we need to install four plug-ins: Vue router, element UI, sass loader and node sass
# Enter project directory
cd hello-vue
# Install Vue router
npm install vue-router --save-dev
# Install element UI
npm i element-ui -S
# Installation dependency
npm install
# Installing the SASS loader
cnpm install sass-loader node-sass --save-dev
# Startup Test
npm run dev
3. Npm command interpretation:
- npm install moduleName: install the module to the project directory
- npm install -g moduleName: - g means to install the module to the global. The specific location to install to the disk depends on the location of npm config prefix
- npm install -save moduleName: - save means to install the module into the project directory and write the dependency in the dependencies node of the package file, - S is the abbreviation of the command
- NPM install - save dev modulename: - save dev means to install the module in the project directory and write dependencies in the devdpendencies node of the package file, - D is the abbreviation of the command
Create login page
Delete the unused initialization!
Create the following structure in the source directory:
- assets: used to store resource files
- Components: used to store Vue functional components
- views: used to store Vue view components
- Router: used to store Vue router configuration
[failed to transfer and store the pictures in the external link. The source station may have anti-theft chain mechanism. It is recommended to save the pictures and upload them directly (img-sax3llqw-1579785514913) (https://blog.kungstudy.com/usr/uploads/2019/10/1596391106.jpg))
Create the homepage view, and create a view component named Main.vue in the views directory;
<template>
    <div>
      //home page
    </div>
</template>

<script>
    export default {
        name: "Main"
    }
</script>

<style scoped>

</style>
Create login page view create a view component named Login.vue in the views directory, where the element of el - * is the element UI component;
<template>
  <div>
    <el-form ref="loginForm" :model="form" :rules="rules" label-width="80px" class="login-box">
      <h3 class="login-title">Welcome to login</h3>
      <el-form-item label="Account number" prop="username">
        <el-input type="text" placeholder="Please enter your account number" v-model="form.username"/>
      </el-form-item>
      <el-form-item label="Password" prop="password">
        <el-input type="password" placeholder="Please input a password" v-model="form.password"/>
      </el-form-item>
      <el-form-item>
        <el-button type="primary" v-on:click="onSubmit('loginForm')">Sign in</el-button>
      </el-form-item>
    </el-form>

    <el-dialog
      title="Reminder"
      :visible.sync="dialogVisible"
      width="30%"
      :before-close="handleClose">
      <span>Please enter your account and password</span>
      <span slot="footer" class="dialog-footer">
        <el-button type="primary" @click="dialogVisible = false">Determine</el-button>
      </span>
    </el-dialog>
  </div>
</template>

<script>
  export default {
    name: "Login",
    data() {
      return {
        form: {
          username: '',
          password: ''
        },

        // For form validation, the prop attribute needs to be added to the El form item element
        rules: {
          username: [
            {required: true, message: 'Account number cannot be empty', trigger: 'blur'}
          ],
          password: [
            {required: true, message: 'Password cannot be empty', trigger: 'blur'}
          ]
        },

        // Dialog show and hide
        dialogVisible: false
      }
    },
    methods: {
      onSubmit(formName) {
        // Binding validation capabilities for forms
        this.$refs[formName].validate((valid) => {
          if (valid) {
            // Using Vue router to route to a specific page is called programmatic navigation
            this.$router.push("/main");
          } else {
            this.dialogVisible = true;
            return false;
          }
        });
      }
    }
  }
</script>

<style lang="scss" scoped>
  .login-box {
    border: 1px solid #DCDFE6;
    width: 350px;
    margin: 180px auto;
    padding: 35px 35px 15px 35px;
    border-radius: 5px;
    -webkit-border-radius: 5px;
    -moz-border-radius: 5px;
    box-shadow: 0 0 25px #909399;
  }

  .login-title {
    text-align: center;
    margin: 0 auto 40px auto;
    color: #303133;
  }
</style>
Create a route, and create a Vue router route configuration file named index.js in the router directory
import Vue from 'vue'
import Router from 'vue-router'

import Login from "../views/Login"
import Main from '../views/Main'

Vue.use(Router);

export default new Router({
  routes: [
    {
      // Login page
      path: '/login',
      name: 'Login',
      component: Login
    },
    {
      // home page
      path: '/main',
      name: 'Main',
      component: Main
    }
  ]
});
Configure route, modify entry code, modify main.js entry code
import Vue from 'vue'
import VueRouter from 'vue-router'
import router from './router'

// Import ElementUI
import ElementUI from 'element-ui'
import 'element-ui/lib/theme-chalk/index.css'

import App from './App'

// Installation routing
Vue.use(VueRouter);

// Install ElementUI
Vue.use(ElementUI);

new Vue({
  el: '#app',
  // Enable routing
  router,
  // Enable ElementUI
  render: h => h(App)
});
Modify App.vue component code
<template>
  <div id="app">
    <router-view/>
  </div>
</template>

<script>
  export default {
    name: 'App',
  }
</script>
Testing: opening in browser http://localhost:8080/#/login
If there is an error: it may be a compilation error due to the too high version of SASS loader. The current maximum version is 8.x, which needs to be returned to 7.3.1;
Go to the package.json file and change the version of "sass loader" to 7.3.1, and then install cnpm again;
[failed to transfer the pictures in the external link. The source station may have anti-theft chain mechanism. It is recommended to save the pictures and upload them directly (img-tlzc7eww-157978554913) (https://blog.kungstudy.com/usr/uploads/2019/10/1972241333. JPG))
Routing nesting
Nested routing, also known as sub routing, is usually composed of multiple nested components in practical applications. Similarly, the dynamic paths in the URL correspond to the nested components in a certain structure, for example:
/user/foo/profile                     /user/foo/posts
+------------------+                  +-----------------+
| User             |                  | User            |
| +--------------+ |                  | +-------------+ |
| | Profile      | |  +------------>  | | Posts       | |
| |              | |                  | |             | |
| +--------------+ |                  | +-------------+ |
+------------------+                  +-----------------+
1. User information component, create a view component named Profile.vue in the views/user directory;
<template>
    <div>
      //Personal information
    </div>
</template>

<script>
    export default {
        name: "UserProfile"
    }
</script>

<style scoped>

</style>
2. The user list component creates a view component named List.vue in the views/user directory;
<template>
    <div>
      //User list
    </div>
</template>

<script>
    export default {
        name: "UserList"
    }
</script>

<style scoped>

</style>
3. Configure the nested route to modify the index.js route configuration file under the router directory. The code is as follows
import Vue from 'vue'
import Router from 'vue-router'

import Login from "../views/Login"
import Main from '../views/Main'

// Routing components for nesting
import UserProfile from '../views/user/Profile'
import UserList from '../views/user/List'

Vue.use(Router);

export default new Router({
  routes: [
    {
      // Login page
      path: '/login',
      name: 'Login',
      component: Login
    },
    {
      // home page
      path: '/main',
      name: 'Main',
      component: Main,
      // Configure nested routes
      children: [
        {path: '/user/profile', component: UserProfile},
        {path: '/user/list', component: UserList},
      ]
    }
  ]
});
Note: the configuration of children array is added to the routing configuration to set nested routes under this component
4. To modify the homepage view, we modify the Main.vue view component. Here we use the ElementUI layout container component. The code is as follows:
<template>
    <div>
      <el-container>
        <el-aside width="200px">
          <el-menu :default-openeds="['1']">
            <el-submenu index="1">
              <template slot="title"><i class="el-icon-caret-right"></i>user management</template>
              <el-menu-item-group>
                <el-menu-item index="1-1">
                  <router-link to="/user/profile">Personal information</router-link>
                </el-menu-item>
                <el-menu-item index="1-2">
                  <router-link to="/user/list">User list</router-link>
                </el-menu-item>
              </el-menu-item-group>
            </el-submenu>
            <el-submenu index="2">
              <template slot="title"><i class="el-icon-caret-right"></i>Content management</template>
              <el-menu-item-group>
                <el-menu-item index="2-1">Classified management</el-menu-item>
                <el-menu-item index="2-2">Content list</el-menu-item>
              </el-menu-item-group>
            </el-submenu>
          </el-menu>
        </el-aside>

        <el-container>
          <el-header style="text-align: right; font-size: 12px">
            <el-dropdown>
              <i class="el-icon-setting" style="margin-right: 15px"></i>
              <el-dropdown-menu slot="dropdown">
                <el-dropdown-item>Personal information</el-dropdown-item>
                <el-dropdown-item>Logout</el-dropdown-item>
              </el-dropdown-menu>
            </el-dropdown>
          </el-header>

          <el-main>
            <router-view />
          </el-main>
        </el-container>
      </el-container>
    </div>
</template>

<script>
    export default {
        name: "Main"
    }
</script>

<style scoped lang="scss">
  .el-header {
    background-color: #B3C0D1;
    color: #333;
    line-height: 60px;
  }

  .el-aside {
    color: #333;
  }
</style>
Explain:
In the element, it is configured to show nested routes, mainly using personal information to show the contents of nested routes
Parameter passing
We often need to map all the routes that a pattern matches to the same component. For example, we have a User component that we use to render for all users with different ID s. Now we need to pass the parameters;
1. To modify the routing configuration, a placeholder such as id is added to the path attribute
{path: '/user/profile/:id', name:'UserProfile', component: UserProfile}
2. Pass parameters
At this time, we will change to: to, is to use this attribute as an object. Note that the name attribute name in the router link must match the name attribute name in the route, because Vue can find the corresponding route path;
<router-link :to="{name: 'UserProfile', params: {id: 1}}">Personal information</router-link>
3. Receive parameters, in the target component
{{ $route.params.id }}
How to use props
1. Modify the routing configuration, mainly adding props: true attribute
{path: '/user/profile/:id', name:'UserProfile', component: UserProfile, props: true}
2. Pass parameters as before
3. Receive parameters add props attribute to the target component
<template>
  <div>
    //Personal information
    {{ id }}
  </div>
</template>

<script>
    export default {
      props: ['id'],
      name: "UserProfile"
    }
</script>

<style scoped>

</style>
Component redirection
We all know the meaning of redirection, but the redirection in Vue works when the paths are different but the components are the same, for example:
    {
      path: '/main',
      name: 'Main',
      component: Main
    },
    {
      path: '/goHome',
      redirect: '/main'
    }
Note: there are two paths defined here, one is / main, the other is / goHome, where / goHome redirects to / main path, so it can be seen that the redirection does not need to define components;
If you use it, you only need to set the corresponding path;
<el-menu-item index="1-3">
    <router-link to="/goHome">Back to the front page</router-link>
</el-menu-item>
Routing mode and 404
There are two routing modes
- hash: path with ා, such as http://localhost/#/login
- history: the path does not have a symbol, such as http://localhost/login
Modify the routing configuration. The code is as follows:
export default new Router({
  mode: 'history',
  routes: [
  ]
});
Process 404 to create a view component named NotFound.vue. The code is as follows:
<template>
  <div>
    //Page does not exist, please try again!
  </div>
</template>

<script>
  export default {
    name: "NotFount"
  }
</script>

<style scoped>

</style>
Modify the routing configuration. The code is as follows:
import NotFound from '../views/NotFound'

{
   path: '*',
   component: NotFound
}
Routing hook and asynchronous request
Before route enter: execute before entering the route
Before route leave: execute before leaving the route
Upper Code:
  export default {
    props: ['id'],
    name: "UserProfile",
    beforeRouteEnter: (to, from, next) => {
      console.log("Prepare to enter the personal information page");
      next();
    },
    beforeRouteLeave: (to, from, next) => {
      console.log("Ready to leave the profile page");
      next();
    }
  }
Parameter Description:
- To: route information to jump
- from: path information before path jump
- next: control parameters of the route
- next() to jump to the next page
- next('/ path') changes the jump direction of the route to another route
- next(false) returns to the original page
- Next ((vm) = > {}) is only available in beforeRouteEnter. vm is a component instance
Using asynchronous requests in hook functions
1. Install Axios cnpm install -- save Vue Axios
2. main.js references Axios
import axios from 'axios'
import VueAxios from 'vue-axios'

Vue.use(VueAxios, axios)
3. Prepare data: only the files in our static directory can be accessed, so we put the static files in this directory.
// Location of static data
static/mock/data.json
4. Asynchronous request in beforeRouteEnter
 export default {
    props: ['id'],
    name: "UserProfile",
    beforeRouteEnter: (to, from, next) => {
      console.log("Prepare to enter the personal information page");
      // Note that you must request in next, because the Vue instance has not been created when the method is called, and you cannot get this object at this time. Here, use the officially provided callback function to get the current instance
      next(vm => {
        vm.getData();
      });
    },
    beforeRouteLeave: (to, from, next) => {
      console.log("Ready to leave the profile page");
      next();
    },
    methods: {
      getData: function () {
        this.axios({
          method: 'get',
          url: 'http://localhost:8080/static/mock/data.json'
        }).then(function (repos) {
          console.log(repos);
        }).catch(function (error) {
          console.log(error);
        });
      }
    }
  }

