1. Implementing data requests through axios
Introduction to 1. json
json is an acronym for JavaScript Object Notation. The word means a javascript object representation, where json refers to a data format similar to a javascript object.
What json does: Transfer data between different system platforms or programming languages.
Syntax for 1.1 json data
The json data object is similar to an object in JavaScript, but its key corresponds to a value without a function method. The value can be a normal variable, undefined is not supported, and the value can be an array or a json object.
// Native js Of json object
var obj = {
  age:10,
  sex: 'female',
  work:function(){
    return "Study hard",
  }
}
// json Object format of data,json data format,There is no way,Only attributes:
{
    "name":"tom",
    "age":18
}

// json Array format of data:
["tom",18,"programmer"]
Complex json format data can contain object and array writings.
{
  "name":"Xiao Ming",
  "age":200,
  "is_delete": false,
  "fav":["code","eat","swim","read"],
  "son":{
    "name":"Xiao Xiaoming",
    "age":100,
    "lve":["code","eat"]
  }
}

// Array structures can also be used as json Transfer data.
The json data can be saved in a.json file, generally with only one json object.
Summary:
1. The suffix of the json file is.json
2. A json file typically holds a single json data
3. Attributes of JSON data cannot be methods or undefined, and attribute values can only be: numeric values [integer, decimal, boolean], strings, json, and arrays
4. json data is only quoted, commas are used between each attribute member, and the last member has no commas.
   {
      "name": "Xiao Ming".
      "age":200,
      "fav":["code","eat","swim","read"],
      "son":{
        "name": "Xiao Xiao Ming".
        "age":100
      }
    }
Tools: postman can be used for test development data interfaces.
The json data conversion method provided in 1.2 js
javascript provides a JSON object to manipulate data conversion for JSON data.
| Method | parameter | Return value | describe |
|---|---|---|---|
| stringify | json object | Character string | json object to string |
| parse | Character string | json object | String-formatted json data into json objects |
<!DOCTYPE html>
<html lang="en">
<head>
    <meta charset="UTF-8">
    <title>Title</title>
</head>
<body>
<script>
    // json grammar
    let emp = {
        "username":"xiaohui",
        "password":"1234567",
        "age":20
    };

    console.log(emp);
    console.log(typeof emp);

    // JSON Object Provider Pair json Conversion function of format data
    // stringify(json object)  # Used to convert json to string
    let result = JSON.stringify(emp);
    console.log(result);
    console.log(typeof result);

    // parse(String type json data)  # Used to convert strings to json objects
    let json_str = '{"password":"1123","age":20,"name":"xiaobai"}';
    console.log(json_str);
    console.log(typeof json_str);

    let json_obj = JSON.parse(json_str);
    console.log(json_obj);
    console.log(typeof json_obj);

    console.log(json_obj.age)
</script>
</body>
</html>
Introduction to Ajax
ajax, commonly called "ajax" in Chinese, is short for "Async Javascript And Xml" in English, translated as Async js and xml data transfer.
Role of ajax: Ajax enables js to send http requests to back-end programs instead of browsers, communicate with the back-end, and manipulate data and information without the user's knowledge, thereby enabling partial page refresh of data/no refresh of updated data.
Therefore, ajax is a very common technology in the development, which is mainly used to operate the data interface provided by the back-end, so as to achieve front-end and back-end separation of the website.
The principle of ajax technology is to instantiate the XMLHttpRequest object of js, which provides a built-in method for data communication with the back end.
Use of 2.1 ajax
The use of Ajax must be used in conjunction with server-side programs, but at this time we are learning how to use ajax, so writing service-side python code is not involved at this time.Therefore, we can use data interfaces written by others to make calls.
jQuery encapsulates Ajax as a function $.ajax(), which we can use directly to execute Ajax requests.
| Interface | address |
|---|---|
| Weather Interface | http://wthrcdn.etouch.cn/weather_mini?city= City Name |
| Music interface search | http://tingapi.ting.baidu.com/v1/restserver/ting?method=baidu.ting.search.catalogSug&query= Song Title |
| Music Information Interface | http://tingapi.ting.baidu.com/v1/restserver/ting?method=baidu.ting.song.play&songid= Music ID |
Version jQuery:
<!DOCTYPE html>
<html lang="en">
<head>
    <meta charset="UTF-8">
    <title></title>
    <script src="https://cdn.bootcss.com/jquery/3.4.1/jquery.js"></script>
</head>
<body>
<button id="btn">Click to get data</button>
<script>
    $("#btn").click(function(){
        $.ajax({
            // Backend program url address
            url: 'http://wthrcdn.etouch.cn/weather_mini',
            // Can also be used method,Submit data by default'GET',Also commonly used are'POST'
            type: 'get',
            dataType: 'json',  // The data format returned is usually'json','html',"jsonp"
            data:{ // Set the data sent to the server if get Requests can also be written in url Addressed?behind
                "city":'Shenzhen'
            }
        })
        .done(function(resp) {     // Operation after successful request
            console.log(resp);
        })
        .fail(function(error) {    // Action after request fails
            console.log(error);
        });
    });
</script>
</body>
</html>
vue.js does not provide ajax functionality by default.
Therefore, when using vue, axios plug-ins are commonly used to implement data interaction between ajax and the back-end server.
Note that axios are essentially javascript's ajax encapsulation and are therefore restricted by homology policies.
The download address of axios:
https://unpkg.com/axios@0.18.0/dist/axios.js
https://unpkg.com/axios@0.18.0/dist/axios.min.js
Axios provides two common ways to send requests: axios.get() and axios.post().
    // Send out get request
    // Parameter 1: Required, string, requested data interface's url Addresses, such as request addresses: http://www.baidu.com?id=200
    // Parameter 2: Optional, json Object, the parameters to be provided to the data interface
    // Parameter 3: Optional, json Object, request header information
    axios.get('Resource Address of Server',{ // http://www.baidu.com
        params:{
            //Parameter name:'parameter values', // id: 200,
        }

    }).then(function (response) { // Callback function after successful request
            console.log("Request succeeded");
            console.log(response.data); // Get the data provided by the server

    }).catch(function (error) {   // Callback function after request fails
            console.log("request was aborted");
            console.log(error.response);  // Get error information
    });

    // Send out post Requests, parameters and usage and axios.get()Same.
    // Parameter 1: Required, string, requested data interface's url address
    // Parameter 2: Required, json Object, the parameters to be provided to the data interface,If there are no parameters, you must use{}
    // Parameter 3: Optional, json Object, request header information
    axios.post('Resource Address of Server',{
        username: 'xiaoming',
        password: '123456'
    },{
        responseData:"json",
    })
    .then(function (response) { // Callback function after successful request
      console.log(response);
    })
    .catch(function (error) {   // Callback function after request fails
      console.log(error);
    });
The Vue version gets weather information:
<!DOCTYPE html>
<html lang="en">
<head>
    <meta charset="UTF-8">
    <title></title>
    <script src="js/vue.js"></script>
    <script src="js/axios.js"></script>
</head>
<body>
<div id="app">
    <button id="btn" @click="get_weather">Click for weather</button>
    <p>{{weather_info}}</p>
</div>
<script>
    var vm = new Vue({
        el: "#app",
        data: {
            weather_info: {},
        },
        methods: {
            get_weather(){
                // Get weather interface
                // axios.get("http://wthrcdn.etouch.cn/weather_mini?city=Shenzhen"
                axios.get("http://wthrcdn.etouch.cn/weather_mini", {
                    // get Requested accompanying parameters
                    params: {
                        "city": "Shenzhen",
                    }
                }).then(response=>{
                    console.log(response.data);  // Get interface data
                    this.weather_info = response.data;
                }).catch(error=>{
                    console.log(error.response);  // Get error information
                })
            }
        }
    })
</script>
</body>
</html>
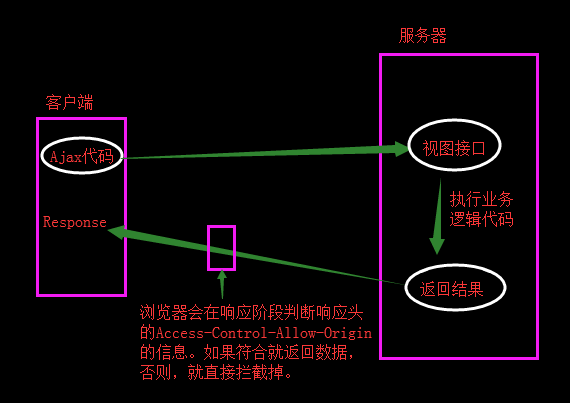
3. Homology Policy
Homology policy is a security mechanism for browsers to protect users'information security.The so-called homology refers to the comparison between two addresses that refer to communication, such as the service-side interface address and the browser client page address, whether the protocol, domain name (IP) and port are the same.Client scripts from different sources [javascript] do not have permission to read and write information about each other without explicit authorization.
ajax is essentially javascript, a scripting language that runs in the browser and is therefore restricted by the browser's homology policy.
| Front End Address: http://www.oldboy.cn/index.html | Is it homologous | Reason |
|---|---|---|
| http://www.oldboy.cn/user/login.html | yes | Same protocol, domain name, port |
| http://www.oldboy.cn/about.html | yes | Same protocol, domain name, port |
| https://www.oldboy.cn/user/login.html | no | Protocol is different (https and http) |
| http:/www.oldboy.cn:5000/user/login.html | no | Ports are different (5000 and 80) |
| http://bbs.oldboy.cn/user/login.html | no | Domain name is different (bbs and www) |
Homology policy for ajax interception, code:
<!DOCTYPE html>
<html lang="en">
<head>
    <meta charset="UTF-8">
    <title></title>
    <script src="js/vue.js"></script>
    <script src="js/axios.js"></script>
</head>
<body>
<div id="app">
    <button id="btn" @click="get_music">Search Music</button>
</div>
<script>
    var vm = new Vue({
        el: "#app",
        data: {

        },
        methods: {
            get_music(){
                axios.get("http://Tingapi.ting.baidu.com/v1/restserver/ting? Method=baidu.ting.search.catalogSug&query=Master Ye Wen"
                ).then(response=>{
                    console.log(response.data);
                }).catch(error=>{
                    alert("Error!");
                    console.log(error.response);
                })
            }
        }
    })
</script>
</body>
</html>
The above code runs incorrectly as follows:
Access to XMLHttpRequest at 'http://tingapi.ting.baidu.com/v1/restserver/ting?method=baidu.ting.search.catalogSug&query=%E5%8F%B6%E9%97%AE%E5%AE%97%E5%B8%88' from origin 'http://localhost:63342' has been blocked by CORS policy: No 'Access-Control-Allow-Origin' header is present on the requested resource.
Above error, keyword: Access-Control-Allow-Origin
Access is restricted whenever this keyword appears.A homology policy intercept problem occurred.
CORS for 3.1 ajax cross-domain (cross-source) scenarios
ajax cross-domain (cross-source) scenario: back-end authorization [CORS], jsonp, server-side proxy
CORS is a W3C standard, fully known as Cross-domain Resource Sharing, which allows browsers to make Ajax requests to cross-source back-end servers, overcoming the limitation that AJAX can only be used in the same source.
Implementing CORS relies primarily on setting the response header information returned from the response data in the back-end server.
# django View def post(request): response = Response() response .set_header("Access-Control-Allow-Origin","http://localhost:63342") return response
// Set the following in the response line information:
Access-Control-Allow-Origin: ajax Located domain name address

Access-Control-Allow-Origin: www.oldboy.cn  # Indicates that ajax cross-domain access is only allowed for clients with the www.oldboy.cn domain name

// *Represents any source, allowing ajax from clients under any source to access current server-side information
Access-Control-Allow-Origin: *
jsonp Let's look at the code:
<!DOCTYPE html>
<html lang="en">
<head>
    <meta charset="UTF-8">
    <title></title>
</head>
<body>
    <p>Strictly speaking: jsonp No ajax Technology, adopted script Labels load cross-domain scripts in a way that avoids homology</p>
    <p>jsonp The implementation of technology depends on the cooperation of both server side and browser side</p>
    <p>api Address: https://suggest.taobao.com/sug?code=utf-8&q=Commodity Name&callback=cb</p>
    <button id="btn">Click Search</button>

    <script>
        function hello(data) {
            console.log(data);
            alert(data.result);
        }

        let btn = document.getElementById("btn");
        btn.onclick = function () {
            // 1. Create a script Label
            script = document.createElement("script");
            // 2. hold script Of src Property, set to backend api The interface address, and the data returned by the back-end interface must be js Code,
            // In this code, you must call a function that the client has previously declared.
            script.src = "https://Suggest.taobao.com/sug?Code=utf-8&q=Wing&callback=hello";
            document.head.appendChild(script);
        }
    </script>
</body>
</html>
Summary:
0.Homology policy: A security mechanism for browsers to protect user data.
   Browsers restrict ajax from accessing data addresses from other sources across sources.
   Homology: Determines whether the two communication addresses are protocol, domain name [IP], and port identical.

   ajax:   http://127.0.0.1/index.html
   api data interface: http://localhost/index

   Are these two homologous?Not homologous.Homology is not determined by computers, but by the strings of protocols, domain names, and ports.

1. By default, AJAX is affected by homology policies and will report the following errors if affected:
     No 'Access-Control-Allow-Origin' header is present on the requested resource

2. Solutions for how ajax can only access data interfaces from the same source:
   1. CORS, cross-domain resource sharing, set in the response line of the server:
      Access-Control-Allow-Origin: Address of domain name to allow access
   2. jsonp
   3. Is the server-side proxy
      Idea: Request the corresponding server interface through python, after getting the data
2. Component Development
Component s are custom encapsulated functions.In front-end development, the functionality of multiple web pages is often duplicated, and the same functionality exists between many different pages.
Implementing a function in a web page requires the use of HTML to define the content structure of the function, the use of CSS to declare the appearance style of the function, and the use of js to define the special effects of the function, resulting in a code block encapsulation pattern that encapsulates a function-related [HTML, css, and javascript] code into a whole, which we call "components".
Therefore, a component is a feature in an html web page, typically a tag with its own html content structure, css style, and js effects.
This allows front-end developers to write code once and use it wherever they want in componentized development.
There are two components of vue: default component [global component] and single file component
1. Default components
<!DOCTYPE html>
<html lang="en">
<head>
    <meta charset="UTF-8">
    <title></title>
    <script src="js/vue.js"></script>
    <style>
        .title{
            color: blue;
        }
    </style>
</head>
<body>
<div id="app">
    <myheader></myheader>
</div>
<script>

    // 1. Declare default components Vue.component
    /*
    * Component name: Do not capitalize, share the same name as native HTML tags, or use special symbols arbitrarily
    * Vue.component("Component Name ", {
    *     template: "html HTML structure code for code', //component
    *     data(){
    *         return {}
    *     },
    *     methods: {  // Component-related js methods
    *         Method name (){
    *             // Logical Code
    *         }
    *     }
    * }
    * */
    // `` yes js Multi-line string
    // Inside Component data The value of the function must be an anonymous function, and the return value of the function must be a json object
    Vue.component('myheader', {
        template: `<div>Header Component HTML Code<h2 @click="demo" :class="className">{{message}}</h2></div>`,
        data(){
            return {
                "message": "hello, I'm inside a component data data",
                "className": "title"
            }
        },
        methods: {
            demo(){
                alert('Hello!')
            }
        }
    });

    var vm = new Vue({
        el: "#app",
        data: {

        }
    })
</script>
</body>
</html>
Effect:
3. Vue Automation Tool (Vue-cli)
After learning about common components, we need to install some component development tools in advance to continue learning about single-file components.Otherwise, the learning order file component cannot be used.
In general, single file components, we run in the automation tool vue-CLI, can help us compile single file components.So we need to set up the vue-CLI tool in the system first.
Official website: https://cli.vuejs.org/zh/
Vue CLI requires Node.js 8.9 or later (recommended 8.11.0+).You can use NVM or nvm-windows to manage multiple versions of Node on the same computer.
Download and install nvm tools: https://www.jianshu.com/p/d0e0935b150a
https://www.jianshu.com/p/622ad36ee020
1. Install node.js
Node.js is a new back-end (back-end) language whose syntax is similar to JavaScript, so it can be said to be a front-end back-end language, the difference between back-end language and front-end language:
-
-
Running environment: Back-end language generally runs on the server side, and front-end language runs on the client's browser
-
Functions: Back-end language can operate files, can read and write databases, front-end language can not operate files, can not read and write databases.
-
We usually install LTS (Long-Time Support):
Download address: https://nodejs.org/en/download/ [nvm is already installed above, so you don't need to install it manually here]
The version of node.js has two major branches:
Official version of node.js: 0.xx.xx This version number is the officially released version
Community released version of node.js: x x.x x.x is the community developed version
If the installation is successful, you can view the version of Node.js and enter the following command at the terminal:
node -v
2. npm
When the installation of node.js is complete, an npm package manager npm will also be installed for us in node.js.We can use the npm command to install the package for node.js.This tool is equivalent to python's pip manager.
npm install -g Package Name              # Installation module-g represents a global installation, and if-g is not present, it represents installation in the current project
npm list                        # View installed node packages in the current directory
npm view Package Name engines            # View the version of the Ode on which the package depends
npm outdated                    # Check if the package is obsolete, the command lists all obsolete packages
npm update Package Name                  # Update node Package
npm uninstall Package Name               # Unload node Package
npm command -h                      # View the help documentation for the specified command
3. Install Vue-cli
npm install -g vue-cli
4. Create Front End Projects using Vue-cli Initialization
Use vue automation tools to quickly build a single-page application project catalog.
This tool provides out-of-the-box configuration for modern front-end development workflows.It takes only a few minutes to create and start a project with hot overloads, static save-time checks, and build configurations available for production environments.
Generate a new project based on the webpack template:
vue init webpack project directory name

For example:
vue init webpack com
Then start the vue project
cd com   # Switch to Project Directory
npm run dev   # start-up node Provided Tests http The server
After running the above code, the following effect prompts will appear under the terminal
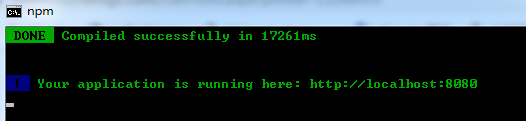
Browser access: http://localhost:8080
5. Project directory structure
src: main development directory, where all single-file components to be developed are in the components directory
Static: static resource directory, where all css, js files are placed
Dist: The project packages the publishing folder, and finally the online single file project files are all in this folder [dist appears after the project is packaged and the vue components in the project are compiled into js code]
node_modules: The directory is the package directory for the node.
config: is the configuration directory,
build: is the directory on which the project is packaged
src/router: Routing, later we need to declare when using Router routing.
6. Project Execution Flowchart
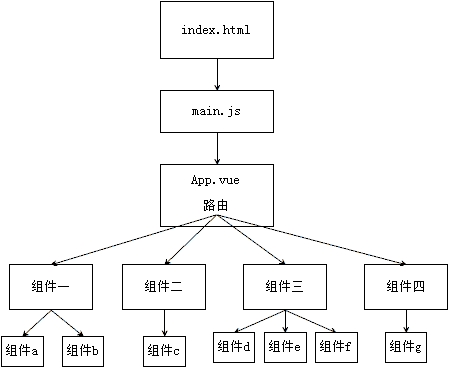
The whole project is a main file index.html, which introduces main.js in the src folder, top-level single-file component App.vue in main.js, and other single-file components in the components folder through component nesting or routing in App.vue.
4. Use of single-file components
There are two kinds of components: normal component, single file component
Disadvantages of common components:
-
html code is written as a string for js, so it is not easy to understand and highlight when assembling and developing.
-
Common components are appropriate for small projects, but for large, complex projects, if you put more components in an html file, maintenance costs can become very expensive.
-
Common components simply integrate js with html, but the css code is stripped out.It's hard to handle when you use it.
Separate the html structure, css style, and interactive JavaScript code associated with a component from the html file to synthesize a file, which is a single file component, equivalent to a component with complete structure, performance, and behavior, making it easy to assemble freely between components and reuse themThis file has the extension'.vue', for example,'Home.vue'.
1. Create Components
Create a new Home.vue file in the components directory under the src directory.
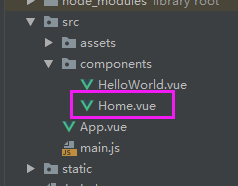
The Home.vue file contains three main sections
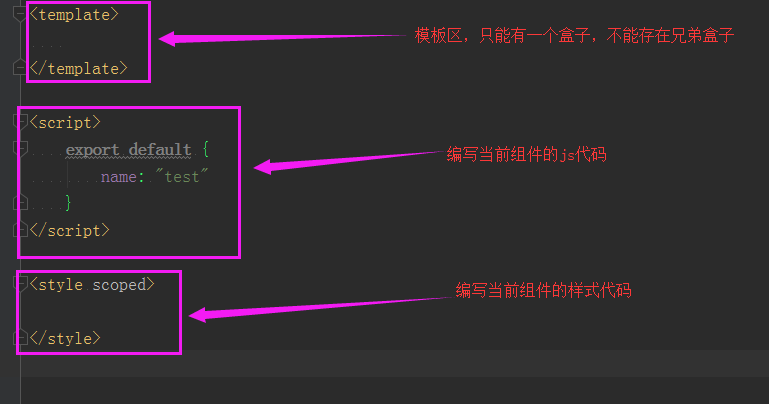
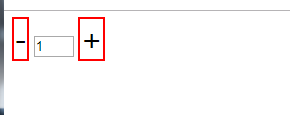
Complete Case - Click on the Plus minus Number
Home.vue file:
<template>
    <div id="Home">
      <span @click="num--">-</span>
      <input type="text" size="1" v-model="num">
      <span @click="num++">+</span>
    </div>
</template>

<script>
  // Exposed Objects
  export default {
    name: "Home",  // Component Name
    data(){
      return {
        num: 0,
      }
    },
    components: {
    }
  }
</script>

<style>
  span{
    font-size: 30px
  }
</style>
Call the above component in the App.vue component
<template>
  <div id="app">
    <Home></Home>
  </div>
</template>

<script>
import Home from './components/Home'

export default {
  name: 'App',
  components: {  // Subcomponent Collection
    Home
  }
}
</script>

<style>
  span{
    border: 2px solid red;
  }
</style>
Before developing a Vue project, you need to manually clear the HelloWorld component code for App.vue and the default css style.
The above code effect:
2. Nesting of components
Sometimes when developing a vue project, a page can be considered a big component, and it can also be divided into subcomponents.
Because a parent component invokes a child component.
For example, we can declare a component as a parent
Create a directory common where subcomponents are saved in components/and a Header.vue file.
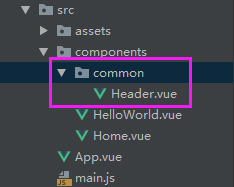
Header.vue file:
// Code in components must be written in the same label
<template>
    <div>
      //Common Head
      <p>{{message}}</p>
    </div>
</template>

<script>
    export default {
        name: "Header",
        data(){
          return {
            message: "Header Component data data"
          }
        }
    }
</script>

<style>
  p{
    color: red;
  }
</style>
Then, invoke the child component declared above in the parent component
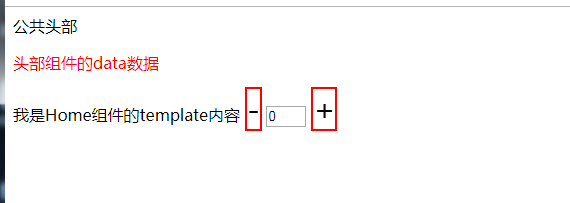
<template>
    <div id="Home">
      <!--Using subcomponents-->
      <HeaderCommon></HeaderCommon>
      //I am the template content of the Home component
      <span @click="num--">-</span>
      <input type="text" size="1" v-model="num">
      <span @click="num++">+</span>
    </div>
</template>

<script>
  // Import subcomponents
  import HeaderCommon from './common/Header'
  // Exposed Objects
  export default {
    name: "Home",  // Component Name
    data(){
      return {
        num: 0,
      }
    },
    components: {  // Register subcomponents
      HeaderCommon,
    }
  }
</script>

<style>
  span{
    font-size: 30px
  }

</style>
Finally, the parent component is called by App.vue. You can see the page effect.
<template>
  <div id="app">
    <Home></Home>
  </div>
</template>

<script>
import Home from './components/Home'

export default {
  name: 'App',
  components: {  // Subcomponent Collection
    Home
  }
}
</script>

<style>
  span{
    border: 2px solid red;
  }
</style>
Effect:
5. Delivery of data
1. Data passed from parent component to child component
For example, we want to pass data from the parent component to the child component.
props property allows data transfer.
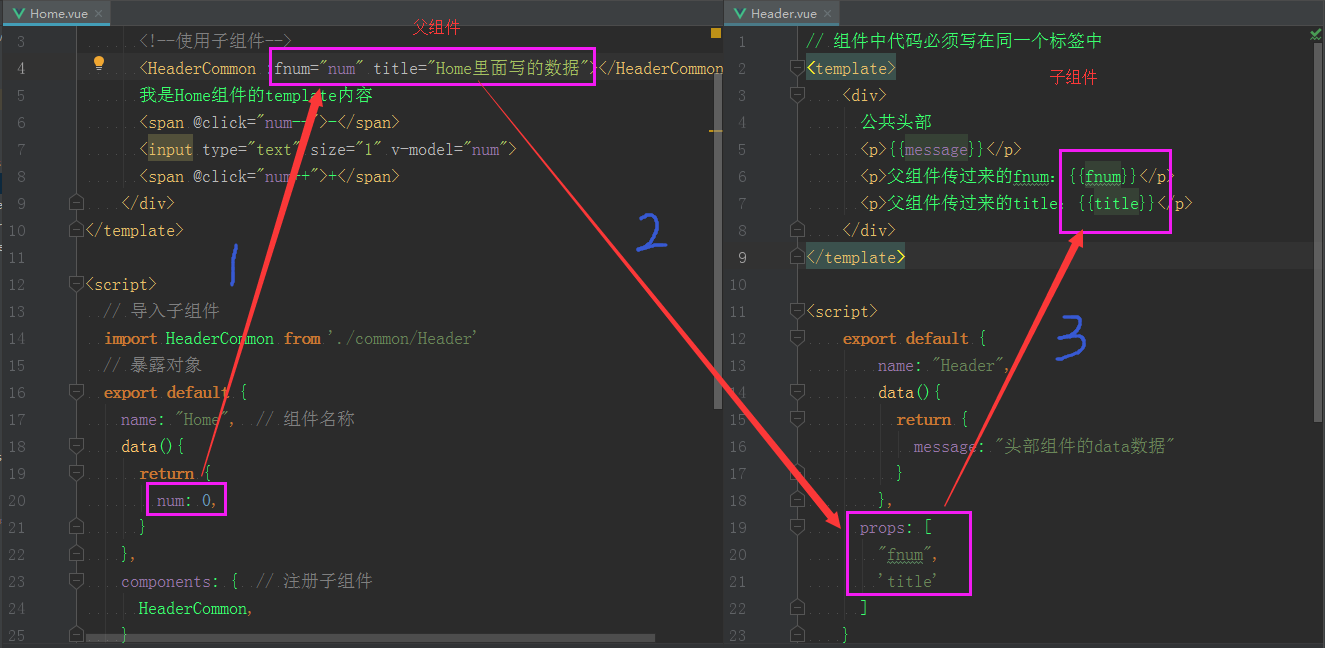
Parent-to-child transfer of data in three steps:
1. In the parent component, data is passed down using attribute values at the group name where the child component is called
<HeaderCommon:fnum="num" title="data written in Home"></HeaderCommon>

The above indicates that two pieces of data are passed when the parent component calls the Menu subcomponent:
  If you want to pass a variable [variables can have various types of data], you must add a colon to the left of the property name:, and the property name is custom and will be used in the subcomponents.
  If you are passing normal string data, you do not need to add a colon:
2. Accepting the data passed by the parent above in the child component requires using the props attribute class in the vm component object.
<script>
    export default {
        name: "Header",
        data(){
          return {
            message: "Header Component data data"
          }
        },
      props: [
        "fnum",
        'title'
      ]
    }
</script>
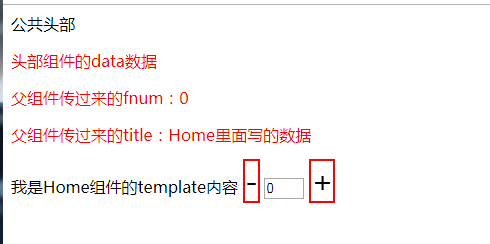
3. Use the data passed by the parent component in the template in the child component.
<template>
    <div>
      Common Head
      <p>{{message}}</p>
      <p>From parent component fnum: {{fnum}}</p>
      <p>From parent component title: {{title}}</p>
    </div>
</template>
Effect:
Step Flowchart:
When using parent components to pass data to child components, note a few points:
-
Pass-through data is a variable, so you need to add a colon to the left of the property.
Transferred data is a variable, which is called "dynamic data transfer"
Transferring data is not a variable, and this data is called static data transfer
-
The data in the parent component is modified and synchronized in the child component, but the data in the child component is modified without affecting the data in the parent component.
This situation, when developed, is also known as "one-way data flow"
2. Subcomponents pass data to parent components
Child-to-parent data transfer steps:
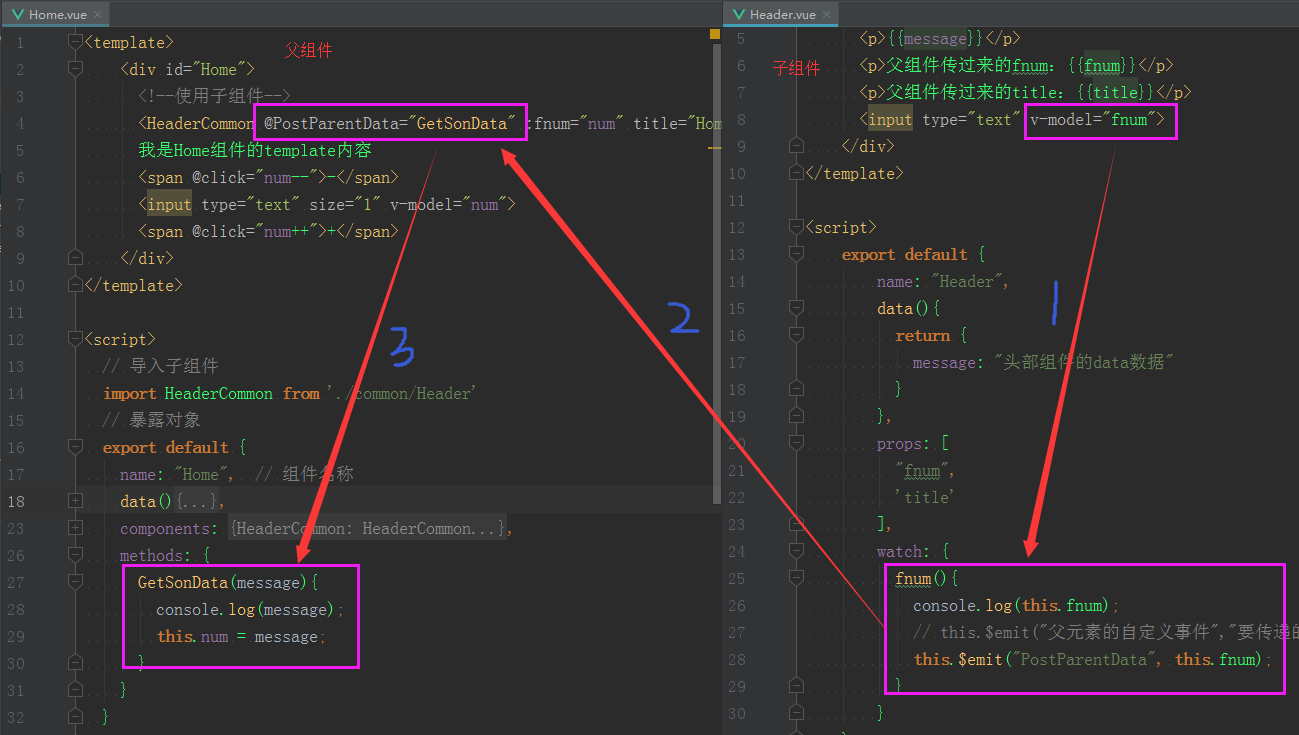
1. In a child component, invoke events defined in the parent component through this.$emit()
<script>
    export default {
        name: "Header",
        data(){
          return {
            message: "Header Component data data"
          }
        },
        props: [
          "fnum",
          'title'
        ],
        watch: {
          fnum(){
            console.log(this.fnum);
            // this.$emit("Custom events for parent elements","Data to be transferred");  // With this.$emit() method, child components can pass data to parent components
            this.$emit("PostParentData", this.fnum);
          }
        }
    }
</script>
2. Declare an event property in the parent component that corresponds to the child component this.$emit("custom event name").
<template>
    <div id="Home">
      <!--Using subcomponents-->
      <HeaderCommon @PostParentData="GetSonData" :fnum="num" title="Home Data written inside"></HeaderCommon>
      //I am the template content of the Home component
      <span @click="num--">-</span>
      <input type="text" size="1" v-model="num">
      <span @click="num++">+</span>
    </div>
</template>
3. In the parent component, declared custom methods are executed when the event is called.
<script>
  // Import subcomponents
  import HeaderCommon from './common/Header'
  // Exposed Objects
  export default {
    name: "Home",  // Component Name
    data(){
      return {
        num: 0,
      }
    },
    components: {  // Register subcomponents
      HeaderCommon,
    },
    methods: {
      GetSonData(message){
        console.log(message);
        this.num = message;
      }
    }
  }
</script>
Effect:
Step Flowchart: