1. vue instruction
(0). Three methods of Vue text rendering {}}, v-text and v-html
- {{}} output elements as plain text
- v-html
v-html will parse the elements as HTML tags and output them - v-text
v-text outputs the element as plain text
<!DOCTYPE html>
<html lang="en">
<head>
    <meta charset="UTF-8">
    <title>Vue Three methods of text rendering</title>
</head>
<body>
    <div id="app">
     	/*{{}}And v-text can't parse html elements, they just output the same*/
      	<p>{{hello}}</p>
        <p v-text = 'hello'></p>
        <p v-html = 'hello'></p>
    </div>
</body>
<script src="vue.js"></script>
<script>
    new Vue({
        el:'#app',
        data:{
            hello:'<span>hello world</span>'
        }
    })
</script>
</html>

//*********Results**************************
//<span>hello world</span>
//<span>hello world</span>
//hello world
(1) . one way binding data ----- v-bind
v-bind is used to bind element attributes (any attributes) and data in data. Its abbreviation is a colon (:)
//Example:
<div class="app">
	//Bind data in vue
    <a v-bind:href="url">click me</a>
    <a :href="url">click me</a>
</div>

var app = new Vue({
    el:'.app',
    data:{
        url:"https://www.baidu.com",
    }
});
(2) . bidirectional binding data ----- v-model( ❗)
<!-- v-bind:value Only one-way data rendering can be performed -->
<input type="text" v-bind:value="searchMap.keyWord">
<!-- v-model Bidirectional data binding can be performed  -->
<input type="text" v-model="searchMap.keyWord">
<input type="text" :value="searchMap.keyWord">
<p>You want to query:{{searchMap.keyWord}}</p>


data: {
    searchMap:{
        keyWord: 'Su xiaonuan'
    }
}
-
v-model is used for two-way binding of form data. In fact, it is a syntax sugar. There are two operations behind this:
- v-bind data binding
- v-on binds events to the current element
-
Application of v-model in drop-down box, radio button and check box of input
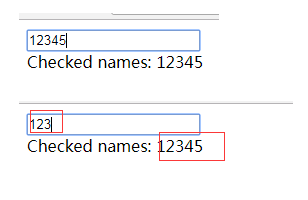
<!--Drop down box--> <div id="app"> <select v-model="selected"> <option value="A Selected">A</option> <option value="B Selected">B</option> <option value="C Selected">C</option> </select> <span>Selected: {{ selected }}</span> </div> //------------------------------------------------------------------------------- <script> new Vue({ el: '#app', data: { selected: '' } }); </script> //**************************************************************************** //**************************************************************************** <!--radio button--> <!--For the same group of radio buttons, you need to set the attribute name Set to the same value--> <div id="app"> <input type="radio" name="size" id="small" value="small_value" v-model="picked"> <label for="small">small</label> <br> <input type="radio" name="size" id="big" value="big_value" v-model="picked"> <label for="big">big</label> <br> <span>Picked: {{ picked }}</span> </div> //------------------------------------------------------------------------------- <script> new Vue({ el: '#app', data: { picked: '' } }) </script> //**************************************************************************** //**************************************************************************** <!--check box--> <div id="app"> <input type="checkbox" id="one" value="value_one" v-model="checkedNames"> <label for="one">Option one</label> <input type="checkbox" id="two" value="value_two" v-model="checkedNames"> <label for="two">Option 2</label> <input type="checkbox" id="three" value="value_three" v-model="checkedNames"> <label for="three">Option 3</label> <br> <span>Checked names: {{ checkedNames }}</span> </div> //------------------------------------------------------------------------------- <script> new Vue({ el: '#app', data: { checkedNames: [] } }) </script> -
v-model modifier
-
[modifiers: modifiers are special suffixes indicated by half width period (.) to indicate that an instruction should be bound in a special way. For example, the. Prevent modifier tells the v-on instruction to call event.preventDefault(): that is, to prevent the original default behavior of the event, such as bubbling event]
-
v-model can also be used with modifiers such as. lazy,. trim, and. number.
<!-- Every time input After the event is triggered, synchronize the value of the input box with the data and add lazy Modifier to change to use change Event, when the focus moves out input The event will be triggered and the value and data of the input box will become the same -->
<input v-model.lazy="msg" >
<!--Remove spaces at the beginning and end of the string-->
<input v-model.trim="msg">
<!--Convert data to value type-->
<input v-model.number="age" type="number">
. lazy is equivalent to a delayed loading process. As mentioned above, < input V-model = "test" > is equivalent to a syntax sugar < input: value = "test" @ input = "test = $event.target.value" >, while < input V-model. Lazy = "msg" > is equivalent to changing the real-time update of input into a change event. v-model.lazy will trigger the event only when the focus is removed.
(3) . conditional rendering instruction ----- v-if / v-show
<body>
	<div id="app">
		<input type="checkbox" v-model="checked">
		<p v-if="checked">{{checked}}</p>
		<p v-show="checked">{{checked}}</p>
	</div>
	<script type="text/javascript">
	/*
	v-if grammar
	v-if = 'The expression true element shows that the false element does not exist on the page
	Render and move out elements according to the true and false conditions of the value of the expression
	v-show Syntax show hide toggle recommended
	v-show = 'The expression 'true' element displays the false element display:none
	Switch the css display attribute of the element according to the true or false value of the expression
	*/
	let vm = new Vue({
		el:'#app',
		data:{
			checked:true
		}
	})
	</script>
</body>
Differences between v-if and v-show:
- When the initial condition is not valid, v-if will not render DOM elements; no matter what the initial condition is, v-show will always render elements, but it simply switches based on CSS display:none to set the display and hiding of the current dom.
- Generally speaking, v-if has higher switching overhead, while v-show has higher initial rendering overhead. Therefore, if you need to switch very frequently, v-show is better; if the conditions change little at runtime, v-if is better.
(4) . list loop instruction ----- v-for
<template>
	<div id="list">
    <ul>
    	<!-- be careful: key The value of must be number or string,Cannot be an object -->
        <!-- And use v-for The value of each item of the loop must be unique -->
        <li v-for="(item,index) in list" :key="item.id">
            {{index}}---{{item.name}}
        </li>
    </ul>
	</div>
</template>
<script>
  export default{
    name:'list',
    data(){
      return{
        list: [
                   { id: 1, name: 'LISS' },
                   { id: 2, name: 'Ying Zheng' },
                   { id: 3, name: 'eunuch who conspired with Li Si to influence the succession to the First Emperor' },
                   { id: 4, name: 'Han Fei' },
                   { id: 5, name: 'a pre-Qin philosopher' },
                ]
      }
    }
  }
</script>
- Why use Key:
Key is the unique id of each vnode. You can find the corresponding vnode node more accurately and faster according to the key. In the diff algorithm, tag and key are used to determine whether it is a sameNode. If it is the same node, there is no need to render again. Using key can reduce the rendering times and improve the rendering efficiency. Generally, a business-related id is used as the key value instead of index, If index is used as the key value, the previous data and re rendered data will change with the key value, so it is impossible to establish a correct association relationship. As a result, Vue will reuse the wrong old child nodes and do a lot of extra work, which will lose the significance of the key value
(5) . bind event to element -- v-on
v-on is used to bind events to elements. v-on: event name can be abbreviated as @ event name
<div class="app">
	//1. Directly bind events
    <button v-on:click="myclick">click me</button>
    <!-- $event yes vue The event object inside, vue Can recognize -->
    <button @click="second($event)">click me</button>
    //2. Binding event class
    <button v-on="{click:myclick,hover:second($event)}">click me</button>
</div>
<script>
var app = new Vue({
    el:'.app',
    data:{

    },
    methods:{
        myclick:function(){
            console.log(111111);
        },
        second:function(e){
        	e.preventDefault();
            //Block browser default behavior
            console.log(222222);
        }
    }
});
</script>
Event modifier for v-on
- Stop: stop bubbling
<div @click="upthis"> aaa <!-- Prevent event bubbling --> <div v-on:click.stop="doThis">bbb</div> </div> - prevent: block default behavior
<form action='baidu'> <!-- The submitted event no longer reloads the page (the page will not jump) --> <input @click.prevent="doThat"> </form> - capture
<!-- Use event capture mode when adding event listeners -->
<!-- That is, events triggered by internal elements are processed here first, and then handed over to internal elements for processing -->
<div v-on:click.capture="doThis">...</div>
- Once: only triggered once
<!-- The click event will only be triggered once to prevent repeated submission -->
<a v-on:click.once="doThis"></a>
- Monitor the key cap of a keyboard
<!-- Key modifier, key alias -->
<input @keydown.enter="onEnter">

<!-- Key modifier, key code -->
<input @keydown.13="onEnter">
- Modifiers can be concatenated
<!-- Modifiers can be concatenated -->
<a v-on:click.stop.prevent="doThat"></a>
2. methods / computed / watch
-
Differences between computed and watch
-
Computed calculated attribute: a new attribute value defined by relying on other existing attributes, and the computed value is cached. Only when the dependent attribute value changes, the computed value will be recalculated the next time the computed value is obtained.
-
watch listener: listens for existing attributes and executes subsequent operations whenever the monitored data changes. There is no caching.
-
How does the watch in Vue deeply listen to an object
In addition to monitoring the properties in data, watch can also monitor the calculation properties or the calculation results of a function.
- There are two ways to deeply listen to objects:
-
String nesting
export default { data () { return { a: { b: { c :'Zhang San' } } } }, watch: { //If you want to monitor c, the data is more deeply monitored at this time "a.b.c": function (newValue, oldValue) { } } } -
Enable deep listening mode
 export default {
       data () {
           return {
              a: {
                  b: {
                      c :'Zhang San'
                  }
              }
           }
       },
       watch: {
           a: {
           	   // deep is true
           	   //It means that deep monitoring is turned on
           	   //Any data change in the a object will trigger the handler function
               deep: true ,
               handler(){
                  // handler is a fixed expression
               }
           }
       }
  }
3. vue life cycle
vue life cycle refers to the process from the beginning of creation to the destruction of vue instance objects
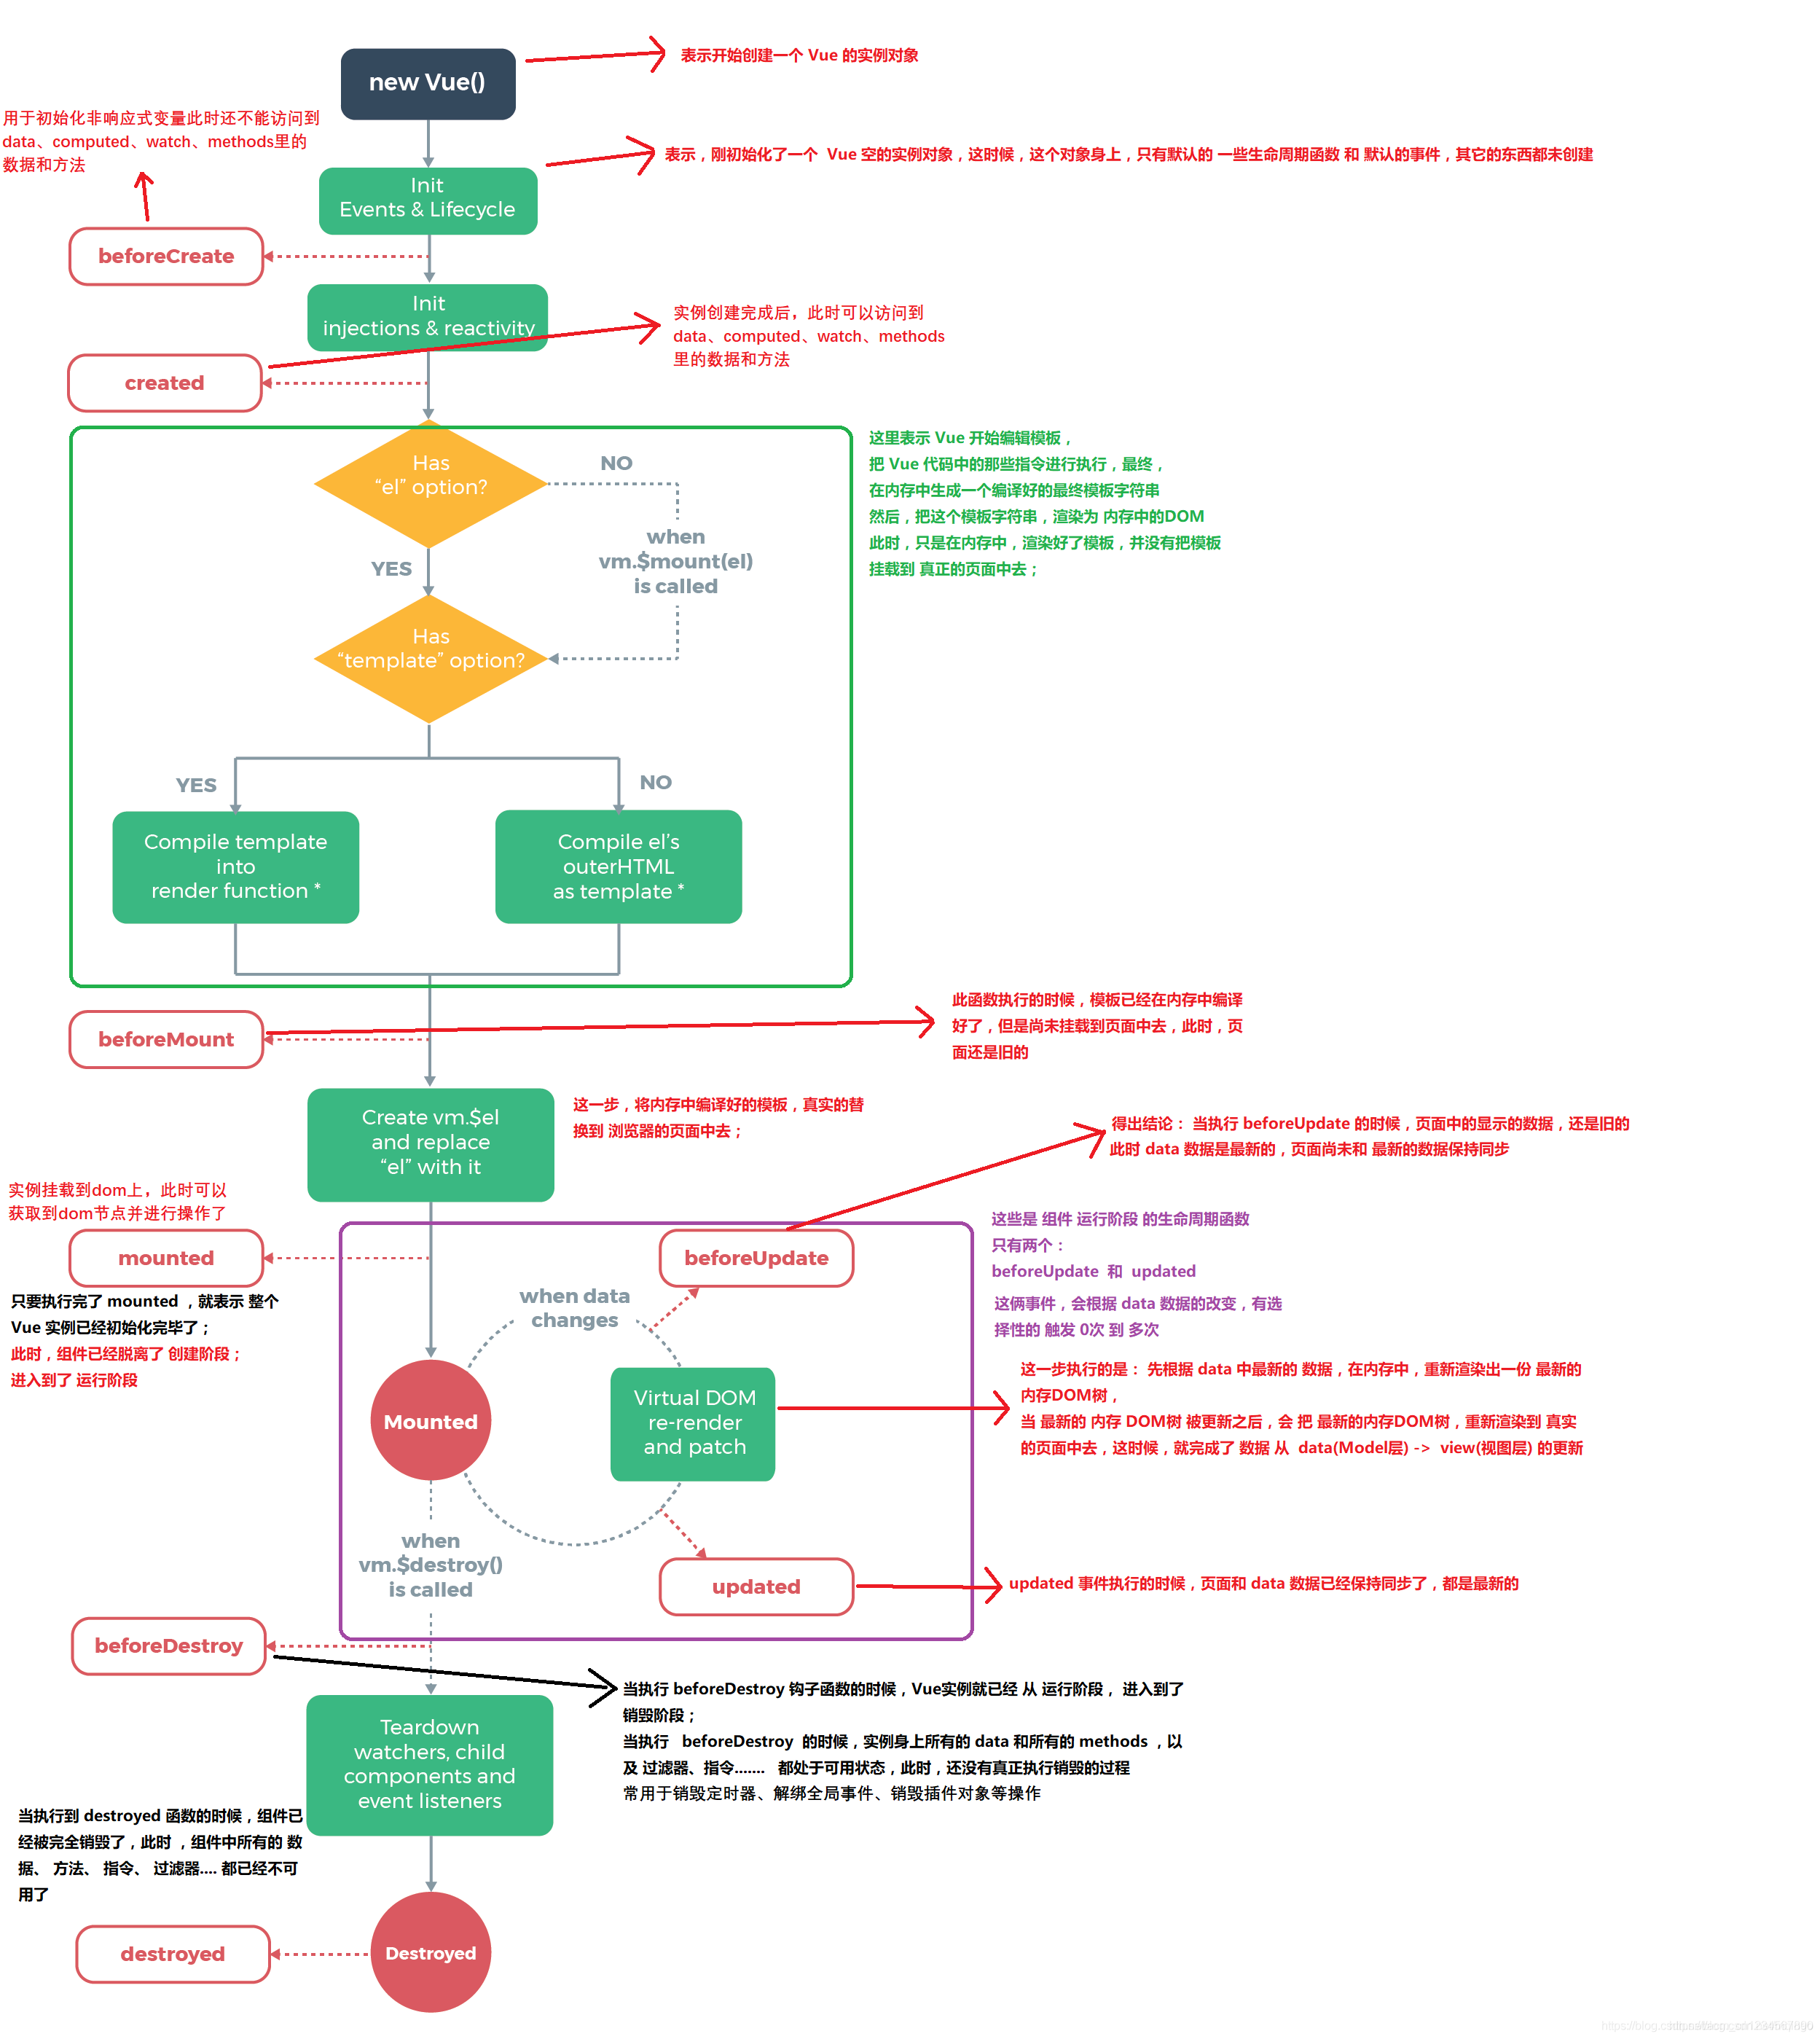
◾ Detailed description:
- beforeCreate: used to initialize non response data. At this time, the data and methods in data, methods, computed and watch cannot be accessed.
- created: vue instance creation is completed, and the initialization of data and methods has been completed. At this time, the data and methods in data, methods, computed and watch can be accessed;
- beforeMount: the template has been compiled in memory, but has not been mounted on the page.
- Mounted: the DOM rendering is completed, and the instance is mounted on the dom. At this time, you can get the DOM node and operate it.
- BeforeUpdate: the data in the data is the latest, but the page is still old, and the page has not been synchronized with the data;
- updated: the data in the page and data are synchronized and are up-to-date.
- Beforedestroy: the Vue instance enters the destruction stage, but the destruction process has not been really executed. At this time, all data and methods are still available. This process is commonly used to destroy timers, unbind global events, destroy plug-in objects, etc;
- Destroyed: the vue instance has been destroyed, and everything in the vue instance is unavailable;
◾ Consider the lifecycle execution sequence of parent-child components:
- Instance initialization process: parent beforecreate - > parent created - > parent beforemount - > child beforecreate - > child created - > child beforemount - > child mounted - > parent mounted
- Sub component update process: parent BeforeUpdate - > child BeforeUpdate - > child updated - > parent updated
- Parent component update process BeforeUpdate - > parent updated
- Destruction process parent beforedestroy - > child beforedestroy - > child destroyed - > parent destroyed
◾ Keep alive's unique life cycle is activated and deactivated respectively. Components wrapped with keep alive will not be destroyed during switching. Instead, they will be cached in memory and the deactivated hook function will be executed. After hitting the cache and rendering, the activated hook function will be executed
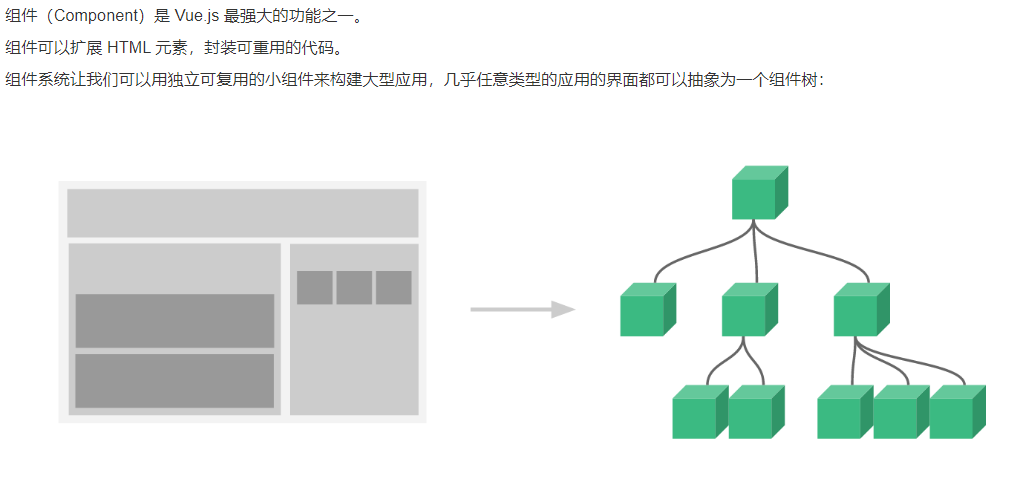
4. vue componentization
- Why is data in a component a function?
If a component is reused multiple times, multiple instances will be created. Essentially, these instances use the same constructor. If data is an object, the object belongs to the reference type, which will affect all instances. Therefore, in order to ensure that the data between different instances of components does not conflict, data must be a function.
Method of communication between components:
1. Parent child component communication
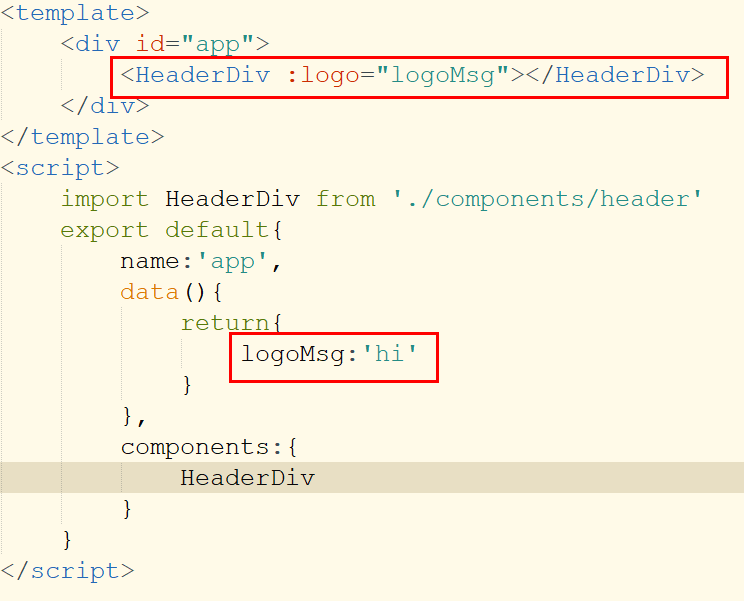
(1) . the parent component passes the value to the child component ----- props. Props is one-way binding: when the properties of the parent component change, it will be transmitted to the child component, but not vice versa. This is to prevent the child component from unintentionally modifying the state of the parent component.
Example:
Subcomponents
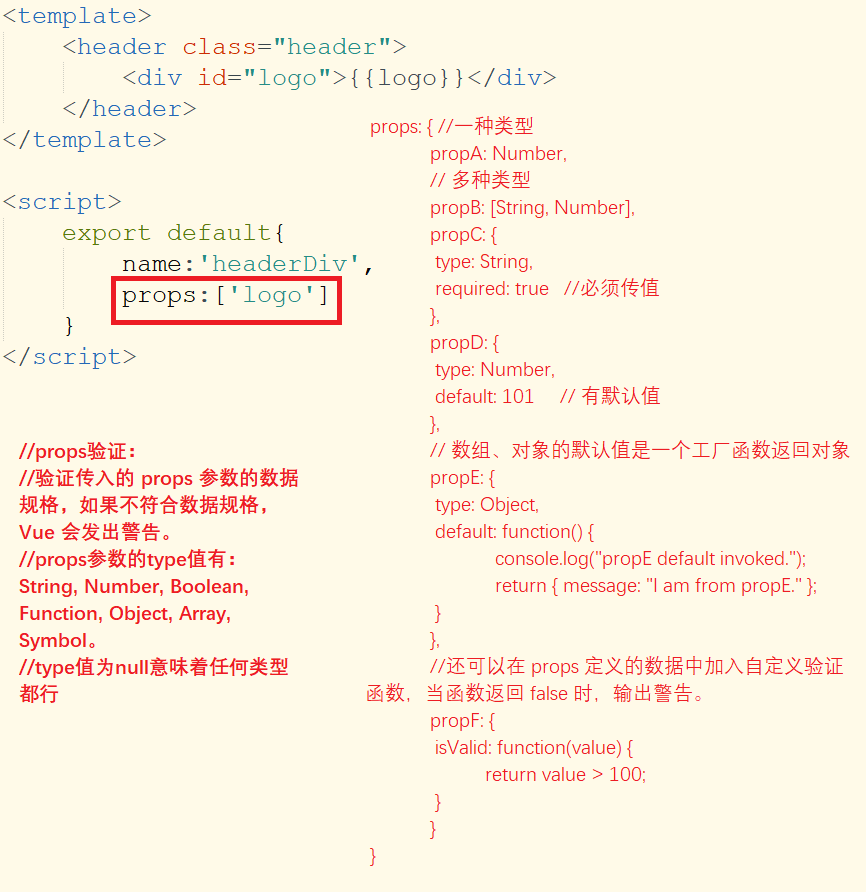
Parent component
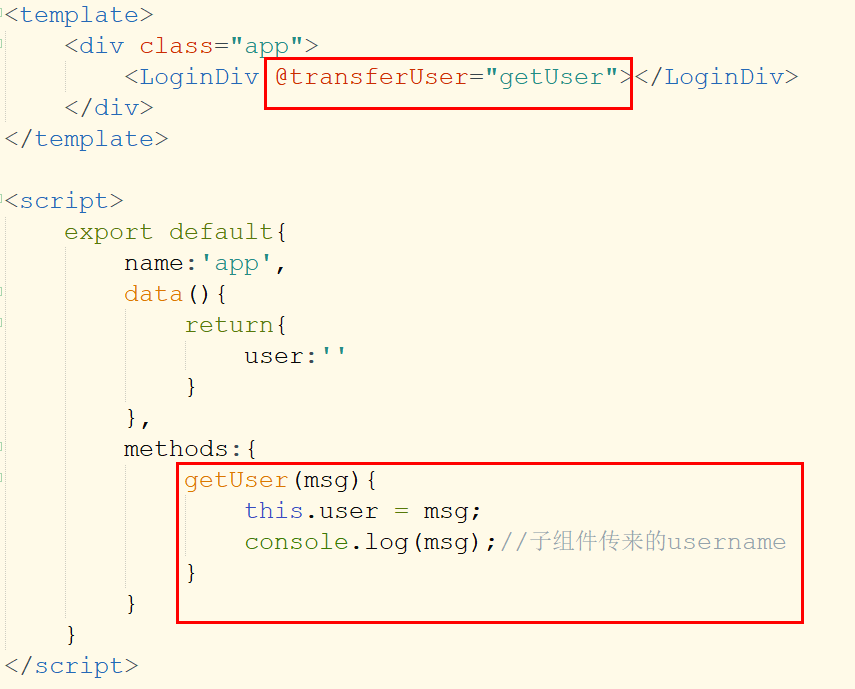
(2) . value transfer from child component to parent component ------ $emit() custom event
Example:
Subcomponents

Parent component
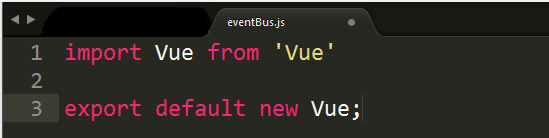
2. Non parent and child components - $emit() and $on
Principle: new is a new vue instance, similar to a station, connecting two components, that is, a central event bus;
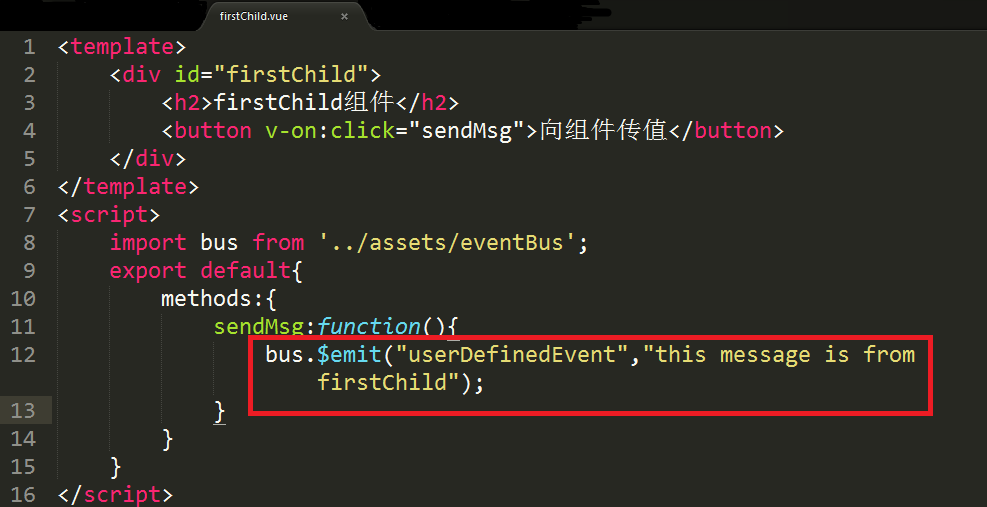
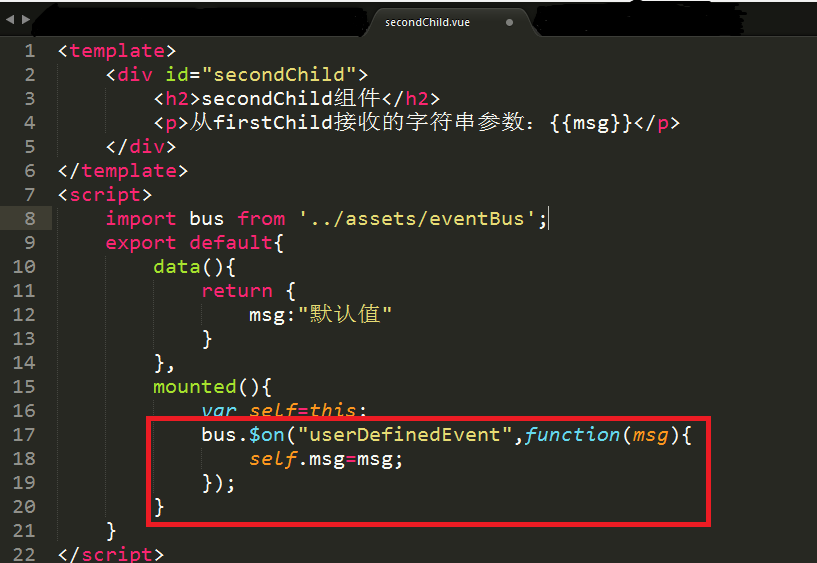
$on: listen for custom events on the current instance (the current instance here is bus, and the custom event is userDefinedEvent). The event is triggered by $emit, and the callback function will receive all the parameters of the incoming event trigger function ($emit).