Congratulations on finding this article.
In my recent work, I need to use QT to write many functions about point cloud processing. There are too many pits in this process. (unable to resist the temptation to make complaints about PCL+VTK, the direct pop-up display of the point cloud is very simple. However, embedding VTK into Qt to display the point cloud can instantly enhance the configuration difficulty of the hellhole level. The main reasons are two: first, the PCL's own VTK is incomplete, does not support Qt embedding, and needs to recompile and replace the PCL version from the source code of VTK. Trivial, and it is difficult to find out after making mistakes in some details, and it is difficult to find the reason back).
Based on all the pits I've stepped on in the past few days, I wrote this article, which may be the most reliable and detailed article that can be found in the whole network at present. All steps are documented in detail in this article. In order to write this article, I specially clear all the previous configurations and start over, step by step screenshots and explanations. If you can see this article, it means that I have successfully configured it again according to this set of steps. Therefore, follow this step by step to the end. I believe you can also configure it successfully. Let's start right away.
1. Environmental preparation
1.1. Version information
All operations in this article are completed under Windows 10 21H2 Version (see the figure below).
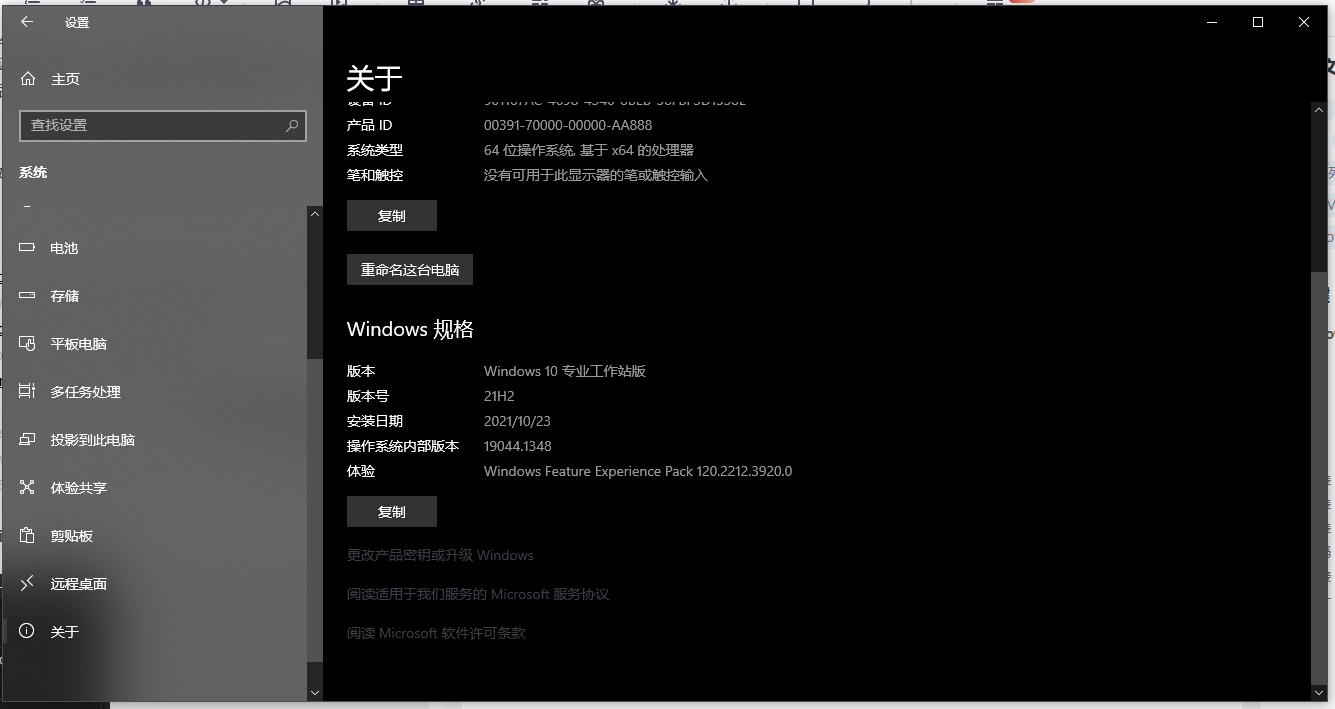
Notes on system version
For Windows 10 users, as long as your version is not too old, there will basically be no problems at the system level.
For Windows 7 users, I will not have any problems during the configuration process, but in the last step (running VTK's own Qt example), there will be an unsolvable problem of "rc.exe not found". It is found that manually installing the Windows 7 SDK can solve this problem, so readers using Windows 7 can configure it according to this article and then test the solution to this small problem by themselves.
The following are the versions of all relevant software packages I use, and all are installed according to the default path. If you configure according to the steps in this article, please try to be consistent with my following versions, otherwise you may encounter problems other than the contents of this article. In addition, if you modify the installation path (not recommended), please replace all my relevant paths with your modified path.
| name | edition | Corresponding file |
|---|---|---|
| Visual Studio | 2015 Update 3 | One file: cn_visual_studio_professional_2015_with_update_3_x86_x64_dvd_8923256.iso |
| Qt | 5.7.0 MSVC2015 x64 | One file: qt-opensource-windows-x86-msvc2015_64-5.7.0.exe |
| PCL | 1.8.1 MSVC2015 x64 | Two files: PCL-1.8.1-AllInOne-msvc2015-win64.exe pcl-1.8.1-pdb-msvc2015-win64.zip |
| VTK | 8.0.0 (source code) | Two files: VTK-8.0.0.zip VTKData-8.0.0.zip |
| CMake | 3.21.2 (with GUI) x64 | One file: cmake-3.21.2-windows-x86_64.msi |
1.2. Installation of VS2015
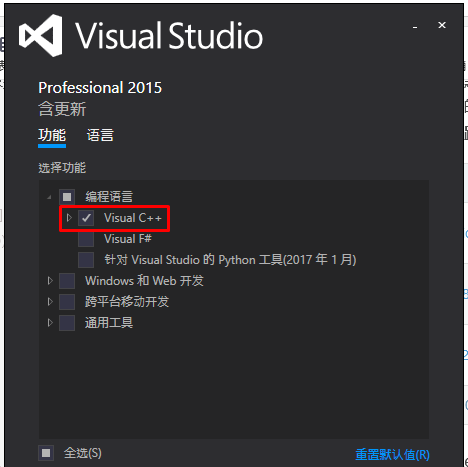
When installing VS2015, it is recommended to use Update3 Version (Update2 or even earlier versions have known serious problems that may lead to system crash. See the official release notes of VS2015 Update3 for details). For the work involved in this article, it is sufficient to install only the C + + tools of VS2015 (as shown in the figure below). Check other components if necessary.
1.3. Installation Qt
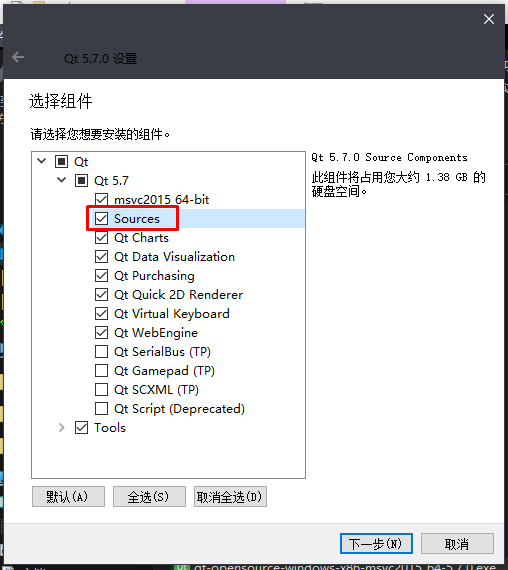
When installing Qt, be sure to check the installation source code (as shown in the figure below), otherwise some paths will not be found when compiling VTK later. If checked, it will take a long time to install the source code during Qt installation (the installer may even be unresponsive for several minutes). Just wait patiently.
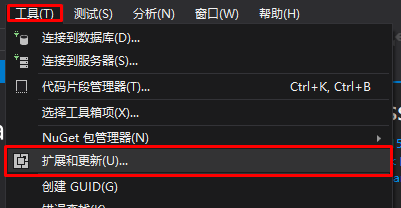
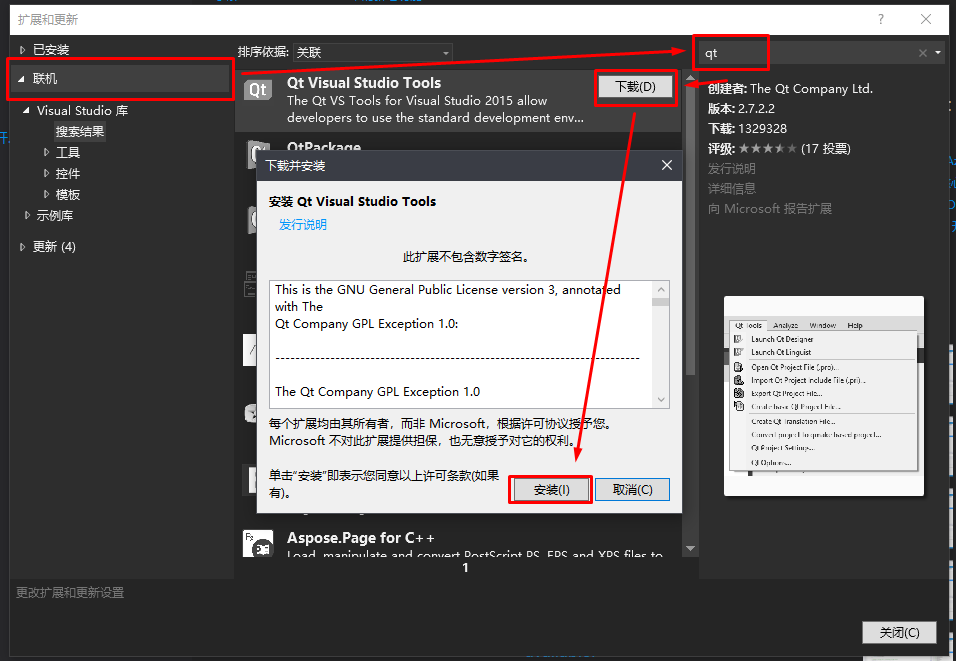
After installing Qt, you need to install Qt Visual Studio Tools in VS.
 After installation, each time the VS is started, the extension tool will be initialized, similar to the state shown in the following figure. (the first initialization takes about five minutes after installation, and the initialization will be fast after each startup. If you are stuck in this initialization state all the time, you can restart vs and try again)

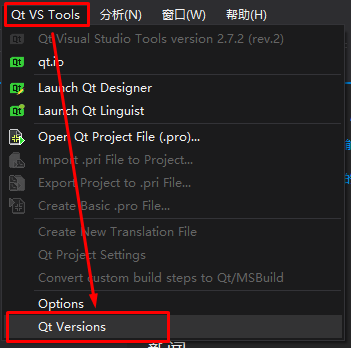
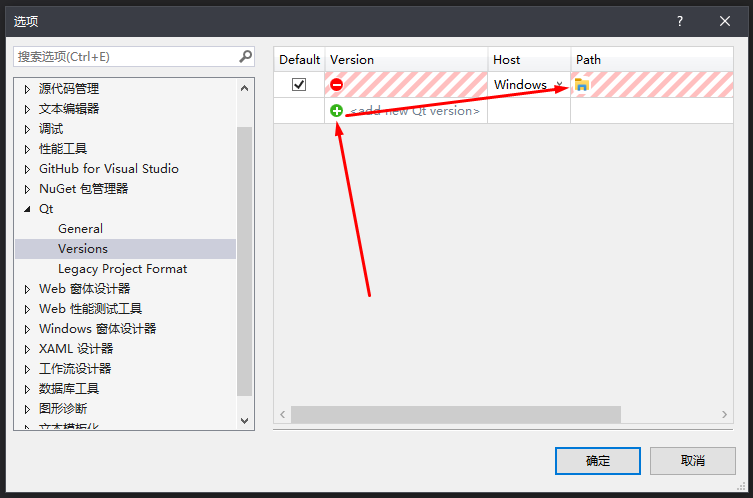
After initialization, we will configure the extension tool for the first time (link to the installed Qt).
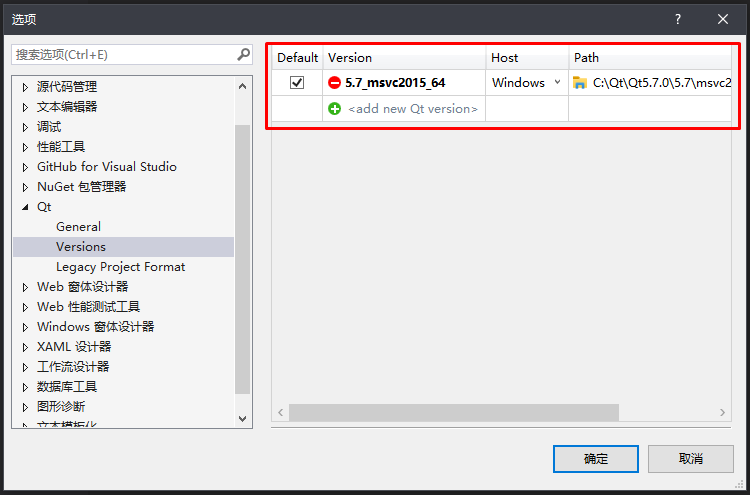
If you are like me, you can see the installed Qt version here in the figure above, it means that the automatic configuration is successful. You don't have to do anything. You can continue to look down. Otherwise, configure the version manually.
1.4. Install PCL
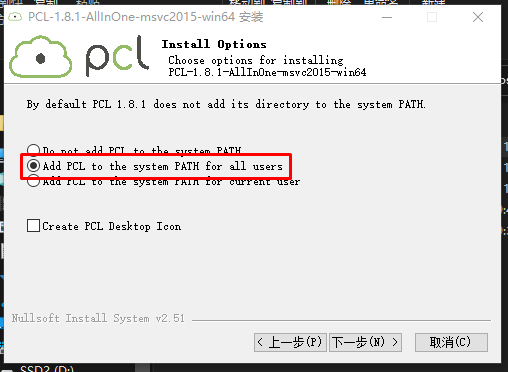
When installing PCL, be sure to select "add to environment variable" (as shown below). In the following steps, we will check whether the environment variables added here are correct again.
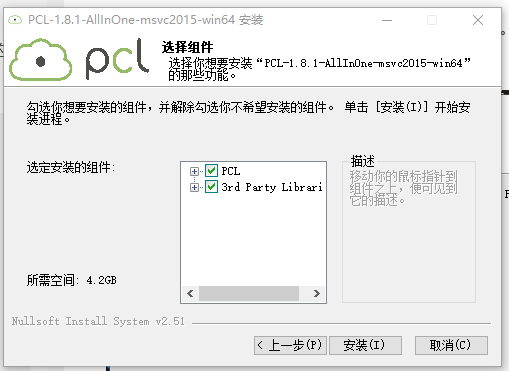
Select install all components.
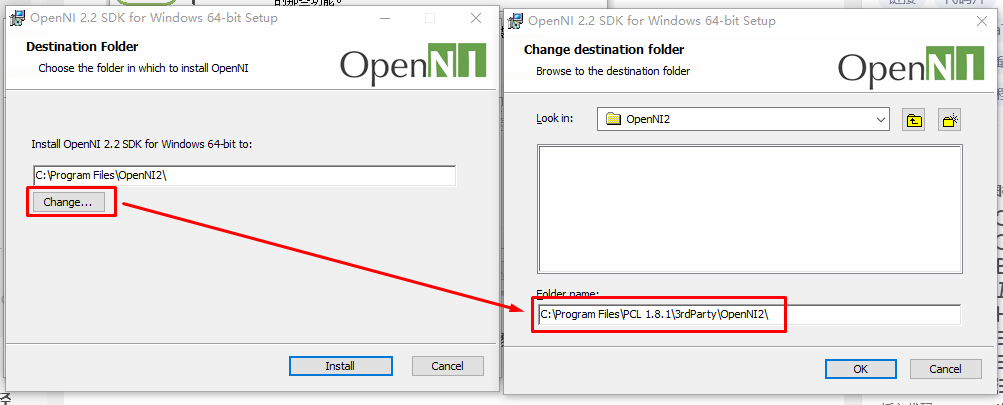
During installation, a separate installation window of OpenNI2 will pop up. It is recommended to modify the installation path of OpenNI2 to the path reserved by PCL instead of its default path (see the figure below). The advantage of this is that it is easy to manage and the file structure is relatively clear.
 Then, we need to check whether the environment variables have been configured correctly.
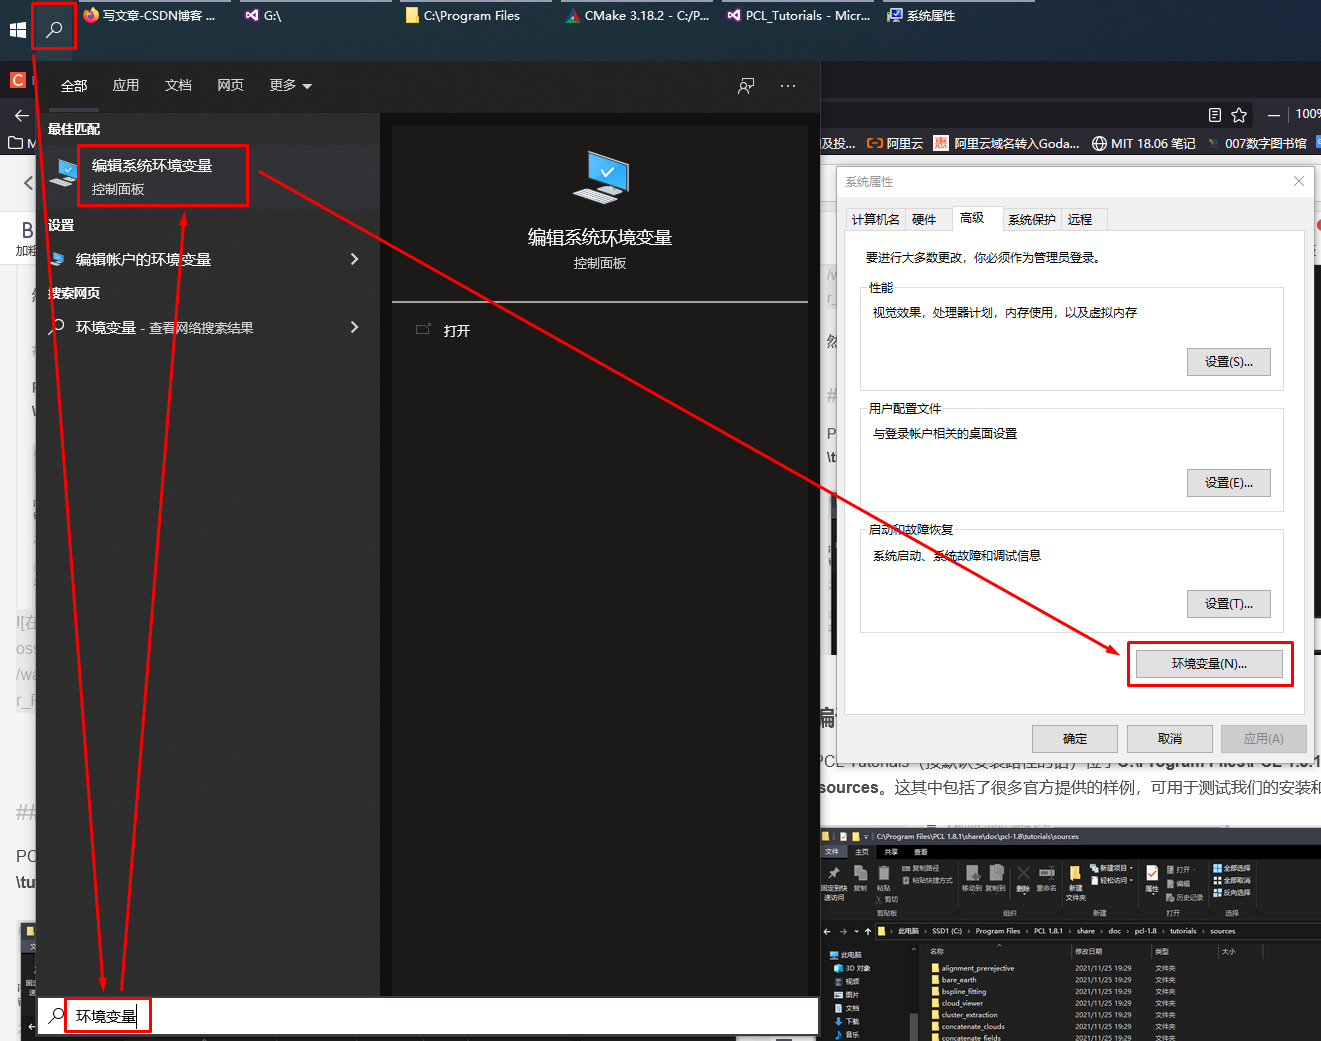
Directly search "environment variable" in the search box next to the start menu to open the environment variable configuration window.
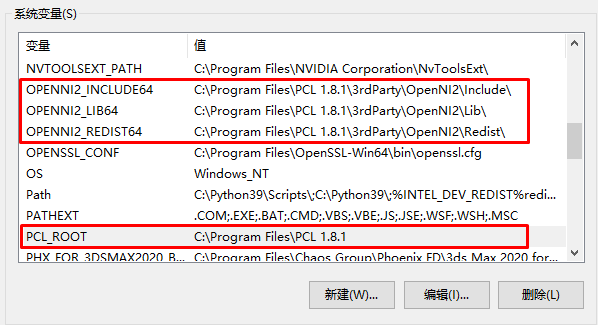
 Check whether the items in your system variables are consistent with the items selected in the red box in the screenshot I give below (note that the "system variables" list at the bottom of the window is not the user variables list at the top). If they are missing or inconsistent, they need to be added or modified manually:
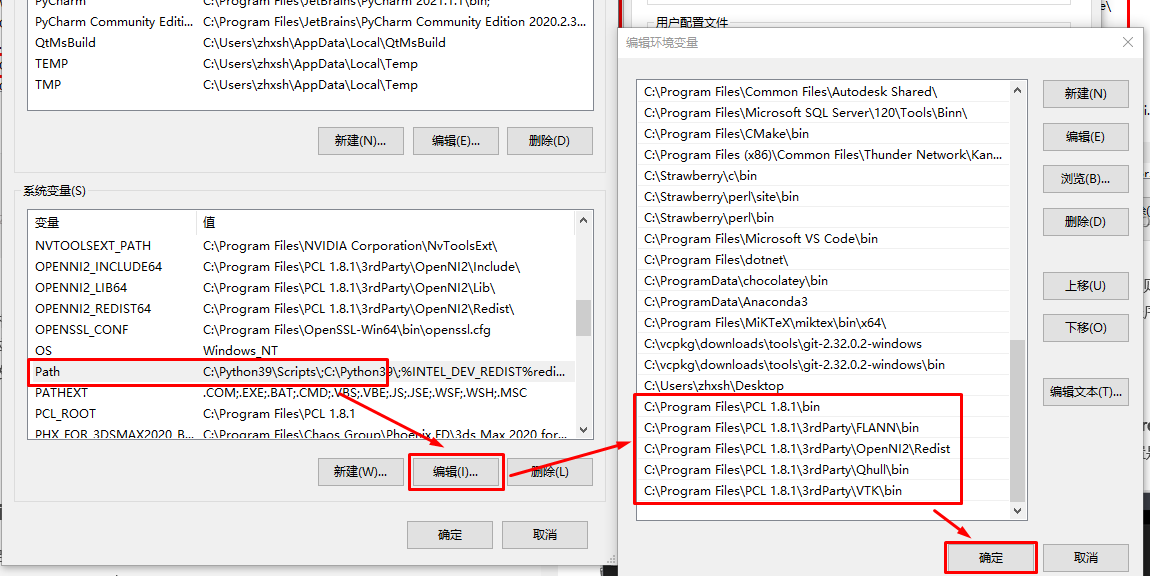
In addition to the above four, you also need to add several directories (see the figure below) where the relevant dll files are located to the path variable, otherwise the following examples will have the problem that the dll file cannot be found (of course, adding the dll file path to the environment variable is only a temporary solution. When publishing the program to users, you still need to package and publish all the dependent dll files together).
 It should be noted that the configuration of environment variables here may take effect after logging off the user and logging in again, or restarting the computer. So it's best to restart here and then proceed to the next steps.
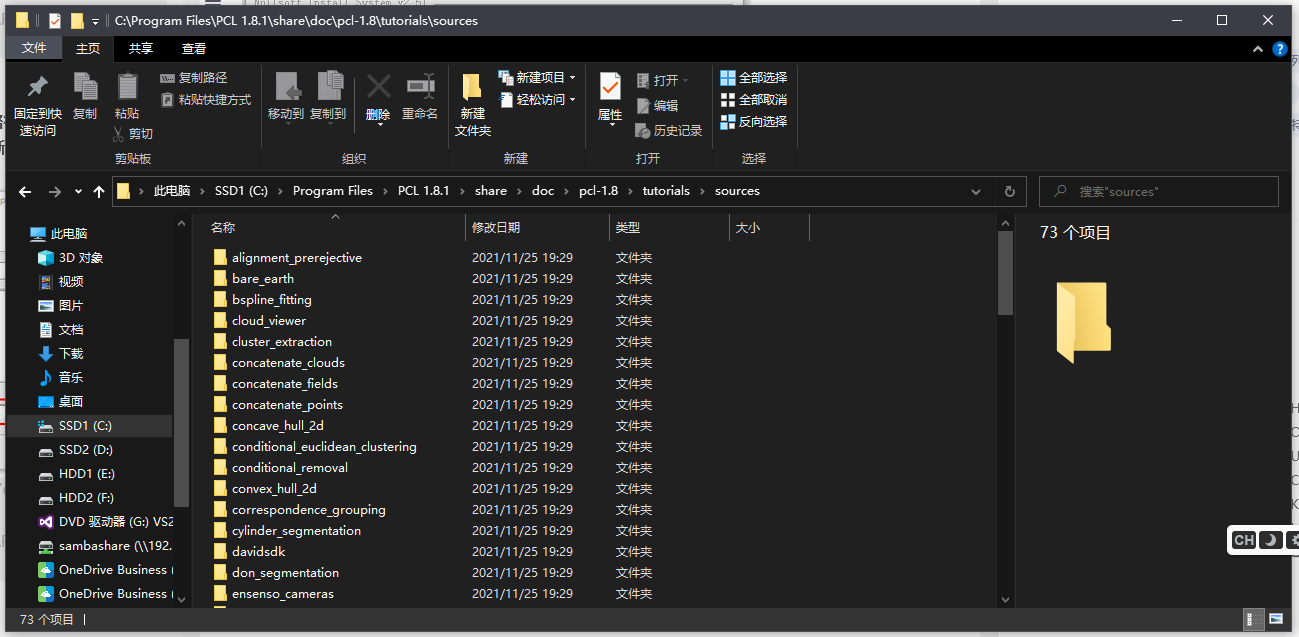
1.5. Compiling PCL Tutorials
PCL Tutorials (if installed by default) is located at C:\Program Files\PCL 1.8.1\share\doc\pcl-1.8\tutorials\sources. This includes many examples provided by the government, which can be used to test whether our installation and configuration are successful, as well as to learn various writing methods of PCL.
 Next, compile it using CMake.
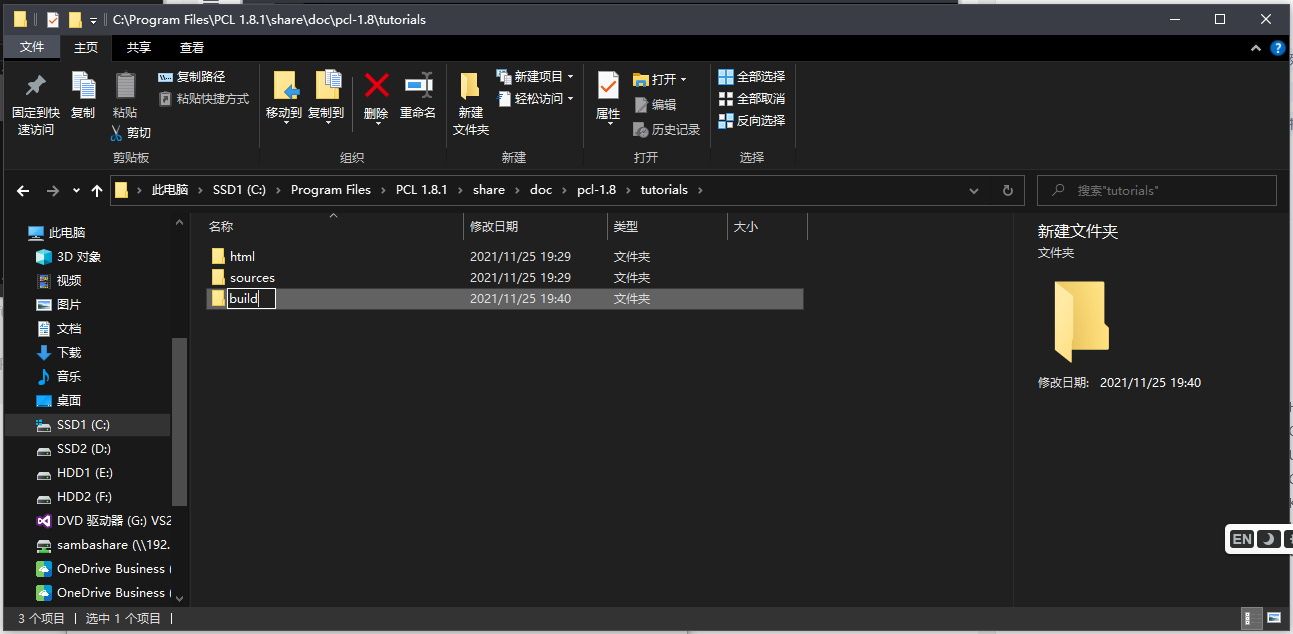
Create a new folder called build under the tutorials folder, and the compiled files will be output here.
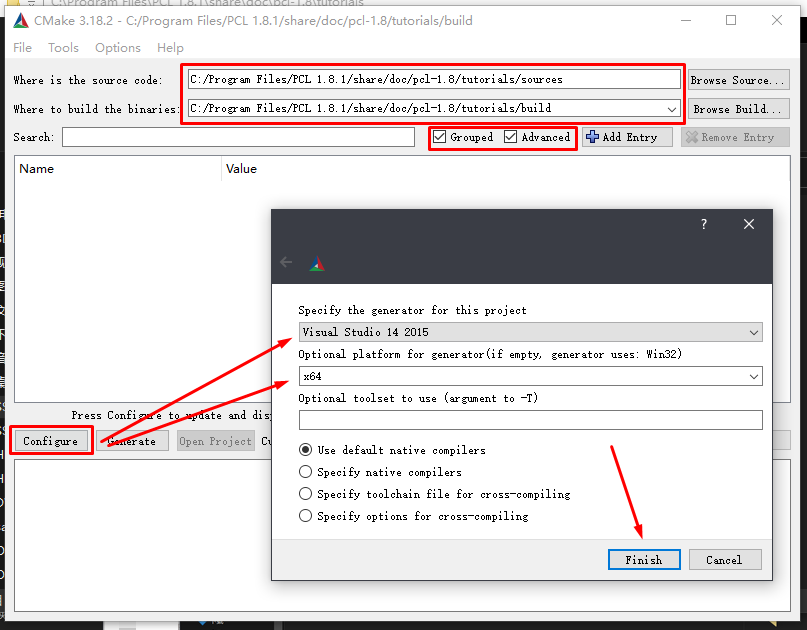
 Start CMake, select the source path to sources, and select the compile output path to build.
Check the display mode of Grouped and Advanced.
Then click Configure and select VS2015 (version No. 14) and x64 platform. (as shown below)
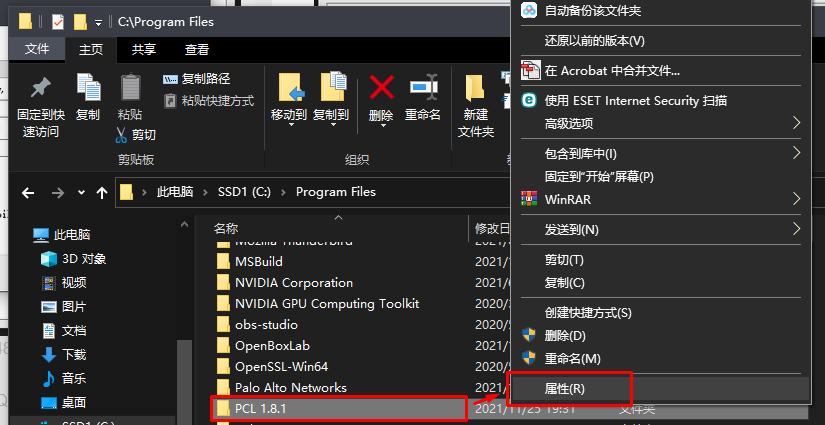
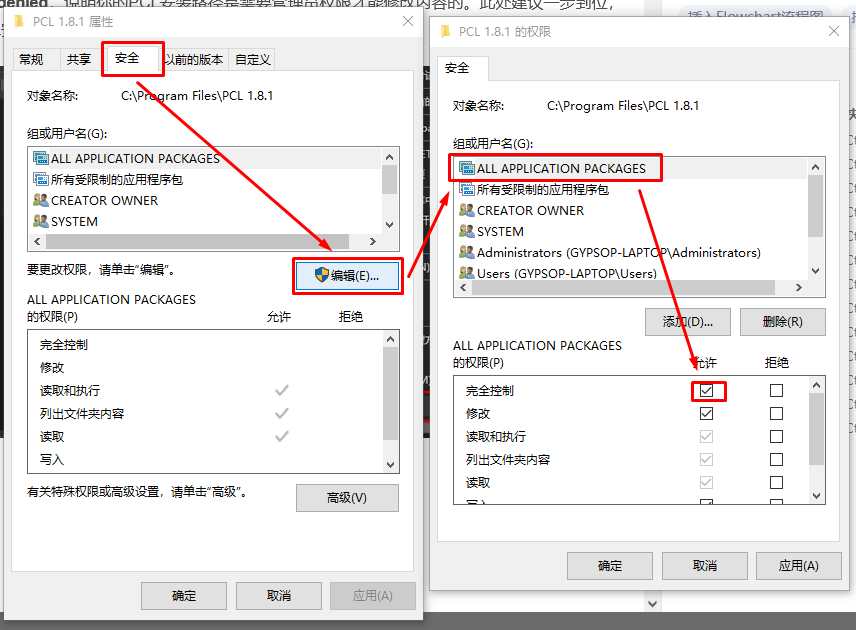
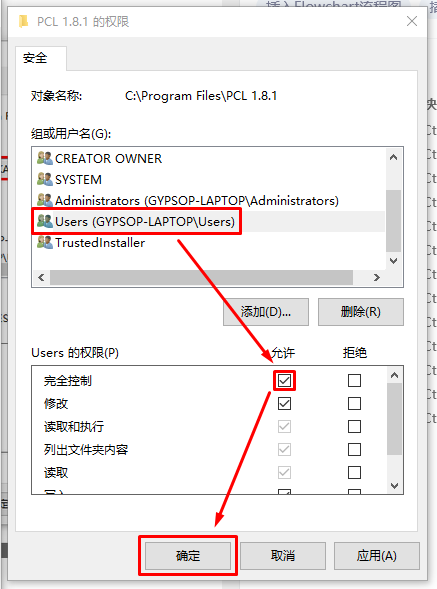
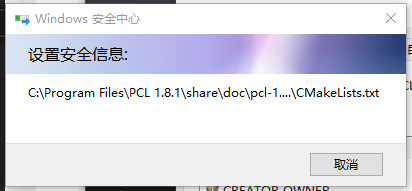
 After clicking Finish, if CMake Error: Cannot open file for write and cmake error:: system error: permission denied are prompted, it indicates that your PCL installation path requires administrator permission to modify the content. It is recommended to modify the permissions of the entire PCL installation directory in one step (set "all packages" and "all users" to have "full control" permissions):
After that, go back to CMake and click Configure again to execute successfully.
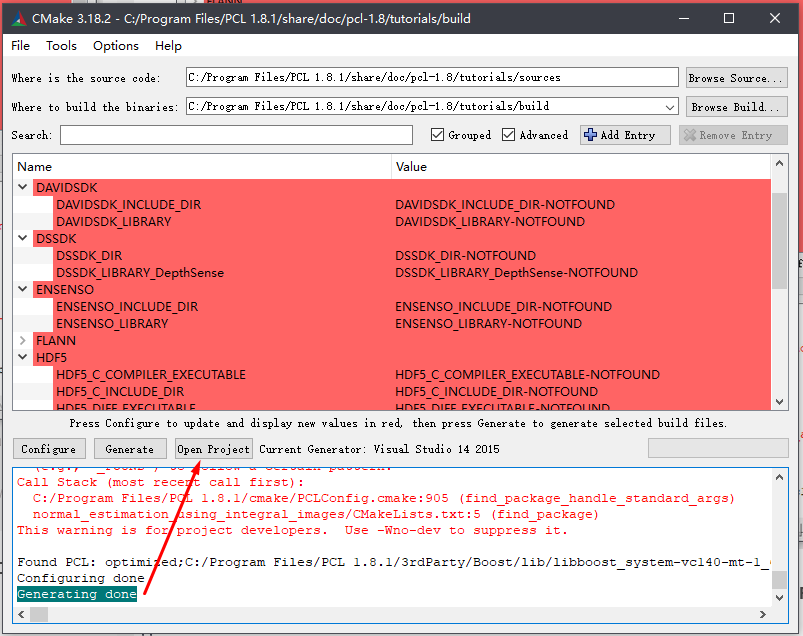
Wait for a while. After the configuration is completed, there will be some dependent packages in the list that cannot be found. It doesn't matter. If you can't use the missing packages, you can ignore the errors here (if you can use the samples related to some dependent packages, you need to install the required packages in advance, and then come back to Configure the path in the list). As long as the bottom output is Configuring done, you can continue to do it later.
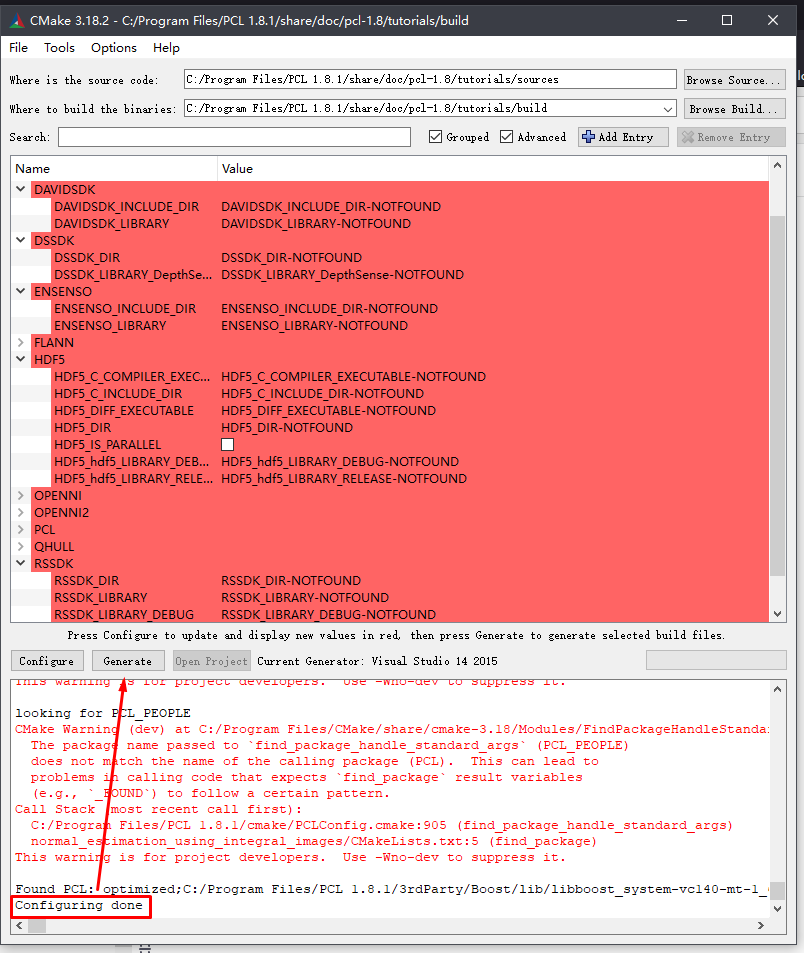 Click Generate and wait until Generating done appears at the bottom. Then click Open Project.
 After clicking Open Project, CMake will automatically help you open VS2015 and load all corresponding sample projects. The rest of this step is the operation in VS2015.
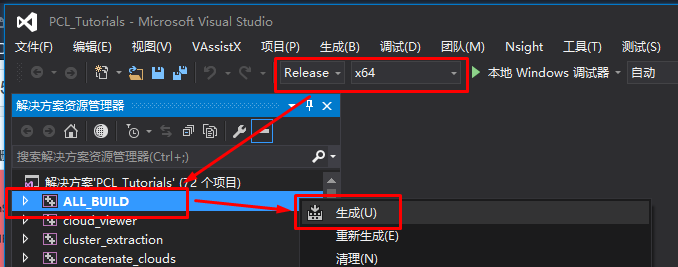
Select Release and x64 version, and then right-click ALL_BUILD, select build.
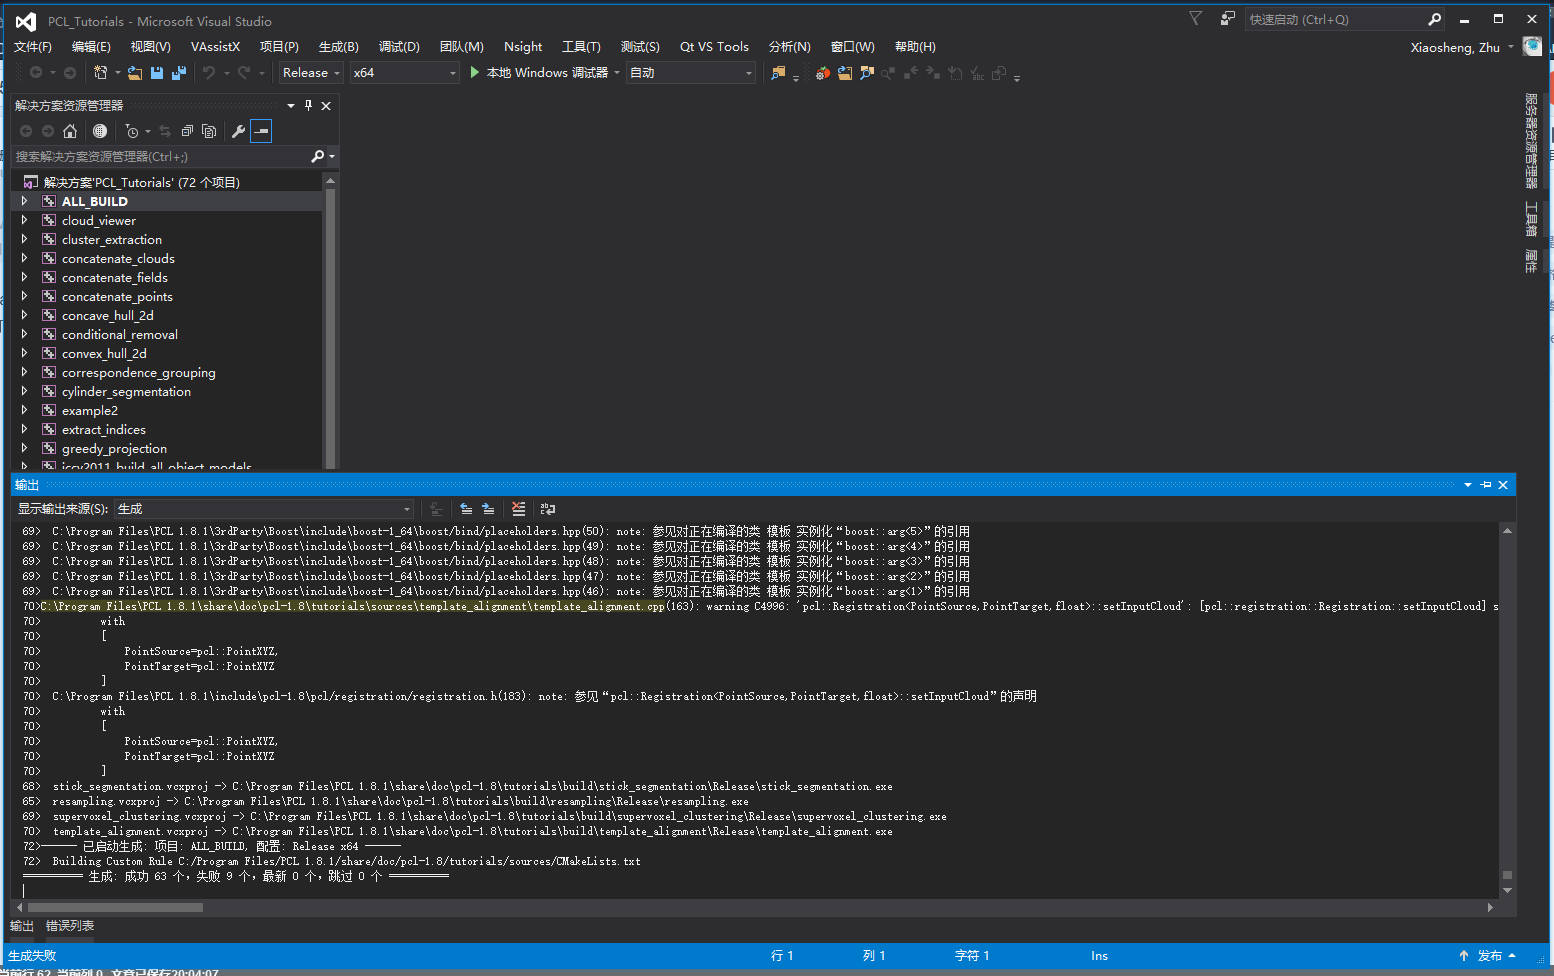
A lot of warning information (such as C4819 and C4996) will be output during compilation, which can be ignored. Just wait for the completion of compilation. This step may take about ten minutes depending on the computer configuration.
After the compilation is completed, you may be prompted that some sample compilation fails (as shown in the figure below, which is normal. After all, all dependent libraries have not been configured in CMake just now). A small number of failed projects can be ignored. If most projects or even all projects fail to compile, go back to check whether there are errors in the steps in CMake, and then repeat all subsequent steps until most projects are compiled successfully.
1.6. Use the official sample to check whether all the above configurations are correct
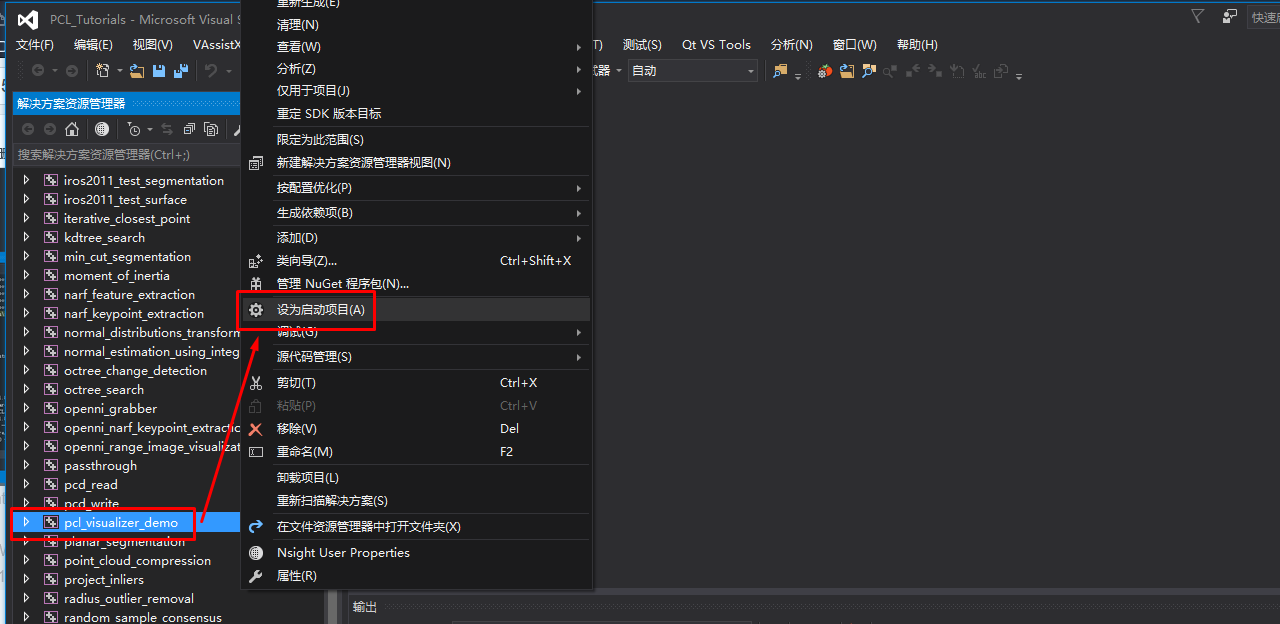
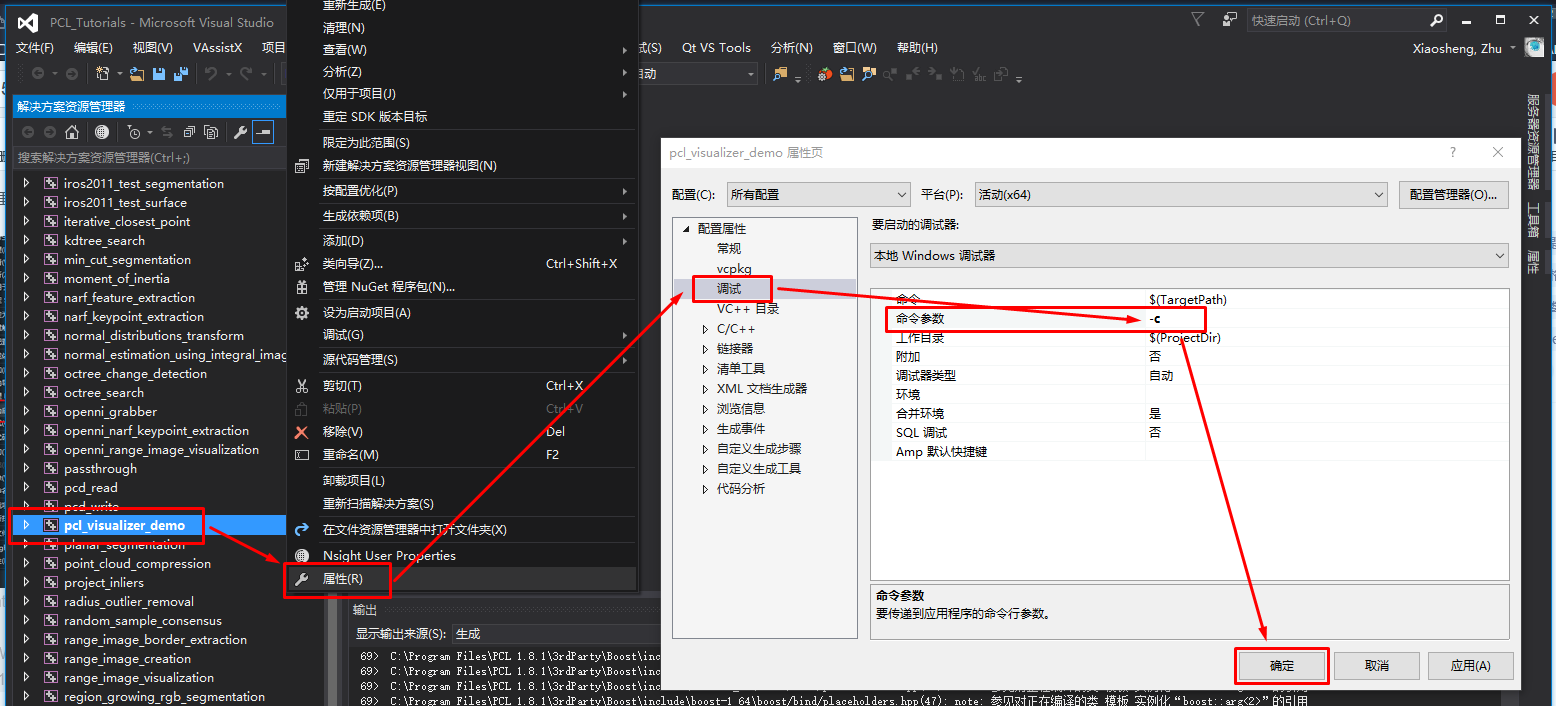
Or in the VS window above, PCL_ visualizer_ Set demo as the startup project (as shown below).
 Then, in the project properties, set the command parameter of this sample project to * * - c * * (as shown below).
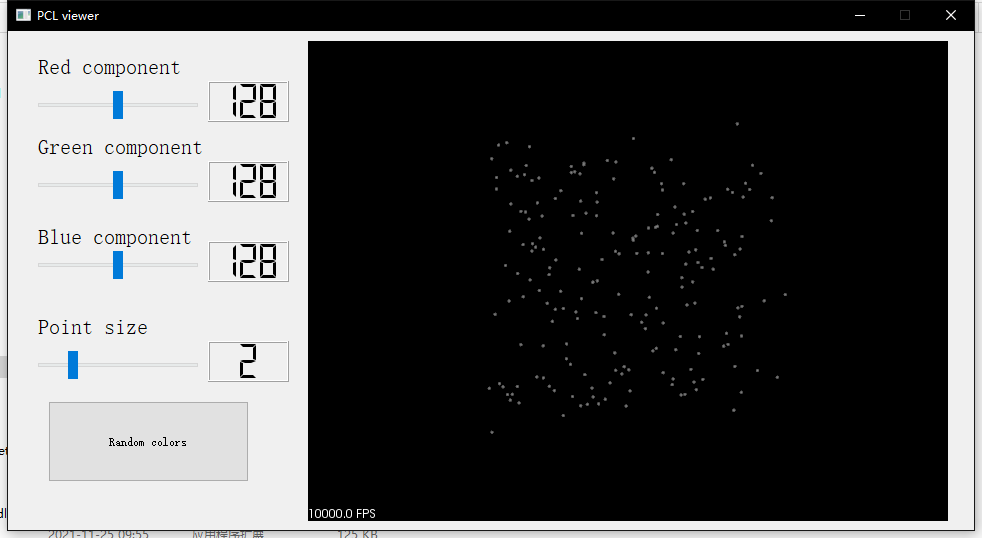
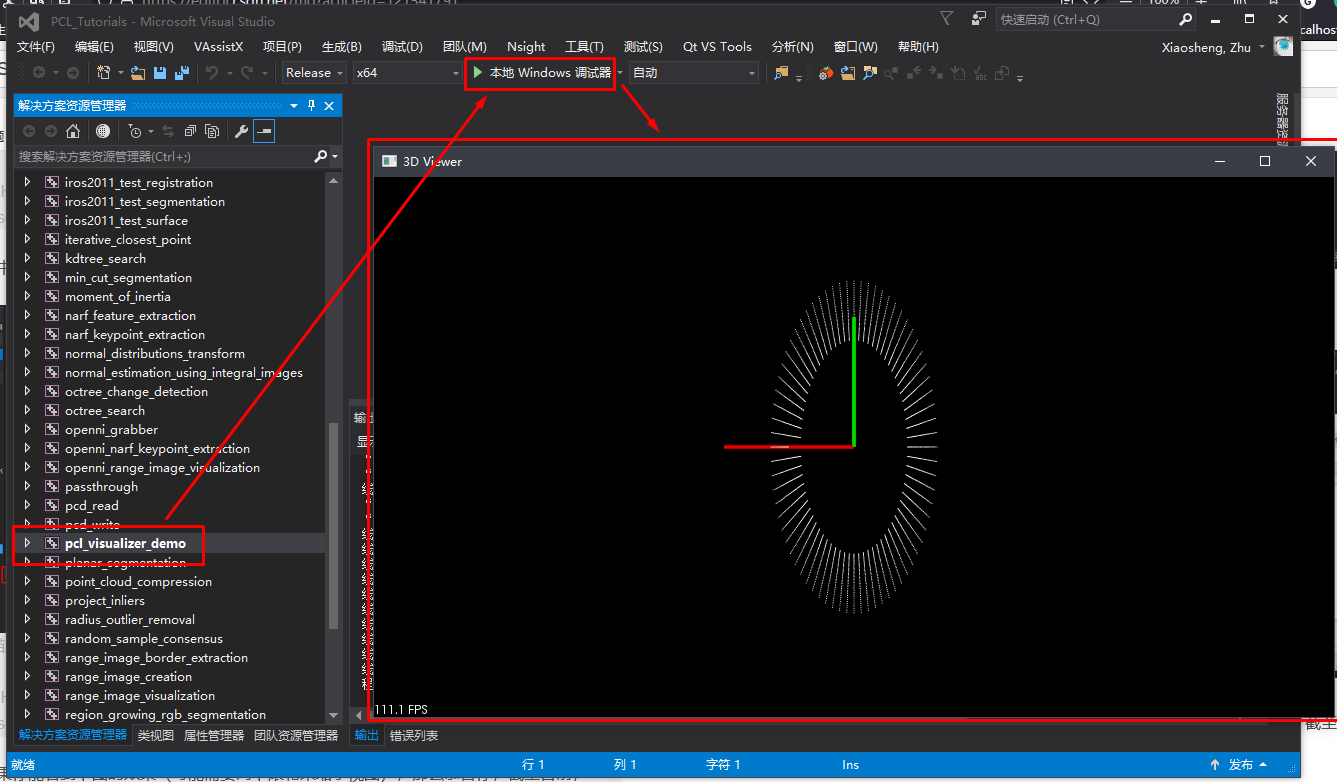
 Then click Run. If you can see the effect in the figure below (you may need to scroll down to zoom out), congratulations. So far, all your steps have been completed correctly.
2. Compile VTK library and integrate it into PCL and Qt
In the previous steps, you may also notice that the installation of PCL is integrated with VTK. However, one Tiankeng is that there are some differences between the VTK8.0 integrated by PCL1.8.1 and the original VTK8.0 released on the VTK official website, resulting in many inexplicable problems when integrating PCL in Qt. These problems include (if you encounter the following problems when integrating PCL into Qt, probably because the VTK in PCL is incomplete):
- Function not found
- Qt window cannot add QVTKWidget (promotion by QWidget fails, or there is no such control in Designer)
- Link error related to QVTKWidget (lib file not found or symbol error)
- ...
You may find some so-called "solutions" on the Internet, but they can't solve this problem!, These solutions include common wrong answers such as the following:
#include <vtkAutoInit.h>
VTK_MODULE_INIT(...);
The correct solution should be: download the VTK source code of the same version (VTK8.0.0 in this article) from the VTK official website, recompile the complete package, and then replace the version provided by PCL. Let's start.
2.1. Compiling VTK
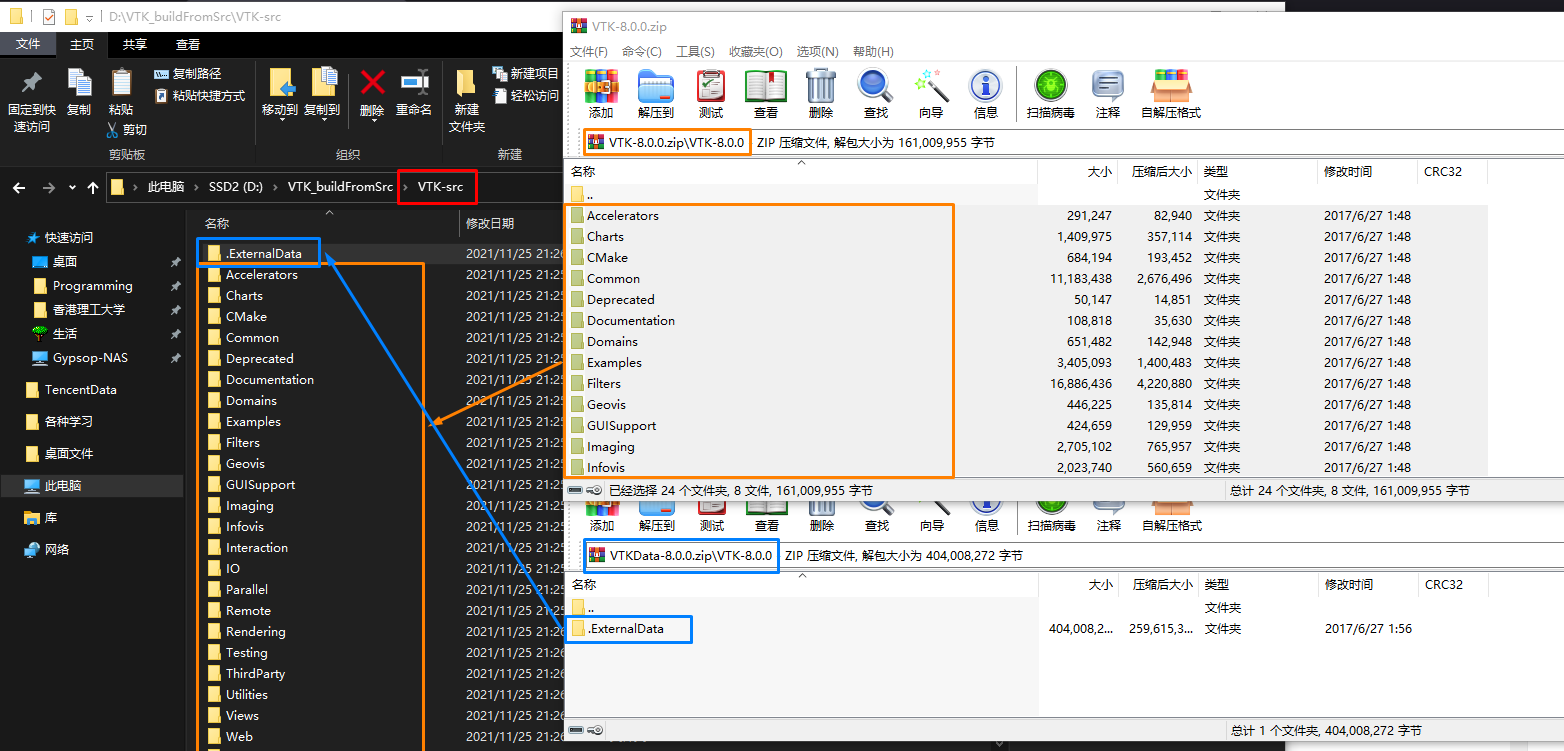
Find a place to create a new folder, and then create a folder VTK Src in it. Decompress all the contents of the two VTK source packages (VTK-8.0.0.zip and VTKData-8.0.0.zip) prepared at the beginning into the following structure.
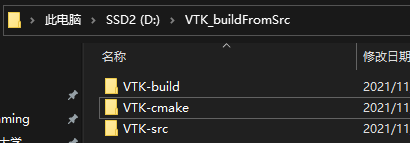
 After that, go back to the previous layer and create two new folders: VTK cmake and VTK build. The cmake folder stores the VS project files generated by cmake, and the build folder really stores the VTK package compiled later.
Then, open CMake (yes, it's it again).
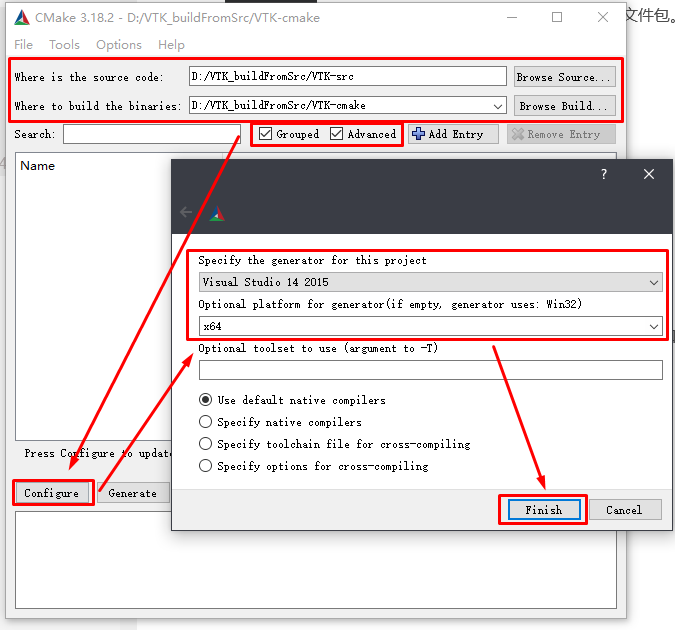
Select the source path as the VTK SRC folder and the compilation path as the VTK cmake folder.
Then, as before, check the display mode of Grouped and Advanced.
Then click Configure and select VS2015 (version No. 14) and x64 platform. (as shown below)
After the first Configure, there will be some items with problems (red). At this point, we need to manually add some information to the list.
-
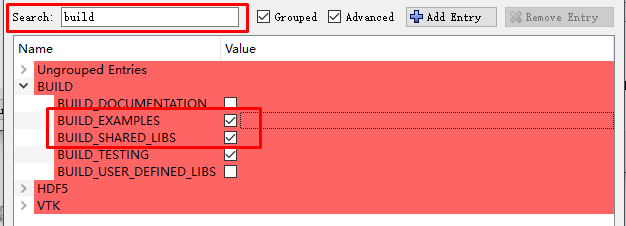
Check BUILD_EXAMPLES and BUILD_SHARED_LIBS (compile the dll file of VTK, of course, check it). If you can't find it, you can search in the search box above the list.
-
Fill in CMAKE_INSTALL_PREFIX is the VTK build folder we just created.

-
Check VTK_Group_Qt, so that the Qt related files of VTK (QVTKWidget control, related header files, lib and dll) can be compiled.

-
Then, the VTK_DATA_STORE select the additional data folder in our VTK Src.

OK, set so many for now. Click Configure again. The remaining settings will appear after this configure.
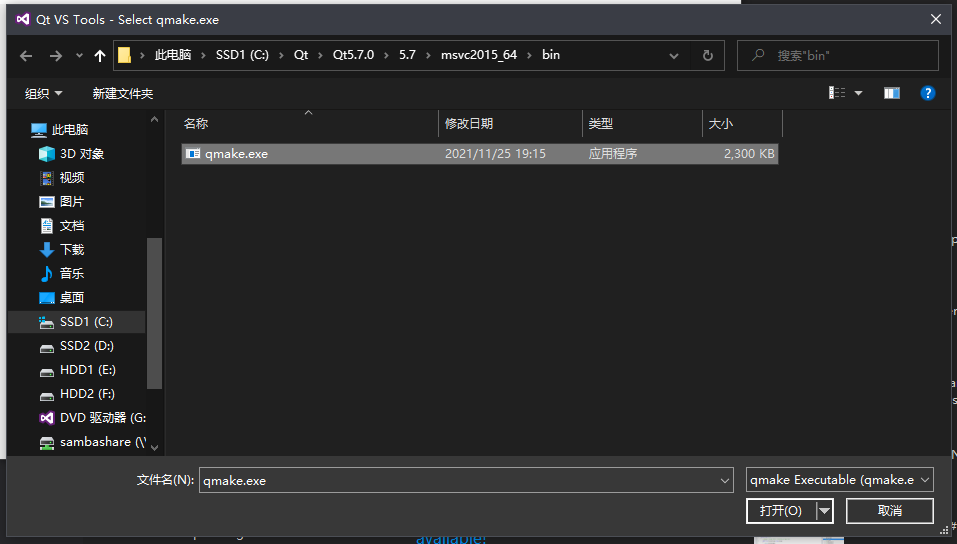
After Configure, a little red setting items will appear. Set VTK_QT_VERSION is 5 (because we installed Qt5); And setting QT_QMAKE_EXECUTABLE is the qmake.exe path below the location where we installed QT (you can refer to the location I selected in the figure below to find out where your qmake is).
 Click Configure again, and then there will be new settings.
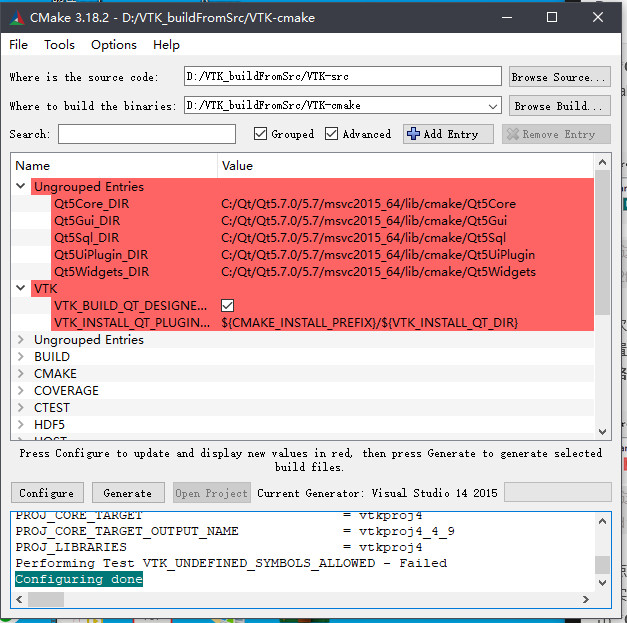
Set Qt5_DIR is the path of Qt5 folder in lib/cmake below the location where we install QT, not the direct installation path of QT! There must be no mistake here. See the figure below.
 Click Configure again. After this click, although there are still red items in the list, in fact, these items have been filled in. And, the log below can output Configuring done.
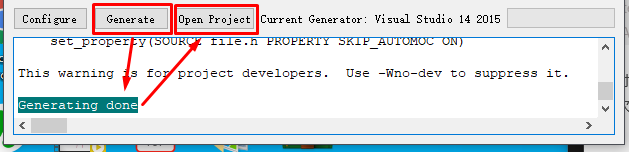
 Click Generate now. After you see Generating done, you can click the Open Project button as you did last time. See the figure below.
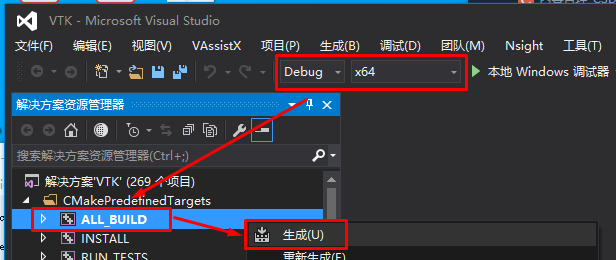
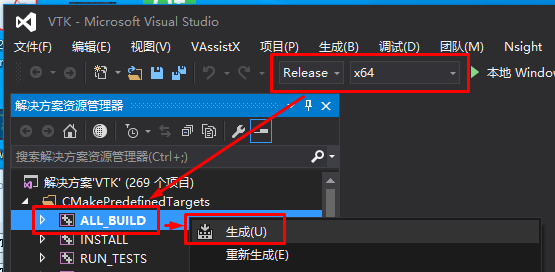
 After clicking Open Project, VS2015 will be opened automatically. This time, we need to compile twice, corresponding to the Debug and Release modes respectively. First, do the operation of Debug mode. There are two steps:
- Step 1: ALL_BUILD. This step takes about twenty minutes.
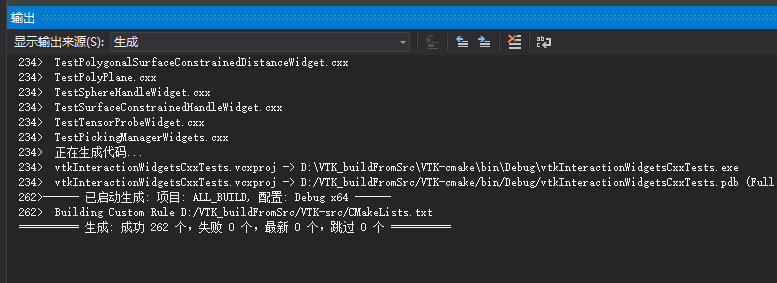
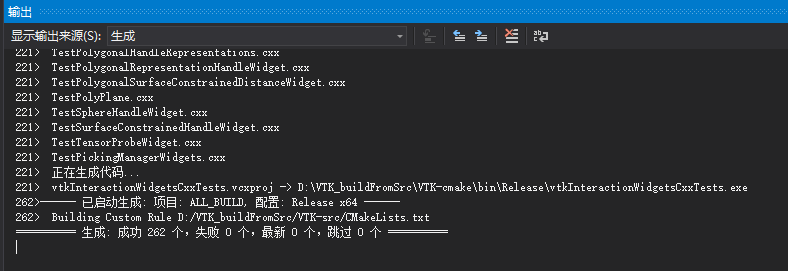
 After this step is completed, all projects are successful (cool!), as shown in the figure below.
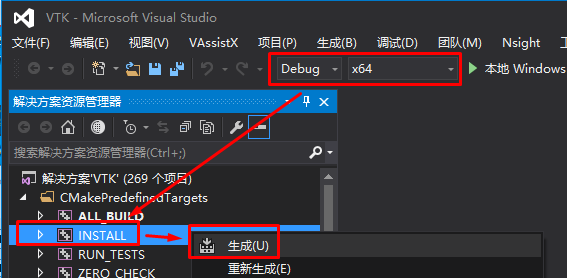
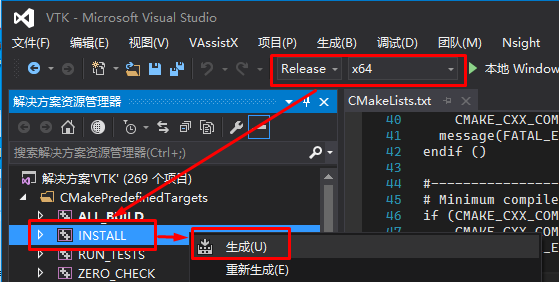
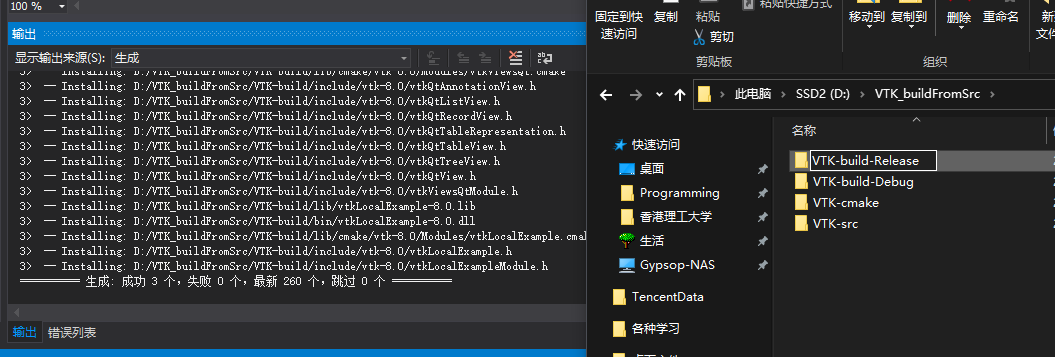
- Step 2: INSTALL. This step is very fast. After running, the Debug version of VTK is placed in the VTK build folder.
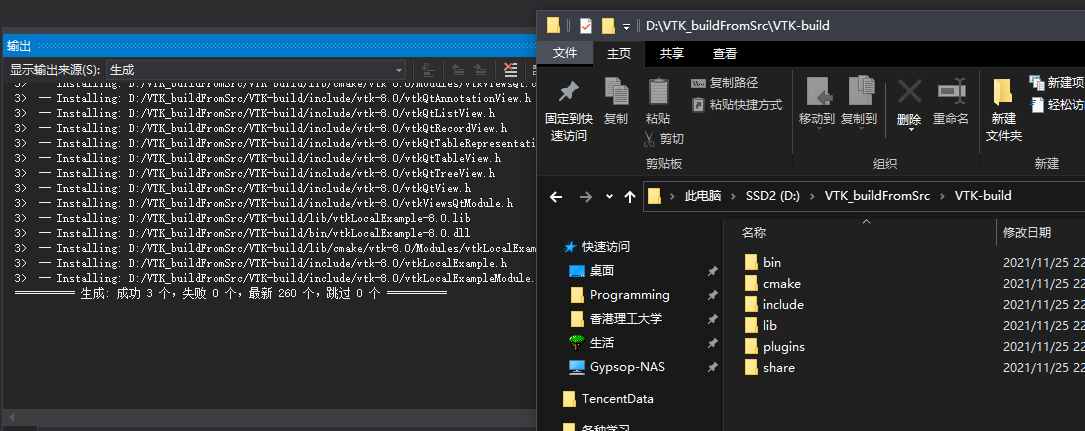
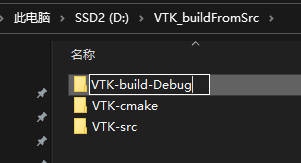
OK, so far, the Debug version of the VTK library has been compiled. Since the Release version library will also be output to the VTK build folder later, we change the current VTK build folder to VTK build Debug (there is no need to re create the VTK build folder, which will be created automatically when the Release version is compiled later).
OK, now do the Release version operation. It's exactly the same as just now, just change the version to Release. Directly above:
- Step 1: ALL_BUILD. As before, it will take some time.
 No accident, all success again.
- Step 2: INSTALL.
 After that, this time we will change the VTK build folder to VTK build release.
Here, the compilation of VTK is completed. I upload my compiled version to here If necessary, you can download it directly, and then proceed to the next steps. However, I still recommend compiling it myself, because you can check whether your machine's environment is configured correctly by compiling it.
2.2. Integrate VTK into PCL and Qt
Now you have a fully compiled VTK package. The next step is to replace the version of PCL with it.
-
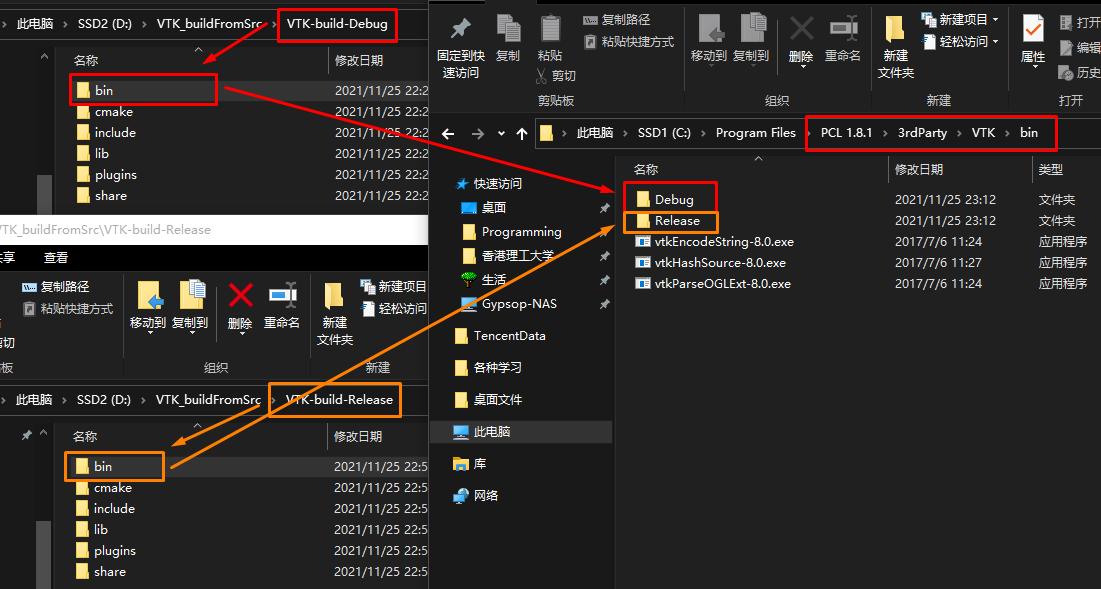
Replace bin
Copy the bin folder in the compiled Debug and Release package to the 3rdParty\VTK\bin path under the PCL installation folder, and rename it to Debug and Release respectively. See the figure below.
-
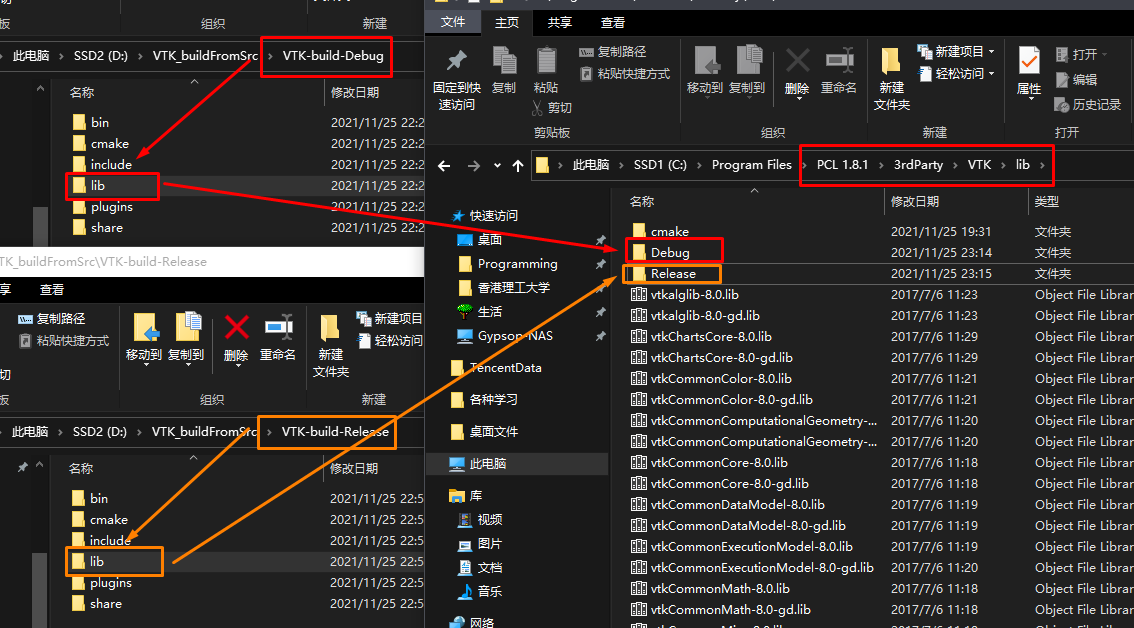
Replace lib
Copy the Lib folder in the compiled Debug and Release package to the 3rdParty\VTK\lib path under the PCL installation folder, and rename it to Debug and Release respectively. See the figure below.
-
Replace include
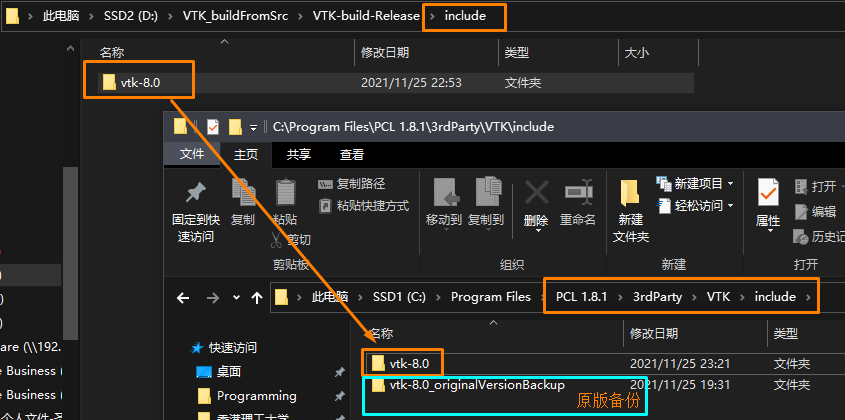
To avoid confusion, delete all files in the path of 3rdParty\VTK\include under the PCL installation folder before doing this step (if you are not sure, you can make a backup and copy back if there is a problem).
Since Debug is the same as the header package of the Release version, you only need to copy any one of them. Copy the vtk-8.0 folder under the include folder in the compiled Debug or Release version package to the 3rdParty\VTK\include path under the PCL installation folder. See the figure below.
-
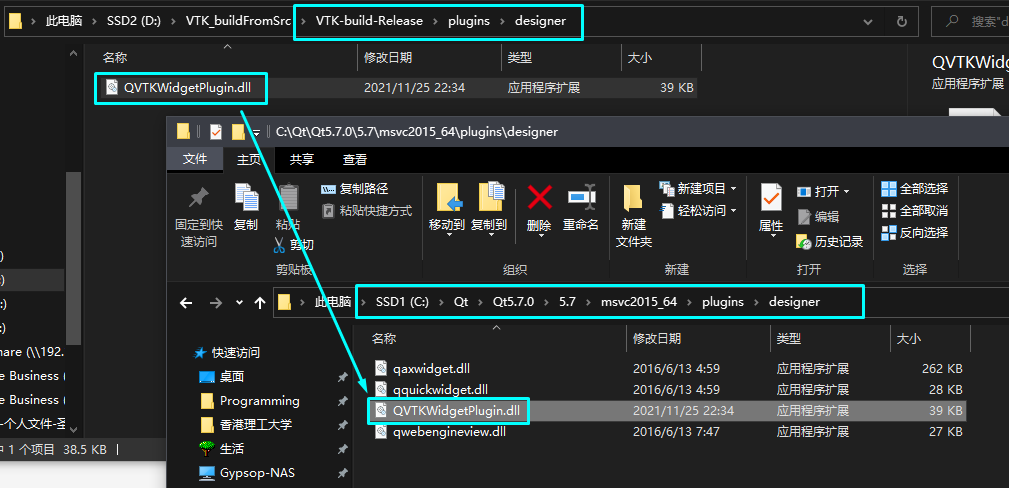
Integrate QVTKWidget to Qt
Copy the QVTKWidgetPlugin.dll file in the \ plugins\designer folder of the compiled Release package to the Qt plug-in folder (see the path below).
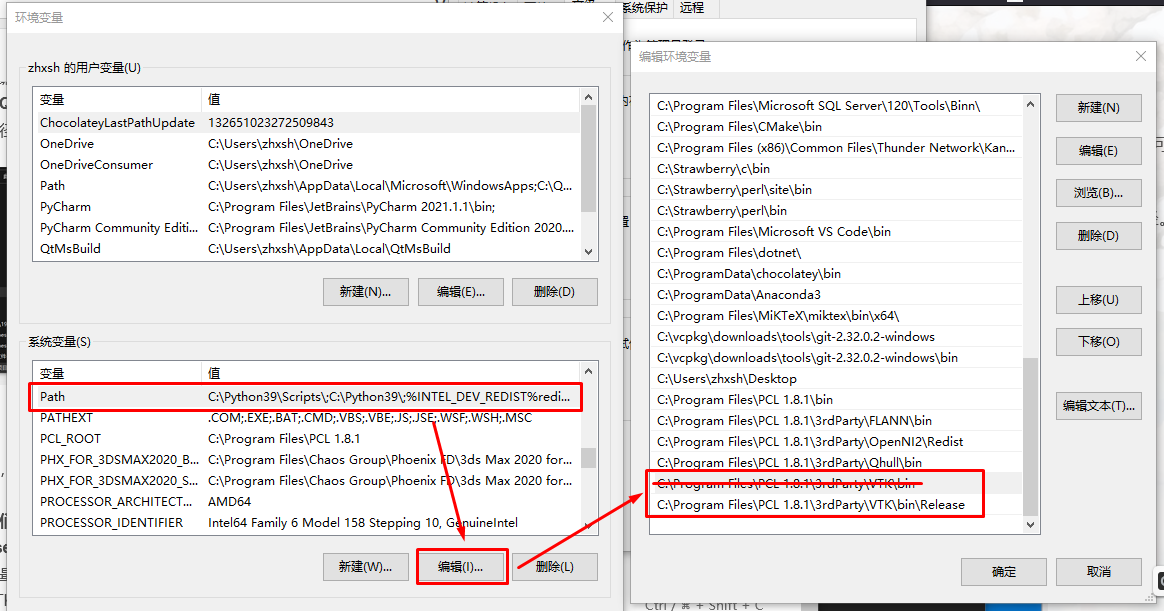
By this point, most of the work has been completed. Next, you need to recheck the environment variables.
Because we have just changed the bin directory structure of VTK (split into subdirectories Debug and Release, and dll files no longer exist directly in the bin directory), the bin directory of VTK needs to be removed from the previously configured path environment variable. Accordingly, we add the VTK bin directory of the Release version here. (as shown below)
 At this point, all configurations have been completed. The next section is a test sample. If you are sure you have configured it, you can end here.
3. VTK official sample debugging - qt_visualizer
Finally, this step uses the Qt sample in the VTK sample package to test whether the configuration is correct.
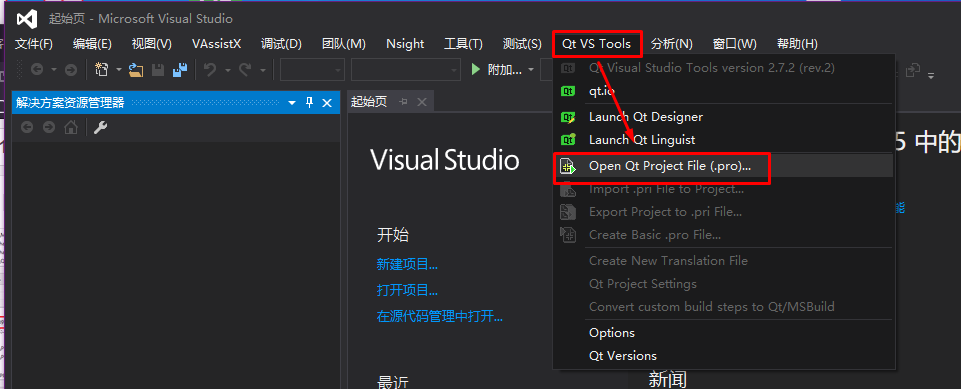
Open a new VS2015. Use the Qt Tools menu to open the Qt project (. pro), as shown in the following figure.
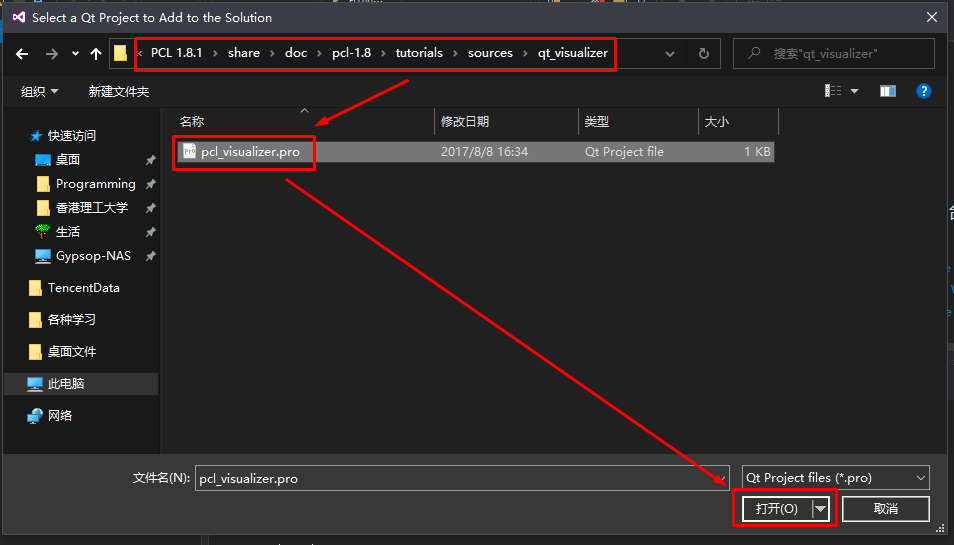
 The default installation path of the project to open is C:\Program Files\PCL 1.8.1\share\doc\pcl-1.8\tutorials\sources\qt_visualizer, as shown below.
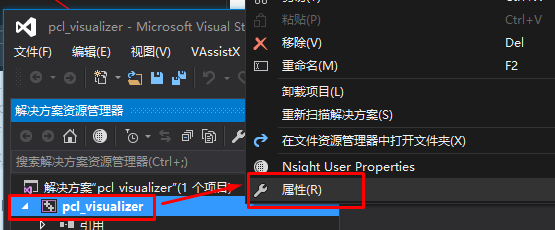
 Next, you need to configure the project properties (which is also the most cumbersome step in writing VS projects using PCL):
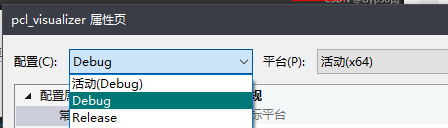
 Debug and Release are two sets of configurations that need to be changed respectively.
- Commissioning / environment
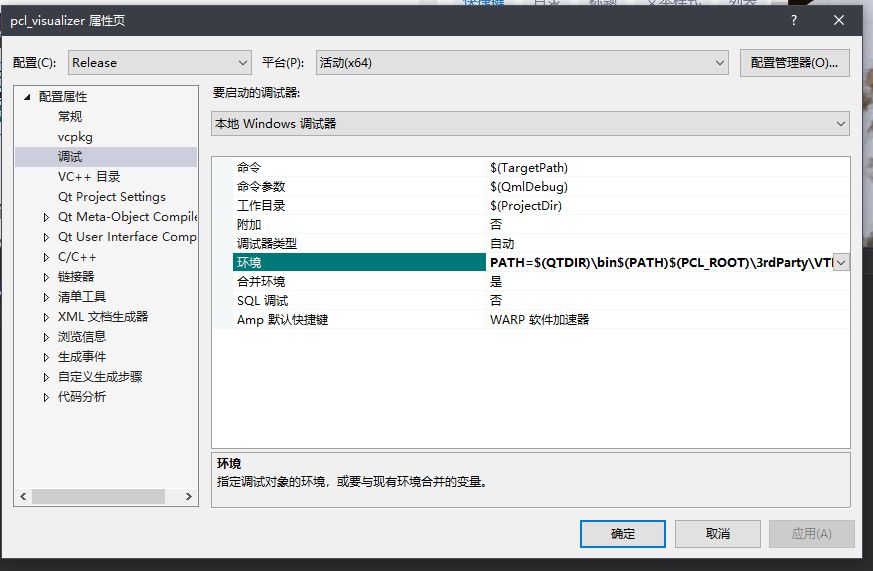
debug
PATH=$(QTDIR)\bin$(PATH)$(PCL_ROOT)\3rdParty\VTK\bin\debug
release
PATH=$(QTDIR)\bin$(PATH)$(PCL_ROOT)\3rdParty\VTK\bin\release
- C/C + + / additional include directory
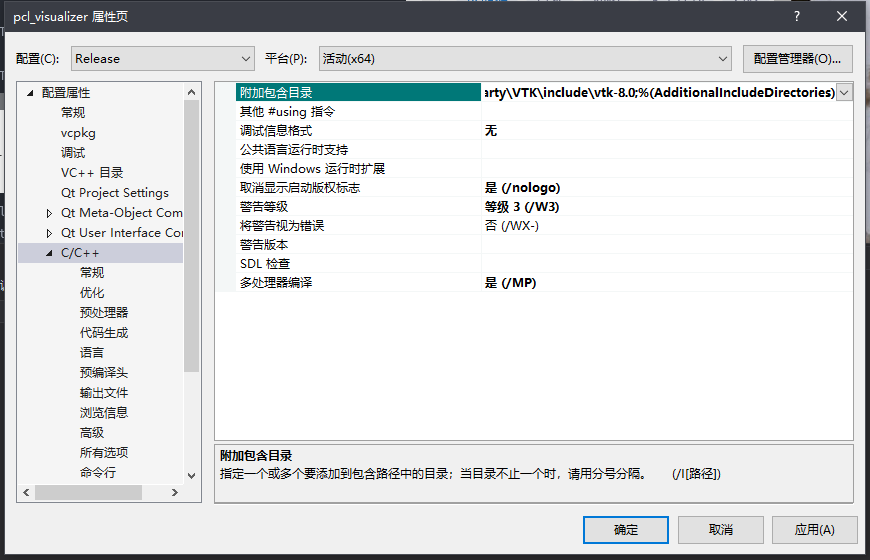
debug|release
.\GeneratedFiles\$(ConfigurationName);.\GeneratedFiles;.;$(QTDIR)\include;$(QTDIR)\include\QtWidgets;$(QTDIR)\include\QtGui;$(QTDIR)\include\QtANGLE;$(QTDIR)\include\QtCore;debug;$(QTDIR)\mkspecs\win32-msvc;$(PCL_ROOT)\include\pcl-1.8;$(PCL_ROOT)\include\pcl-1.8\pcl;$(PCL_ROOT)\3rdParty\Boost\include\boost-1_64;$(PCL_ROOT)\3rdParty\Eigen\eigen3;$(PCL_ROOT)\3rdParty\FLANN\include;$(PCL_ROOT)\3rdParty\OpenNI2\Include\Win32;$(PCL_ROOT)\3rdParty\Qhull\include;$(PCL_ROOT)\3rdParty\VTK\include\vtk-8.0;%(AdditionalIncludeDirectories)
- Linker / general / additional Library Directory

debug
$(QTDIR)\lib;$(PCL_ROOT)\lib;$(PCL_ROOT)\3rdParty\FLANN\lib;$(PCL_ROOT)\3rdParty\Boost\lib;$(PCL_ROOT)\3rdParty\Qhull\lib;$(PCL_ROOT)\3rdParty\VTK\lib\debug;$(PCL_ROOT)\3rdParty\OpenNI2\Lib;%(AdditionalLibraryDirectories)
release
$(QTDIR)\lib;$(PCL_ROOT)\lib;$(PCL_ROOT)\3rdParty\FLANN\lib;$(PCL_ROOT)\3rdParty\Boost\lib;$(PCL_ROOT)\3rdParty\Qhull\lib;$(PCL_ROOT)\3rdParty\VTK\lib\release;$(PCL_ROOT)\3rdParty\OpenNI2\Lib;%(AdditionalLibraryDirectories)
- Linker / input / attach dependencies
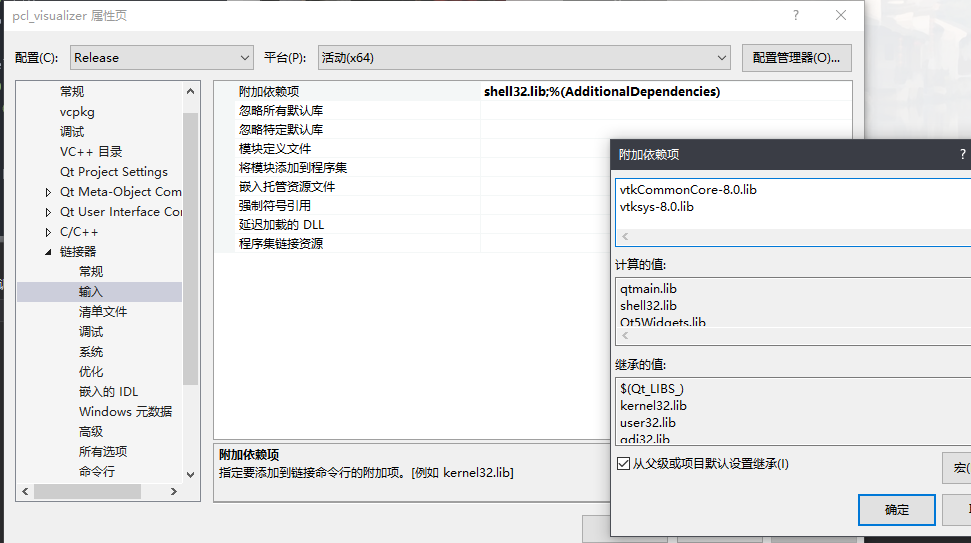
debug
qtmaind.lib
shell32.lib
Qt5Widgetsd.lib
Qt5Guid.lib
Qt5Cored.lib
pcl_common_debug.lib
pcl_features_debug.lib
pcl_filters_debug.lib
pcl_io_ply_debug.lib
pcl_io_debug.lib
pcl_kdtree_debug.lib
pcl_keypoints_debug.lib
pcl_ml_debug.lib
pcl_octree_debug.lib
pcl_outofcore_debug.lib
pcl_people_debug.lib
pcl_recognition_debug.lib
pcl_registration_debug.lib
pcl_sample_consensus_debug.lib
pcl_search_debug.lib
pcl_segmentation_debug.lib
pcl_stereo_debug.lib
pcl_surface_debug.lib
pcl_tracking_debug.lib
pcl_visualization_debug.lib
libboost_atomic-vc140-mt-gd-1_64.lib
libboost_bzip2-vc140-mt-gd-1_64.lib
libboost_chrono-vc140-mt-gd-1_64.lib
libboost_container-vc140-mt-gd-1_64.lib
libboost_context-vc140-mt-gd-1_64.lib
libboost_coroutine-vc140-mt-gd-1_64.lib
libboost_date_time-vc140-mt-gd-1_64.lib
libboost_exception-vc140-mt-gd-1_64.lib
libboost_fiber-vc140-mt-gd-1_64.lib
libboost_filesystem-vc140-mt-gd-1_64.lib
libboost_graph-vc140-mt-gd-1_64.lib
libboost_graph_parallel-vc140-mt-gd-1_64.lib
libboost_iostreams-vc140-mt-gd-1_64.lib
libboost_locale-vc140-mt-gd-1_64.lib
libboost_log-vc140-mt-gd-1_64.lib
libboost_log_setup-vc140-mt-gd-1_64.lib
libboost_math_c99-vc140-mt-gd-1_64.lib
libboost_math_c99f-vc140-mt-gd-1_64.lib
libboost_math_c99l-vc140-mt-gd-1_64.lib
libboost_math_tr1-vc140-mt-gd-1_64.lib
libboost_math_tr1f-vc140-mt-gd-1_64.lib
libboost_math_tr1l-vc140-mt-gd-1_64.lib
libboost_mpi-vc140-mt-gd-1_64.lib
libboost_numpy3-vc140-mt-gd-1_64.lib
libboost_numpy-vc140-mt-gd-1_64.lib
libboost_prg_exec_monitor-vc140-mt-gd-1_64.lib
libboost_program_options-vc140-mt-gd-1_64.lib
libboost_python3-vc140-mt-gd-1_64.lib
libboost_python-vc140-mt-gd-1_64.lib
libboost_random-vc140-mt-gd-1_64.lib
libboost_regex-vc140-mt-gd-1_64.lib
libboost_serialization-vc140-mt-gd-1_64.lib
libboost_signals-vc140-mt-gd-1_64.lib
libboost_system-vc140-mt-gd-1_64.lib
libboost_test_exec_monitor-vc140-mt-gd-1_64.lib
libboost_thread-vc140-mt-gd-1_64.lib
libboost_timer-vc140-mt-gd-1_64.lib
libboost_type_erasure-vc140-mt-gd-1_64.lib
libboost_unit_test_framework-vc140-mt-gd-1_64.lib
libboost_wave-vc140-mt-gd-1_64.lib
libboost_wserialization-vc140-mt-gd-1_64.lib
libboost_zlib-vc140-mt-gd-1_64.lib
flann-gd.lib
flann_cpp-gd.lib
flann_cpp_s-gd.lib
flann_s-gd.lib
qhull_d.lib
qhullcpp_d.lib
qhullstatic_d.lib
qhullstatic_r_d.lib
qhull_p_d.lib
qhull_r_d.lib
vtkGUISupportQt-8.0.lib
vtkRenderingOpenGL2-8.0.lib
vtkglew-8.0.lib
vtkInteractionImage-8.0.lib
vtkInteractionWidgets-8.0.lib
vtkFiltersHybrid-8.0.lib
vtkFiltersModeling-8.0.lib
vtkImagingGeneral-8.0.lib
vtkImagingHybrid-8.0.lib
vtkRenderingAnnotation-8.0.lib
vtkRenderingFreeType-8.0.lib
vtkfreetype-8.0.lib
vtkRenderingVolume-8.0.lib
vtkIOXML-8.0.lib
vtkIOXMLParser-8.0.lib
vtkexpat-8.0.lib
vtkInteractionStyle-8.0.lib
vtkFiltersExtraction-8.0.lib
vtkFiltersStatistics-8.0.lib
vtkImagingFourier-8.0.lib
vtkalglib-8.0.lib
vtkImagingSources-8.0.lib
vtkIOImage-8.0.lib
vtkDICOMParser-8.0.lib
vtkmetaio-8.0.lib
vtkpng-8.0.lib
vtktiff-8.0.lib
vtkjpeg-8.0.lib
vtkImagingColor-8.0.lib
vtkImagingCore-8.0.lib
vtkRenderingCore-8.0.lib
vtkFiltersSources-8.0.lib
vtkFiltersGeneral-8.0.lib
vtkCommonComputationalGeometry-8.0.lib
vtkCommonColor-8.0.lib
vtkFiltersGeometry-8.0.lib
vtkFiltersCore-8.0.lib
vtkIOCore-8.0.lib
vtkCommonExecutionModel-8.0.lib
vtkCommonDataModel-8.0.lib
vtkCommonTransforms-8.0.lib
vtkCommonMisc-8.0.lib
vtkCommonMath-8.0.lib
vtkCommonSystem-8.0.lib
vtkCommonCore-8.0.lib
vtksys-8.0.lib


release
qtmain.lib
shell32.lib
Qt5Widgets.lib
Qt5Gui.lib
Qt5Core.lib
pcl_common_release.lib
pcl_features_release.lib
pcl_filters_release.lib
pcl_io_ply_release.lib
pcl_io_release.lib
pcl_kdtree_release.lib
pcl_keypoints_release.lib
pcl_ml_release.lib
pcl_octree_release.lib
pcl_outofcore_release.lib
pcl_people_release.lib
pcl_recognition_release.lib
pcl_registration_release.lib
pcl_sample_consensus_release.lib
pcl_search_release.lib
pcl_segmentation_release.lib
pcl_stereo_release.lib
pcl_surface_release.lib
pcl_tracking_release.lib
pcl_visualization_release.lib
libboost_atomic-vc140-mt-1_64.lib
libboost_bzip2-vc140-mt-1_64.lib
libboost_chrono-vc140-mt-1_64.lib
libboost_container-vc140-mt-1_64.lib
libboost_context-vc140-mt-1_64.lib
libboost_coroutine-vc140-mt-1_64.lib
libboost_date_time-vc140-mt-1_64.lib
libboost_exception-vc140-mt-1_64.lib
libboost_fiber-vc140-mt-1_64.lib
libboost_filesystem-vc140-mt-1_64.lib
libboost_graph-vc140-mt-1_64.lib
libboost_graph_parallel-vc140-mt-1_64.lib
libboost_iostreams-vc140-mt-1_64.lib
libboost_locale-vc140-mt-1_64.lib
libboost_log-vc140-mt-1_64.lib
libboost_log_setup-vc140-mt-1_64.lib
libboost_math_c99-vc140-mt-1_64.lib
libboost_math_c99f-vc140-mt-1_64.lib
libboost_math_c99l-vc140-mt-1_64.lib
libboost_math_tr1-vc140-mt-1_64.lib
libboost_math_tr1f-vc140-mt-1_64.lib
libboost_math_tr1l-vc140-mt-1_64.lib
libboost_mpi-vc140-mt-1_64.lib
libboost_numpy3-vc140-mt-1_64.lib
libboost_numpy-vc140-mt-1_64.lib
libboost_prg_exec_monitor-vc140-mt-1_64.lib
libboost_program_options-vc140-mt-1_64.lib
libboost_python3-vc140-mt-1_64.lib
libboost_python-vc140-mt-1_64.lib
libboost_random-vc140-mt-1_64.lib
libboost_regex-vc140-mt-1_64.lib
libboost_serialization-vc140-mt-1_64.lib
libboost_signals-vc140-mt-1_64.lib
libboost_system-vc140-mt-1_64.lib
libboost_test_exec_monitor-vc140-mt-1_64.lib
libboost_thread-vc140-mt-1_64.lib
libboost_timer-vc140-mt-1_64.lib
libboost_type_erasure-vc140-mt-1_64.lib
libboost_unit_test_framework-vc140-mt-1_64.lib
libboost_wave-vc140-mt-1_64.lib
libboost_wserialization-vc140-mt-1_64.lib
libboost_zlib-vc140-mt-1_64.lib
flann.lib
flann_cpp.lib
flann_cpp_s.lib
flann_s.lib
qhull_d.lib
qhullcpp_d.lib
qhullstatic_d.lib
qhullstatic_r_d.lib
qhull_p_d.lib
qhull_r_d.lib
vtkGUISupportQt-8.0.lib
vtkRenderingOpenGL2-8.0.lib
vtkglew-8.0.lib
vtkInteractionImage-8.0.lib
vtkInteractionWidgets-8.0.lib
vtkFiltersHybrid-8.0.lib
vtkFiltersModeling-8.0.lib
vtkImagingGeneral-8.0.lib
vtkImagingHybrid-8.0.lib
vtkRenderingAnnotation-8.0.lib
vtkRenderingFreeType-8.0.lib
vtkfreetype-8.0.lib
vtkRenderingVolume-8.0.lib
vtkIOXML-8.0.lib
vtkIOXMLParser-8.0.lib
vtkexpat-8.0.lib
vtkInteractionStyle-8.0.lib
vtkFiltersExtraction-8.0.lib
vtkFiltersStatistics-8.0.lib
vtkImagingFourier-8.0.lib
vtkalglib-8.0.lib
vtkImagingSources-8.0.lib
vtkIOImage-8.0.lib
vtkDICOMParser-8.0.lib
vtkmetaio-8.0.lib
vtkpng-8.0.lib
vtktiff-8.0.lib
vtkjpeg-8.0.lib
vtkImagingColor-8.0.lib
vtkImagingCore-8.0.lib
vtkRenderingCore-8.0.lib
vtkFiltersSources-8.0.lib
vtkFiltersGeneral-8.0.lib
vtkCommonComputationalGeometry-8.0.lib
vtkCommonColor-8.0.lib
vtkFiltersGeometry-8.0.lib
vtkFiltersCore-8.0.lib
vtkIOCore-8.0.lib
vtkCommonExecutionModel-8.0.lib
vtkCommonDataModel-8.0.lib
vtkCommonTransforms-8.0.lib
vtkCommonMisc-8.0.lib
vtkCommonMath-8.0.lib
vtkCommonSystem-8.0.lib
vtkCommonCore-8.0.lib
vtksys-8.0.lib
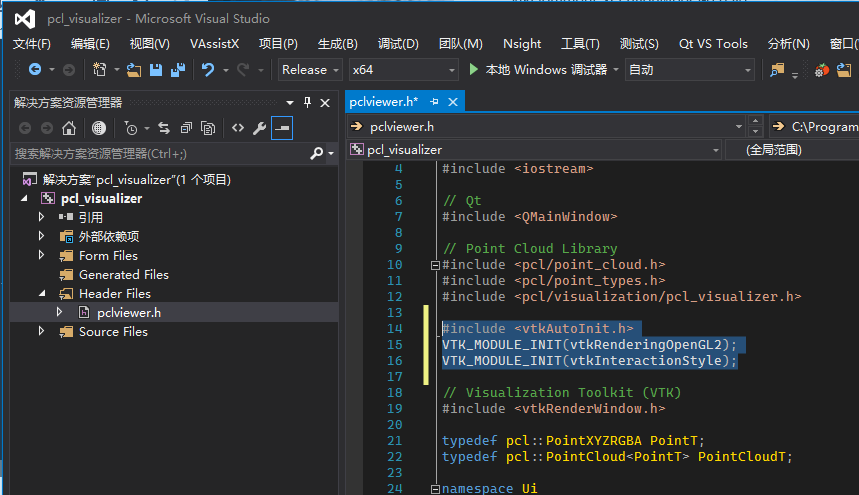
- Finally, add the following code to pclviewer.h
#include <vtkAutoInit.h>
VTK_MODULE_INIT(vtkRenderingOpenGL2);
VTK_MODULE_INIT(vtkInteractionStyle);
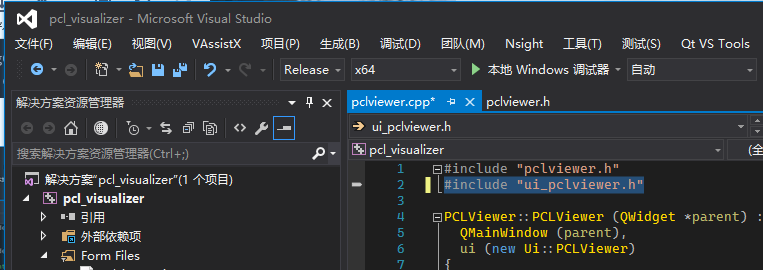
- And, modify the reference path of the second line of pclviewer.h to
#include "ui_pclviewer.h"
Then click Run to see the running effect shown in the figure below, even if the configuration is successful.