Android Camera Architecture
Summary of Interprocess Communication Classes for Android Camera
Photo of Android Camera Module Resolution
Video Recording with Android Camera Module Resolution
CameraDeviceCallbacks Callback Module of Android Camera Principles
openCamera Module of Android Camera Principles (1)
openCamera Module of Android Camera Principles (2)
createCaptureSession Module of Android Camera Principles
setRepeatingRequest and capture Module of Android Camera Principles
Compilation of Android Camera Principles
Start camera provider for Android Camera principles
How does cameraserver of Android Camera Principle relate to cameraprovider?
"Android Camera Principles Camservice and camera provider session session and capture request rotation"
Summary of CamHAL Bottom Data Structure and Classes of Android Camera Principles
Camservice Class and Interface Relationship of Android Camera Principles
Previously, we explained the relationship between camera2 API and the function of taking pictures using camera2 api. In this paper, we will explain how to use camera2 to realize the function of recording video.On the basis of explaining the function implementation, we will discuss some more.
The previous functions of taking photos and recording videos are similar. Before taking photos, there will be camera preview function. Before recording videos, there will also be this function. The only difference is that the captured data is different. Photos capture image s, videos capture videos, and data organization formats are different.
The Android L version introduced Camera2 api before Photo of Android Camera Module Resolution The call relationships between the main camera2 api classes have been described in detail.Video recording mainly calls CameraDevice and AmeraCaptureSession to record video, uses a custom TextureView to render the output data, and preview interface uses TextureView to host.
- 1. Create a custom TextureView in your layout. The previous section explains why you use TextureView to render the camera preview interface.
- 2. Implement the TextureView.SurfaceTextureListener method to listen on the current TextureView to listen on the Camera preview interface.
- 3. Implement CameraDevice.StateCallback to monitor the status of CameraDevice. You can monitor the status of CameraDevice such as opening, connecting, disconnecting, in which you can operate recording, stop recording, and so on.
- 4. Start camera preview and set the video format accepted by MediaRecorder.
- 5. Create a CaptureRequest.Builder object by calling createCaptureRequest(CameraDevice.TEMPLATE_RECORD) with the CameraDevice instance.
- 6. Implement the CameraCaptureSession.StateCallback method and call createCaptureSession(surfaces, new CameraCaptureSession.StateCallback(){} using the CameraDevice instance.
- 7. The instance of MediaRecorder calls the start() and stop() methods to start and stop video recording.
- 8. Do a good job of control methods in onResume() and onPause().
1. Launch Settings Preview Interface
1.1 Set up TextureView display interface
    private TextureView.SurfaceTextureListener mSurfaceTextureListener
            = new TextureView.SurfaceTextureListener() {

        @Override
        public void onSurfaceTextureAvailable(SurfaceTexture surfaceTexture,
                                              int width, int height) {
            openCamera(width, height);
        }

        @Override
        public void onSurfaceTextureSizeChanged(SurfaceTexture surfaceTexture,
                                                int width, int height) {
            configureTransform(width, height);
        }

        @Override
        public boolean onSurfaceTextureDestroyed(SurfaceTexture surfaceTexture) {
            return true;
        }

        @Override
        public void onSurfaceTextureUpdated(SurfaceTexture surfaceTexture) {
        }

    };
        if (mTextureView.isAvailable()) {
            openCamera(mTextureView.getWidth(), mTextureView.getHeight());
        } else {
            mTextureView.setSurfaceTextureListener(mSurfaceTextureListener);
        }
Before setting up SurfaceTextureListener, there is a judgment that mTextureView.isAvailable() determines whether the mSurface set by dCurrent TextureView exists. This mSurface is SurfaceTexture, which is the medium used to capture picture frames from the picture stream.
    public boolean isAvailable() {
        return mSurface != null;
    }
How did this mSurface come about?
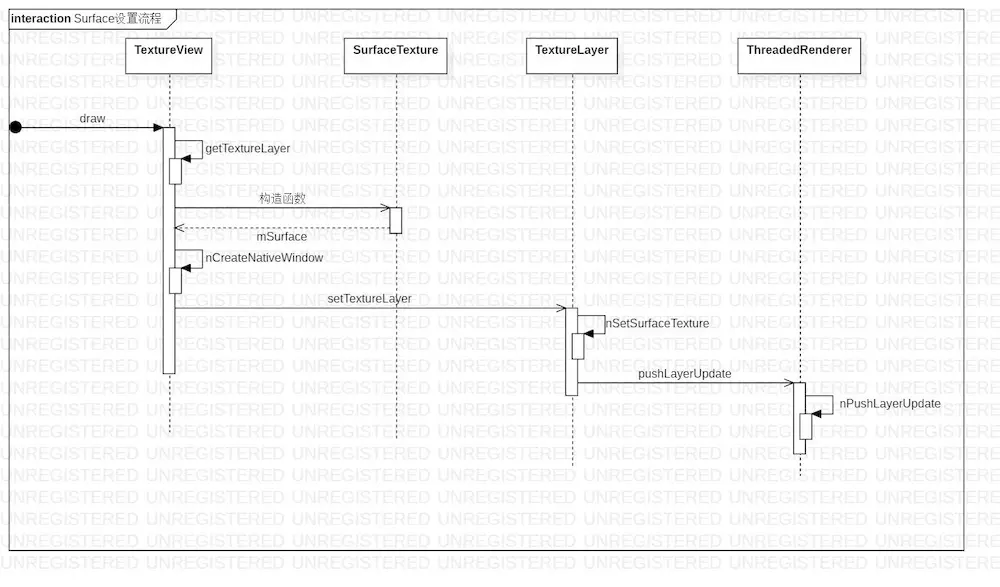
Surface Setup Process.jpg
While the TextureView is drawing, get the current TextureDrawing Layer.
    public final void draw(Canvas canvas) {
        // NOTE: Maintain this carefully (see View#draw)
        mPrivateFlags = (mPrivateFlags & ~PFLAG_DIRTY_MASK) | PFLAG_DRAWN;

        /* Simplify drawing to guarantee the layer is the only thing drawn - so e.g. no background,
        scrolling, or fading edges. This guarantees all drawing is in the layer, so drawing
        properties (alpha, layer paint) affect all of the content of a TextureView. */

        if (canvas.isHardwareAccelerated()) {
            DisplayListCanvas displayListCanvas = (DisplayListCanvas) canvas;

            TextureLayer layer = getTextureLayer();
            if (layer != null) {
                applyUpdate();
                applyTransformMatrix();

                mLayer.setLayerPaint(mLayerPaint); // ensure layer paint is up to date
                displayListCanvas.drawTextureLayer(layer);
            }
        }
    }
Critical judgment: canvas.isHardwareAccelerated() can be further rendered using TextureView with hardware acceleration turned on.Then determine if there is currently a SurfaceTexture. If there is no normalization, construct a new SurfaceTexture object, and the current TextureView has a SurfaceTexture object.
1.2 Execute openCamera
openCamera Module of Android Camera Principles (1)
openCamera Module of Android Camera Principles (2)
Two articles have described the underlying logic of openCamera.
manager.openCamera(cameraId, mStateCallback, null);
    private CameraDevice.StateCallback mStateCallback = new CameraDevice.StateCallback() {

        @Override
        public void onOpened(@NonNull CameraDevice cameraDevice) {
            mCameraDevice = cameraDevice;
            startPreview();
            mCameraOpenCloseLock.release();
            if (null != mTextureView) {
                configureTransform(mTextureView.getWidth(), mTextureView.getHeight());
            }
        }

        @Override
        public void onDisconnected(@NonNull CameraDevice cameraDevice) {
            mCameraOpenCloseLock.release();
            cameraDevice.close();
            mCameraDevice = null;
        }

        @Override
        public void onError(@NonNull CameraDevice cameraDevice, int error) {
            mCameraOpenCloseLock.release();
            cameraDevice.close();
            mCameraDevice = null;
            Activity activity = getActivity();
            if (null != activity) {
                activity.finish();
            }
        }

    };
After we get the onOpened callback for the current camera device, we really start previewing.
1.3 Settings Preview
            SurfaceTexture texture = mTextureView.getSurfaceTexture();
            assert texture != null;
            texture.setDefaultBufferSize(mPreviewSize.getWidth(), mPreviewSize.getHeight());
            mPreviewBuilder = mCameraDevice.createCaptureRequest(CameraDevice.TEMPLATE_PREVIEW);

            Surface previewSurface = new Surface(texture);
            mPreviewBuilder.addTarget(previewSurface);

            mCameraDevice.createCaptureSession(Collections.singletonList(previewSurface),
                    new CameraCaptureSession.StateCallback() {

                        @Override
                        public void onConfigured(@NonNull CameraCaptureSession session) {
                            mPreviewSession = session;
                            updatePreview();
                        }

                        @Override
                        public void onConfigureFailed(@NonNull CameraCaptureSession session) {
                            Activity activity = getActivity();
                            if (null != activity) {
                                Toast.makeText(activity, "Failed", Toast.LENGTH_SHORT).show();
                            }
                        }

                    }, mBackgroundHandler);
Surface encapsulated SurfaceTexture is the primary medium for CameraDevice preview rendering, where image stream rendering receipts are processed.
mPreviewBuilder = mCameraDevice.createCaptureRequest(CameraDevice.TEMPLATE_PREVIEW);
Here is the setup preview interface, which is a CaptureRequest.Builder object. CaptureRequest is an important initiative in the camera2 api. You can set up the camera request request request cache, which will explain the underlying principles here later.
    public void createCaptureSession(List<Surface> outputs,
            CameraCaptureSession.StateCallback callback, Handler handler)
            throws CameraAccessException {
        List<OutputConfiguration> outConfigurations = new ArrayList<>(outputs.size());
        for (Surface surface : outputs) {
            outConfigurations.add(new OutputConfiguration(surface));
        }
        createCaptureSessionInternal(null, outConfigurations, callback,
                checkAndWrapHandler(handler), /*operatingMode*/ICameraDeviceUser.NORMAL_MODE,
                /*sessionParams*/ null);
    }
Capturing the current surface stream allows you to render the image before the current camera device.At this point, the camera preview process has completed, and then the video recording process begins.
2. Recording Videos
2.1 Setting the MediaRecorder property
    private void setUpMediaRecorder() throws IOException {
        final Activity activity = getActivity();
        if (null == activity) {
            return;
        }
        mMediaRecorder.setAudioSource(MediaRecorder.AudioSource.MIC);
        mMediaRecorder.setVideoSource(MediaRecorder.VideoSource.SURFACE);
        mMediaRecorder.setOutputFormat(MediaRecorder.OutputFormat.MPEG_4);
        if (mNextVideoAbsolutePath == null || mNextVideoAbsolutePath.isEmpty()) {
            mNextVideoAbsolutePath = getVideoFilePath(getActivity());
        }
        mMediaRecorder.setOutputFile(mNextVideoAbsolutePath);
        mMediaRecorder.setVideoEncodingBitRate(10000000);
        mMediaRecorder.setVideoFrameRate(30);
        mMediaRecorder.setVideoSize(mVideoSize.getWidth(), mVideoSize.getHeight());
        mMediaRecorder.setVideoEncoder(MediaRecorder.VideoEncoder.H264);
        mMediaRecorder.setAudioEncoder(MediaRecorder.AudioEncoder.AAC);
        int rotation = activity.getWindowManager().getDefaultDisplay().getRotation();
        switch (mSensorOrientation) {
            case SENSOR_ORIENTATION_DEFAULT_DEGREES:
                mMediaRecorder.setOrientationHint(DEFAULT_ORIENTATIONS.get(rotation));
                break;
            case SENSOR_ORIENTATION_INVERSE_DEGREES:
                mMediaRecorder.setOrientationHint(INVERSE_ORIENTATIONS.get(rotation));
                break;
        }
        mMediaRecorder.prepare();
    }
- Setting up the audio and video sources means that the sound is taken from the microphone, and the video is taken from the Surface interface, or from the screen.
- Set output file format and output file.
- Set the video encoding code rate and frame rate to show whether the current video is jammed or not.
- Set the video width and height.
- Set up audio and video encoding, audio using AAC encoding, video using H264 encoding.
MediaRecorder.prepare();
Execute MediaRecorder.prepare(); start MediaRecorder recording.
The main work in the prepare() function is to set the output file File, prepare to start IO, set the underlying audio and video encoding cache, and start the encoding work.The underlying parsing is done later.
    public void prepare() throws IllegalStateException, IOException
    {
        if (mPath != null) {
            RandomAccessFile file = new RandomAccessFile(mPath, "rw");
            try {
                _setOutputFile(file.getFD());
            } finally {
                file.close();
            }
        } else if (mFd != null) {
            _setOutputFile(mFd);
        } else if (mFile != null) {
            RandomAccessFile file = new RandomAccessFile(mFile, "rw");
            try {
                _setOutputFile(file.getFD());
            } finally {
                file.close();
            }
        } else {
            throw new IOException("No valid output file");
        }

        _prepare();
    }
2.2 Start recording
                    getActivity().runOnUiThread(new Runnable() {
                        @Override
                        public void run() {
                            // UI
                            mButtonVideo.setText(R.string.stop);
                            mIsRecordingVideo = true;

                            // Start recording
                            mMediaRecorder.start();
                        }
                    });
Recording needs to be done in the main thread, otherwise the UI interface information is not available.
MediaRecorder involves a number of native methods, which will not be expanded in this article, but will return to what these native methods do in subsequent detailed analysis.
mMediaRecorder.start(); Be sure to use MediaRecorder.prepare(); then, because prepare() does not set the output file and prepare the audio and video encoding, subsequent start() will not continue to work.
Project Source: https://github.com/googlesamples/android-Camera2Video
Take a walk with small gifts and follow me in brief books