1. What is CompositionBrush
CompositionBrush is used to draw when manipulating visualization layers SpriteVisual Brush for area.
Make UWP application optional XAML Brush or CompositionBrush Draw UIElement.Many times XAML brushes and synthetic brushes can achieve the same effect, in official documents Use XAML brush vs.CompositionBrush A detailed comparison is provided in this section.
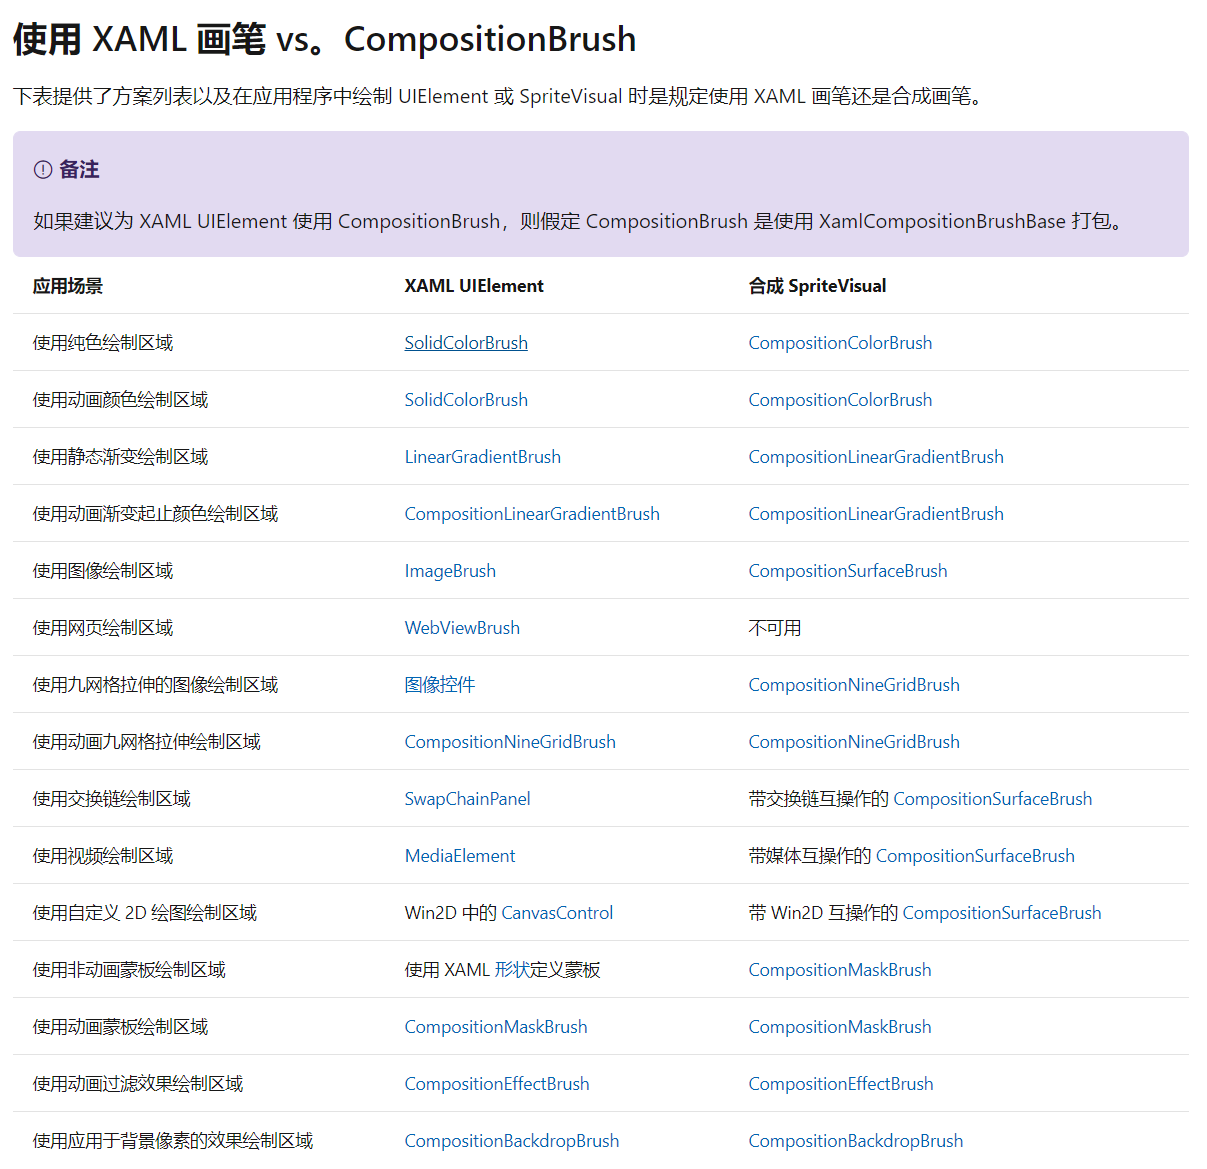
CompositionBrush has better performance and can make more complex animations.There is a limit to XAML Brush's ability. I learned one thing from my short UWP career. The more XAML Brush plays with animations, the more likely they are to fail because of unexpected events...Unless you exceed XAML Brush.So I don't do XAML Brush animations.
2. Use CompositionLinearGradientBrush
CompositionLinearGradientBrush Is a linear gradient brush, which is one of the most basic brushes and can be similar LinearGradientBrush Effect.The basic usage steps are as follows:
- Create CompositionLinearGradientBrush through Compositor;
- Create and configure CompositionColorGradientStop through Compositor and add it to ColStops in CompositionLinearGradientBrush;
- Create SpriteVisual and set its Brush to CompositionLinearGradientBrush;
- Use ElementCompositionPreview.SetElementChildVisual Set SpriteVisual into the visualization layer of a UIElement.
The code is as follows:
<Rectangle x:Name="Gradient"/>
var compositor = Window.Current.Compositor;

//Create CompositionLinearGradientBrush.
var gradientBrush = compositor.CreateLinearGradientBrush();
gradientBrush.StartPoint = Vector2.Zero;
gradientBrush.EndPoint = new Vector2(1.0f);

var blueGradientStop = compositor.CreateColorGradientStop();
blueGradientStop.Offset = 0f;
blueGradientStop.Color = Color.FromArgb(255, 43, 210, 255);
var redGradientStop = compositor.CreateColorGradientStop();
redGradientStop.Offset = 1f;
redGradientStop.Color = Color.FromArgb(255, 255, 43, 136);
gradientBrush.ColorStops.Add(blueGradientStop);
gradientBrush.ColorStops.Add(redGradientStop);

//Create SpriteVisual and set Brush
var backgroundVisual = compositor.CreateSpriteVisual();
backgroundVisual.Brush = gradientBrush;

//Set the custom SpriteVisual as the last child element of the element's visual tree.
ElementCompositionPreview.SetElementChildVisual(Gradient, backgroundVisual);

Gradient.SizeChanged += (s, e) =>
{
    if (e.NewSize == e.PreviousSize)
        return;

    //Set the size of gradientBrush
    backgroundVisual.Size = e.NewSize.ToVector2();
    gradientBrush.CenterPoint = backgroundVisual.Size / 2;
};
The results are as follows:

Write so much code that the end result is actually the same as the XAML below.
<Rectangle x:Name="Gradient">
    <Rectangle.Fill>
        <LinearGradientBrush EndPoint="1,1" StartPoint="0,0">
            <GradientStop Color="#FFFF2B88" Offset="1"/>
            <GradientStop Color="#FF2BD2FF" Offset="0"/>
        </LinearGradientBrush>
    </Rectangle.Fill>
</Rectangle>
So far, CompositionBrush seems to have no advantage.
3. Use synthetic animations
One of the interesting things about CompositionBrush is its flexible synthetic animation.
To use a synthetic animation, there are three simple steps:
- Create Composition Animation;
- Configure CompositionAnimation;
- Called on CompositionObject and its properties to achieve animation effects StartAnimation;
The following code animates the Offset property of CompositionColorGradientStop:
//Create Animation
var relaxGradientStopOffsetAnimation = _compositor.CreateScalarKeyFrameAnimation();
//Configure Animation
relaxGradientStopOffsetAnimation.Duration = TimeSpan.FromSeconds(1);
relaxGradientStopOffsetAnimation.InsertKeyFrame(1.0f, ViewModel.IsInPomodoro ?1.0f : 0.75f);
//Run Animation
_relaxGradientStop.StartAnimation(nameof(_relaxGradientStop.Offset), relaxGradientStopOffsetAnimation);
Complete code in Here The specific results are as follows:
4. Conclusion
Actually, the above animations can also be done with XAML brushes and Storyboard, but they are old wives and have no passion to play with anymore, so I want to play some new tricks.I've been working on Tomato clock apps lately, and any new ideas will get stuck. You can install them at the following address:
5. Reference
Composite Brush - Windows UWP applications Microsoft Docs
Composite Animation - Windows UWP applications Microsoft Docs
CompositionLinearGradientBrush Class (Windows.UI.Composition) - Windows UWP applications _ Microsoft Docs
SpriteVisual Class (Windows.UI.Composition) - Windows UWP applications _ Microsoft Docs
ElementCompositionPreview.SetElementChildVisual(UIElement, Visual) Method (Windows.UI.Xaml.Hosting) - Windows UWP applications _ Microsoft Docs