1. Preface
What is Failure Art?The LOGO of the jitter we are familiar with is just one form of failure art.It has a magical feeling, looks like it flickers, vibrates and is eye-catching.Fault Art It simulates the sensation that a faulty picture signal causes an imaging error.This failure is due to the inability of the cyan and red color blocks to coincide.From the era of film to today's digital age, this failure has been a familiar phenomenon to the audience.
I saw it last month CSS Failure Art This article, recently trying to change your mood, began copying its animation (by the way, hanging the UWP section of the blog park).CSS mix-blend-mode l seems to work well, this time using Win2D in UWP BlendEffect Imitate its play.
2. What is BlendEffect
Under the Microsoft.Graphics.Canvas.Effects namespace BlendEffect Used to combine two pictures (Background and Foreground as input sources), which contain multiple modes, as shown in the following image:
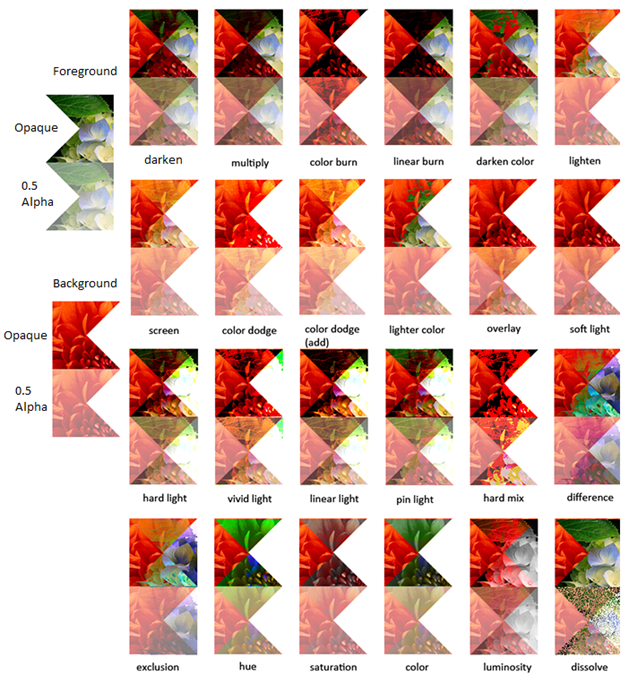
To use BlendEffect, you need to set the Mode for it and set Foreground and Background to CompositionEffectSourceParameter:
var blendEffect = new BlendEffect()
{
    Mode = BlendEffectMode.Screen,
    Foreground = new CompositionEffectSourceParameter("Main"),
    Background = new CompositionEffectSourceParameter("Tint"),
};
Then use this BlendEffect to create a Brush, and set its Foreground and Background with SetSourceParameter for the two Composition Brushes that need to be mixed:
var effectFactory = compositor.CreateEffectFactory(blendEffect);
var blendEffectBrush = effectFactory.CreateBrush();
blendEffectBrush.SetSourceParameter("Main", foregroundBrush);
blendEffectBrush.SetSourceParameter("Tint", backgroundBrush);
This mixes Foreground and Background according to the pattern specified by Mode l.
3. Text blending in various modes
The Composition API does not provide the ability to write text, but Win2D does. I am Using Win2D to Realize Pierced Text There are instructions on how to use Win2D to create a CompositionSurfaceBrush that contains text, this time re-encapsulating it, and then using the code below to show the mixing effect in various modes.
private void AddTextToRoot(BlendEffectMode blendEffectMode)
{
    var redBrushWrapper = CreateTextToBrushWrapper(blendEffectMode.ToString(), Colors.Red);
    var blueBrushWrapper = CreateTextToBrushWrapper(blendEffectMode.ToString(), Colors.Cyan);
    blueBrushWrapper.Brush.Offset = new Vector2(-4f, 0);

    var textVisual = Compositor.CreateSpriteVisual();
    textVisual.Brush = CreateBrush(blueBrushWrapper.Brush, redBrushWrapper.Brush, blendEffectMode);
    textVisual.Size = new Vector2(400, 70);
    var background = new Rectangle { Height = 70, Width = 400 };

    ElementCompositionPreview.SetElementChildVisual(background, textVisual);
    Root.Children.Add(background);
}

private CompositionBrush CreateBrush(CompositionBrush foreground, CompositionBrush background, BlendEffectMode blendEffectMode)
{
    var compositor = Window.Current.Compositor;
    var effect = new BlendEffect()
    {
        Mode = blendEffectMode,
        Foreground = new CompositionEffectSourceParameter("Main"),
        Background = new CompositionEffectSourceParameter("Tint"),
    };
    var effectFactory = compositor.CreateEffectFactory(effect);
    var compositionBrush = effectFactory.CreateBrush();
    compositionBrush.SetSourceParameter("Main", foreground);
    compositionBrush.SetSourceParameter("Tint", background);

    return compositionBrush;
}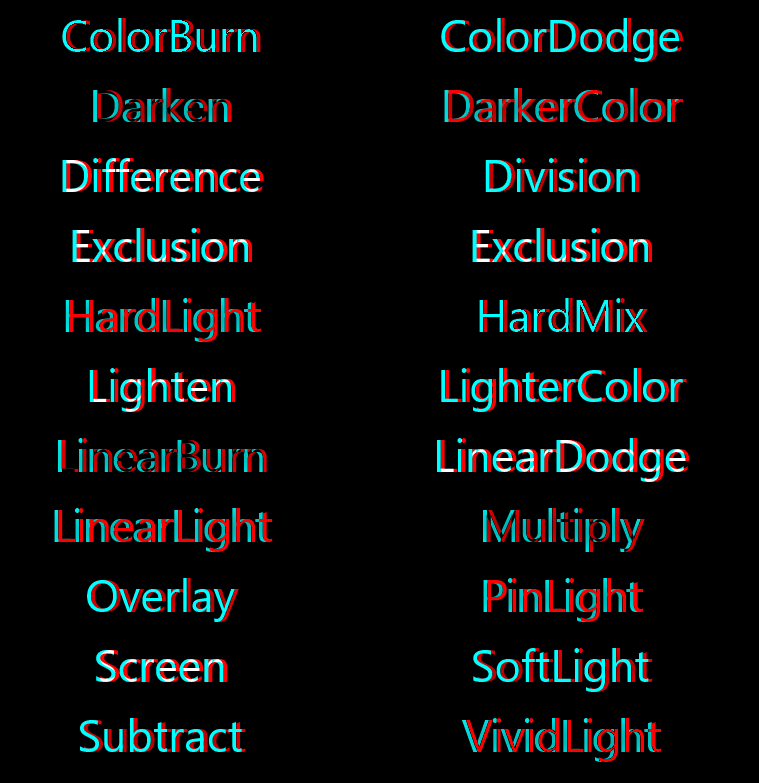
The above image shows a blend of red and blue text under various BlendEffectMode s.
4. Glitch Art for Pictures
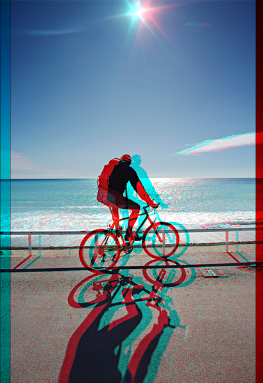
Now that you understand the use and function of BlendEffect, you can try some fault art.Take this picture to try:

private (CompositionBrush compositionBrush, CompositionSurfaceBrush compositionSurfaceBrush) CreateBrush(string imageName, Color color)
{
    var compositor = Window.Current.Compositor;
    var loadedSurface = LoadedImageSurface.StartLoadFromUri(new Uri("ms-appx:///Assets/Images/" + imageName));
    var compositionSurfaceBrush = compositor.CreateSurfaceBrush();
    compositionSurfaceBrush.Surface = loadedSurface;
    var compositionBrush = CreateBrush(compositionSurfaceBrush, compositor.CreateColorBrush(color), BlendEffectMode.Lighten);
    return (compositionBrush, compositionSurfaceBrush);
}
Use the code above to mix this picture with CompositionColorBrush created from Colors.Red (255, 0, 0) and Colors.Cyan (0, 255, 255) using BlendEffectMode.Lighten to get the following results:

var compositor = Window.Current.Compositor;
var (foreground, foregroundBrush) = CreateBrush(imageName, Colors.Cyan);
var (background, backgroundBrush) = CreateBrush(imageName, Colors.Red);
foregroundBrush.Offset = new Vector2(10, 0);

var brush = CreateBrush(foreground, background, BlendEffectMode.Darken);
BlendEffectMode.Darken mixes two pictures and offsets one of them by 10 pixels to achieve the following effect, so that the breakdown art of the picture is completed:
5. Dynamic Class Dither Style Glitch Effect
Continue copying the animation, even with the title.Mix the two-text CompositionSurfaceBrush with BlendEffectMode.Lighten and animate their Offset:
CreateBrush(backgroundWrapper.Brush, foregroundWrapper.Brush, BlendEffectMode.Lighten);

StartOffsetAnimation(backgroundWrapper.Brush, TimeSpan.FromSeconds(0.95), TimeSpan.Zero);
StartOffsetAnimation(foregroundWrapper.Brush, TimeSpan.FromSeconds(1.1), TimeSpan.FromSeconds(0.2));

private void StartOffsetAnimation(CompositionSurfaceBrush brush, TimeSpan duration, TimeSpan delay)
{
    var offsetAnimation = Compositor.CreateVector2KeyFrameAnimation();
    offsetAnimation.Duration = duration;
    offsetAnimation.DelayTime = delay;
    offsetAnimation.IterationBehavior = AnimationIterationBehavior.Forever;

    void addKey(float key, float top, float left)
    {
        offsetAnimation.InsertKeyFrame(key, new Vector2(top * 2.5f, left * 2.5f));
    };
    addKey(.1f, -0.4f, -1.1f);
    addKey(.2f, 0.4f, -0.2f);
    addKey(.3f, 0f, .5f);
    addKey(.4f, -0.3f, -0.7f);
    addKey(.5f, 0, .2f);
    addKey(.6f, 1.8f, 1.2f);
    addKey(.7f, -1f, .1f);
    addKey(.8f, -0.4f, -0.9f);
    addKey(.9f, 0, 1.2f);
    addKey(1, 0, -1.2f);
    brush.StartAnimation(nameof(CompositionSurfaceBrush.Offset), offsetAnimation);
}
Put another black line moving up and down in the middle, and the effect of the failure comes out:
6. More complex Glitch effects
I can't completely copy the CSS animation this time. I have limited ability to roughly copy it.
Create two text with white and black shading (<CODE>BlurAmount = 0</CODE>) (as shown below):
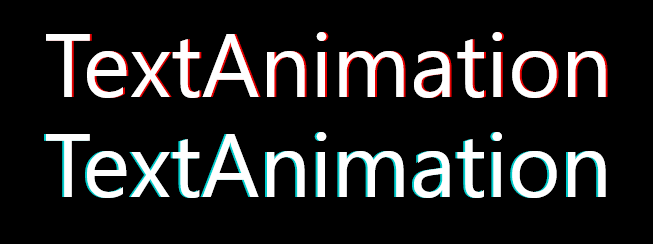
BlendEffectMode.Multiply mixes several pixels apart to create a more complex fault art animation:

Then put a white text after it, adjust the height of the first two words respectively, as follows:

Then animate the height of the first two words, and the effect comes out:
StartHeightAnimation(redBrushWrapper, new List<(double, double)>() { (0, 1), (20, 80), (60, 15), (100, 105) }, TimeSpan.FromSeconds(1), TimeSpan.Zero);
StartHeightAnimation(blueBrushWrapper, new List<(double, double)>() { (0, 110), (20, 112.5), (35, 30), (50, 100), (60, 50), (70, 85), (80, 55), (100, 1) }, TimeSpan.FromSeconds(1.5), TimeSpan.Zero);

private void StartHeightAnimation(TextToBrushWrapper brush, List<(double, double)> keyFrames, TimeSpan duration, TimeSpan delay)
{
    var storyboard = new Storyboard();

    var animation = new DoubleAnimationUsingKeyFrames();
    animation.EnableDependentAnimation = true;
    Storyboard.SetTarget(animation, brush);
    Storyboard.SetTargetProperty(animation, nameof(TextToBrushWrapper.Height));

    foreach (var item in keyFrames)
    {
        animation.KeyFrames.Add(new LinearDoubleKeyFrame { KeyTime = duration / 100 * item.Item1, Value = item.Item2 });
    }

    storyboard.Children.Add(animation);
    storyboard.RepeatBehavior = RepeatBehavior.Forever;

    storyboard.BeginTime = delay;
    storyboard.Begin();
}

7. Conclusion
I specially created a new one to copy animations from the big guys project.
There are still a lot of animations to refer to in the original text, but I gave up halfway and got to know the general principle and the freshness went away.It seems that CPU and GPU are not very occupied, but I can't think of any practical application scenarios for the moment. My blog has also written, my pictures have been truncated, and I will throw them away if I get bored.
8. Source Code
DinoChan_uwp_design_and_animation_lab is a project that collects UWP design and animation.