Now the use of QR code is more and more widely, and it can be seen almost everywhere, and almost all of the company's related projects are related to QR code scanning, so summarize your own experience of using QR code, and always feel that something should be done to record your growth, so that your growth can be followed. If it can help you, I will be very happy, if not, please Ignore it.
End of nonsense, start of text
If you have any questions, please correct them. Thank you very much
First of all, I would like to recommend some articles
The implementation of Android QR code scanning function
zxing is commonly used in Android. Open source project address: https://github.com/zxing/zxing . First, we download the project locally, and then load it into our own project. Please refer to my previous blog Android studio import zxing Android project , which is imported as a library file. Of course, we can separate a package in the project to realize the function of scanning QR code.
Special note: if the project is imported completely as a module, it can be run after configuration. If it is a package, it needs to copy the layout file and resource files res - > values ids.xml and res - > raw beep.ogg
1, Learn about ZXing
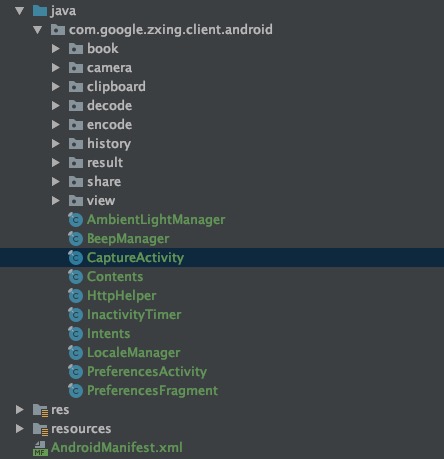
After importing ZXing, all the content is as shown in the figure above. Running the example code, it is found that the horizontal screen is used to scan the barcode, including identifying the QR code in the album, scanning records, cutting board, generating QR code and other functions. We can separate the part we need according to our needs. First, we can understand the role of each part in the project of ZXing, and then start DELETE 👹 operation.
Take CaptureActivity as the entry to start the analysis
(PS: not necessarily correct. It's my own understanding, but it's probably like this. If there is any mistake, it will be corrected later.)
CaptureActivity: turn on the camera and carry out the actual scanning in the background thread, draw the viewfinder, and carry out the image scanning feedback.
CameraManager: camera management class, call camera preview, draw the specific content of the scan box here. Related camera configurations are also set here, such as front and rear camera switching, automatic focus, etc. In CaptureActivity, CameraManager gets the object in onResume(), and openDriver() is used to open the camera
CaptureActivityHandler: processes all captured status messages. In initCamera(), after opening the camera, create the object. According to the description, it should deliver the message, pass the content to be decoded to and return the result to CaptureActivity
DecodeThread: handle the most difficult image parsing work, including parsing and generating QR code content, and partner with DecodeHandler
DecodeHandler: returns the code scanning result to CaptureActivityHandler.
Viewfinder view: a custom scanning interface. If you want to draw the scanning effect you want, you can do it here
It's roughly like this. From the perspective of capture activity, you can understand what's going on and how it feels when you don't understand. You can also see the DEMO implemented here, which is annotated accordingly. Github:
2, Modify UI, modify scan page
After the general process is clear, first of all, draw the scanning interface as we want
First, change the screen direction to the vertical screen, and the camera scanning direction should be rotated accordingly,
In CameraManager, getframerectinpreview() modifies:
      rect.left = rect.left * cameraResolution.y / screenResolution.x;
      rect.right = rect.right * cameraResolution.y / screenResolution.x;
      rect.top = rect.top * cameraResolution.x / screenResolution.y;
      rect.bottom = rect.bottom * cameraResolution.x / screenResolution.y;
Then, in the decidehandler, add:
// After processing the scanning direction of rotating camera, you can scan two-dimensional code or barcode
    byte[] rotatedData = new byte[data.length];
    for (int y = 0; y < height; y++) {
      for (int x = 0; x < width; x++)
        rotatedData[x * height + height - y - 1] = data[x + y * width];
    }
    int tmp = width;
    width = height;
    height = tmp;
    data = rotatedData;

    PlanarYUVLuminanceSource source = activity.getCameraManager().buildLuminanceSource(data, width, height);
What we want is a square scan box. Then, adjust ViewfinderView to draw the preview interface of the scan box, which can be implemented in the onDraw() method of ViewfinderView,
Rect frame = cameraManager.getFramingRect();
If you want to draw a square, the width and height of the preview interface obtained by getframeingrect() can be set to the same, which are set by the width of the screen
 int width = findDesiredDimensionInRange(screenResolution.x, MIN_FRAME_WIDTH, MAX_FRAME_WIDTH);
      int height = findDesiredDimensionInRange(screenResolution.x, MIN_FRAME_WIDTH, MAX_FRAME_WIDTH);
//      int height = findDesiredDimensionInRange(screenResolution.y, MIN_FRAME_HEIGHT, MAX_FRAME_HEIGHT);
Draw four corners
 //Draw the corner on the edge of the scan box, 8 parts in total
            paint.setColor(getResources().getColor(R.color.result_view));
            canvas.drawRect(frame.left, frame.top, frame.left + ScreenRate, frame.top + CORNER_WIDTH, paint);
            canvas.drawRect(frame.left, frame.top, frame.left + CORNER_WIDTH, frame.top + ScreenRate, paint);
            canvas.drawRect(frame.right - ScreenRate, frame.top, frame.right, frame.top + CORNER_WIDTH, paint);
            canvas.drawRect(frame.right - CORNER_WIDTH, frame.top, frame.right, frame.top + ScreenRate, paint);
            canvas.drawRect(frame.left, frame.bottom - CORNER_WIDTH, frame.left + ScreenRate, frame.bottom, paint);
            canvas.drawRect(frame.left, frame.bottom - ScreenRate, frame.left + CORNER_WIDTH, frame.bottom, paint);
            canvas.drawRect(frame.right - ScreenRate, frame.bottom - CORNER_WIDTH, frame.right, frame.bottom, paint);
            canvas.drawRect(frame.right - CORNER_WIDTH, frame.bottom - ScreenRate, frame.right, frame.bottom, paint);

            //Draw the middle line. Every time you refresh the interface, the middle line moves down
            slideTop += SPEEN_DISTANCE;
            if (slideTop >= frame.bottom) {
                slideTop = frame.top;
            }
            canvas.drawRect(frame.left + MIDDLE_LINE_PADDING, slideTop - MIDDLE_LINE_WIDTH / 2, frame.right - MIDDLE_LINE_PADDING, slideTop + MIDDLE_LINE_WIDTH / 2, paint);


            //Draw the words under the scan box
            paint.setColor(getResources().getColor(R.color.white));
            paint.setTextSize(TEXT_SIZE * density);
            paint.setAlpha(225);
            paint.setTypeface(Typeface.DEFAULT);
            String text = getResources().getString(R.string.msg_default_status);
            float textWidth = paint.measureText(text);
            canvas.drawText(text, (width - textWidth) / 2, (float) (frame.bottom + (float) TEXT_PADDING_TOP * density), paint);
Implementation effect diagram: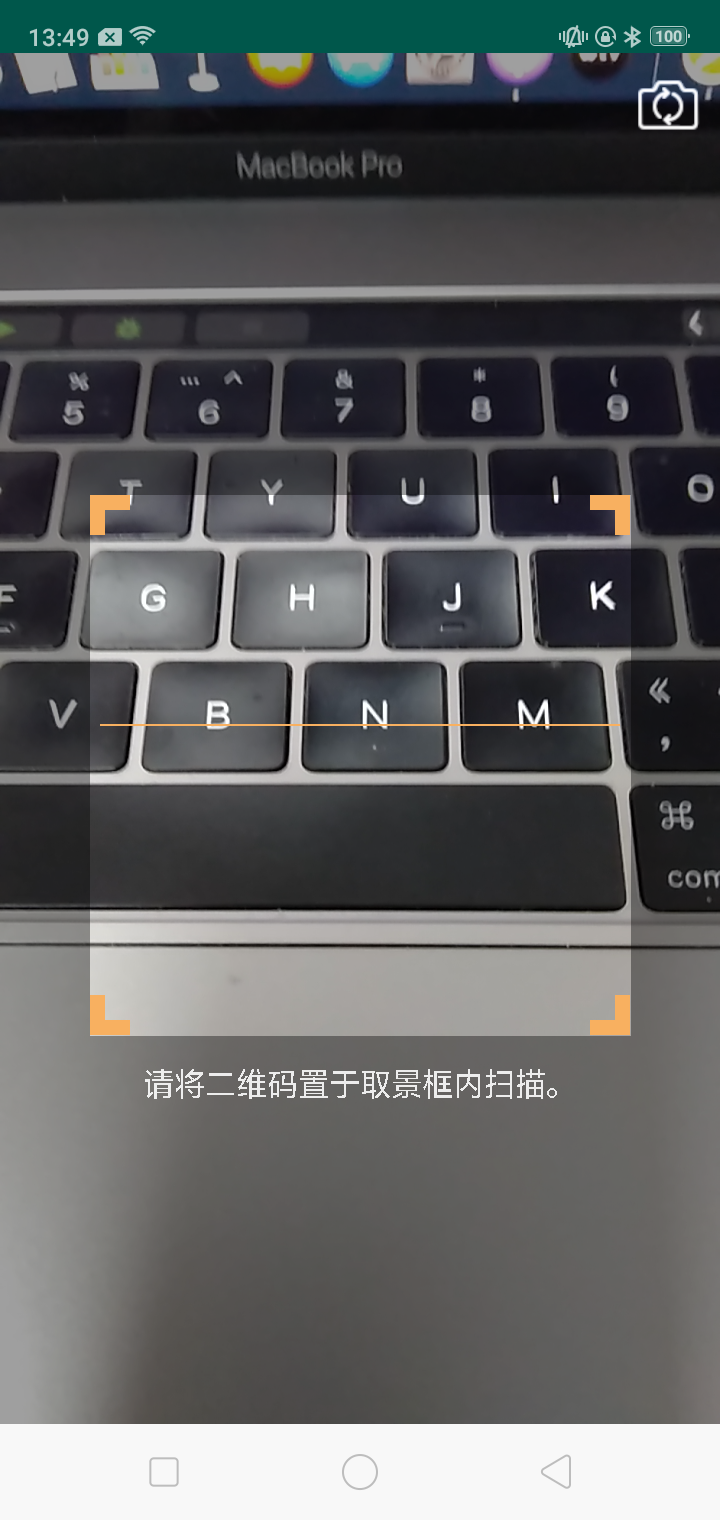
3, Realize sweeping
After the UI is drawn, start the CaptureActivity call to scan. handleDecode() in CaptureActivity processes the scanned results and returns the processed results,
    public void handleDecode(Result rawResult, Bitmap barcode, float scaleFactor) {
        inactivityTimer.onActivity();
        String result = rawResult.getText();

        if (result.equals("")) {
            Toast.makeText(CaptureActivity.this, "Scan Failed!", Toast.LENGTH_SHORT).show();
        } else {
            Log.e(TAG, "Scan results" + result);
            // Return the scan results to the scanned page
            Intent intent = new Intent();
            Bundle bundle = new Bundle();
            bundle.putString("result", result);
            intent.putExtras(bundle);
            setResult(RESULT_OK, intent);
        }
        CaptureActivity.this.finish();
    }
4, Add switch front and rear cameras
The camera used to scan QR code is a system camera. If the mobile phone supports front and rear cameras (nonsense, is there any mobile phone that does not support front cameras now, why can't I take my own photos...) There should be no problem. It is mainly to switch the front and rear cameras. So, we mainly look at the part of calling camera. Under camera - > open, OpenCameraInterface is mainly used to deal with camera related issues. Therefore, we find that
  while (cameraId < numCameras) {
        Camera.CameraInfo cameraInfo = new Camera.CameraInfo();
        Camera.getCameraInfo(cameraId, cameraInfo);
        if (CameraFacing.values()[cameraInfo.facing] == CameraFacing.BACK) {
          break;
        }
        cameraId++;
      }
CameraFacing.BACK: when it is a rear camera, the current camera is returned. That is to say, the Default scan only supports the rear scan. Here we change to support the front and rear cameras, and modify according to the parameters passed by the camera. Add a parameter to the open() method to judge whether it is a front camera or a rear camera
public static OpenCamera open(int cameraId, CameraFacing cf) {

        int numCameras = Camera.getNumberOfCameras();
        if (numCameras == 0) {
            Log.w(TAG, "No cameras!");
            return null;
        }
        if (cameraId >= numCameras) {
            Log.w(TAG, "Requested camera does not exist: " + cameraId);
            return null;
        }

        if (cameraId <= NO_REQUESTED_CAMERA) {
            cameraId = 0;

            while (cameraId < numCameras) {
                Camera.CameraInfo cameraInfo = new Camera.CameraInfo();
                Camera.getCameraInfo(cameraId, cameraInfo);

                if(cf == CameraFacing.BACK){
                    if (CameraFacing.values()[cameraInfo.facing] == cf.BACK) {
                        break;
                    }
                }

                if(cf == CameraFacing.FRONT){
                    if (CameraFacing.values()[cameraInfo.facing] == cf.FRONT) {
                        break;
                    }
                }
                cameraId++;
            }

            if (cameraId == numCameras) {
                Log.i(TAG, "No camera facing " + CameraFacing.BACK + "; returning camera #0");
                cameraId = 0;
            }
        }

        Log.i(TAG, "Opening camera #" + cameraId);
        Camera.CameraInfo cameraInfo = new Camera.CameraInfo();
        Camera.getCameraInfo(cameraId, cameraInfo);
        Camera camera = Camera.open(cameraId);
        if (camera == null) {
            return null;
        }
        return new OpenCamera(cameraId,
                camera,
                CameraFacing.values()[cameraInfo.facing],
                cameraInfo.orientation);
    }
Then I found that the openDriver() method in OpenCameraInterface is actually called by the openDriver() method of CameraManager, that is to say, parameters need to be passed in openDriver(), and then I found that the initCamera() of CaptureActivity is to open the camera and set the location of parameters, so here I pass the parameters of the front and rear cameras,
 private void initCamera(SurfaceHolder surfaceHolder) {
        if (surfaceHolder == null) {
            throw new IllegalStateException("No SurfaceHolder provide");
        }
        if (cameraManager.isOpen()) {
            Log.w(TAG, "initCamera() while already open -- late SurfaceView callback?");

            // If the camera is already on, turn off the current camera and rebuild a switch camera. If you don't need to switch the front camera, return directly here
            handler = null;
            cameraManager.closeDriver();

//            return;
        }
        try {
            cameraManager.openDriver(surfaceHolder, cfbf);
            // Creating the handler starts the preview, which can also throw a RuntimeException.
            if (handler == null) {
                handler = new CaptureActivityHandler(this, decodeFormats, decodeHints, characterSet, cameraManager);
            }
//            decodeOrStoreSavedBitmap(null, null);
        } catch (IOException ioe) {
            Log.w(TAG, ioe);
            displayFrameworkBugMessageAndExit();
        } catch (RuntimeException e) {
            // Barcode Scanner has seen crashes in the wild of this variety:
            // java.?lang.?RuntimeException: Fail to connect to camera service
            Log.w(TAG, "Unexpected error initializing camera", e);
            displayFrameworkBugMessageAndExit();
        }
    }
This will call the corresponding front or rear camera.
After the bug is modified, it is found that the error is reported. The front and rear cameras cannot be switched and are stuck directly!!
Error:
 Unexpected exception while focusing
 Camera is being used after Camera.release() was called
Reading the error information roughly means that the camera object has been released, but it is still in use. Well, think about what you have done. Right, cameraManager.closeDriver(); when switching between the front and rear cameras, release the camera first when the camera is open, and recreate an object, so you can't continue to use the camera when releasing. Add the camera in closeDriver() Stop previewing before releasing.
 camera.getCamera().setPreviewCallback(null);
 camera.getCamera().lock();
 stopPreview();
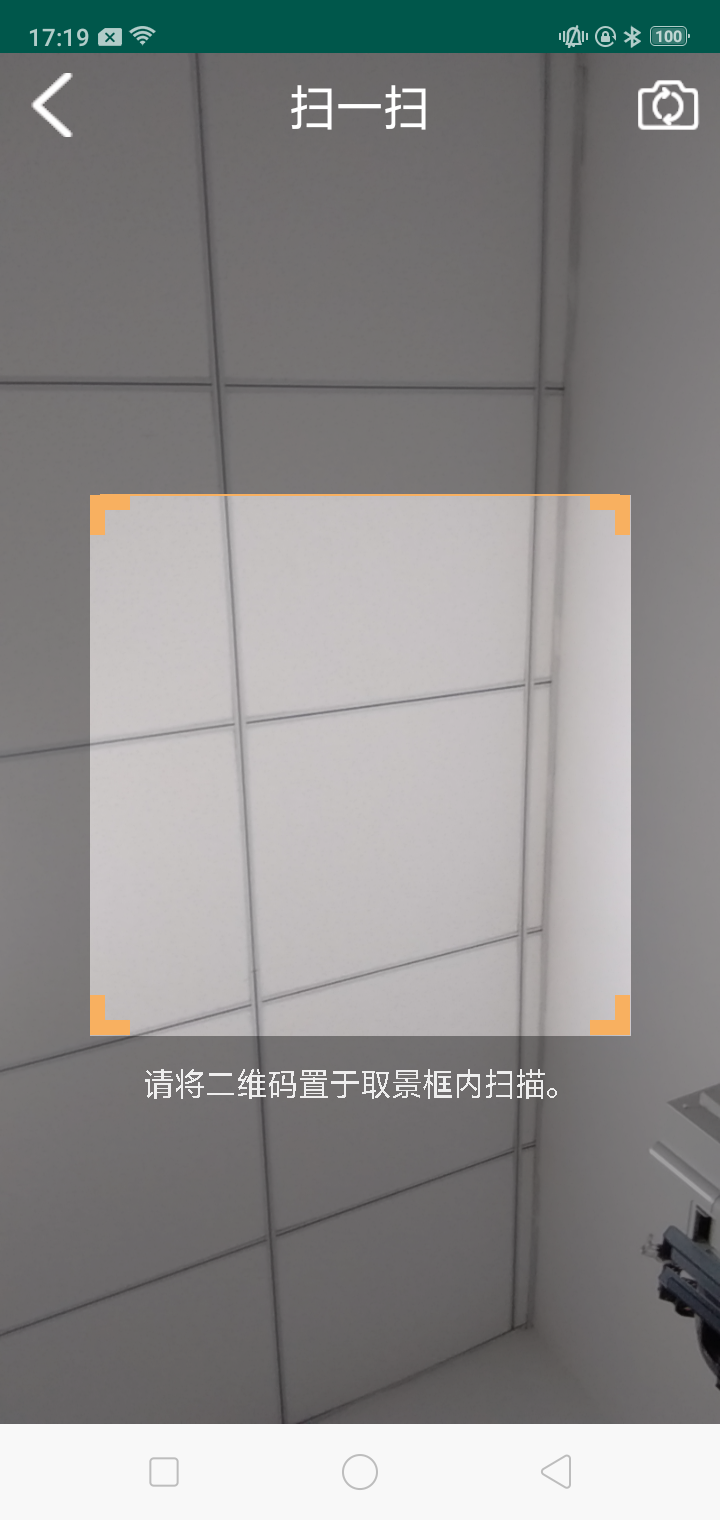
Add a component in capture.xml to switch the front and back cameras of the camera.
Effect:
5, Generate QR code
The function of generating QR code is mainly in QRCodeEncoder.java. Here, only QR code is generated. For the format of QR code content, the default is used. The rewriting constructor only passes in the parameters we need
 public QRCodeEncoder(Context activity, int dimension, String contnt) {
    this.activity = activity;
    this.dimension = dimension; // Generate the size of the QR code picture
    this.contents = contnt; // Content of generated QR code
  }
 public Bitmap encodeAsBitmap() throws WriterException {

    Log.e("QR code picture parameters",String.valueOf(dimension));

    String contentsToEncode = contents;
    if (contentsToEncode == null) {
      return null;
    }

    Map<EncodeHintType,Object> hints = new HashMap<>();
//    String encoding = guessAppropriateEncoding(contentsToEncode);
//    if (encoding != null) {
//      hints = new EnumMap<>(EncodeHintType.class);
//      hints.put(EncodeHintType.CHARACTER_SET, encoding);
//    }

    hints.put(EncodeHintType.CHARACTER_SET, "UTF-8");

    BitMatrix result;
    try {
      format = BarcodeFormat.QR_CODE;

      Log.e(TAG,"contentsToEncode == " + contentsToEncode);
      result = new MultiFormatWriter().encode(contentsToEncode, format, dimension, dimension, hints);

      int width = result.getWidth();
      int height = result.getHeight();
      int[] pixels = new int[width * height];
      for (int y = 0; y < height; y++) {
        int offset = y * width;
        for (int x = 0; x < width; x++) {
          pixels[offset + x] = result.get(x, y) ? BLACK : WHITE;
        }
      }

      Bitmap bitmap = Bitmap.createBitmap(width, height, Bitmap.Config.ARGB_8888);
      bitmap.setPixels(pixels, 0, width, 0, 0, width, height);

      return bitmap;

    } catch (IllegalArgumentException iae) {
      Log.e(TAG,"Error == " + iae.toString());
      // Unsupported format
      return null;
    }

  }
The Bitmap object can be generated by calling encodeAsBitmap().
Here, I just extract the functions I need in the zxing project. I need to be patient. It's still effective for me to read more if I don't understand. Hahaha, of course, I've found a lot of materials to help me understand. Thank you.
As a rule, I'd like to give myself a sentence at last: think about everything in a simple way and do it in a serious way

