A few days ago, we need to make a demand: when adding an xml file, we need to add an xml tag with uncertain quantity and the same attribute. If we want to do it in a table, we need to use the same attribute, and use a unified header. The following attribute values just need to be added, deleted, or modified, just like mysql filling in the table with data.
However, it seems that there is no direct operation of adding, deleting and changing a row of tables, so how to achieve it? Then, through the Internet and my own thinking, I finally realized the following code, ideas and renderings:
1 html part:
<el-button type="success" @click="addRow(tableData)">Newly added</el-button>
<template>
 <el-table
   :data="tableData"
   style="width: 100%"
   max-height="250"
   @cell-dblclick="tableDbEdit">
   <el-table-column
     prop="name"
     label="name"
     width="150">
   </el-table-column>
   <el-table-column
     prop="xpath"
     label="xpath"
     width="120">
   </el-table-column>
   <el-table-column
     prop="desc"
     label="desc"
     width="120">
   </el-table-column>
   <el-table-column
     prop="value"
     label="value"
     width="120">
   </el-table-column>
   <el-table-column
     prop="defVal"
     label="defVal"
     width="300">
   </el-table-column>
   <el-table-column
     fixed="right"
     label="operation"
     width="120">
     <template slot-scope="scope">
   <el-button
     @click.native.prevent="deleteRow(scope.$index, tableData)"
     type="text"
     size="small">
     //remove
   </el-button>
     </template>
   </el-table-column>
 </el-table>
</template>
2 style part
<style>
  .el-table .warning-row {
    background: oldlace;
  }
  .el-table .success-row {
    background: #f0f9eb;
  }
 .cell-edit-color{
         color:#2db7f5;
         font-weight: bold;
     }
   .cell-edit-input .el-input, .el-input__inner {
    width:100px;
   }
   .cell-icon{
    cursor:pointer;
    color:#fff;
     }
</style>
3.data definition:
rules: {
fileName: [
{ required: true, message: 'Please enter the file path', trigger: 'blur' }
],
policyfileName: [
{ required: true, message: 'Please enter the file path', trigger: 'blur' }
],
parmna: [
{ required: true, message: 'Please enter data field name', trigger: 'blur' }
],
remark: [
{ required: true, message: 'Please enter group type name', trigger: 'blur' }
]
},
activeName: 'include',
tabPosition: 'left',
dialogFormVisible: false,
formQuery:[],
serverForm: {
fileName: '',
policyfileName: '',//include under policy
scmType: '',
version: '',
address: ''
},
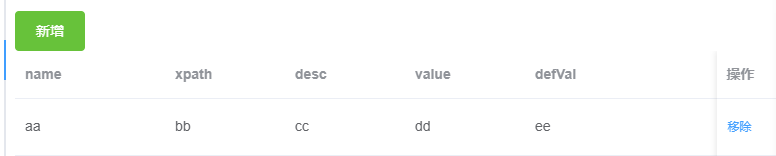
tableData: [{
name: 'aa',
xpath: 'bb',
desc: 'cc',
value: 'dd',
defVal: 'ee'
}, {
name: 'aa1',
xpath: 'bb1',
desc: 'cc1',
value: 'dd1',
defVal: 'ee1'
}]4. Specific methods:
deleteRow(index, rows) {//Remove a row
        rows.splice(index, 1);//Delete the bank.
      },
 addRow(tableData,event){//Add a new line
 //I never thought how to add a row of empty data before. At last, thanks to a friend's prompt: adding a row in the table is actually adding the source data, which can be realized from the source data, so I suddenly realized!
   tableData.push({ name: '', xpath: '',desc:'',value:'',defVal:'' })
 },

tableDbEdit(row, column, cell, event) {//Edit cell data
//When you double-click the specific cell in the cell, you can edit the data. In fact, you add an input box, and finally save the data in the input box.
           event.target.innerHTML = "";
           let cellInput = document.createElement("input");
           cellInput.value = "";
           cellInput.setAttribute("type", "text");
           cellInput.style.width = "60%";
           cell.appendChild(cellInput);
           cellInput.onblur = function() {
           cell.removeChild(cellInput);
           event.target.innerHTML = cellInput.value;
           };
    }
The effect is as follows