In this paper, we will learn the basic knowledge of multi view geometry, such as pole, polar line and contrapolar constraint. When we use a pinhole camera to take photos, we will lose a lot of important information, such as the depth information of objects. Or how far each point in the image is from the camera is not recorded, because this is a conversion process from 3D to 2D. So how can we keep the depth information through the camera? This requires the use of more than two cameras, just like our eyes work, because there are two eyes, this way is called stereovision. Let's learn what OpenCV provides. Before understanding the construction of depth images from multiple perspectives, let's learn the basic concepts of polar geometry. The following figure is a depth camera composed of two basic cameras:
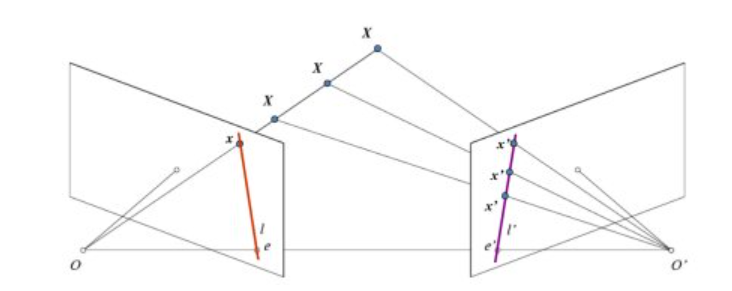
If we only use the camera on the left, we will find that all the points of OX in 3D space are projected on the x-point. If we consider using the camera on the right, we will find that the points on the x-axis are not projected into one point in the camera on the right, but into different x-points, so the two cameras can separate these points by triangulation. The line (l ') in the right plane projected by OX in the above figure is called epiline, which means that to find the position of X point in the right figure is to search along the epiline. In the same way, if you want to search the projection of the same line in another picture, you can also search in the polar line without searching the whole picture, so you can improve the speed and performance, which is also called the Epipolar Constraint. The plane composed of XOO 'is called Epipolar Plane. O and o 'are called the camera center, the line between O and o' is called the baseline, and the points e and e 'that the baseline is calibrated with the two image planes are called poles. In some cases, the poles may not be found on the image, because the poles are outside the image, which means that the two cameras cannot see each other.
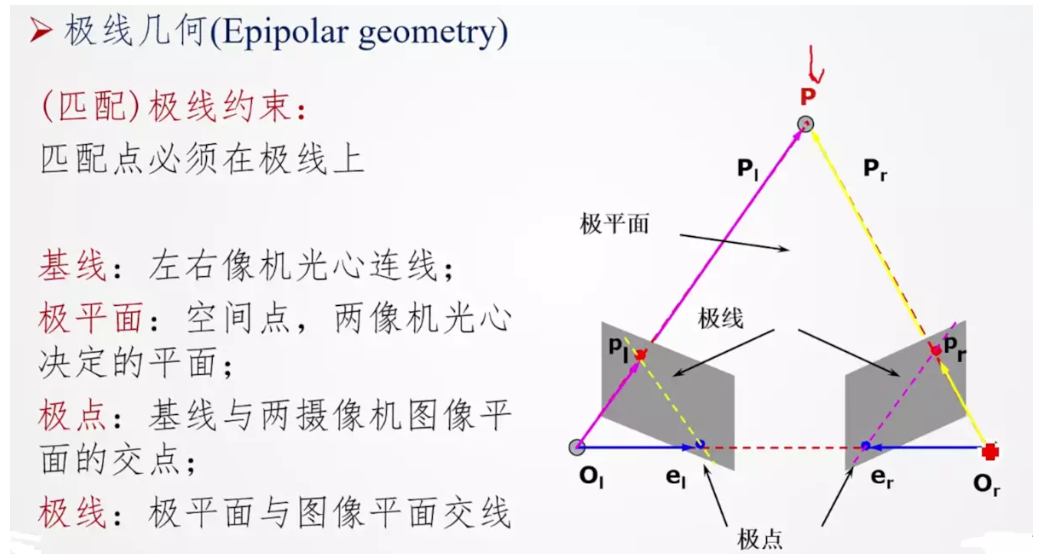
All polar lines pass through poles. If you want to find poles, you can find multiple polar lines on the image, and then find their intersections. Therefore, the main focus of this paper is to find the poles and poles. To find them, we need to find two matrices: the basic matrix F (basic matrix) and the Essential Matrix E (Essential Matrix). The Essential Matrix contains translation and rotation information, which describes how the first camera can move and rotate in the same position and direction as the second camera, as shown in the following figure:

In the figure above, T is the translation vector and R is the rotation.
Generally, we like to measure in the pixel coordinate system, and the basic matrix is based on the pixel coordinate system. It is similar to the essential matrix, and also describes the relative relationship between two cameras, except that it is in the pixel coordinate system. If we correct the image, divide it by focal length and normalize it, then the basic matrix is the same as the essential matrix. In short, the basic matrix F is the transformation process of mapping a point on one image to a polar line on another image. The relationship between basic matrix and essential matrix is as follows:

Given two images of the same scene and unknown camera parameters, the basic matrix can be estimated. This method is called the eight point algorithm. In 1981, Longuet Higgins proposed the eight point algorithm; in 1995, Hartley extended it. The 8-point algorithm assumes that at least 8 pairs of corresponding points on two images can be obtained. More points can use RANSAC algorithm.
Let's use the following example:
#python 3.7.4,opencv4.1
#Cai Junsheng https://blog.csdn.net/caimouse/article/details/51749579
#
import numpy as np
import cv2
from matplotlib import pyplot as plt

img1 = cv2.imread('left.jpg',0)  #queryimage # left image
img2 = cv2.imread('right.jpg',0) #trainimage # right image

#Initialize ORB detector
orb = cv2.ORB_create()
#Find key points with ORB
kp1, des1 = orb.detectAndCompute(img1,None)
kp2, des2 = orb.detectAndCompute(img2,None)

# FLANN parameter
FLANN_INDEX_LSH = 6
index_params = dict(algorithm = FLANN_INDEX_LSH,
                    table_number = 6,
                    key_size = 12,
                    multi_probe_level = 1)
search_params = dict(checks=50)   #Or use an empty dictionary
flann = cv2.FlannBasedMatcher(index_params,search_params)

matches = flann.knnMatch(des1,des2,k=2)


good = []
pts1 = []
pts2 = []

# ratio test as per Lowe's paper
for i,(m,n) in enumerate(matches):
    if m.distance < 0.6*n.distance:
        good.append(m)
        pts1.append(kp1[m.queryIdx].pt)
        pts2.append(kp2[m.trainIdx].pt)


pts1 = np.int32(pts1)
pts2 = np.int32(pts2)
F, mask = cv2.findFundamentalMat(pts1,pts2, cv2.LMEDS)

# We select only inlier points
pts1 = pts1[mask.ravel()==1]
pts2 = pts2[mask.ravel()==1]

def drawlines(img1,img2,lines,pts1,pts2):
    ''' img1 - stay img2 Point on img1 Upper polar line
        lines - Polar line '''
    r,c = img1.shape
    img1 = cv2.cvtColor(img1,cv2.COLOR_GRAY2BGR)
    img2 = cv2.cvtColor(img2,cv2.COLOR_GRAY2BGR)
    for r,pt1,pt2 in zip(lines,pts1,pts2):
        color = tuple(np.random.randint(0,255,3).tolist())
        x0,y0 = map(int, [0, -r[2]/r[1] ])
        x1,y1 = map(int, [c, -(r[2]+r[0]*c)/r[1] ])
        img1 = cv2.line(img1, (x0,y0), (x1,y1), color,1)
        img1 = cv2.circle(img1,tuple(pt1),5,color,-1)
        img2 = cv2.circle(img2,tuple(pt2),5,color,-1)
    return img1,img2

# Point on right draw a polar line on left
lines1 = cv2.computeCorrespondEpilines(pts2.reshape(-1,1,2), 2,F)
lines1 = lines1.reshape(-1,3)
img5,img6 = drawlines(img1,img2,lines1,pts1,pts2)

# Point on the left draw a polar line on the right
lines2 = cv2.computeCorrespondEpilines(pts1.reshape(-1,1,2), 1,F)
lines2 = lines2.reshape(-1,3)
img3,img4 = drawlines(img2,img1,lines2,pts2,pts1)

plt.subplot(121),plt.imshow(img5)
plt.subplot(122),plt.imshow(img3)
plt.show()

cv2.imshow("img1", img5)
cv2.imshow('img2', img3)
#
cv2.waitKey(0)
cv2.destroyAllWindows()
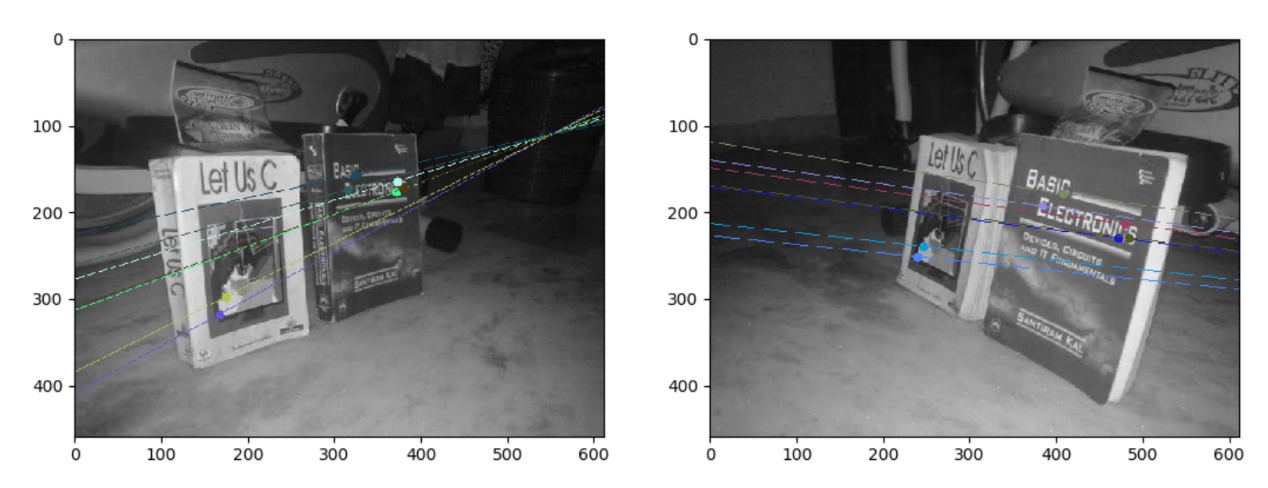
The result output is as follows: