Catalog
- I. Preface
- Introduction to OpenCV
- Introduction of OpenCV Module
- IV. Operating Environment
- V. Preparations
- 6. so for compilation
- VII. Problems and Solutions
- VIII. EFFECT CHARACTERISTICS
I. Preface
In order to transplant c++ code to Android and use opencv in c++, it is necessary to call opencv through the bottom layer in Android.
Introduction to OpenCV
OpenCV is a cross-platform computer vision library based on open source, which implements many general algorithms in image processing and computer vision. OpenCV is one of the most powerful research tools in the field of computer vision.
OpenCV applications: human-computer interaction object recognition image segmentation, face recognition, motion recognition, motion tracking robot motion analysis, machine vision structure analysis, automobile safe driving and automatic driving....
Introduction of OpenCV Module
- 1.core, the core function module, mainly contains the following contents:
_OpenCV Basic Structures;
_Basic C Structures and Operations;
Dynamic Structures;
Operations on Arrays;
Drawing Functions;
_XML and YAML grammar support (XML/YAML Persistence);
_XML and YAML grammar supported C language interface (XML/YAML Persistence (C API));
Clustering;
Auxiliary functions and system functions and macros (Utility and System Functions and Macros);
OpenGL interoperability; - 2.imgproc, short for Image Processing. The image processing module mainly includes the following contents:
_Linear and Nonlinear Image Filtering;
Geometric Image Transformations;
Miscellaneous Image Transformations;
Histograms;
Structural Analysis and Shape Descriptors;
Motion Analysis and Object Tracking;
Feature Detection;
Object Detection; - 3. High gui, short for High-level GUI and Media I/O. High-level user interface module and media input/output module mainly include the following contents:
User Interface;
Reading and Writing Images and Video;
Qt New Functions; - 4.features2d, short for 2D Features Framework. The two-dimensional feature framework module mainly includes the following contents:
_Face Recognition
_VR and AR
Feature Detection and Description;
Common Interfaces of Feature Detectors;
Common Interfaces of Descriptor Extractors;
Common Interfaces of Descriptor Matchers;
Common Interfaces of Generic Descriptor Matchers;
Drawing Function of Keypoints and Matches;
Object Categorization; - 5.flann, Clustering and Search in Multi-Dimensional Spaces, Multidimensional Spaces Clustering and Search Modules,
It mainly includes the following contents:- Fast Approximate Nearest Neighbor Search;
- Clustering;
- 6.video, short for Video Analysis. The video analysis module mainly includes the following contents:
Motion Analysis and Object Tracking. Video related. Picture related. - 7.calib3d, Camera Calibration and 3D
The abbreviation of Reconstruction. This module is mainly related to camera calibration and three-dimensional reconstruction, including basic multi-view geometry algorithm, single stereo camera calibration, object attitude estimation, stereo similarity algorithm, 3D information reconstruction and so on.
IV. Operating Environment
- Android Studio 3.3.2
- opencv-4.0.1-android-sdk.zip
- NDK
- ...
V. Preparations
1. First of all, let's download:
https://opencv.org/releases.html
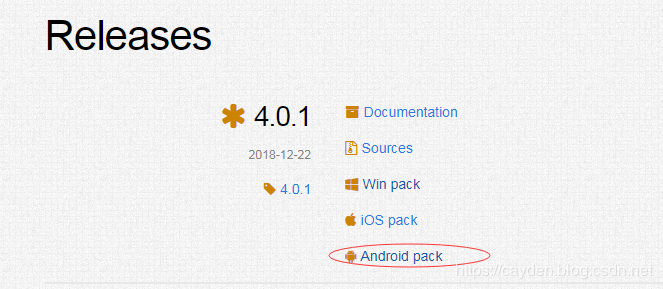
2. Click Android pack to download opencv-4.0.1-android-sdk.zip
Then extract it to the directory
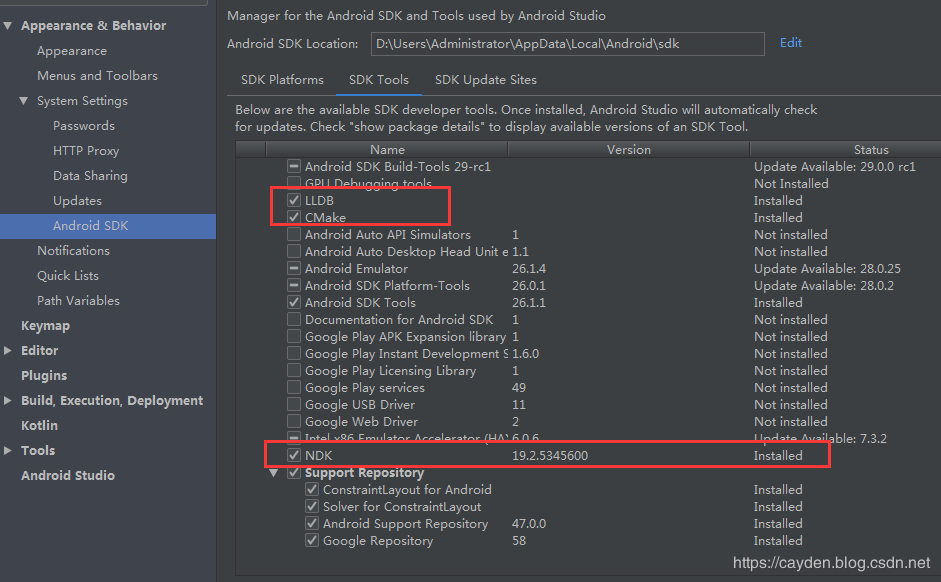
3. Start Android Studio and install CMakeLLDBNDK under SDK Manager
4. Create a project (the creation steps are omitted here)
5. Start configuring opencv
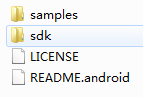
Create jni under src/main (to store the c++ code we wrote), then copy the include d in the OpenCV-android-sdk sdk native jni directory to the jni directory.
Also, don't forget to copy sdk native LIBS to the jniLibs directory in the project
6 Start writing c/c++ files
First create a java class
package com.cayden.opencvtest;
/**
 * Created by caydencui on 2019/3/27.
 */
public class NativeLib {
    // Used to load the 'native-lib' library on application startup.
    static {
        System.loadLibrary("native-lib");
    }

    /**
     * A native method that is implemented by the 'native-lib' native library,
     * which is packaged with this application.
     */
    public static native int[] Bitmap2Grey(int[] pixels,int w,int h);
}
Then create the file native-lib.cpp in the jni directory
//
// Created by caydencui on 2019/3/27.
//
#include <jni.h>
#include<opencv2/opencv.hpp>
#include<iostream>
using namespace cv;
using namespace std;

extern "C" JNIEXPORT jintArray

JNICALL
Java_com_cayden_opencvtest_NativeLib_Bitmap2Grey(
        JNIEnv *env,
        jobject /* this */,jintArray buf,jint w,jint h) {
    jint *cbuf;
    jboolean ptfalse = false;
    cbuf = env->GetIntArrayElements(buf, &ptfalse);
    if(cbuf == NULL){
        return 0;
    }

    Mat imgData(h, w, CV_8UC4, (unsigned char*)cbuf);
    // Note that Android's Bitmap is an ARGB four-channel, not a RGB three-channel.
    cvtColor(imgData,imgData,CV_BGRA2GRAY);
    cvtColor(imgData,imgData,CV_GRAY2BGRA);

    int size=w * h;
    jintArray result = env->NewIntArray(size);
    env->SetIntArrayRegion(result, 0, size, (jint*)imgData.data);
    env->ReleaseIntArrayElements(buf, cbuf, 0);
    return result;
}
Create CMakeLists.txt [Important, because cmake will find this file and compile it]
There are many attributes in it. Let's take a look at what English means.
# For more information about using CMake with Android Studio, read the
# documentation: https://d.android.com/studio/projects/add-native-code.html
# Setting the version number of CMAKE
cmake_minimum_required(VERSION 3.4.1)

# Set the address of the include folder
include_directories(${CMAKE_SOURCE_DIR}/src/main/jni/include)

# Setting up dynamic libraries of opencv
add_library(libopencv_java3 SHARED IMPORTED)
set_target_properties(libopencv_java3 PROPERTIES IMPORTED_LOCATION
            ${CMAKE_SOURCE_DIR}/src/main/jniLibs/${ANDROID_ABI}/libopencv_java3.so)

add_library( # Sets the name of the library.
             native-lib #The. so library name can be customized

             # Sets the library as a shared library.
             SHARED

             # Provides a relative path to your source file(s).
             src/main/jni/native-lib.cpp )

find_library( # Sets the name of the path variable.
              log-lib

              # Specifies the name of the NDK library that
              # you want CMake to locate.
              log )

target_link_libraries( # Specifies the target library.
                       native-lib
                       libopencv_java3

                       # Links the target library to the log library
                       # included in the NDK.
                       ${log-lib} )
9 Finally, we need to configure build.gradle in app (the correct file code for compiling is given here, which is easy to cause problems before compiling, which needs attention)
apply plugin: 'com.android.application'

android {
    compileSdkVersion 28
    defaultConfig {
        applicationId "com.cayden.opencvtest"
        minSdkVersion 21
        targetSdkVersion 28
        versionCode 1
        versionName "1.0"
        testInstrumentationRunner "android.support.test.runner.AndroidJUnitRunner"

        externalNativeBuild {
            cmake {
                cppFlags ""
                arguments "-DANDROID_STL=c++_shared"
            }
        }
        ndk{
            abiFilters "armeabi-v7a","arm64-v8a"
        }

    }

    sourceSets{
        main{
            jniLibs.srcDirs = ['src/main/jniLibs']
        }
    }
    buildTypes {
        release {
            minifyEnabled false
            proguardFiles getDefaultProguardFile('proguard-android-optimize.txt'), 'proguard-rules.pro'
        }
    }
    externalNativeBuild {
        cmake {
            path file('CMakeLists.txt')
        }
    }

    splits {
        abi {
            enable true
            reset()
            include 'x86', 'x86_64', 'armeabi-v7a', 'arm64-v8a' //select ABIs to build APKs for
            universalApk true //generate an additional APK that contains all the ABIs
        }
    }

    project.ext.versionCodes = ['armeabi': 1, 'armeabi-v7a': 2, 'arm64-v8a': 3, 'mips': 5, 'mips64': 6, 'x86': 8, 'x86_64': 9]

    android.applicationVariants.all { variant ->
        variant.outputs.each { output ->
            output.versionCodeOverride =
                    project.ext.versionCodes.get(output.getFilter(com.android.build.OutputFile.ABI), 0) * 1000000 + android.defaultConfig.versionCode
        }
    }
}

dependencies {
    implementation fileTree(dir: 'libs', include: ['*.jar'])
    implementation 'com.android.support:appcompat-v7:28.0.0'
    implementation 'com.android.support.constraint:constraint-layout:1.1.3'
    testImplementation 'junit:junit:4.12'
    androidTestImplementation 'com.android.support.test:runner:1.0.2'
    androidTestImplementation 'com.android.support.test.espresso:espresso-core:3.0.2'
}
6. so for compilation
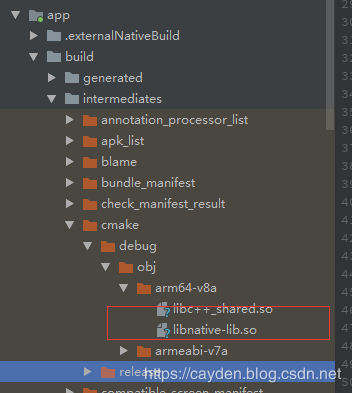
After the above environment configuration, you can now compile, if there are no problems, the corresponding so dynamic library will be generated, the specific directory as shown in the figure.
VII. Problems and Solutions
1. How to import opencv jni files
I use <> here.
2. cmake parameter setting at compile time
cmake {
cppFlags ""
arguments "-DANDROID_STL=c++_shared"
}
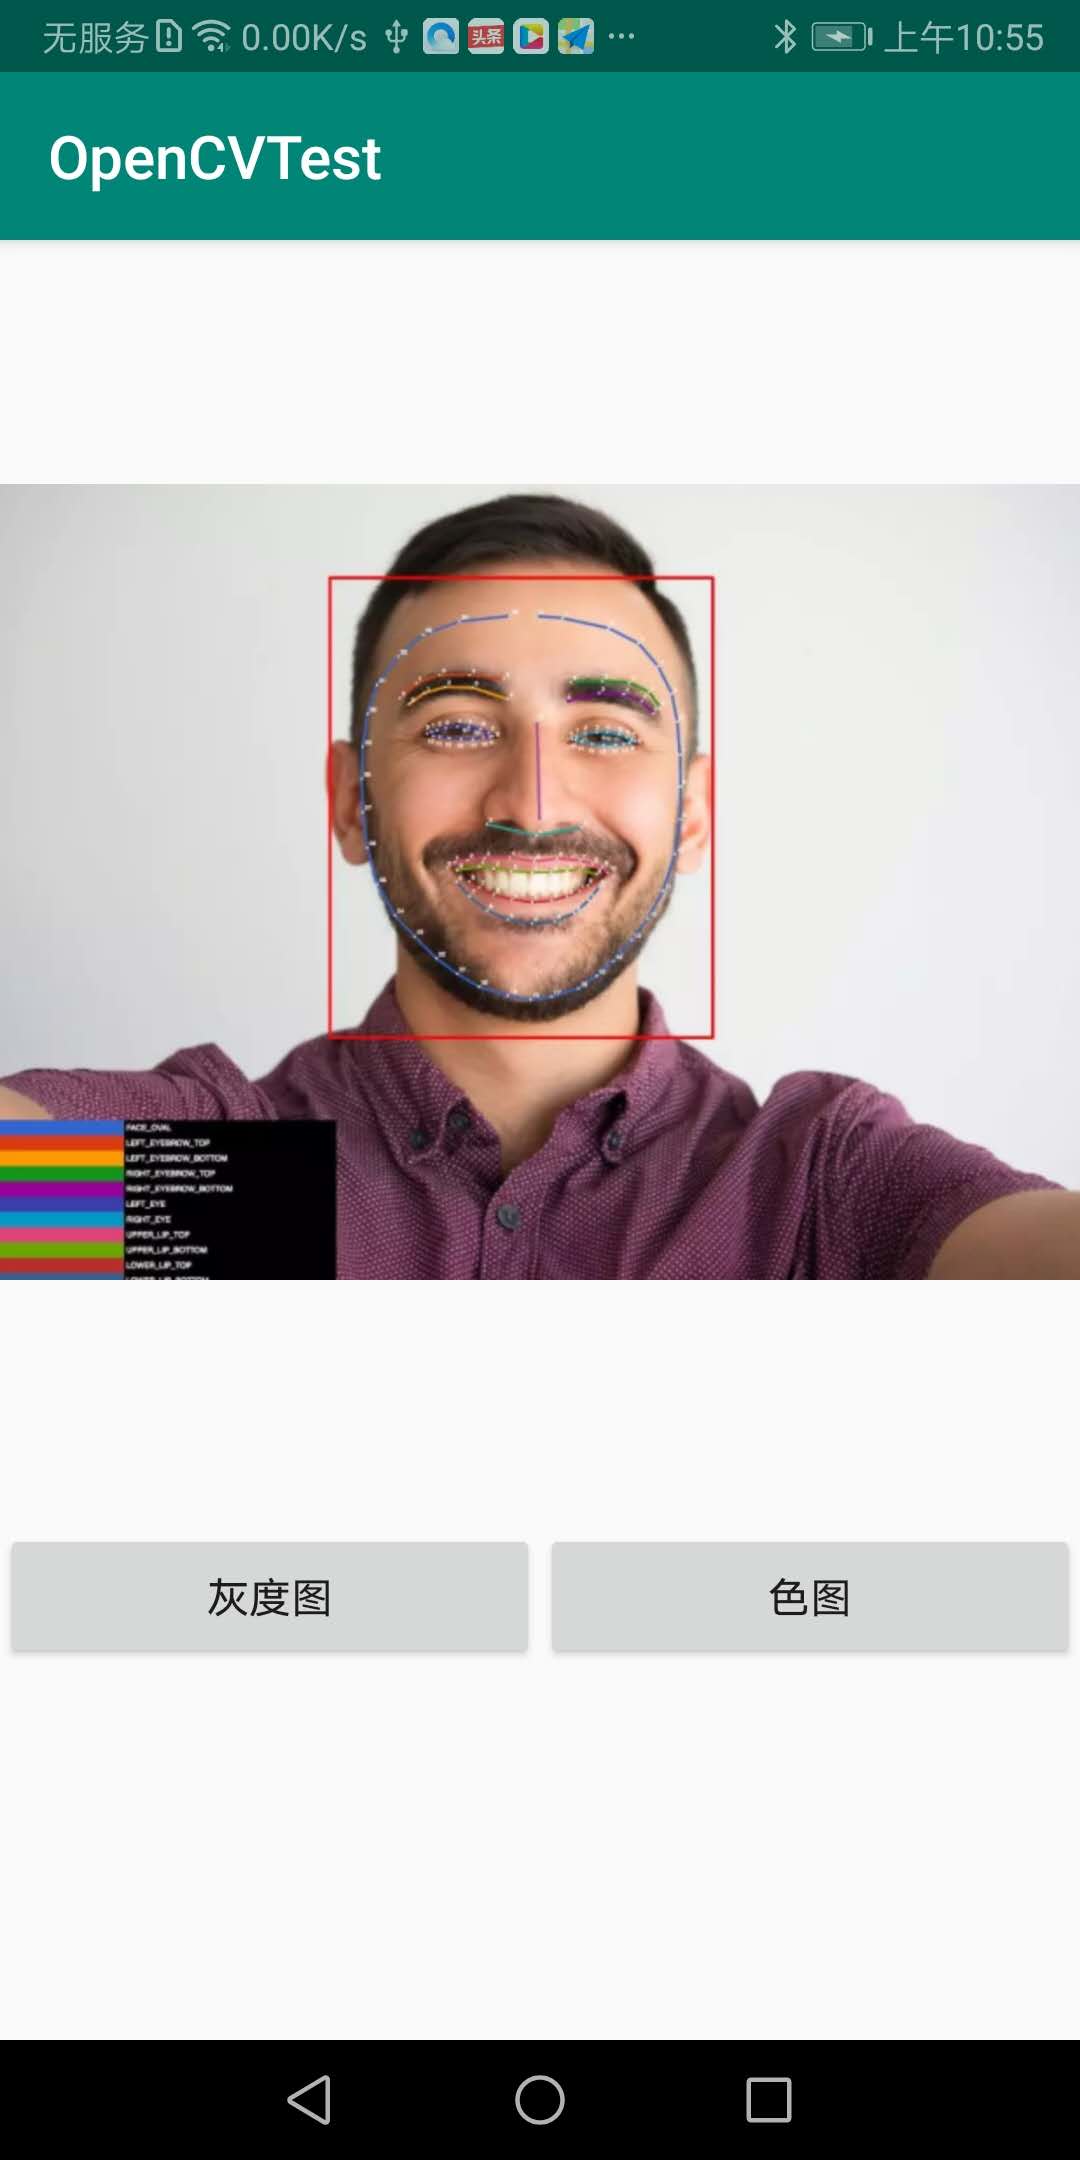
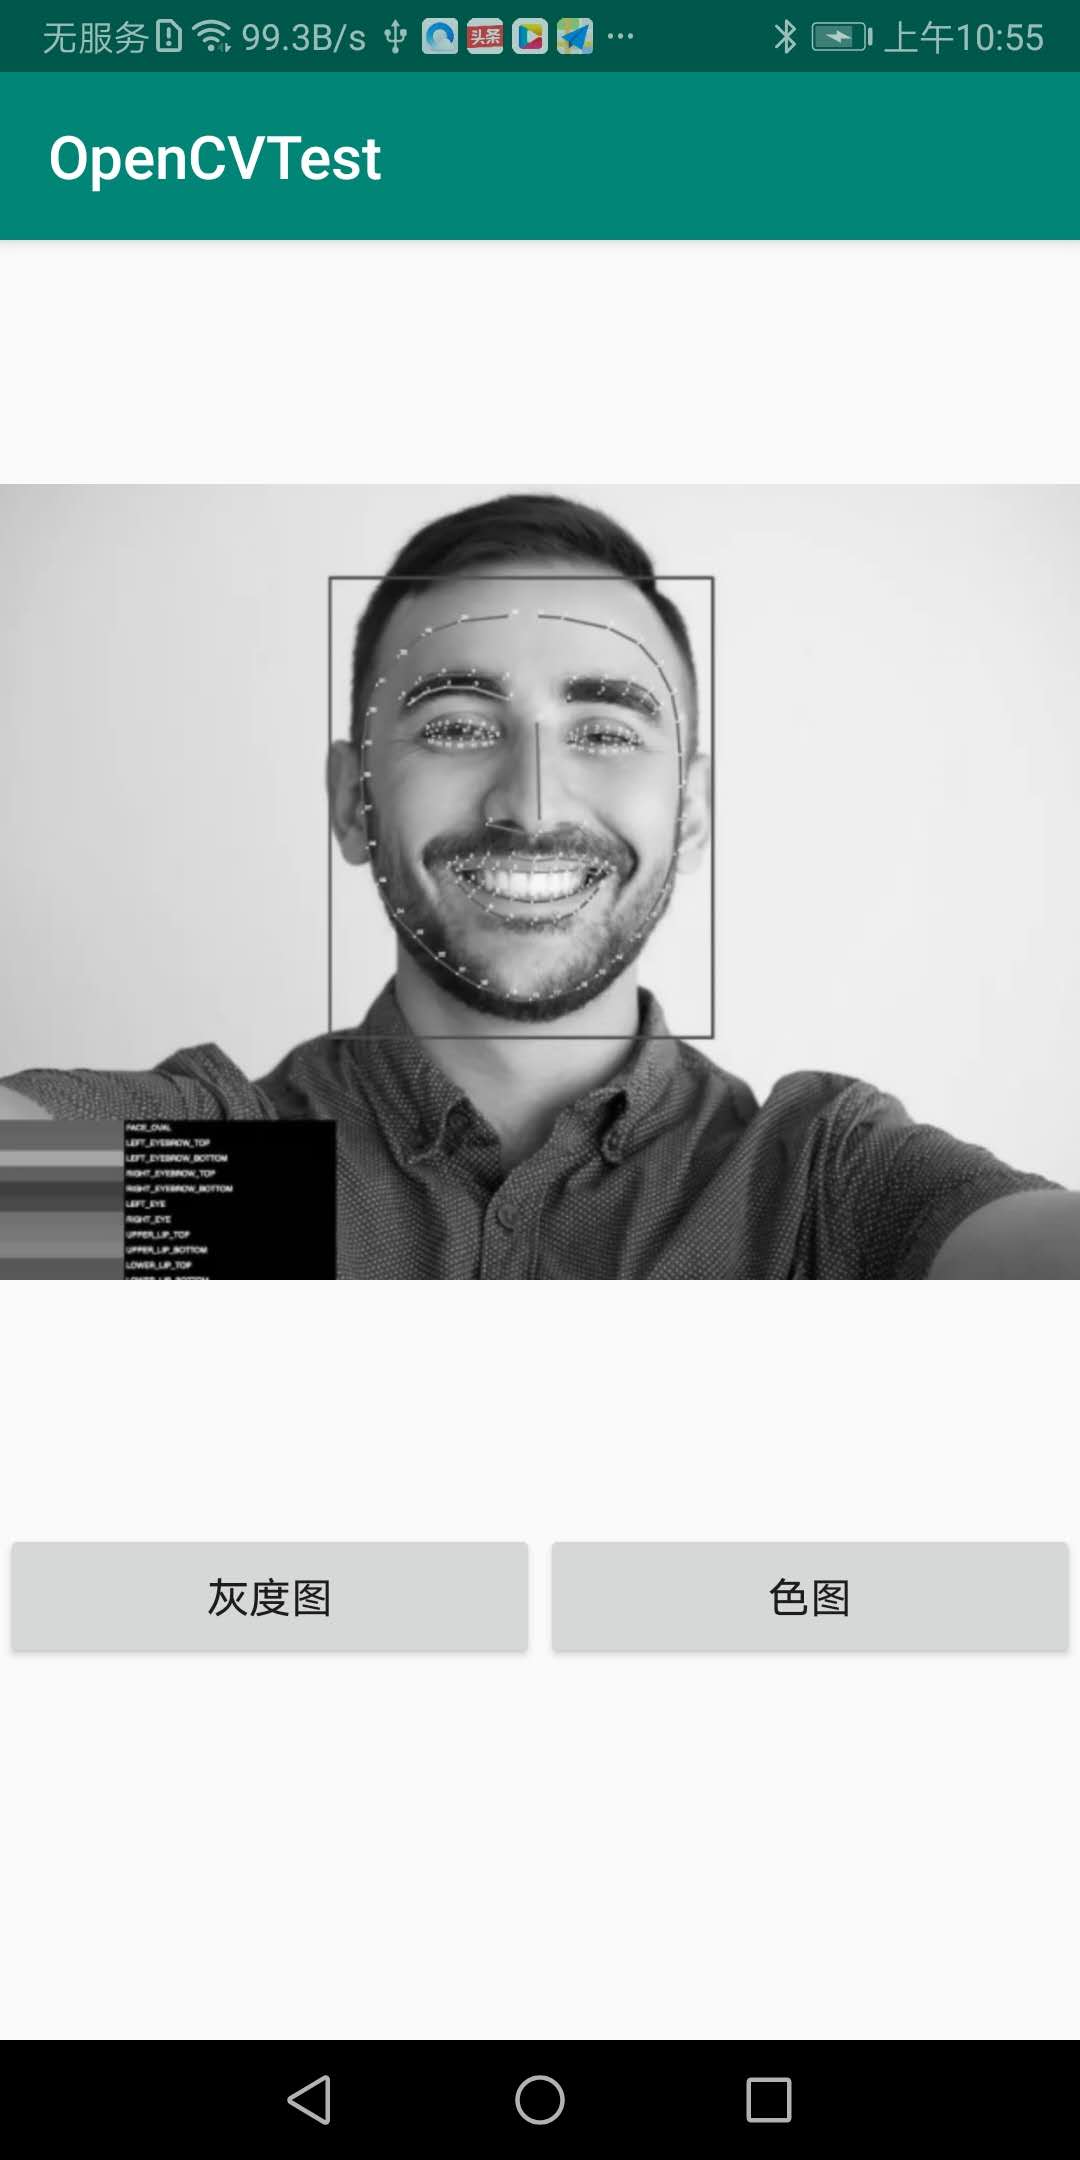
VIII. EFFECT CHARACTERISTICS
Finally, add an Activity to write an interface
As shown in the figure:
Finally, the source address is attached: https://github.com/cayden/OpenCVTest
Thank you for reading, and I hope to forward and pay attention to my public number.