*The author is Peng Lin, senior researcher of VMware CTO Office
Background and KubeFATE architecture
Previously, we introduced how to use KubeFATE to deploy a docker based on docker in the articles "using KubeFATE to rapidly deploy the federal learning experiment development environment (I)," using KubeFATE to rapidly deploy the federal learning experiment development environment (II) "and" deep neural network federal learning using fat for image recognition " Compose's fat federate learning cluster is convenient for you to experience federate learning quickly. However, with the formal use of Federated learning, the training set and model will gradually become larger. In the production environment, we will encounter the following problems:
How does fat cluster adapt to various security and compliance requirements within the enterprise organization, as well as the IT environment such as network and security domain;
One server can't support the computing power demand of Federated learning. How to deploy multiple computing nodes and manage them easily;
If some nodes have problems, whether they have self-healing ability to ensure the reliability of services;
Whether it can realize horizontal expansion and adapt to the growth of business;
Whether fat version can be well upgraded and managed;
Whether there can be different federations in an organization, how to manage multiple clusters according to the needs of different businesses, partners and application scenarios.
Kubernetes is the most popular infrastructure platform at present. A large number of practices have proved that kubernetes is very suitable for internal operation and maintenance of large-scale distributed system platform. According to Ovum, by the end of 2019, half of the big data load was running on Kubrenetes. Our team also recommends kubernetes as a platform to run the fat federated learning cluster production environment. KubeFATE provides a solution for deploying O & m fat in kubernetes.
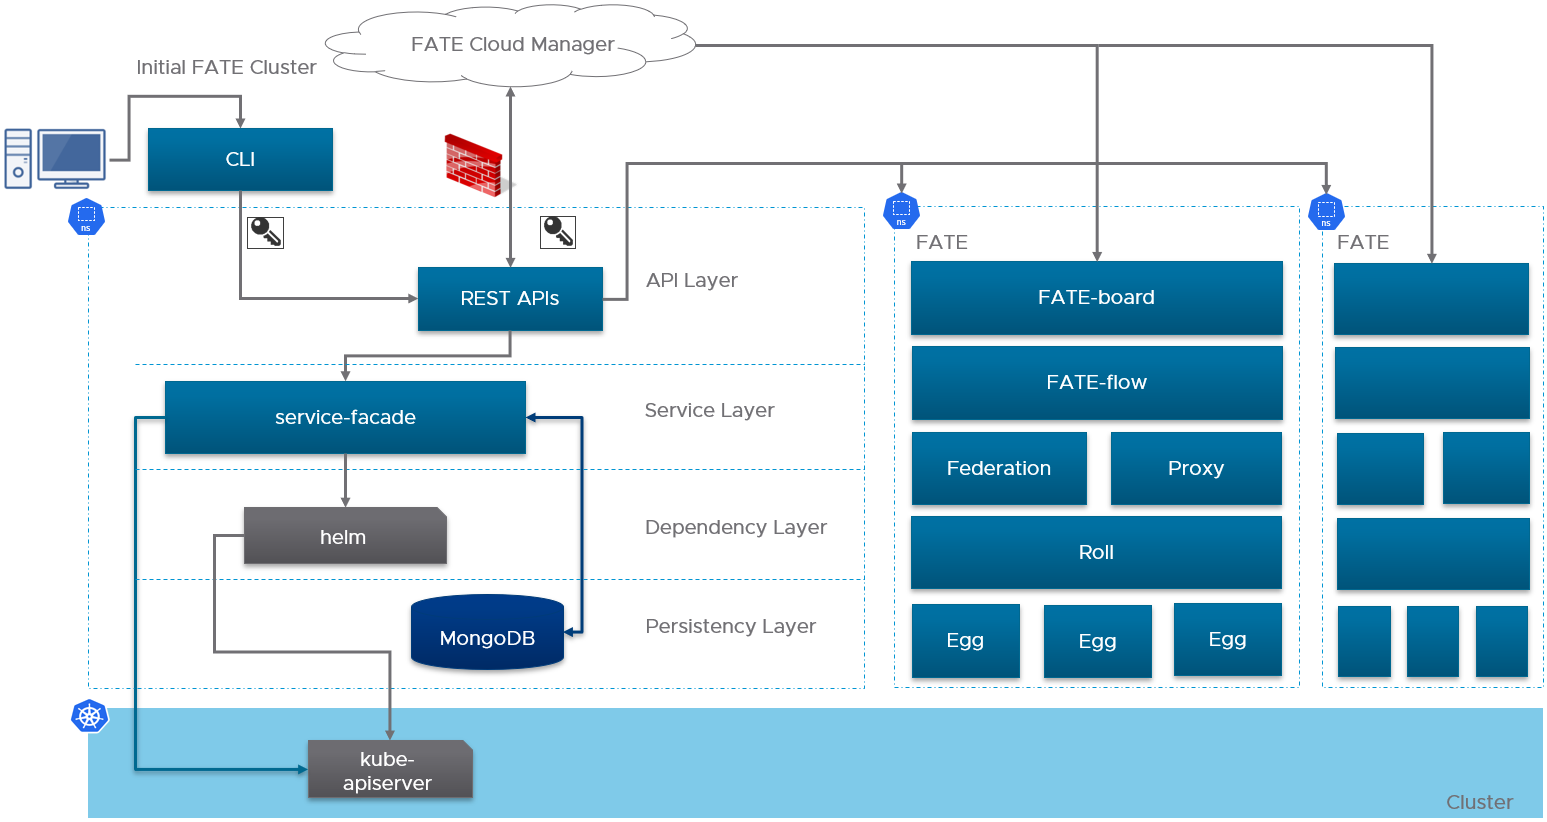
Kubernetes of KubeFATE deploys two modules:
- KubeFATE command line tool: KubeFATE's command line is an executable binary file that users can use to quickly initialize, deploy and manage fat clusters. KubeFATE's command line can be run outside Kubernetes to interact with the KubeFATE service. In the middle, https protocol can be used for SSL encryption and adapt to the firewall rules of the enterprise. Its function module is shown in the figure below:

- KubeFATE service: KubeFATE service is deployed on Kubernetes as an application and provides Restful APIs to the outside, which can be easily integrated with the existing network management operation and maintenance systems of the enterprise.
Quick use of KubeFATE on a Linux server
Deploy two-way federal learning based on MiniKube
In order to better experience the function of KubeFATE, we will demonstrate step by step how to deploy a two-party federated learning cluster using KubeFATE and verify it. The final deployment structure is as follows:
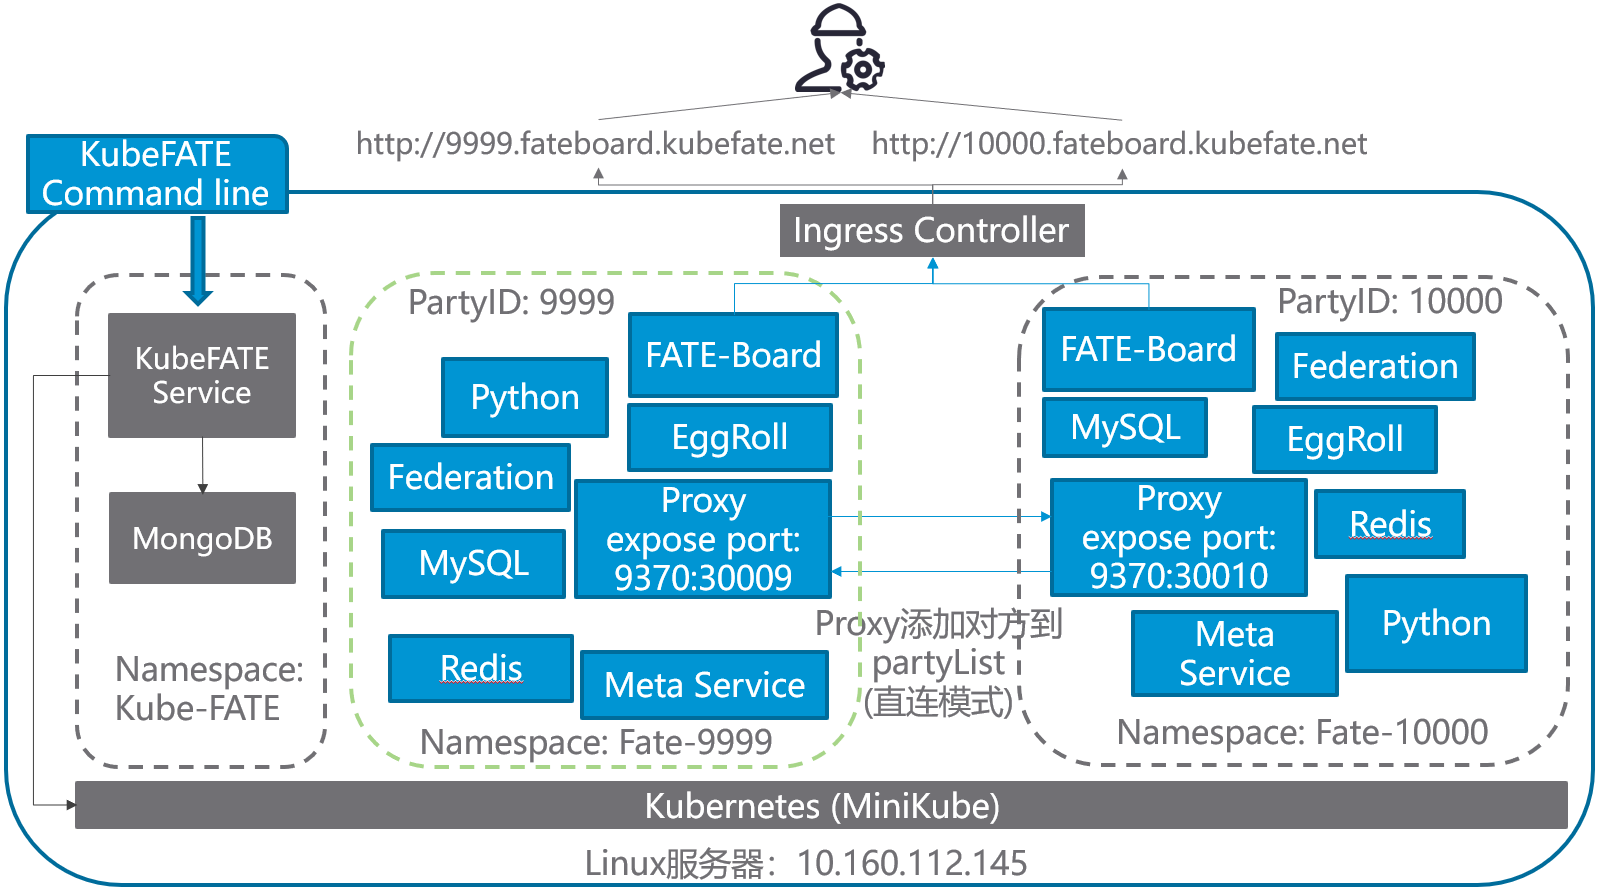
There are two machines in this paper:
The machine used for Demo is a Linux machine. Refer to the first point of the precondition;
Using a browser to access the fat board's machine requires access to the machine used to execute the Demo.
Preconditions
-
A Linux server, the OS version we tested is Ubuntu 18.04
LTS, because it needs to run multi-party computing, the recommended configuration of the server is: 8-core, more than 16G memory; -
The two domains are used by KubeFATE service and fat board respectively. If there is no DNS resolution condition, you can set the hosts mode. The following introduction is based on this situation;
-
Linux server needs to install Docker environment in advance, please refer to Install Docker in Ubuntu for details;
-
To ensure that the installation machine can normally access Docker Hub and Google storage;
-
Create a directory in advance so that it can be used as the working directory for the whole process. The command is as follows:
cd ~ && mkdir demo && cd demo
Note: the IP address of the MiniKube machine described below is 10.160.112.145. Please change the IP address of the experimental machine prepared for you!!!
Tools required for installation
In order to deploy fat using KubeFATE, we need the following tools:
-
MiniKube v1.7.3, if we already have Kubernetes environment, we can directly jump to deploy KubeFATE service;
-
kubectl v1.17.3: the command line of Kubernetes needs to correspond to the specific version of Kubernetes, where the version corresponds to MiniKube v1.7.3;
-
KubeFATE:
- Release: v1.3.1-a

-Service version: v1.0.2

-Command line version: v1.0.2
Install kubectl
curl -LO https://storage.googleapis.com/kubernetes-release/release/v1.17.3/bin/linux/amd64/kubectl && chmod +x ./kubectl && sudo mv ./kubectl /usr/bin
After execution, you can verify whether it is successful,
layne@machine:~/demo$ kubectl version

Client Version: version.Info{Major:"1", Minor:"17", GitVersion:"v1.17.3", GitCommit:"06ad960bfd03b39c8310aaf92d1e7c12ce618213", GitTreeState:"clean", BuildDate:"2020-02-11T18:14:22Z", GoVersion:"go1.13.6", Compiler:"gc", Platform:"linux/amd64"}

The connection to the server localhost:8080 was refused - did you specify the right host or port?
Install MiniKube
curl -LO https://github.com/kubernetes/minikube/releases/download/v1.7.3/minikube-linux-amd64 && mv minikube-linux-amd64 minikube && chmod +x minikube && sudo mv ./minikube /usr/bin
Verify installation results:
layne@machine:~/demo$ minikube version

minikube version: v1.7.3

commit: 436667c819c324e35d7e839f8116b968a2d0a3ff
Download KubeFATE's release package
And install KubeFATE's command line
From the KubeFATE Release page on Github, we find the download package deployed by Kuberetes and download it,
curl -LO https://github.com/FederatedAI/KubeFATE/releases/download/v1.3.0-a/kubefate-k8s-v1.3.0-a.tar.gz && tar -xzf ./kubefate-k8s-v1.3.0-a.tar.gz
Then we can view the contents of the downloaded and unzipped installation package,
layne@machine:~/demo$ ls

cluster.yaml  config.yaml  kubefate  kubefate-k8s-v1.3.0-a.tar.gz  kubefate.yaml  rbac-config.yaml
Because the KubeFATE command line is an executable binary, it can be moved directly to the path directory for easy use,
chmod +x ./kubefate && sudo mv ./kubefate /usr/bin
Then we test whether the kubefate command is available,
layne@machine:~/demo$ kubefate version

* kubefate service connection error, Get http://kubefate.net/v1/version: dial tcp: lookup kubefate.net: no such host

* kubefate commandLine version=v1.0.2
We found that there was an error in getting the KubeFATE service version, because we haven't deployed the KubeFATE service yet, and the command line version has been displayed normally.
At this point, the tools we need have been installed.
Installing Kubernetes with MiniKube
MiniKube supports using different virtual machines to deploy Kubernetes, but in Linux environment, we recommend using Docker directly. This method is very simple, just set - VM driver = none. For further instructions, refer to Install MiniKube - Install a Hypervisor.
sudo minikube start --vm-driver=none
Follow the on-screen instructions and wait a minute. When the command returns without error, we can verify that,
layne@machine:~/demo$ sudo minikube status

host: Running

kubelet: Running

apiserver: Running

kubeconfig: Configured
If your display is the same as above, Congratulations, a single node Kubernetes has been deployed in your server! However, there is still a small step to be done, because KubeFATE provides services through Ingress, and MiniKube does not start Ingress module by default, so it needs to be started manually,
sudo minikube addons enable ingress
Here, our Kubernetes is ready.
Deploy KubeFATE services
Create the namespace and account of Kube fate
The related yaml file rbac-config.yaml has been included in our installation package, and the previous preparations have extracted this file to your working directory. We just need to do it directly,
kubectl apply -f ./rbac-config.yaml
Deploy the Kube fate service in the Kube fate namespace
The related yaml file is also ready in the working directory, using kubectl apply directly,
kubectl apply -f ./kubefate.yaml
Wait for a while. In about 10 seconds, use the following command to see if Kube fate service is deployed well. If the following information is returned (in particular, the STATUS of pod shows the Running STATUS), the KubeFATE service is deployed and Running normally:
layne@machine:~/demo$ kubectl get all,ingress -n kube-fate

NAME                                                    READY    STATUS     RESTARTS   AGE

pod/kubefate-6d576d6c88-mz6ds   1/1        Running    0               16s

pod/mongo-56684d6c86-4ff5m         1/1        Running    0               16s


NAME                           TYPE             CLUSTER-IP          EXTERNAL-IP   PORT(S)     AGE

service/kubefate   ClusterIP   10.111.165.189   <none>            8080/TCP    16s

service/mongo         ClusterIP   10.98.194.57       <none>           27017/TCP   16s


NAME                                          READY    UP-TO-DATE   AVAILABLE   AGE

deployment.apps/kubefate   1/1       1                     1                   16s

deployment.apps/mongo         1/1       1                     1                   16s


NAME                                                                DESIRED   CURRENT   READY   AGE

replicaset.apps/kubefate-6d576d6c88   1               1              1           16s

replicaset.apps/mongo-56684d6c86         1               1              1           16s


NAME                                                 HOSTS                 ADDRESS                PORTS   AGE

ingress.extensions/kubefate   kubefate.net   10.160.112.145   80        16s
Add kubefate.net to the hosts file
Because we want to use the domain name of kubefate.net to access the kubefate service (the domain name is defined in ingress and can be modified if necessary), we need to configure the hosts file on the machine where the kubefate command line is running (note that it is not necessarily the machine where Kubernetes is running). If the network environment has domain name resolution service, you can configure the kubefate.net domain name to point to the IP address of the MiniKube machine, so you do not need to configure the hosts file. Note: the following address 10.160.112.145 is to be replaced with your MiniKube machine address.
sudo -- sh -c "echo \"10.160.112.145 kubefate.net\" >> /etc/hosts"
After adding, you can verify whether it takes effect:
layne@machine:~/demo$ ping -c 2 kubefate.net

PING kubefate.net (10.160.112.145) 56(84) bytes of data.

64 bytes from kubefate.net (10.160.112.145): icmp_seq=1 ttl=64 time=0.080 ms

64 bytes from kubefate.net (10.160.112.145): icmp_seq=2 ttl=64 time=0.054 ms


--- kubefate.net ping statistics ---

2 packets transmitted, 2 received, 0% packet loss, time 1006ms

rtt min/avg/max/mdev = 0.054/0.067/0.080/0.013 ms
At the same time, if we execute kubefate version again, the display will be as follows,
layne@machine:~/demo$ kubefate version

* kubefate service version=v1.0.2

* kubefate commandLine version=v1.0.2
Now that all the preparations are finished, we can start to install fat. It should be noted that the above work only needs to be done once. If fat clusters are added, deleted or updated later, the above work does not need to be executed again.
Install fat using KubeFATE
According to the previous plan, we need to install two alliance parties with ID 9999 and 10000 respectively. In reality, these two parties should be completely independent and isolated organizations. In order to simulate the reality, we need to create their own namespace on Kubernetes first.
Create namespace
We create namespace fate-9999 to deploy 9999, fate-10000 to deploy 10000
kubectl create namespace fate-9999
kubectl create namespace fate-10000
Prepare the respective cluster profile
The KubeFATE installation package contains a brief configuration reference file cluster.yaml for cluster configuration. We can copy one copy to each participant to modify the configuration. If the previous steps are correct, the file is already in the working directory. Run the following command to copy the file:
cp ./cluster.yaml fate-9999.yaml && cp ./cluster.yaml fate-10000.yaml
Modify fate-9999.yaml as follows,
name: fate-9999

namespace: fate-9999

version: v1.3.0-a

partyId: 9999

modules:

  - proxy

  - egg

  - fateboard

  - fateflow

  - federation

  - metaService

  - mysql

  - redis

  - roll

  - python


proxy:

  type: NodePort

  nodePort: 30009

  partyList:

    - partyId: 10000

      partyIp: 10.160.112.145

      partyPort: 30010


egg:

  count: 1
The main modifications are as follows:
-
Delete the exchange part. In order to simplify the configuration, point-to-point connection is used here;
-
Change the configuration of the proxy module, and set the listening port to 30009;
-
Change the partyList section, and configure the IP and listening port of the proxy at the other end of 10000. Note that 10.160.112.145 here needs to be replaced with your server IP address! The port needs to be the same as the listening port set by the proxy in the late-10000.yaml;
-
Change the count of egg from 3 to 1. Egg is the calculation module of fat. Because we use a server to simulate, in order to save resources and avoid errors caused by insufficient resources, it is suggested to modify it to 1.
The configuration of fate-10000.yaml is modified as follows,
name: fate-10000

namespace: fate-10000

version: v1.3.0-a

partyId: 10000

modules:

  - proxy

  - egg

  - fateboard

  - fateflow

  - federation

  - metaService

  - mysql

  - redis

  - roll

  - python


proxy:

  type: NodePort

  nodePort: 30010

  partyList:

    - partyId: 9999

      partyIp: 10.160.112.145

      partyPort: 30009


egg:

  count: 1
Similar to the modification of fate-9999.yaml,
-
Change the name to fate-10000;
-
namespace uses the fate-10000 created previously for 10000 square meters;
-
partyId is set to 10000;
-
Delete the exchange section;
-
The nodePort of the proxy is changed to 30010, which needs to correspond to the partyList information of fate-9999.yaml;
-
Modify the partyList to point to the proxy configuration in fate-9999.yaml;
-
Also change the count of the egg module to 1.
If everything is OK, you can use kubefate cluster install to deploy the two fate clusters,
layne@machine:~/demo$ kubefate cluster install -f ./fate-9999.yaml

create job success, job id=a3dd184f-084f-4d98-9841-29927bdbf627

layne@machine:~/demo$ kubefate cluster install -f ./fate-10000.yaml

create job success, job id=370ed79f-637e-482c-bc6a-7bf042b64e67
In this step, you need to go to the Docker Hub to download the relevant images, so the specific speed has a lot to do with the network speed of the server. If the network speed is fast or the image is ready to be on the server, it can be deployed in about 2 or 3 minutes. We can use the kubefate job ls command to observe the deployment,
layne@machine:~/demo$ kubefate job ls

UUID                                                                   CREATOR METHOD                STATUS   STARTTIME                       CLUSTERID

a3dd184f-084f-4d98-9841-29927bdbf627    admin   ClusterInstall  Success 2020-03-10 12:26:39     2a15d783-67cd-4723-8a5c-50eb6355b6b0

370ed79f-637e-482c-bc6a-7bf042b64e67    admin   ClusterInstall  Success 2020-03-10 12:27:06     16270e8a-20b1-43c7-9c6c-385977d8dfc8
If the STATUS is found to be successful as above, the deployment is successful.
Verify deployment of fat
Test by executing the toy example provided by fat
Toy example is a fast test case for cluster connectivity provided by fat. The test script sets 10000 as the host side and 9999 as the guest side. We use the cluster mode. For details of this example, please refer to: README of toy example
Fat stipulates that the guest side initiates training, so we need to enter the python container of fat-10000,
layne@machine:~/demo$ kubectl get pod -n fate-10000|grep python*

python-dc94c9786-8jsgh          2/2     Running   0          3m13s
Where python-dc94c9786-8jsgh is the ID of Python pod (note that the ID of the following command needs to be replaced with the specific ID value returned by the above command). We use the kubectl exec command to enter the container,
kubectl exec -it python-dc94c9786-8jsgh -n fate-10000 -- /bin/bash
And run toy example in the container,
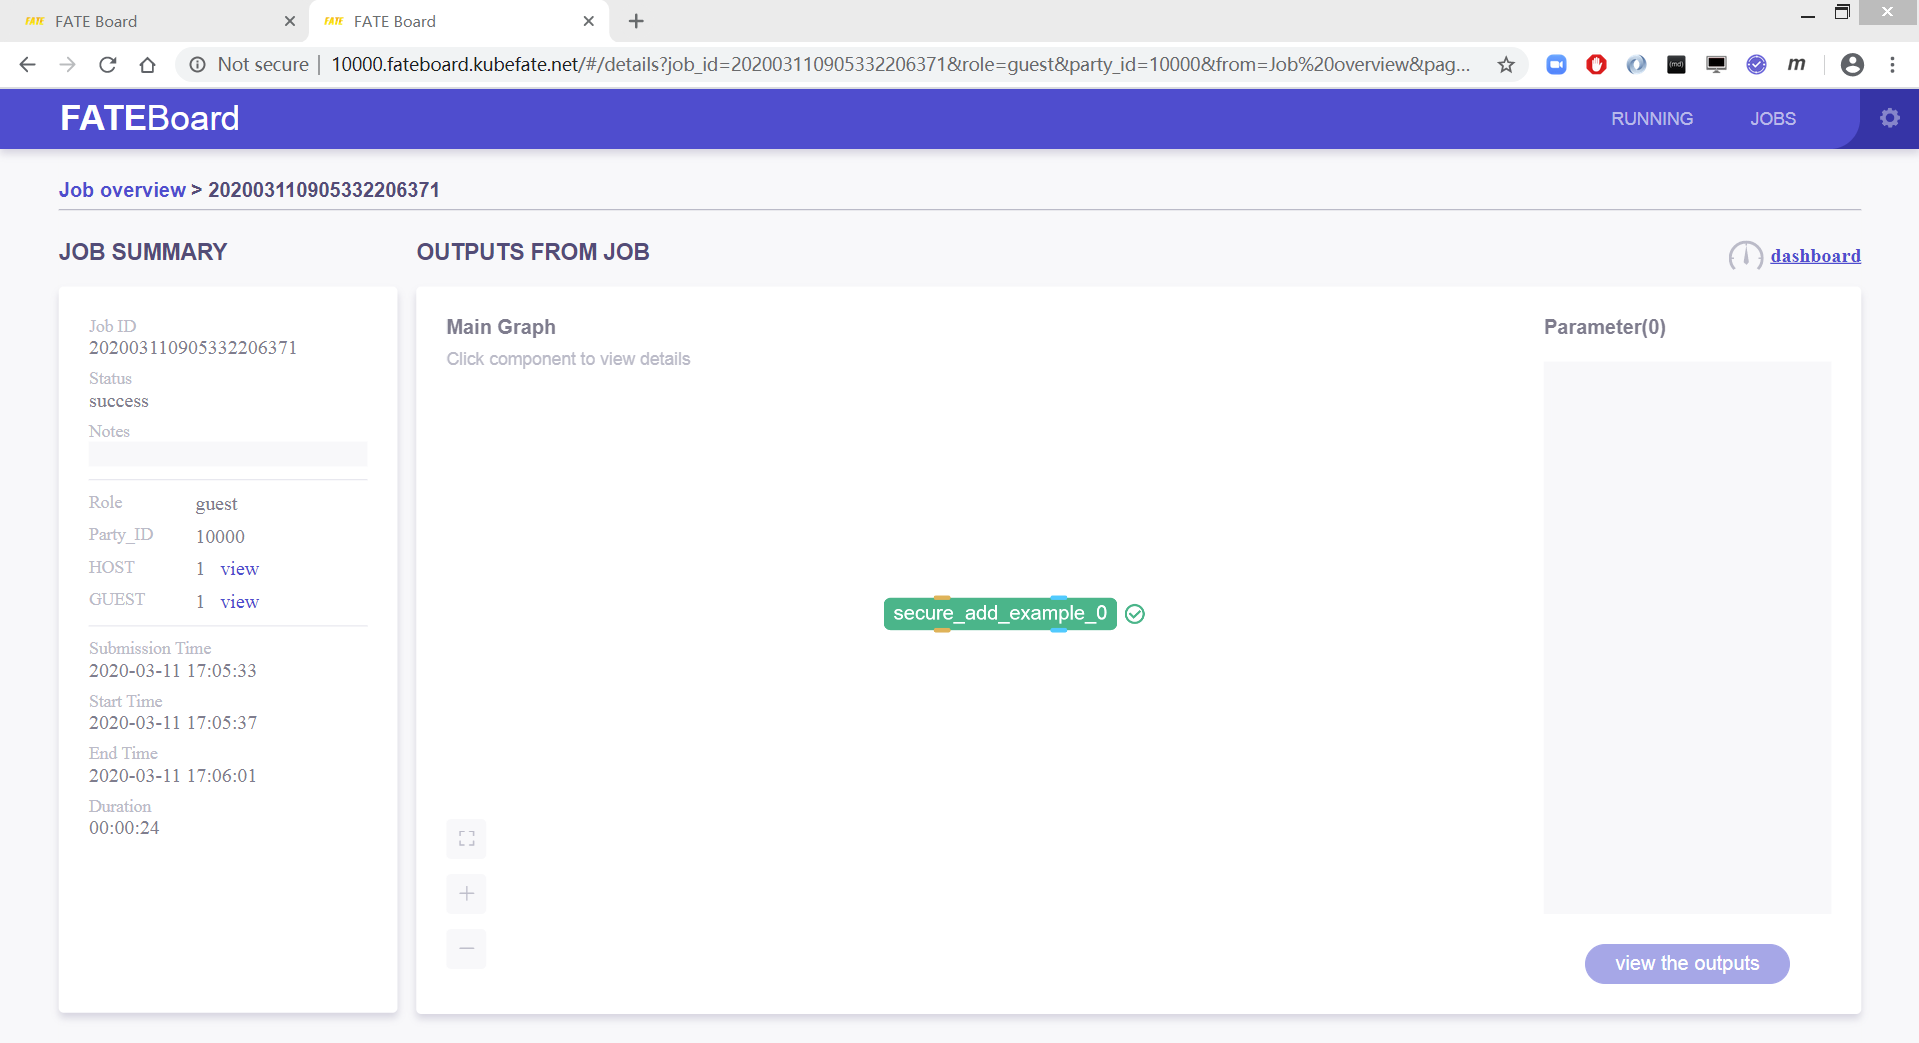
(venv) [root@python-dc94c9786-8jsgh python]# cd examples/toy_example/ && python run_toy_example.py 10000 9999 1

stdout:{

    "data": {

        "board_url": "http://fateboard:8080/index.html#/dashboard?job_id=202003110905332206371&role=guest&party_id=10000",

        "job_dsl_path": "/data/projects/fate/python/jobs/202003110905332206371/job_dsl.json",

        "job_runtime_conf_path": "/data/projects/fate/python/jobs/202003110905332206371/job_runtime_conf.json",

        "logs_directory": "/data/projects/fate/python/logs/202003110905332206371",

        "model_info": {

            "model_id": "guest-10000#host-9999#model",

            "model_version": "202003110905332206371"

        }

    },

    "jobId": "202003110905332206371",

    "retcode": 0,

    "retmsg": "success"

}


job status is running

job status is running

job status is running

job status is running

job status is running

job status is running

job status is running

"2020-03-11 09:05:39,911 - secure_add_guest.py[line:101] - INFO: begin to init parameters of secure add example guest"

"2020-03-11 09:05:39,911 - secure_add_guest.py[line:104] - INFO: begin to make guest data"

"2020-03-11 09:05:42,576 - secure_add_guest.py[line:107] - INFO: split data into two random parts"

"2020-03-11 09:05:51,661 - secure_add_guest.py[line:110] - INFO: share one random part data to host"

"2020-03-11 09:05:52,444 - secure_add_guest.py[line:113] - INFO: get share of one random part data from host"

"2020-03-11 09:05:57,566 - secure_add_guest.py[line:116] - INFO: begin to get sum of guest and host"

"2020-03-11 09:05:58,571 - secure_add_guest.py[line:119] - INFO: receive host sum from guest"

"2020-03-11 09:05:58,643 - secure_add_guest.py[line:126] - INFO: success to calculate secure_sum, it is 2000.0"

(venv) [root@python-dc94c9786-8jsgh toy_example]#
If your output is similar to the above, you will finally return INFO: success to calculate secure_sum, it is xxxx, which means the training is successful, in other words, fat cluster is installed successfully.
View fat board
KubeFATE will configure the fat board in the format http: / / {party {ID}. Fateboard. PartyI d.fateboard.{serviceurl} service. So:
The fat board URL of fat-9999 is: http://9999.fateboard.kubefate.net/
The fat board URL of fat-10000 is: http://10000.fateboard.kubefate.net/
If we don't have a DNS service, we need to match the hosts on the machine that accesses the above domain name, that is, the machine where the browser is located, so that the above domain name points to the server where fat is deployed. In this example, it is 10.160.112.145, which needs to be configured according to your actual IP address. If it is Mac OS or Linux, you can use the following command to configure,
sudo -- sh -c "echo \"10.160.112.145 9999.fateboard.kubefate.net\"  >> /etc/hosts"

sudo -- sh -c "echo \"10.160.112.145 10000.fateboard.kubefate.net\"  >> /etc/hosts"
If it's Windows, we need to
10.160.112.145 9999.fateboard.kubefate.net

10.160.112.145 10000.fateboard.kubefate.net
Add it to C:\WINDOWS\system32\drivers\etc\hosts. For specific methods, please refer to related materials. Then we can use the browser to access the fat board of Party-9999 and Party-10000.
Party-9999 will be displayed as host task completed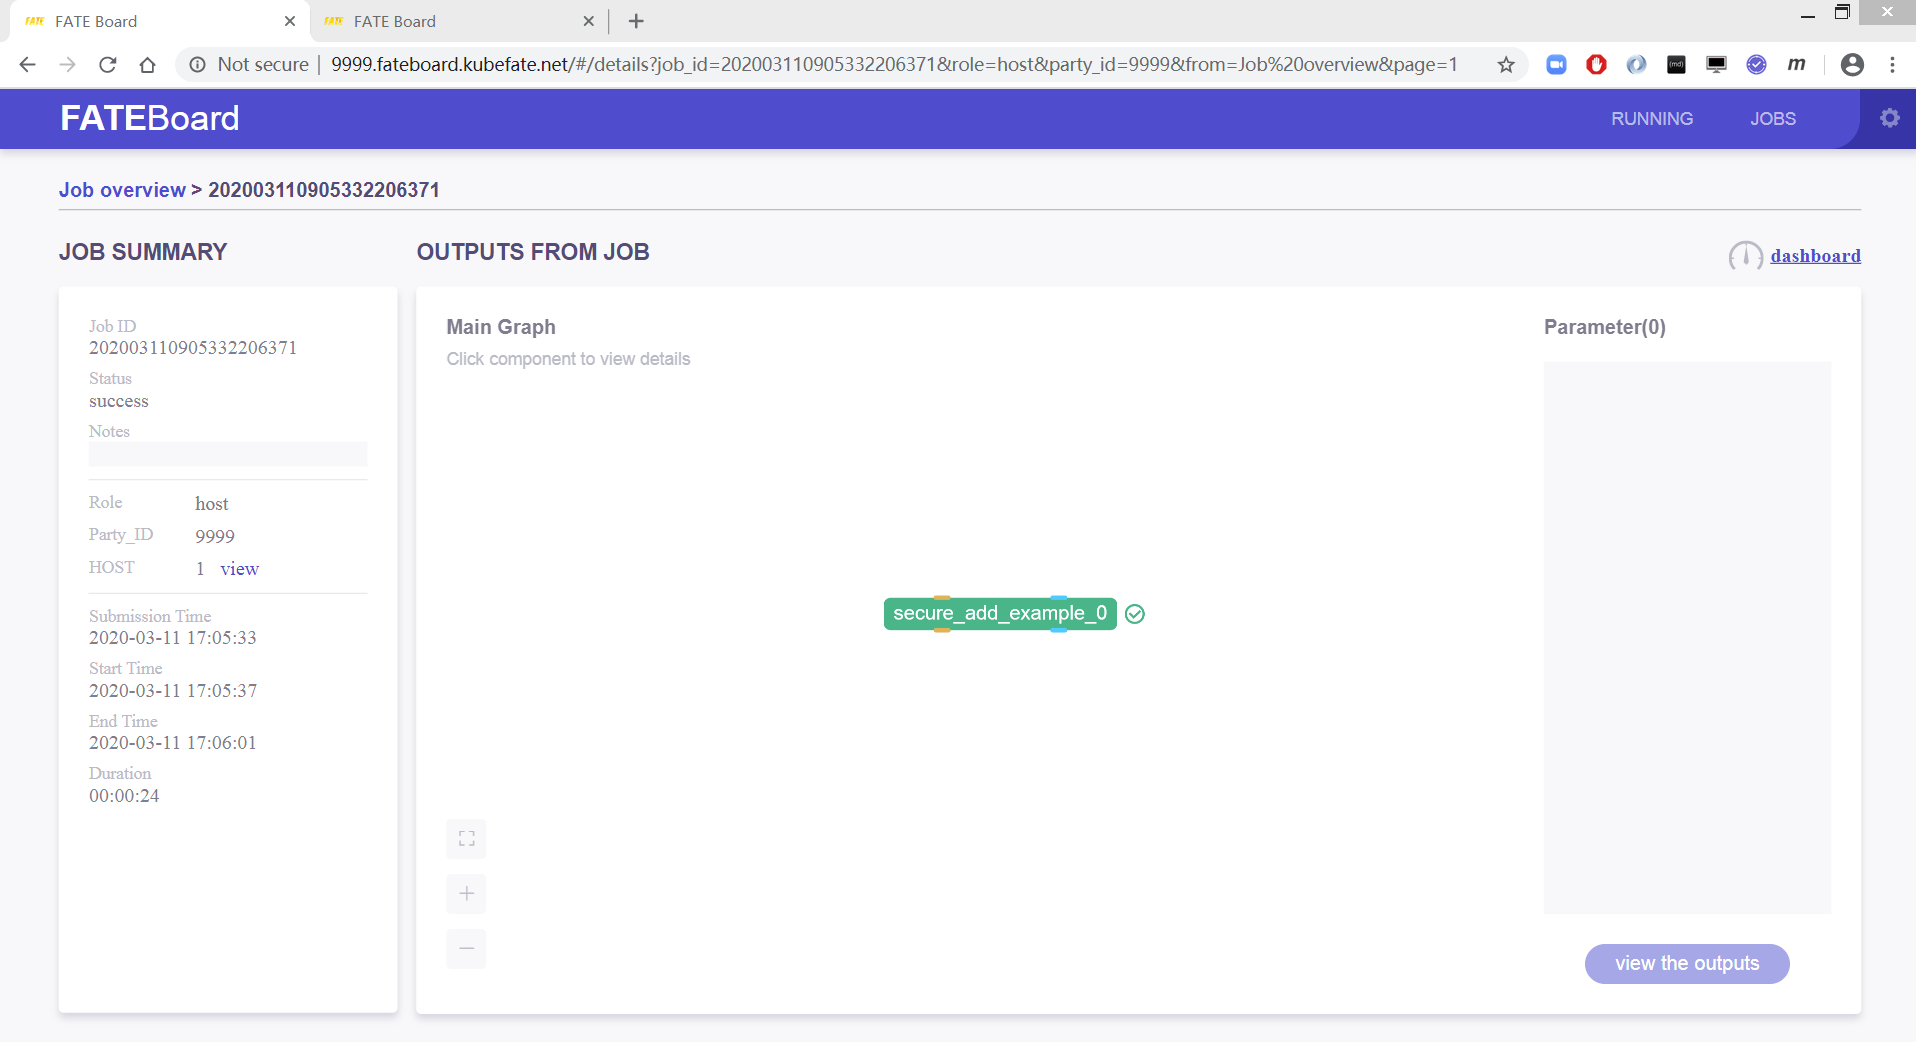
Party-10000 will be displayed as guest end task completion