DSkin encapsulates the Web UI development mode to develop desktop applications, which is very convenient to use Vue. It's a little like WPF
Let's use element UI as a simple example.
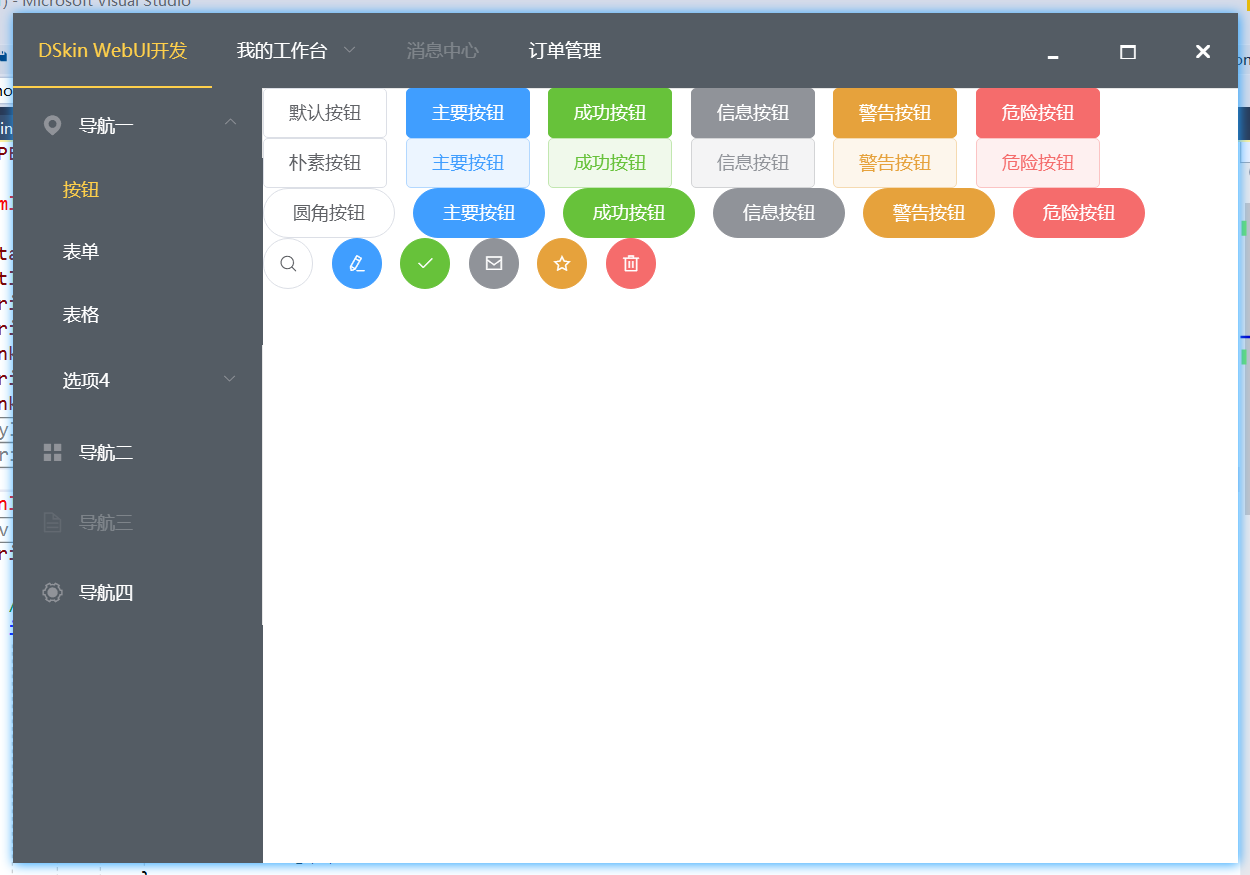
Operation effect; you can change the layout effect according to your own needs.
Element UI template code of main framework
<div id="page" class="shadow"> <el-container> <el-header onmousemove="if(event.button == 0){ MoveWindow(); }" ondblclick="Command_MaxOrNor()"> <el-menu :default-active="activeIndex" class="el-menu-demo" mode="horizontal" @select="handleSelect" background-color="#545c64" text-color="#fff" active-text-color="#ffd04b"> <el-menu-item index="1">DSkin WebUI Development</el-menu-item> <el-submenu index="2"> <template slot="title"> //My workbench </template> <el-menu-item index="2-1">Option 1</el-menu-item> <el-menu-item index="2-2">Option 2</el-menu-item> <el-menu-item index="2-3">Option 3</el-menu-item> <el-submenu index="2-4"> <template slot="title"> //Option 4 </template> <el-menu-item index="2-4-1">Option 1</el-menu-item> <el-menu-item index="2-4-2">Option 2</el-menu-item> <el-menu-item index="2-4-3">Option 3</el-menu-item> </el-submenu> </el-submenu> <el-menu-item index="3" disabled>Message center</el-menu-item> <el-menu-item index="4">Order management</el-menu-item> <span index="5" id="minimize" class="sys-btn" onclick="Command_Min();" onmousemove="event.stopPropagation()">0</span> <span index="6" id="maximize" class="sys-btn" onclick="Command_MaxOrNor()" onmousemove="event.stopPropagation()">1</span> <span index="7" id="close" class="sys-btn" onclick="Command_Close()" onmousemove="event.stopPropagation()">r</span> </el-menu> </el-header> <el-container> <el-aside width="200px"> <el-menu default-active="2" class="el-menu-vertical-demo" background-color="#545c64" text-color="#fff" active-text-color="#ffd04b"> <el-submenu index="1"> <template slot="title"> <i class="el-icon-location"></i> <span>Navigation one</span> </template> <el-menu-item index="1-1" class="open-page" href="button.html">Button</el-menu-item> <el-menu-item index="1-2" class="open-page" href="form.html">form</el-menu-item> <el-menu-item index="1-3" class="open-page" href="table.html">form</el-menu-item> <el-submenu index="1-4"> <template slot="title"> //Option 4 </template> <el-menu-item index="1-4-1">Option 1</el-menu-item> </el-submenu> </el-submenu> <el-menu-item index="2"> <i class="el-icon-menu"></i> <span slot="title">Navigation two</span> </el-menu-item> <el-menu-item index="3" disabled> <i class="el-icon-document"></i> <span slot="title">Navigation three</span> </el-menu-item> <el-menu-item index="4"> <i class="el-icon-setting"></i> <span slot="title">Navigation four</span> </el-menu-item> </el-menu> </el-aside> <el-main> <iframe frameborder="0" allowtransparency="true" src="button.html"></iframe> </el-main> </el-container> </el-container> </div>
Among them, activeIndex is an attribute defined in the template, handleSelect is the method of selecting event binding. We can define these two directly in C ා, and it will be bound automatically. There is no need to write JS manually to new a Vue object binding, which is done automatically in DSkin.
   //This C code is equivalent to JS's  var page=new Vue({el:"#page",data:{ activeIndex:"1",},methods:{handleSelect(a,b,c){ }}});
public class mainframe : DSkin.Forms.MiniBlinkPage
    {
        string _activeIndex = "1";

        public string activeIndex
        {
            get { return _activeIndex; }
            set { OnPropertyChanged(value, ref _activeIndex); }
        }
        [JSFunction]
        public void handleSelect(string a, JsValue b, JsValue c)
        {

        }
    }
In the lower right corner, I use iframe framework page to do this, which facilitates C ා binding and separation of business logic into separate C ා classes.
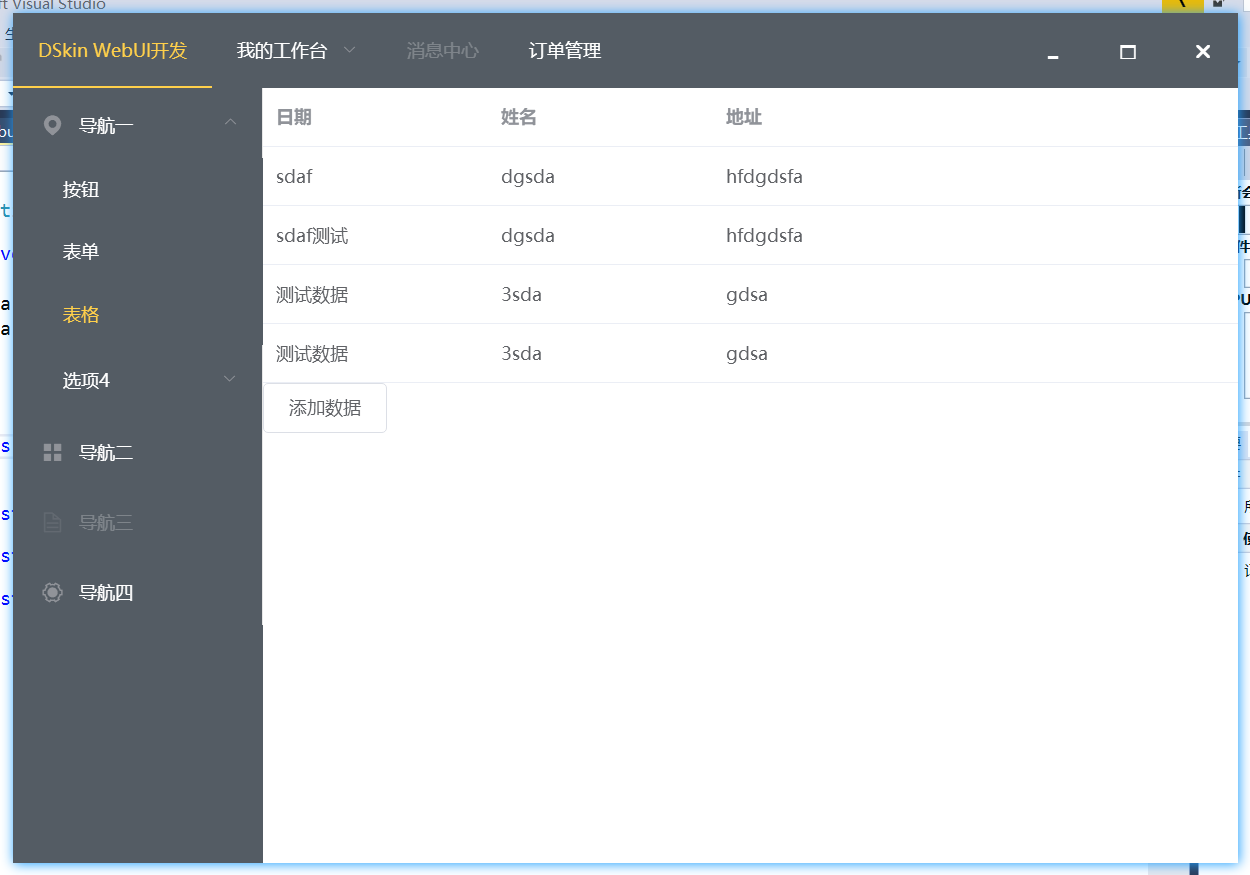
Simple table add data example
<!DOCTYPE html>
<html>
<head>
    <meta charset="utf-8">
    <title></title>
    <script src="js/jquery-1.9.0.min.js"></script>
    <script src="js/vue.js"></script>
    <link href="css/element.css" rel="stylesheet" />
    <script src="js/element.js"></script>
    <link href="css/main.css" rel="stylesheet" />
</head>
<body onload="$('body').addClass('body-active');">
    <div id="page">
        <el-table :data="Data" style="width: 100%">
            <el-table-column prop="date" label="date" width="180">
            </el-table-column>
            <el-table-column prop="name" label="Full name" width="180">
            </el-table-column>
            <el-table-column prop="address" label="address">
            </el-table-column>
        </el-table>
        <el-button onclick="AddData()">Add data</el-button>
    </div>

</body>
</html>
There is a button to add data. Click the button to add a row of data to the table
   public class table : MiniBlinkPage
    {
        public table()
        {
            Data.Add(new data { date = "sdaf", name = "dgsda", address = "hfdgdsfa" });
            Data.Add(new data { date = "sdaf test", name = "dgsda", address = "hfdgdsfa" });
        }

        MiniBlinkCollection<data> data;
    //Data bound in template
        public MiniBlinkCollection<data> Data
        {
            get
            {
                if (data == null)
                {
                    data = new MiniBlinkCollection<data>(this);
                }
                return data;
            }
        }

        [JSFunction]//The method called by the button to add data. Click the button to add a row, and the UI will be updated and displayed
        public void AddData()
        {
            Data.Add(new data { date = "test data", name = "3sda", address = "gdsa" });
            Data.SaveChanges();
        }
    }

    public class data
    {
        public string date { get; set; }
        public string name { get; set; }
        public string address { get; set; }
    }
Operation effect
Generally speaking, it is very simple and convenient, with rich front-end resources, which can quickly develop the desired effect