User and Group Management
1. User Profile
/ The passwd file in the etc directory is the core user profile. Every user's information created is stored in this file. The structure of the passwd file is one line for each user, and each line is fragmented into seven segments.
- User profile: /etc/passwd
[root@sc ~]# cat /etc/passwd

root:x:0:0:root:/root:/bin/bash


The first paragraph represents the user name.
The second paragraph is the placeholder for the password (so the password is not stored in this file)
The third paragraph is the user's uid
 The fourth paragraph is the gid of the user's group
 The fifth paragraph describes and annotates the user's information.
The sixth paragraph is the user's home directory, also known as the host directory.
The seventh paragraph is the user's login shell
 In this file, we can find that the seventh paragraph of information of root user and ordinary user is / bin/bash, which means that these users can log in, and most of the users in the system are sbin/nologin, which means that these users can not log in.
2. Password Profile
There is also a shadow file in the / etc directory. This file is the user's password file. The user's password is stored here. This file corresponds to the passwd file one by one, so this file is used to store and control the user's password. The same file records one user per line, with a colon divided into nine segments.
- Password Profile: /etc/shadow
[root@sc ~]# cat /etc/shadow

root:$6$2Zb5YJ2vO7U0gvq4$lVbjtZM37yIRS3EaU.r9ZhiitI4FJXJLbWyC4QFMoqYxyWTtfW89.2qGesMvUTDQd656CJQxpCTAf7LZwKPdq/::0:99999:7:::


The first paragraph is the user's name.
The second section is the user's password, which is encrypted, because the MD5 algorithm and the ciphertext generated by random numbers can not be cracked or decompiled.
The third paragraph is a number of days, from January 1, 1970 to the last time you changed your password.
The fourth paragraph indicates how many days it will take to change the password. The default is zero, that is, there is no limit.
The fifth paragraph indicates how many days the password will expire, that is, the password must be changed within that number of days.
Paragraph 6 indicates a warning before the password expires, which reminds the user how many days the password will expire.
Paragraph 7 indicates the expiration period of an account.
Paragraph 8 indicates the life cycle of an account
 Paragraph 9 is a reserved field, which has no practical significance.
- man shadow
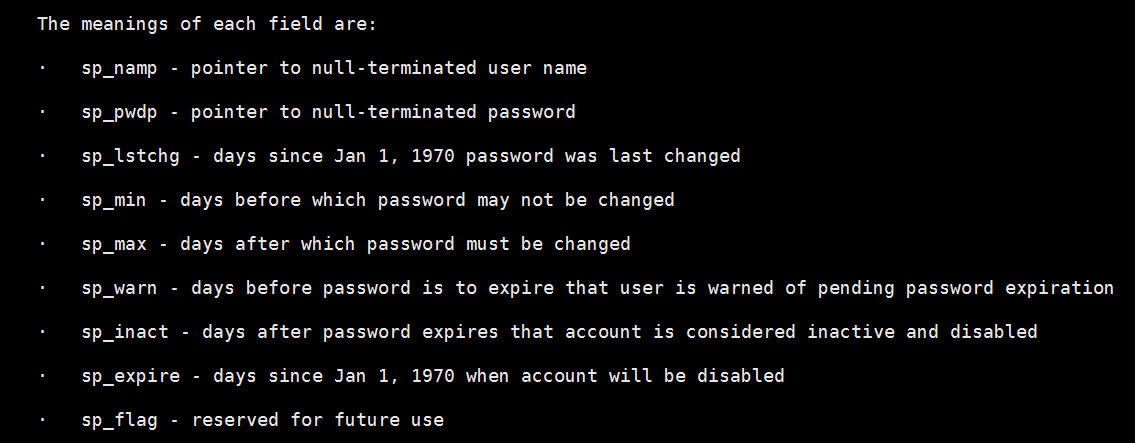
The meaning of each field is:

· sp_namp - A pointer to a user name ending with null
 · sp_pwdp - A pointer to the null end password
 · sp_lstchg - Date of the latest password change (Date calculation method starts on January 1, 1970)
· sp_min - Password must not be changed before this date
 · sp_max - After that, you must change your password
 · sp_warn - A few days before the password expires, the user will be warned that the password expires
 · sp_inact - A few days after the password expires, the account will be considered invalid and disabled
 · sp_expire - Accounts will be disabled from 1 January 1970
 · sp_flag - Reserved for future use
3. groupadd command
groupadd: Create a new user group.
groupadd [-g gid] [-o] [-r] [-f] groupname
| parameter | Parametric Meaning |
|---|---|
| -g (gid) | Specify group ID number |
| -o | Allow group ID number, not unique |
| -r | Join group ID number below 499 system account |
| -f | When joining an existing group, the development program exits |
Examples of main parameters for groupadd:
- View User Group Information
[root@sc ~]# cat /etc/group
- gshadow is a configuration file for user group password
[root@sc ~]# cat /etc/gshadow
- If you use the ls command to list these files one by one, you will find that there is another file with the same name and a - number. This file with a - number is a backup file. If you delete the original file carelessly, you can copy the file. But there may be a problem. If you just create a new user, but the backup file has not yet been updated, the user's information will be lost, but generally it has little impact.
[root@sc ~]# ls /etc/shadow*
/etc/shadow  /etc/shadow-
[root@sc ~]# ls /etc/gshadow*
/etc/gshadow  /etc/gshadow-
[root@sc ~]# ls /etc/passwd*
/etc/passwd  /etc/passwd-
[root@sc ~]# ls /etc/group*
/etc/group  /etc/group-
- Create user groups
[root@test01 ~]# groupadd test01
- gid can be specified at the same time of creation. gid specified in CentOS 7 should be more than 1000, and less than 1000 has been reserved for the system.
[root@test01 ~]# groupadd -g 1005 test02
4. groupdel command
Groupdel Meaning: The groupdel command is used to delete groups.
groupdel [group name]
Examples of groupdel main parameters:
- Delete user groups (provided there are no users in this user group to delete)
[root@test01 ~]# groupdel test02
- Summary: User groups can contain many members. As long as there is a user in the user group, it is impossible to delete the user group.
[root@test01 ~]# groupdel user1

groupdel: Users cannot be removed“ user1"Group
5. useradd command
useradd Meaning: useradd or adduser commands are used to establish user accounts and create the user's starting directory. The permission is superuser.
useradd [-d home] [-s shell] [-c comment] [-m [-k template]] [-f inactive] [-e expire ] [-p passwd] [-r] name
| parameter | Parametric Meaning |
|---|---|
| -c | Add comment text, which is saved in the comment bar of passwd |
| -d | Specify the home directory when the user logs in and replace the default system value / home /< username > |
| -D | Change default values |
| -e | Specify an account's expiration date in MM/DD/YY format, such as 06/30/12. Default means permanent validity |
| -f | Specifies how many days after the password expires to close the account. If the account is 0, it is immediately disabled; if it is - 1, the account is always available. The default value is -1 |
| -g | Specify the group to which the user belongs. Values can make group names GID as well. User groups must already exist, with a default value of 100, or users |
| -G | Specify additional groups to which users belong |
| -m | Automatically create user's login directory |
| -M | Do not automatically create a user's login directory |
| -n | Cancel the creation of groups with user names |
| -r | Establishing System Account |
| -s | Specifies the shell to be used after the user logs in. The default value is / bin/bash |
| -u | Specify the user ID number. This value must be unique in the system. 0-499 is reserved for system user account by default, so the value must be greater than 499. |
Examples of main parameters of useradd:
- The useradd and adduser commands can create an ordinary user. The two commands are used the same way. You can see that the uid of an ordinary user starts at 1000.
[root@test01 ~]# useradd user01
- You can specify the user's uid and the user's gid while creating the user
[root@test01 ~]# useradd -u 1003 -g user01 user2

user2:x:1003:1002::/home/user2:/bin/bash

user01 Group A:1002
- You can specify the user's home directory and shell while creating the user
[root@test01 ~]# useradd -u 1004 -g user01 -d /home/test -s /sbin/
nologin user3

user3:x:1004:1002::/home/test:/sbin/nologin

user01 Group A:1002
- User creation can also specify that the user's home directory is not created, requiring the addition of -M
[root@test01 ~]# useradd -M user4
- If the user's uid is not specified when creating the user, the default is to increase from the previous user's uid. If the gid is not specified when creating a user, the gid will not increase according to the gid of the previous user, but will be consistent with the uid of the user.
[root@sc ~]# groupadd -g 1010 grp3
[root@sc ~]# useradd -g grp3 user6
[root@sc ~]# tail -n5 /etc/passwd
user2:x:1003:1003::/home/user2:/bin/bash
user3:x:1004:1005::/home/user3:/bin/bash
user4:x:1006:1005::/home/aming111:/sbin/nologin
user5:x:1007:1007::/home/user5:/bin/bash
user6:x:1008:1010::/home/user6:/bin/bash
[root@sc ~]# useradd user7
[root@sc ~]# tail -n5 /etc/passwd
user3:x:1004:1005::/home/user3:/bin/bash
user4:x:1006:1005::/home/aming111:/sbin/nologin
user5:x:1007:1007::/home/user5:/bin/bash
user6:x:1008:1010::/home/user6:/bin/bash
user7:x:1009:1009::/home/user7:/bin/bash
[root@sc ~]# adduser user8
[root@sc ~]# tail -n5 /etc/passwd
user4:x:1006:1005::/home/aming111:/sbin/nologin
user5:x:1007:1007::/home/user5:/bin/bash
user6:x:1008:1010::/home/user6:/bin/bash
user7:x:1009:1009::/home/user7:/bin/bash
user8:x:1010:1011::/home/user8:/bin/bash
6. userdel command
userdel Introduction: userdel command deletes user data.
userdel [-r] [user account]
| parameter | Parametric Meaning |
|---|---|
| -r | Delete user login directory and all files in directory |
Examples of main parameters of userdel:
- Delete the user but the user's home directory is not deleted, because the user's home directory may have files, so it is not deleted, left to the system administrator to delete manually.
[root@sc ~]# userdel user8
[root@sc ~]# tail -n3 /etc/passwd
user5:x:1007:1007::/home/user5:/bin/bash
user6:x:1008:1010::/home/user6:/bin/bash
user7:x:1009:1009::/home/user7:/bin/bash
[root@sc ~]# ls /home
aming     sc     user2  user6  user8
aming111  user1  user3  user7
[root@sc ~]# rm -fr /home/user8
- You can also delete the user's home directory and delete the user's home directory at the same time.
[root@sc ~]# userdel -r user7
[root@sc ~]# ls /home/
aming  aming111  sc  user1  user2  user3  user6
7. usermod command
usermod Introduction: usermod command is used to modify user account or to modify user account settings.
Usermod [-LU] [-c < Note >] [-d < Login Directory >] [-e < Validity Period >] [-f < Buffer Days > [-g < Groups >] [-G < Groups >] [-l < Account Name >] [-s] [-u] [User Account]
| parameter | Parametric Meaning |
|---|---|
| - C < Note > | Modify the Note Text of User Account |
| - d < Login Directory > | Modify the directory when the user logs in |
| - e < validity period > | Modify the validity period of the account |
| - f < Buffer Days > | How many days after the password expires, the account will be closed |
| - G < group > | Modify the user's group |
| - G < Group > | Modify additional groups to which users belong |
| - L < Account Name > | Modify user account name |
| -L | Lock the user's password to invalidate it |
| -s (shell) | Modify the shell used by the user after login |
| -u (uid) | Modify user ID |
| -U | Unlock password |
Examples of usermod parameters:
- The usermod command is used to change user attributes
[root@sc ~]# usermod -u 111 username
[root@sc ~]# usermod -g gid username
[root@sc ~]# usermod -d /home/jfdjka username
[root@sc ~]# usermod -s /sbin/nologin username
- Usermod-G user group or gid username extended user group (extended group), a user can belong to more than one group, but gid has only one, for example, I add one more grp1 user, user1 user aming user group
[root@test01 ~]# useradd test100
[root@test01 ~]# usermod -G user02,user03 test100
[root@test01 ~]# id test100
uid=1006(test100) gid=1008(test100) group=1008(test100),1006(user02),1007(user03)
- The id user1 command allows you to view uid, gid, and user groups of user1 users
[root@test01 ~]# id test100
uid=1006(test100) gid=1008(test100) group=1008(test100),1006(user02),1007(user03)
- How to delete a user from multiple user groups under linux instead of deleting users
[root@test01 ~]# usermod -g test100 -G test100 test100

usermod: Changing user attributes
 - g test100: belongs to the group test100
 - G: Add more than one user group parameter, but only add the test 100 group, and everything else is removed.
Last test100: Ordinary users
- The usermod-L command can also lock a user's password, but unlike using the passwd-l command to lock a password, this command locks only one number in front of the password!
[root@sc ~]# usermod -L aming
[root@sc ~]# tail /etc/shadow
postfix:!!:17973::::::
chrony:!!:17973::::::
sc:$6$0NK2/c8N.C0DVPIB$JcjkdT2LHSstcKGr/stgJG0erg6h9ULXLoSbI8Q71iTDk5C/kAEmL9xuKCDaBEluik9lldJE0t44rQlb5t09G1::0:99999:7:::
aming:!$6$viybskWe$WOvVIEe3UJQn70EI44EQkTkqtjYCxDcj0CFTboB0x9w84WWtZY/WPOHUnrz74Gnr73lkF4Eot34nojkpmhO3K/:17980:0:99999:7:::
user1:!!:17980:0:99999:7:::
user2:!!:17980:0:99999:7:::
user3:!!:17980:0:99999:7:::
user4:!!:17980:0:99999:7:::
user5:!!:17980:0:99999:7:::
user6:!!:17980:0:99999:7:::
- The usermod-U command unlocks the password
[root@sc ~]# usermod -U aming
[root@sc ~]# tail /etc/shadow
postfix:!!:17973::::::
chrony:!!:17973::::::
sc:$6$0NK2/c8N.C0DVPIB$JcjkdT2LHSstcKGr/stgJG0erg6h9ULXLoSbI8Q71iTDk5C/kAEmL9xuKCDaBEluik9lldJE0t44rQlb5t09G1::0:99999:7:::
aming:$6$viybskWe$WOvVIEe3UJQn70EI44EQkTkqtjYCxDcj0CFTboB0x9w84WWtZY/WPOHUnrz74Gnr73lkF4Eot34nojkpmhO3K/:17980:0:99999:7:::
user1:!!:17980:0:99999:7:::
user2:!!:17980:0:99999:7:::
user3:!!:17980:0:99999:7:::
user4:!!:17980:0:99999:7:::
user5:!!:17980:0:99999:7:::
user6:!!:17980:0:99999:7:::
8. passwd (User Password Management)
- The passwd command is a command used to modify the user's password and change the password of the root user.
[root@sc ~]# passwd
Change the password of the user root.
New password:
Invalid password: password less than 8 characters
 Re-enter the new password:
passwd: All authentication tokens have been successfully updated.
- Change the password of ordinary users
[root@sc ~]# passwd aming
 Change the password of user aming.
New password:
Invalid password: password less than 8 characters
 Re-enter the new password:
passwd: All authentication tokens have been successfully updated.
- Two! Numbers indicate that the user does not have a password, which means that the user cannot log in.
[root@sc ~]# tail /etc/shadow
postfix:!!:17973::::::
chrony:!!:17973::::::
sc:$6$0NK2/c8N.C0DVPIB$JcjkdT2LHSstcKGr/stgJG0erg6h9ULXLoSbI8Q71iTDk5C/kAEmL9xuKCDaBEluik9lldJE0t44rQlb5t09G1::0:99999:7:::
aming:$6$viybskWe$WOvVIEe3UJQn70EI44EQkTkqtjYCxDcj0CFTboB0x9w84WWtZY/WPOHUnrz74Gnr73lkF4Eot34nojkpmhO3K/:17980:0:99999:7:::
user1:!!:17980:0:99999:7:::
user2:!!:17980:0:99999:7:::
user3:!!:17980:0:99999:7:::
user4:!!:17980:0:99999:7:::
user5:!!:17980:0:99999:7:::
user6:!!:17980:0:99999:7:::
- The two * numbers in the password segment indicate that the user's password is locked and unavailable, which means that the user cannot log in.
[root@sc ~]# head /etc/shadow
root:$6$i8gxKKjg$YeqkLyT0X0DOp8lhZm2qZUbgNUVuN7tQI/8XUxEjhzKY3yWYNRpmlW0.4vDt.vnEOouEcMeC6YSGzJmL6JtgL1:17980:0:99999:7:::
bin:*:17834:0:99999:7:::
daemon:*:17834:0:99999:7:::
adm:*:17834:0:99999:7:::
lp:*:17834:0:99999:7:::
sync:*:17834:0:99999:7:::
shutdown:*:17834:0:99999:7:::
halt:*:17834:0:99999:7:::
mail:*:17834:0:99999:7:::
operator:*:17834:0:99999:7:::
- Passwd-l command can lock a user's password, for example, I want to lock user 1, after the lock is successful, the user's password will be preceded by two numbers!
[root@sc ~]# passwd -l aming
//Lock the password of the user aming.
passwd: Successful operation
[root@sc ~]# tail /etc/shadow
postfix:!!:17973::::::
chrony:!!:17973::::::
sc:$6$0NK2/c8N.C0DVPIB$JcjkdT2LHSstcKGr/stgJG0erg6h9ULXLoSbI8Q71iTDk5C/kAEmL9xuKCDaBEluik9lldJE0t44rQlb5t09G1::0:99999:7:::
aming:!!$6$viybskWe$WOvVIEe3UJQn70EI44EQkTkqtjYCxDcj0CFTboB0x9w84WWtZY/WPOHUnrz74Gnr73lkF4Eot34nojkpmhO3K/:17980:0:99999:7:::
user1:!!:17980:0:99999:7:::
user2:!!:17980:0:99999:7:::
user3:!!:17980:0:99999:7:::
user4:!!:17980:0:99999:7:::
user5:!!:17980:0:99999:7:::
user6:!!:17980:0:99999:7:::
- The passwd-u command can unlock the user's password, after which the first two! Numbers of the user's password disappear.
[root@sc ~]# passwd -u aming
//Unlock the password of the user aming.
passwd: Successful operation
[root@sc ~]# tail /etc/shadow
postfix:!!:17973::::::
chrony:!!:17973::::::
sc:$6$0NK2/c8N.C0DVPIB$JcjkdT2LHSstcKGr/stgJG0erg6h9ULXLoSbI8Q71iTDk5C/kAEmL9xuKCDaBEluik9lldJE0t44rQlb5t09G1::0:99999:7:::
aming:$6$viybskWe$WOvVIEe3UJQn70EI44EQkTkqtjYCxDcj0CFTboB0x9w84WWtZY/WPOHUnrz74Gnr73lkF4Eot34nojkpmhO3K/:17980:0:99999:7:::
user1:!!:17980:0:99999:7:::
user2:!!:17980:0:99999:7:::
user3:!!:17980:0:99999:7:::
user4:!!:17980:0:99999:7:::
user5:!!:17980:0:99999:7:::
user6:!!:17980:0:99999:7:::
- Passwd -- The stdin command can change the user's password, which may be used in shell scripts
[root@sc ~]# passwd --stdin user5
 Change the password of user user5.
123
 passwd: All authentication tokens have been successfully updated.
- Using this command to change the user's password is plain text and does not require a second confirmation password, so you can set a string directly to the user's password using a pipe character.
[root@sc ~]# echo "123" |passwd --stdin user5
 Change the password of user user5.
passwd: All authentication tokens have been successfully updated.
- The echo-e command can display a newline character n\t in a single line command
[root@sc ~]# echo "123\nsss"
123\nsss
[root@sc ~]# echo -e "123\nsss"
123
sss
[root@sc ~]# echo -e "123\tsss"
123	sss
- So you can use this even if you don't use the passwd command -- the stdin option can set your password with just one command
[root@sc ~]# echo -e "123\n123" |passwd user3
 Change user user3's password.
New password: Invalid password: password less than 8 characters
 Re-enter the new password: passwd: All authentication tokens have been successfully updated.
Principles for setting passwords:
The length of the password should be greater than or equal to 10 bits (except in special cases)
Passwords should include numeric capital letters, lowercase letters and special characters
It's better not to have regular passwords.
Passwords should not contain personal information, such as names, birthdays, etc.
Regular password replacement
9. mkpasswd command
Introduction to mkpasswd: mkpasswd command generates random passwords.
| parameter | Parametric Meaning |
|---|---|
| -l | Specify password length |
| -s | Short for special, specifying the number of special characters |
| -d | Number of specified numbers: mkpasswd command cooperates with echo, passwd command and pipeline character“ |
Examples of mkpasswd main parameters:
- mkpasswd is the abbreviation of make password. It is a tool and a tool for generating passwords. Usually this command needs to be installed by itself and expect package needs to be installed.
[root@sc ~]# yum install -y expect
- Once installed, you can randomly generate a password using the mkpasswd command
[root@sc ~]# mkpasswd
p2{aVH6ww
- Mkpasswd-l can specify the length of the generated password, for example, I can specify the length of a 12-bit password.
[root@sc ~]# mkpasswd -l 12
4Zadnvb4C{kw
- You can also specify that the generated password contains several special symbols, such as a 12-bit password with five special symbols.
[root@sc ~]# mkpasswd -l 12 -s 5
)~09A-q\hD<l
- Or specify that the generated password does not contain special characters
[root@sc ~]# mkpasswd -l 12 -s 0
tqpjSe72cSdu
10. su command
Introduction to su: The Su command is used to change the identity of other users. In addition to root, the user's password needs to be typed.
- The su command is used to switch users, such as I want to switch from root to aming.
[root@sc ~]# su - aming
[aming@sc ~]$ whoami
aming
[aming@sc ~]$ id
uid=1001(aming) gid=1001(aming) group=1001(aming),1005(grp2),1007(user5) Environmental Science=unconfined_u:unconfined_r:unconfined_t:s0-s0:c0.c1023
- This - option is to completely switch the user's meaning, if not - option, but the switch is not complete, such as the current home directory or root, environment variables or the configuration of root, and so on.
[root@sc ~]# su aming
[aming@sc root]$ pwd
/root
[aming@sc root]$ su - root
 Password:
Last logon: March 25, 18:59:00 CST 2019pts/1
[root@sc ~]# su - aming
 Last logon: March 25, 18:59:12 CST 2019pts/1
[aming@sc ~]$ pwd
/home/aming
- You can use the su command to execute a command as a user, and the user will not log in.
[aming@sc ~]$ su - -c "touch /tmp/aming.111" aming
[aming@sc ~]$ ls -lt /tmp/ |head
//Total dosage 12
-rw-rw-r--. 1 aming aming   0 3month  25 19:02 aming.111  # This is aming user in/tmp/Files created below
drwx------. 2 root  root    6 3month  25 10:23 vmware-root_5487-3853949434
drwx------. 3 root  root   17 3month  25 10:23 systemd-private-4b0698c0cbd84892bd651a034f19be73-chronyd.service-LbZqht
drwx------. 2 root  root    6 3month  24 22:26 vmware-root_5490-2865234879
-rw-r--r--. 1 root  root  540 3month  23 23:03 fstab
-rw-r--r--. 1 root  root  884 3month  23 23:02 passwd
drwx------. 2 root  root    6 3month  23 13:19 vmware-root_5457-3853949403
drwx------. 2 root  root    6 3month  23 01:09 vmware-root_5437-4148145672
drwx------. 2 root  root    6 3month  22 20:43 vmware-root_5411-4147621393
[aming@sc ~]$ id aming
uid=1001(aming) gid=1001(aming) group=1001(aming),1005(grp2),1007(user5)
[aming@sc ~]$ date
2019year 03month 25Sunday, Monday 19:06:45 CST
- Ordinary users need to enter passwords when they switch to root or other ordinary users with su command, while root users need not enter passwords when switching to ordinary users.
In one case, an ordinary user does not have a home directory, which is a bit different from other users when they log in to this user.
[aming@sc ~]$ pwd
/home/aming
[aming@sc ~]$ su - user5
 Password:
su: Warning: Cannot change to / home/user5 directory: No file or directory
-bash-4.2$
- To get the user back to normal, you need to use root to create a home directory for the user in the home directory, and then copy the configuration file of the home directory into it.
1. View the properties of user5 in / root / environment and create a home directory and change ownership and group
Last login: 1 3month 25 18:59:31 CST 2019pts/1 upper
[root@sc ~]# id user5
uid=1007(user5) gid=1007(user5) group=1007(user5)
[root@sc ~]# mkdir /home/user5
[root@sc ~]# chown user5:user5 /home/user5
2. Copy the configuration file of / etc/skel / directory. This / etc/skel / directory is the template directory. The configuration file is common to all users. Copy it to / home / user 5 / and change the owner and subgroup of / home / user 5 / directory.
[root@aminglinux01 ~]# su - user5  #Switch user5 again
//Last login: 2 4month 23 12:17:02 CST 2019pts/0 upper
-bash-4.2$ ls -la
//Total dosage 0
drwxr-xr-x   2 user5 user5   6 4month  23 12:19 .  #No configuration files
drwxr-xr-x. 19 root  root  247 4month  23 12:19 ..
-bash-4.2$ su - root
//Password:
//Last login: 2 4month 23 12:19:08 CST 2019pts/0 upper
[root@sc ~]# ls /etc/skel/
[root@sc ~]# ls -la /etc/skel/  # See /etc/skel The following configuration file
//Total dosage 24
drwxr-xr-x.  2 root root   62 4month  11 2018 .
drwxr-xr-x. 75 root root 8192 3month  25 18:39 ..
-rw-r--r--.  1 root root   18 10month 31 01:07 .bash_logout
-rw-r--r--.  1 root root  193 10month 31 01:07 .bash_profile
-rw-r--r--.  1 root root  231 10month 31 01:07 .bashrc
[root@sc ~]# cp /etc/skel/.bash* /home/user5/  # hold /etc/skel/ Copy the template file to /home/user5/ in
[root@sc ~]# chown -R user5:user5 !$  # change /home/user5 Subordinate group
chown -R user5:user5 /home/user5/
3. Normal login
[root@sc ~]# su - user5
 Last logon: March 25 19:08:12 CST 2019pts/1
[user5@sc ~]$
11. sudo command
Sudo introduction: sudo command allows ordinary users to temporarily designate a user to execute a command, generally used to temporarily authorize the identity of root users to ordinary users.
- View Configuration File Command
The reason for opening a file with this command is that grammar errors can be detected when editing this configuration file.
[root@sc ~]# visudo
Note: When giving users specific commands, write the absolute path of the command file and divide it with commas and spaces.


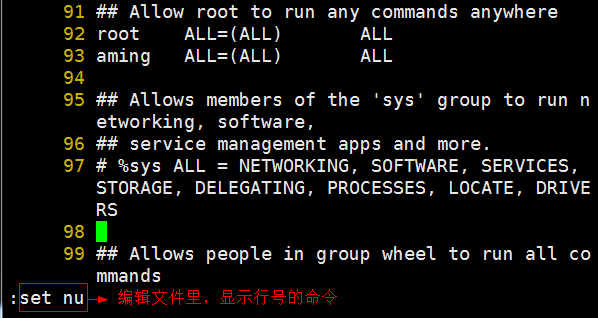

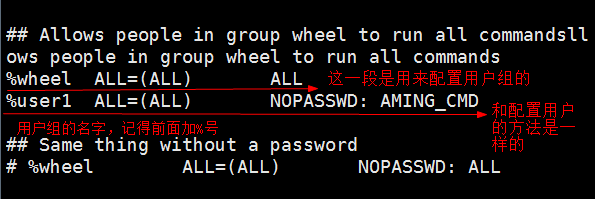
## Allow root to run any commands anywhere
root    ALL=(ALL)       ALL
aming   ALL=(ALL)       ls,mv,cat

## Allows members of the 'sys' group to run networking, software,
## service management apps and more.
# %sys ALL = NETWORKING, SOFTWARE, SERVICES, STORAGE, DELEGATING, PROCESSES, LOCATE, DRIVERS

## Allows people in group wheel to run all commands
%wheel  ALL=(ALL)       ALL

## Same thing without a password
# %wheel        ALL=(ALL)       NOPASSWD: ALL

## Allows members of the users group to mount and unmount the
## cdrom as root
# %users  ALL=/sbin/mount /mnt/cdrom, /sbin/umount /mnt/cdrom

## Allows members of the users group to shutdown this system
# %users  localhost=/sbin/shutdown -h now
:wq
">/etc/sudoers: grammatical error near line 101 <"
What are you doing now?
Options are:
  Reedit sudoers file (e)
  Exit without saving changes to sudoers files (x)
  Exit and save changes to sudoers file (dangerous! (Q)

What are you doing now? e
## Allow root to run any commands anywhere
root    ALL=(ALL)       ALL
aming   ALL=(ALL)       /usr/bin/ls,/usr/bin/mv,/usr/bin/cat
- Ordinary users do not have enough privileges to view the root directory
[aming@sc ~]$ ls /root/
ls: Unable to open directory/root/: insufficient privilege
- But since we just granted aming users the right to execute commands as root users temporarily using sudo commands in the configuration file, you can view the root directory using sudo commands.
[aming@sc ~]$ sudo /usr/bin/ls /root/

We trust that you have learned about the daily precautions from the system administrator.
To sum up, there are only three points:

    # 1) Respect the privacy of others.
    # 2) Consider the consequences and risks before input.
    # 3) The greater the power, the greater the responsibility.

The password of [sudo] aming:
233.txt  anaconda-ks.cfg
[aming@sc ~]$ sudo /usr/bin/ls /root/
233.txt  anaconda-ks.cfg
[aming@sc ~]$ cat /root/3.txt
 cat: /root/3.txt: insufficient permissions
[aming@sc ~]$ sudo cat /root/3.txt
 The password of [sudo] aming:
111
- Add a PASSWD when granting permissions in the configuration file: You don't need to enter a password when ordinary users use sudo commands
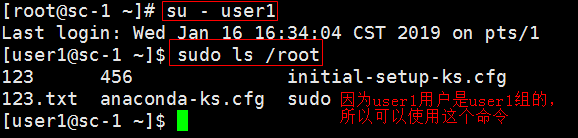
## Allow root to run any commands anywhere
root    ALL=(ALL)       ALL
aming   ALL=(ALL)       /usr/bin/ls,/usr/bin/mv,/usr/bin/cat
user5   ALL=(ALL)       NOPASSWD: /usr/bin/ls,/usr/bin/cat
[root@sc ~]# su - user5
//Last login: 1 3month 25 19:24:06 CST 2019pts/1 upper
[user5@sc ~]$ sudo ls /root/
233.txt  3.txt	anaconda-ks.cfg
- Configure the use of aming user command aliases
## Command Aliases
## These are groups of related commands...

## Networking
# Cmnd_Alias NETWORKING = /sbin/route, /sbin/ifconfig, /bin/ping, /sbin/dhclient, /usr/bin/net, /sbin/iptables, /usr/bin/rfcomm, /usr/bin/wvdial, /sbin/iwconfig, /sbin/mii-tool
Cmnd_Alias AMING_CMD = /usr/bin//ls, /usr/bin/mv, /usr/bin/cat
## Installation and management of software
# Cmnd_Alias SOFTWARE = /bin/rpm, /usr/bin/up2date, /usr/bin/yum
## Allow root to run any commands anywhere
root    ALL=(ALL)       ALL
aming   ALL=(ALL)       AMING_CMD
user5   ALL=(ALL)       NOPASSWD: /usr/bin/ls,/usr/bin/cat
[root@sc ~]# su - aming
//Last login: 1 3month 25 19:55:41 CST 2019pts/1 upper
[aming@sc ~]$ sudo ls /root/
[sudo] aming Password:
233.txt  3.txt	anaconda-ks.cfg
[aming@sc ~]$ sudo cat /root/3.txt
111
- Configure permissions for user groups
12. Restrict root remote login
- Because the password of root user is very important, it can not be easily known by others, so we need to enable ordinary users to log in to root user without knowing the password.
1. First edit the configuration file using the visudo command
## User Aliases
## These aren't often necessary, as you can use regular groups
## (ie, from files, LDAP, NIS, etc) in this file - just use %groupname
## rather than USERALIAS
# User_Alias ADMINS = jsmith, mikem
User_Alias AMINGS = aming, user5, user6
## Next comes the main part: which users can run what software on
## which machines (the sudoers file can be shared between multiple
## systems).
## Syntax:
##
##      user    MACHINE=COMMANDS
##
## The COMMANDS section may have other options added to it.
##
## Allow root to run any commands anywhere
root    ALL=(ALL)       ALL
aming   ALL=(ALL)       AMING_CMD
user5   ALL=(ALL)       NOPASSWD: /usr/bin/ls,/usr/bin/cat
AMINGS  ALL=(ALL)       NOPASSWD: /usr/bin/su
2. If the configuration is successful, you can log in to root without password using sudo command
[root@sc ~]# su - aming
 Last logon: March 25 22:54:34 CST 2019pts/0
[aming@sc ~]$ sudo su -
Last login: March 25 22:55:12 CST 2019 from 192.168.94.
[root@sc ~]# whoami
root
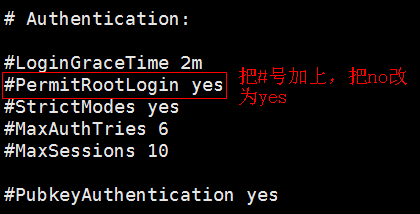
- If the password is not managed by the tool that manages the password, it is usually displayed in clear text. In order to prevent the root user's password from accidentally being acquired by others, it is sometimes necessary to restrict the use of root users for remote login.
1. Modify the sshd.config configuration file
[root@sc ~]# vi /etc/ssh/sshd_config
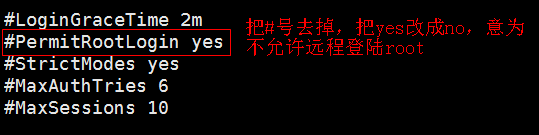
[root@sc ~]# systemctl restart sshd.service
2. After completing the above operation, no matter using the key or password, the root user can not be logged in remotely.
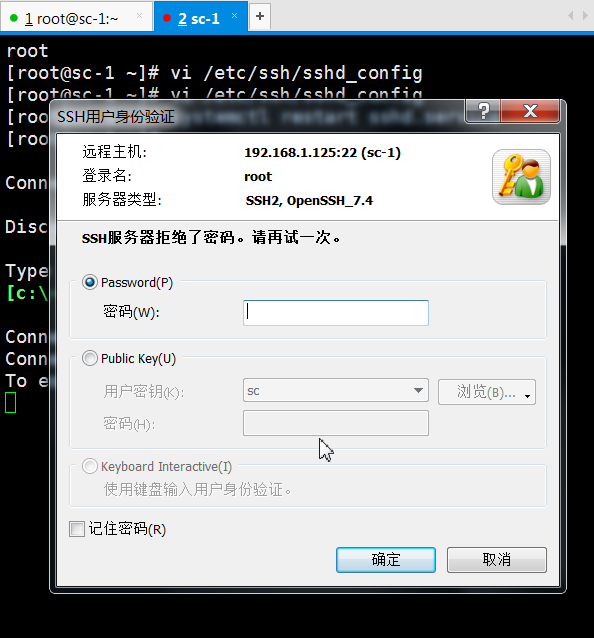
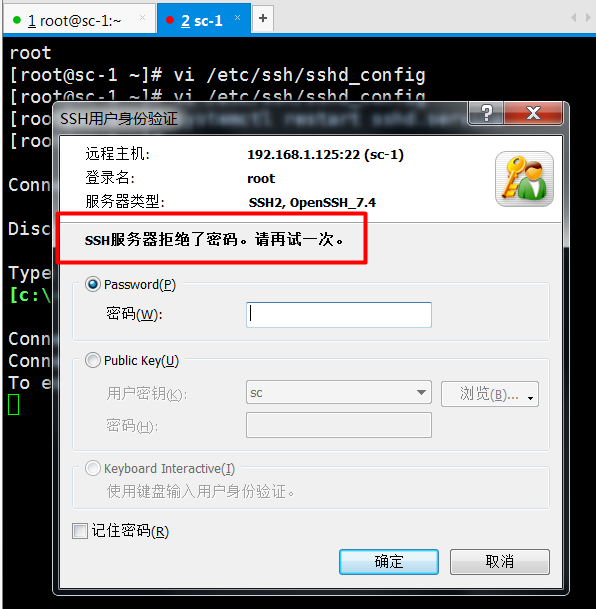
3. Only ordinary users can login remotely.
- Since the sudo command has just been granted to ordinary users to log in to root without password, ordinary users aming can now log in to root without knowing the password.
[aming@sc ~]$ ls /root/
ls: Unable to open directory / root/: Not enough permissions
[aming@sc ~]$ su - root
 Password:
[aming@sc ~]$ sudo su - root
 Last logon: March 25 22:57:02 CST 2019pts/0
 Last failed login: March 25, 23:18:24 CST 2019 from 192.168.94.1 ssh: notty
 There are three failed login attempts after the most successful login.
[root@sc ~]#
- If you want to cancel the restriction, comment out the line just modified in the sshd.config file, and then restart the service. After lifting the restriction, you can login to root remotely.
[root@sc ~]# vi /etc/ssh/sshd_config
[root@sc ~]# systemctl restart sshd.service
13. Extension
Comparison between sudo and su http://www.apelearn.com/bbs/thread-7467-1-1.html
sudo configuration file sample www.opensource.apple.com/source/sudo/sudo-16/sudo/sample.sudoers
sudo is a good tutorial http://www.jianshu.com/p/51338e41abb7
Can sudo-i also log in to root? http://www.apelearn.com/bbs/thread-6899-1-1.html
Suo is a good tutorial: https://www.jianshu.com/p/51338e41abb7
Limited users: chroot https://linux.cn/article-8313-1.html
1 How to Embody User Management in Work
2 usermod-L plus 1! Passwd-l plus 2!
3 cryptographic 666 SHA-512
4 sudo format:
= < command to run > usage scenarios for host fields
Configuration items for the second column of passwords in the password configuration file:
"*"!"The account number is locked.
"!!" indicates that the password has expired.
The string is 6
At the beginning of 6, it indicates that it is encrypted with SHA-512, 11 indicates that it is encrypted with MD5, 22 is encrypted with Blowfish, and 55 is encrypted with SHA-256.
sudo configuration file / etc/sudoers:
Configuration file field root ALL=(ALL) ALL
root: User, User Group, Alias User, Alias Group
First ALL: Login to host: host name, host name, ip segment
Second ALL: Identity, if not set, default root identity
The third ALL: and the second ALL can set NOPASSWD directly; the command must be absolute strength, using "," number between multiple commands.