Recently, I want to make a redis second killing scene with a page for my students. Many of them are java on the internet. Because recently my students are also learning python, I want to write a page with python's related web framework and implement the redis cache database to support second killing scene.
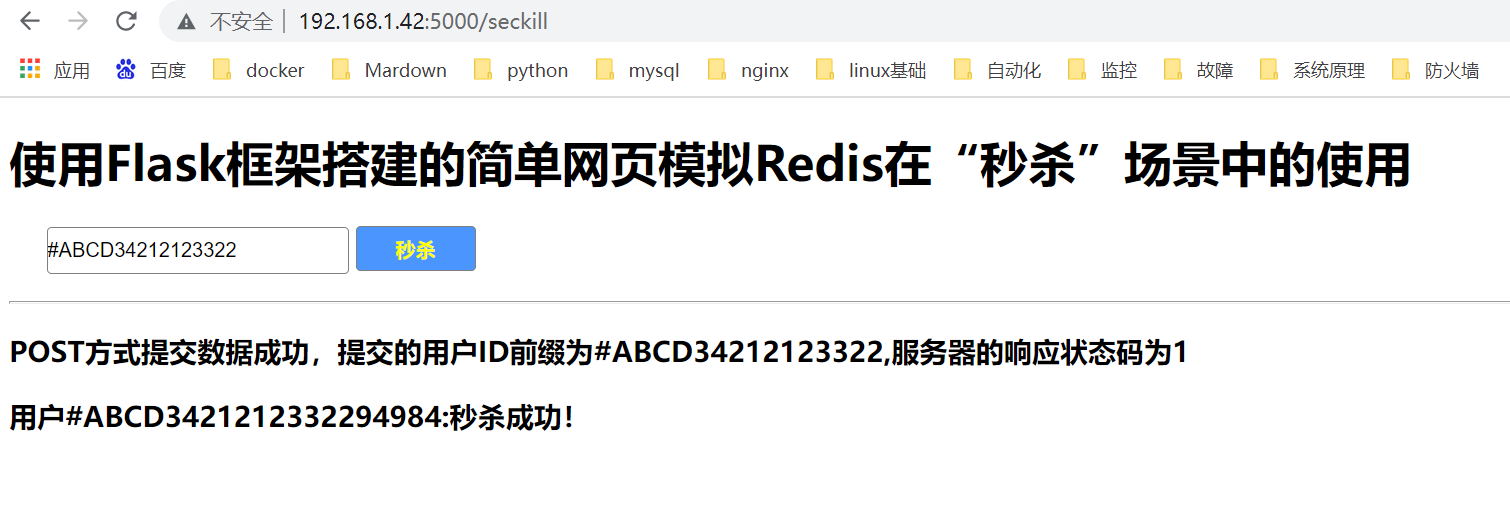
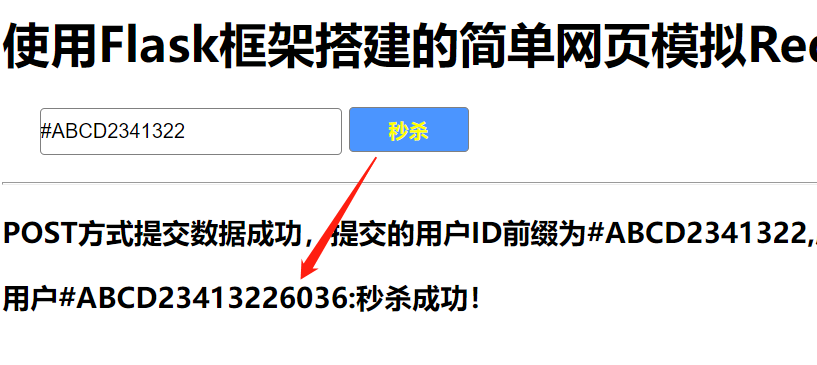
The effect of the page is as follows:
First look at the project code structure:
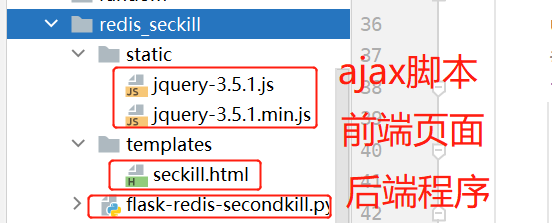
Front-end seckill.html page code
<!DOCTYPE html>
<html lang="en">
<head>
    <meta charset="UTF-8">
    <meta http-equiv="X-UA-Compatible" content="IE=edge">
    <meta name="viewport" content="width=device-width, initial-scale=1.0">
    <title>Redis High Concurrency Testing</title>
    <script src="../static/jquery-3.5.1.min.js"></script>
    <style>
        #user,#submit{
            margin-bottom: 10px;
            padding: 0;
            border: 0.5px solid gray;
            border-radius: 3px;
            width: 200px;
            height: 30px;
            position: relative;
            left: 25px;
        }
        #submit{
            color: #fff;
            background-color: #4b95ff;
            color: yellow;
            font-weight: bolder;
            width: 80px;
        }
    </style>
</head>
<body>
    <h1>Use Flask Simple web page simulation for framing Redis Use in "secondkill" scenarios</h1>
    <input id="user" type="text" name="user" placeholder="user ID">
    <button id="submit" type="submit">Secondkill</button>
    <hr/>
    <h3 id="rep"></h3>
    <h3 id="res"></h3>
</body>
<script>
    request_method = 'POST'
    if(window.XMLHttpRequest){
        var xhr = new XMLHttpRequest();
    }else{
        var xhr = new ActiveXObject('Microsoft.XMLHTTP');
    }
    // AJAX Native Request-post
    $("#submit").on("click",function(){
        console.log($("#user").val())
        xhr.open('post','http://127.0.0.1:5000/seckill',true)
        xhr.setRequestHeader("Content-type","application/x-www-form-urlencoded")
        xhr.send('msg='+$("#user").val())
        request_method = 'POST'
    })

    xhr.onreadystatechange = function(){
        if (xhr.readyState==4&&xhr.status==200){
            // Convert data in JSON format to a dictionary
            console.log($.parseJSON(xhr.response))
            console.log(JSON.parse(xhr.response))
            // Modify the content of the original page
            console.log(xhr.response)
            var rep_num = JSON.parse(xhr.response)["response_num"]
            $('#rep').text(`${request_method}Successful data submission by method, submitted user ID Prefix is ${$("#user").val()}, server response status code is ${rep_num}`
            switch(rep_num){
                case 1:var user_text = 'Success in seconds!'
                    break
                case -1:var user_text = 'The second kill is over.'
                    break
                case -2:var user_text = 'Cannot repeat secondkill.'
                    break
            }
            $('#res').text(`user${JSON.parse(xhr.response)['user_id']}: ${user_text}`)
        }
    }
</script>
</html>
Backend code:
# -*- coding:utf8 -*-
from flask import Flask, request, render_template, jsonify
from flask.json import loads
import random
import redis
app = Flask(__name__)
# Use connection pools and optimistic locks to handle connection timeouts and oversell problems, which may result in inventory legacy due to lock effects
# Initialize Redis database decode_responses=True: so the written data is in string format
pyredis = redis.Redis(host='192.168.42.29', port=6379, db=0, decode_responses=True)
# pyredis.set(name='commodity:num',value=10)
pyredis.set(name='commodity:num', value=500)
pyredis.delete('user:id')
pyredis.sadd('user:id', 'null')
pyredis.close()
# Using Redis Connection Pool: Handling connection timeouts
# Redis is single-threaded but uses multiple IO multiplexing, and performance bottlenecks are more likely to be network traffic delays that establish connections
# Using thread pools, connections are not released or rebuilt frequently after they are established, but instead return to the pool to wait for the next connection
pool = redis.ConnectionPool(host='192.168.42.29', port=6379, db=0)
# Native AJAX Request
# Consider concurrent requests (using optimistic locks and transactions: handling oversold issues)
@app.route('/seckill', methods=['POST', 'GET'])
def fun_send():
if request.method == 'GET':
return render_template('seckill.html')
else:
pyredis = redis.Redis(connection_pool=pool)
rpipe = pyredis.pipeline(transaction=True)
baseid = request.form.get('msg', type=str).strip()
# print(baseid)
# User id is generated using a random function and postfile value is used by baseid
userid = baseid + str(random.randint(0, 100000))
# Add Optimistic Lock: Solve Oversell
rpipe.watch('commodity:num')
if int(rpipe.get('commodity:num')) < 1:
print('The second kill is over')
return jsonify(user_id=userid, response_num=-1)
elif rpipe.sismember('user:id', userid):
print(f'user%{userid}Commodity has been killed in seconds, no repetition!')
return jsonify(user_id=userid, response_num=-2)
else:
# Use Transactions
rpipe.multi()
# organize a team
rpipe.decr('commodity:num', amount=1)
rpipe.sadd('user:id', userid)
# implement
reslist = rpipe.execute()
rpipe.close()
print(reslist)
print(f'user{userid}Successful Secondary Kill!')
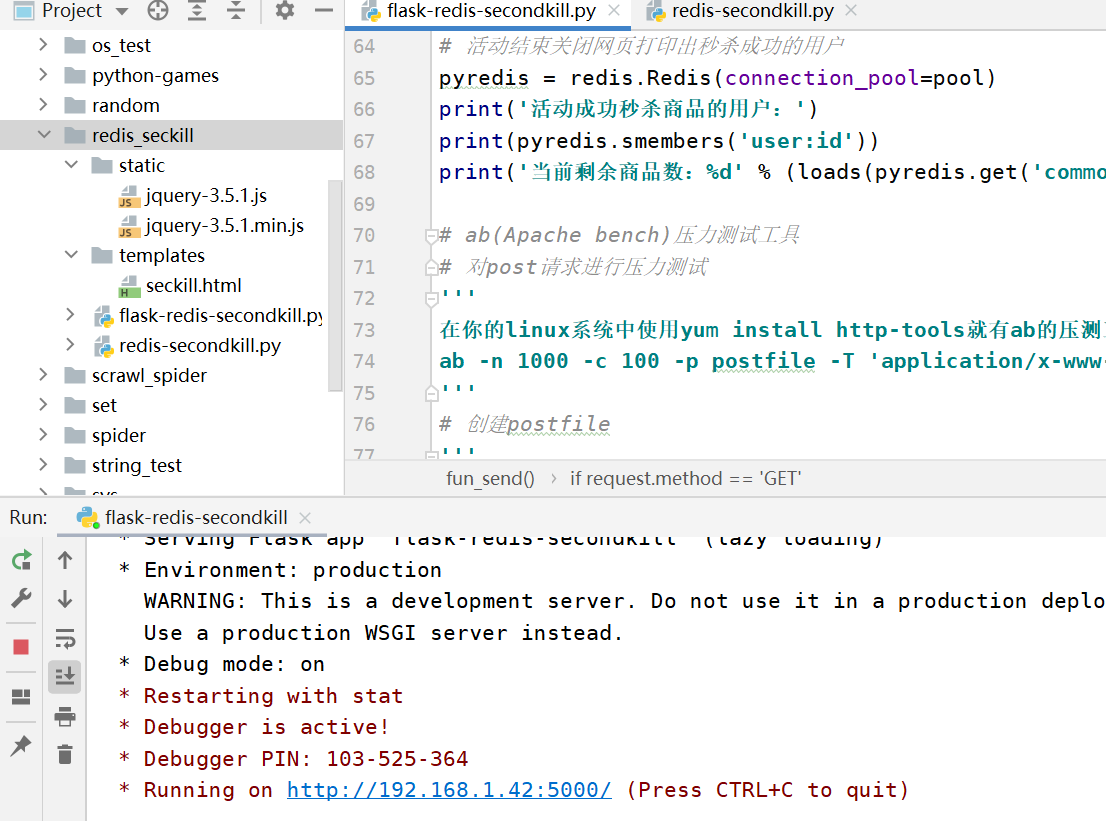
print('Current Remaining Merchandise Number:%d' % (loads(pyredis.get('commodity:num'))))
return jsonify(user_id=userid, response_num=1)
# Start the web service in debug mode, where host fills in its own windows server ip because it will be tested with linux's ab tool later
app.run(debug=True, host='192.168.1.42', port=5000)
# Activity End Close Page Print out Successful Users
pyredis = redis.Redis(connection_pool=pool)
print('Users whose campaign succeeded in killing merchandise:')
print(pyredis.smembers('user:id'))
print('Current Remaining Merchandise Number:%d' % (loads(pyredis.get('commodity:num'))))
# ab(Apache bench) pressure test tool
# Stress test post requests
'''
In your linux Used in the system yum install http-tools There are ab Pressure tools
ab -n 1000 -c 100 -p postfile -T 'application/x-www-form-urlencoded' http://192.168.1.42:5000/seckill
'''
# Create postfile
'''
touch postfile
echo "msg=#ABCD" > postfile
'''
# Terminal execution python script generation output file
'''
Linux:
chmod u+x flask_redis_web3.py
./flask_redis_web3.py > output 2>&1
Windos:
Use pycharm Perform page access http://ip:5000/seckill.html for your python project server
'''
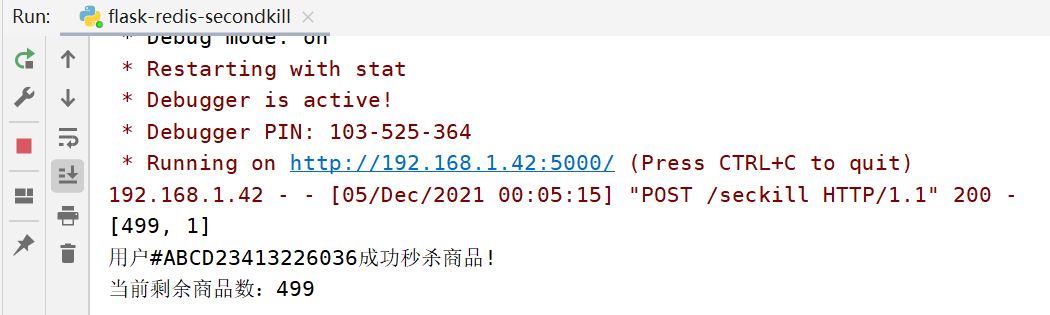
When the back-end service opens, click on the effect of Submission on the web page:
Front End Page Submits a Request
 pycharm has log printing
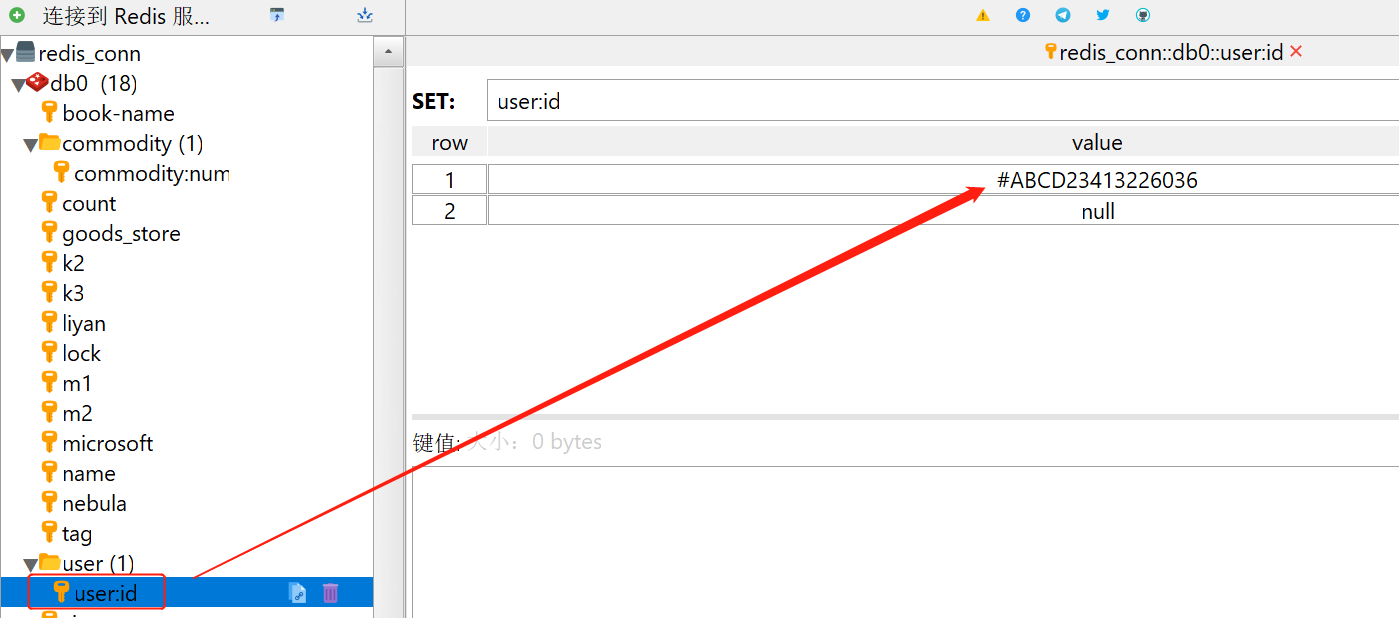
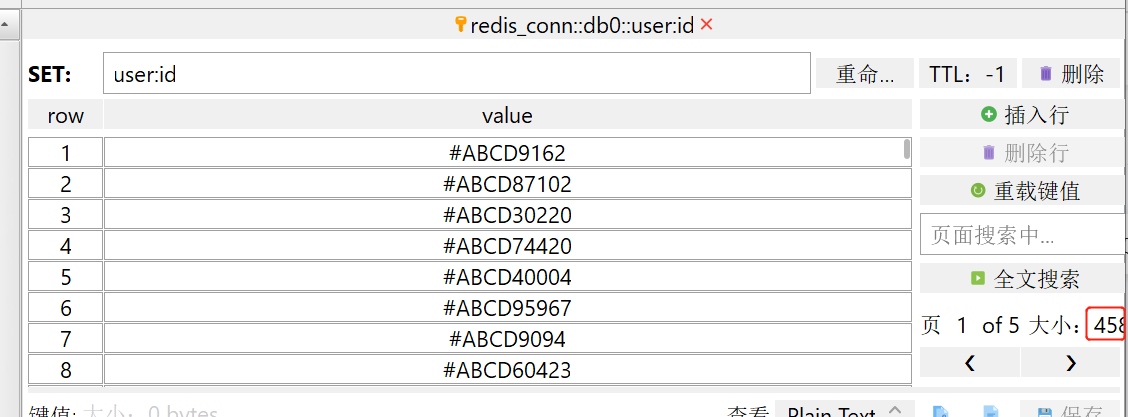
 The redis database has the id to record the second kill of a successful user
 Multiple clicks on the front page in seconds will result in multiple inventory reductions
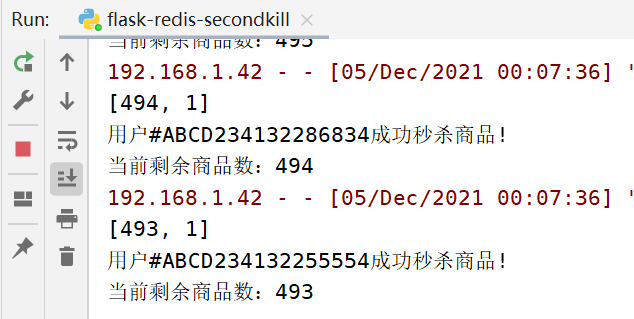
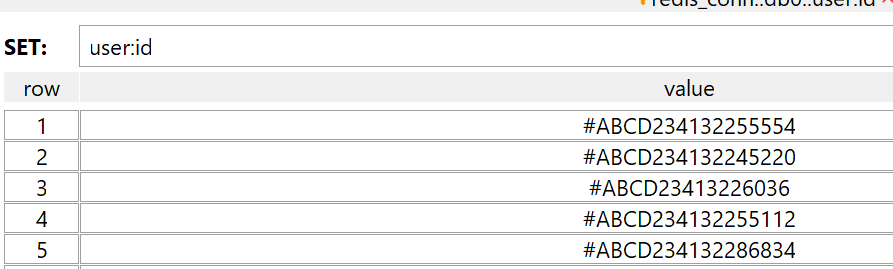
Background databases are also recorded
Here we just can't simulate the real concurrent scenario of seconds killing and purchasing by a single click manually, because in fact, for example, the double 11 second killing of iphone13 is the online second killing of tens of millions or even tens of millions of people at the same time, so we can't use a single user to simulate it here. (But it's also possible to simulate clicks on the second button by multiple online users, such as selenium). Here we use the apache bench tool, also known as the ab tool in the industry. ab is a useful stress test tool that comes with apache , Large concurrent user requests can be simulated.
ab Installation:
Usually a yum installation is sufficient
yum install -y http-tools
After the installation is complete, you can use ab --help to see the help menu and verify that the installation was successful.

Avoid reading English here and posting Chinese
-n To execute the number of requests, a request is executed by default

-c The number of requests executed at one time, defaulting to one request at a time.

-t Maximum number of seconds used for benchmarking to benchmark the server in a fixed total time. By default, there is no time limit.

-s Maximum number of seconds to wait before timeout. Default is 30 seconds.

-b TCP Send out/The size of the receive buffer in bytes.

-B The address to bind when making an outgoing connection.

-p Contains data to POST Files. Also remember settings-T.

-u Contain PUT Files of data. Also remember settings-T .

-T Content-type Be used for POST / PUT The content type of the data The content type title, for example:'application/x-www-form-urlencoded' Default is'text/plain'

-v verbosity How many troubleshooting messages to print and set the level of detail - 4 And above print header information, 3 and above print response code (404),200 And so on), 2 and above to print warnings and information.

-w stay HTML Print the results in a table.

-i Use HEAD replace GET.

-x Be used as<table>The string of the property of the. Property is inserted<table here>.

-y Be used as<tr>The string of the property of.

-z Be used as<td>The string of the property of.

-C take cookie Add to request. Parameters are usually named=The form of the value pair. This field is repeatable.

-H attribute for example 'Accept-Encoding: gzip' After inserting all normal header rows. (Repeat)

-A Add Basic WWW Authentication, which is a colon-separated username and password. auth-username:password

-P Add basic proxy authentication with a colon-separated username and password. proxy-auth-username:password

-X Use proxy server and port number.

-V Print version number and exit.

-k Use HTTP KeepAlive Functions.

-d Do not show percentage service table.

-S Do not show confidence estimates and warnings.

-q Do not show progress when making more than 150 requests.

-g Export collected data to gnuplot Format file.

-e Percentage supplied by output CSV File.

-r Do not exit the socket to receive errors.

-h Display usage information (this message).

-Z Password Suite Specification SSL / TLS Password kit (see openssl Password)

-f Appoint SSL / TLS Agreement (SSL3, TLS1, TLS1.1, TLS1.2 or ALL)
Pressure test (where 1000 requests are simulated and 100 concurrently):
ab -n 1000 -c 100 -p postfile -T 'application/x-www-form-urlencoded' http://192.168.1.42:5000/seckill
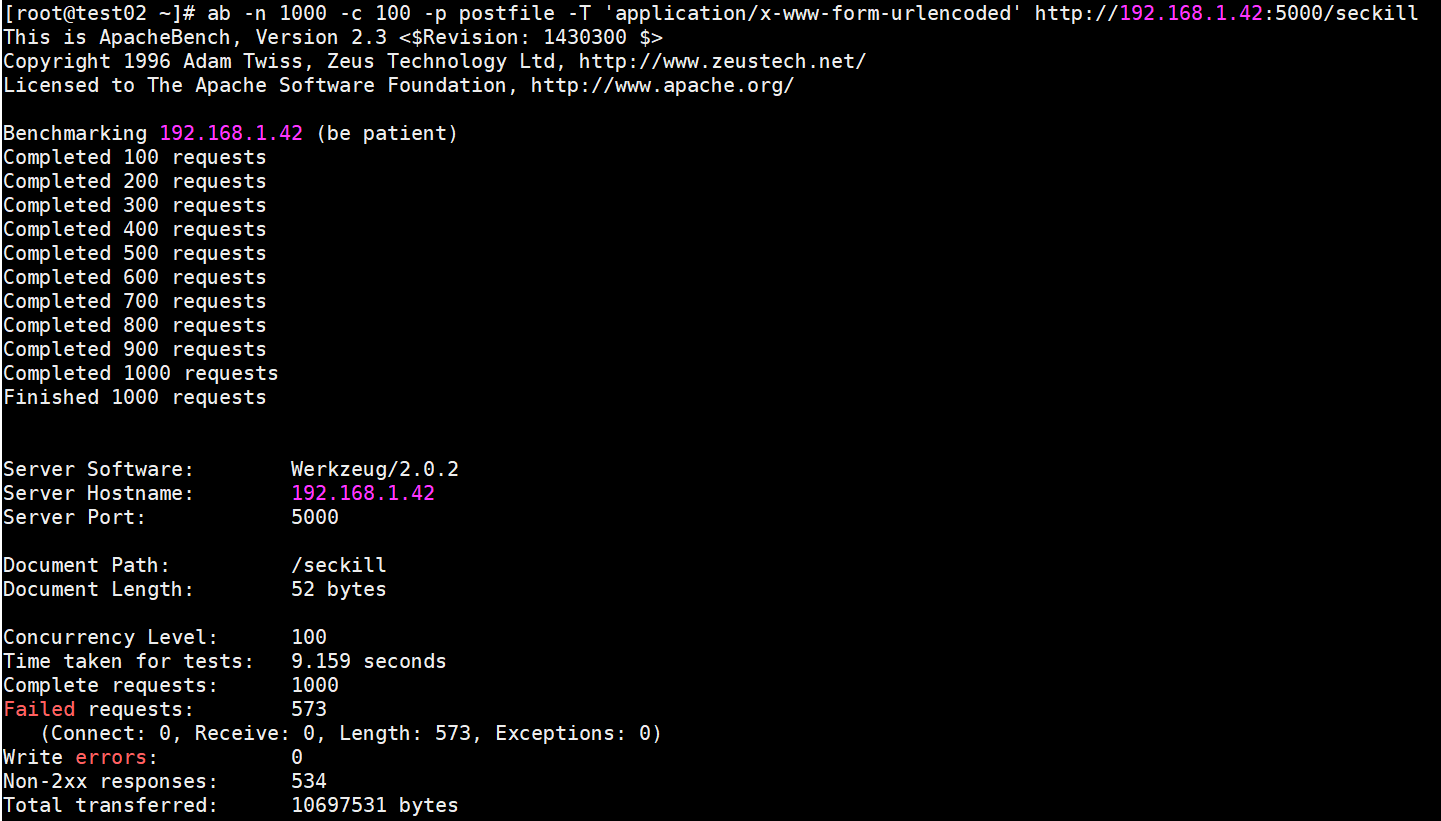
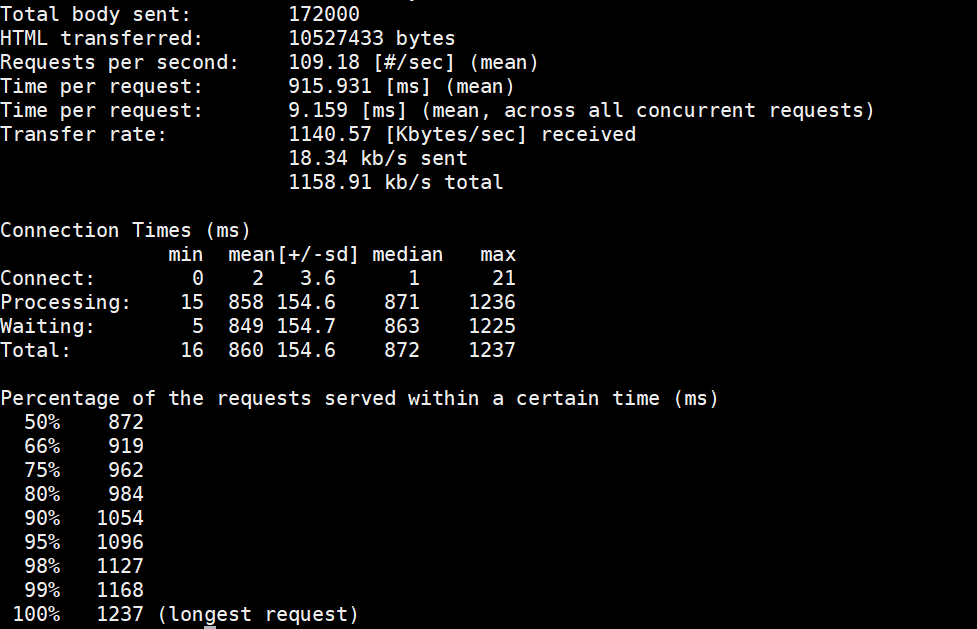
Explanation of pressure test results:
##First is the version information for apache
This is ApacheBench, Version 2.3 <Revision:655654>
Copyright 1996 Adam Twiss, Zeus Technology Ltd, http://www.xxx.xxx/
Licensed to The Apache Software Foundation, http://www.apache.org/
Benchmarking xxx.xxx.com (be patient)
Server Software: Apache/2.2.19 ##apache version
Server Hostname: vm1.xxx.com ##Requested Machine
Server Port: 80 ##Request Port
Document Path: /xxx.html
Document Length: 25 bytes ##Page Length
Concurrency Level: 100 ##Concurrency Number
Time taken for tests: 0.273 seconds ##How much time was used in total
Complete requests: 1000 ##Number of requests
Failed requests: 0 ##Failed Request
Write errors: 0
Total transferred: 275000 bytes ##Total number of bytes transferred, including http header information, etc.
HTML transferred: 25000 bytes ##html bytes, actual page delivery bytes
Requests per second: 3661.60 [#/sec] (mean) ##The number of requests per second, which is a very important parameter value, is the throughput of the server
Time per request: 27.310 [ms] (mean) ##Average Request Wait Time for Users
Time per request: 0.273 [ms] (mean, across all concurrent requests) ##Average server processing time, which is the reciprocal of server throughput
Transfer rate: 983.34 [Kbytes/sec] received ##Length of data fetched per second
Connection Times (ms)
min mean[+/-sd] median max
Connect: 0 1 2.3 0 16
Processing: 6 25 3.2 25 32
Waiting: 5 24 3.2 25 32
Total: 6 25 4.0 25 48
Percentage of the requests served within a certain time (ms)
50% 25 ## 50% of requests returned within 25 ms
66% 26 ## 60% of requests returned within 26 MS
75% 26
80% 26
90% 27
95% 31
98% 38
99% 43
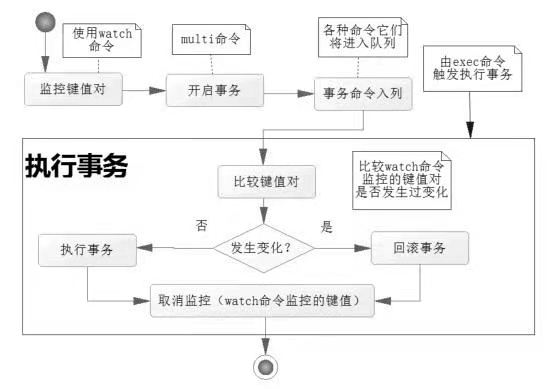
100% 48 (longest request)Background redis database found at this time There were 458 random IDS recorded for successful users, plus 500 successful users who clicked twice on my front page. Redis databases use optimistic locks by default, and use the watch command to monitor key-value pairs. Before a transaction modifies a key-value pair for monitoring, it compares whether the key-value pair at this time is the same version as when monitoring was started. If a change occurs, the operation is not allowed.
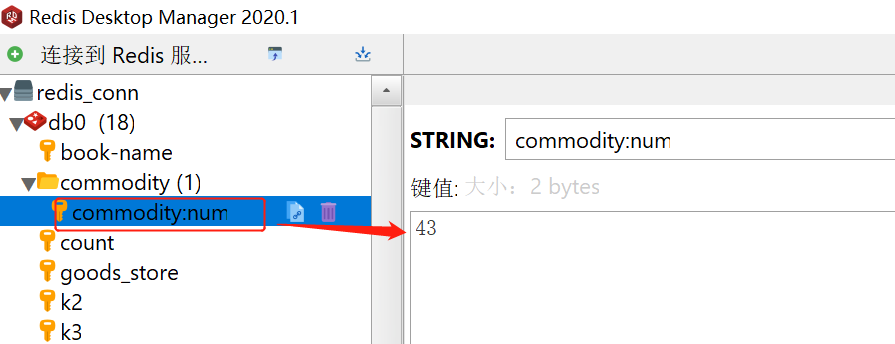
500 key values set in code

Remember to open the redis database service before starting the python web page service to simulate exceptions with high concurrent access using the ab test tool.
Matters needing attention:
Optimistic locks and transactions are a good solution to the "oversold" problem, but when there is a lot of inventory, there may be a legacy inventory. A large number of requests were initiated at the same time at a certain point in time, many requests failed subsequent operations due to changes in key-value pairs and version inconsistencies, so the inventory may not be emptied once, leaving behind.
Network latency is also an important factor in concurrent scenarios when establishing connections. It may take less time to query than to establish and close connections frequently. It is better to change the connection mode to use connection pool instead of releasing and rebuilding connections frequently after the connection is established. Instead, return to the connection pool to wait for the next connection.
Connection pool is already in code
Connection pooling is designed to improve performance.
Role of connection pooling: Connection pooling stores created connections in the pool and, when requested, directly accesses the database using the created connections. This omits the process of creating and destroying connections. This improves performance.
See this article about principles: Role of Connection Pool and Explanation_ Blog for cbmljs - CSDN Blog_ Connection Pool
Pthon Page Secondary Kill Reference Bullman Link: Simple web pages built with Flask framework to simulate Redis use in "secondkill" scenarios (above) - Short book