Use of Android retro fit
1, Overview
1. What is retrofit
Retrofit is a popular network request framework. It can be understood as an enhanced version of okhttp. Okhttp is encapsulated at the bottom. To be exact, retrofit is the encapsulation of a RESTful http network request framework. Because the network request is essentially completed by okhttp, and retrofit is responsible for the encapsulation of the network request interface.
Essential process: App applications request the network through Retrofit. In essence, it uses the Retrofit interface layer to encapsulate the request parameters, Header, Url and other information, and then okhttp completes the subsequent request work. After the server returns the data, okhttp gives the original data to Retrofit, which parses it according to the user's needs. (the source code is given at the end of the article)
2. Advantages of Retrofit
- Super decoupling, interface definition, interface parameters and interface callback are not coupled together
- Different httpclients can be configured to implement network requests, such as okhttp and httpclient
- Support synchronous, asynchronous and Rxjava
- Different deserialization tool classes can be configured to parse different data, such as json and xml
- Fast request speed, easy to use, flexible and concise
2, Annotation
Retrofit uses a large number of annotations to simplify requests. Retrofit abstracts okhttp requests into java interfaces and uses annotations to configure and describe network request parameters. It can be divided into the following categories. Let's take a look at the meaning of each annotation first, and then explain it in practice.
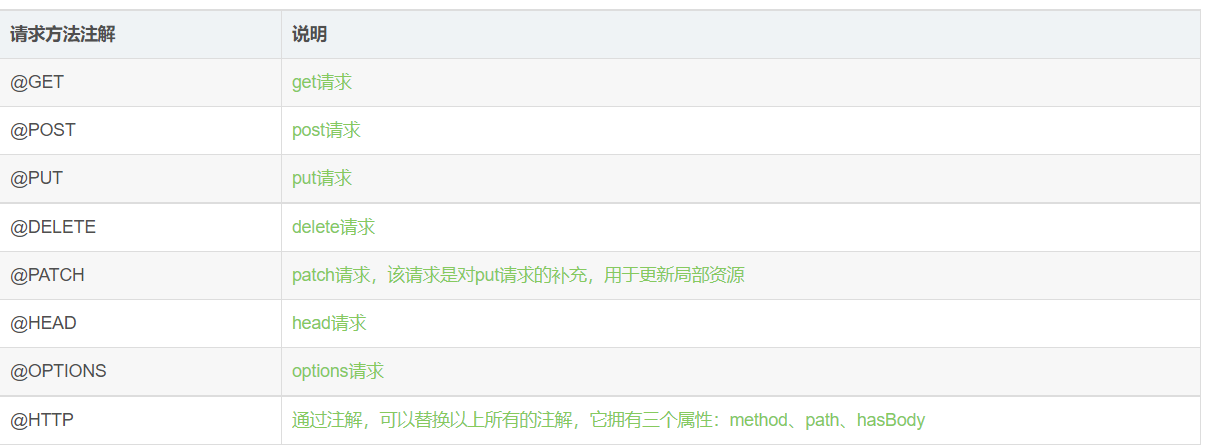
1. Request method annotation
2. Request header annotation

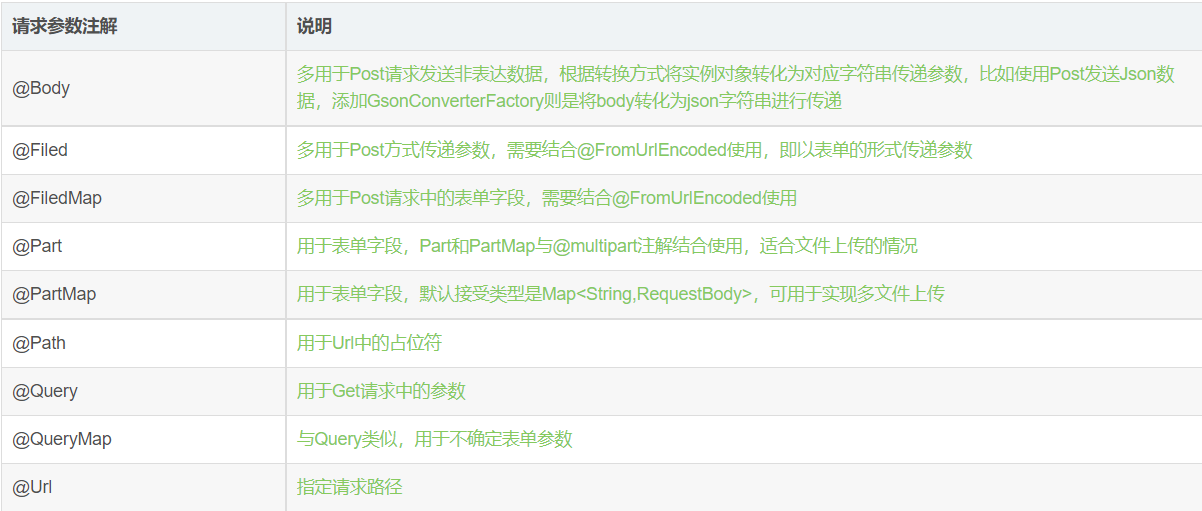
3. Request Parameter annotation
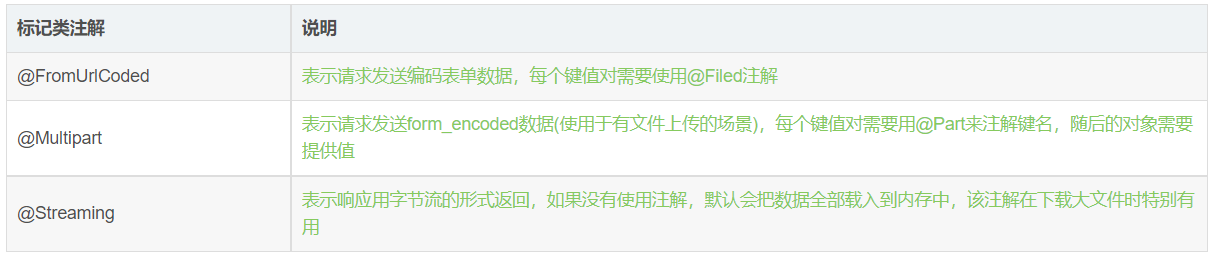
4. Request and response format (tag) annotation
3, Use of retrofit
1. Annotation details
Let's first explain the use of annotations and the problems needing attention (the specific use steps will be given later). The annotations mentioned above are used to configure and describe network request parameters. Let's explain them one by one. First, create a network interface class:
Retrofit abstracts the okhttp request into a java interface, uses annotations to describe and configure network request parameters, uses dynamic agents to "translate" the annotations of the interface into an Http request, and finally executes the Http request.
Note: the parameters of each method in the interface should be marked with annotations, otherwise an error will be reported.
(1) Use of @ GET, @ Query, @ QueryMap
public interface Api {
    //get request
    @GET("user")
    Call<ResponseBody> getData();
}
- @get request method annotation, get request, request address in parentheses, part of Url
- Call < * > return type, * indicates the class that receives data. It is generally user-defined
- getData() interface method name. Parameters can be written in parentheses
The above network interface is the simplest form. Let's start with simplicity and understand it step by step. This is a GET request method without network parameters. You need to add @ GET annotation in the method header to indicate that the GET method is used to access the network request. In parentheses is the address of the request (part of the Url), where the return type is Call < * >, * indicates the class receiving data. If you want to directly obtain the content in the ResponseBody, you can define the return value of the network request as Call, ResponseBody is the original data returned after the network request. If the network request has no parameters, it does not need to be written.
The composition of the Url is specially described here (which will be explained below). Retrofit divides the Url of the network request into two parts: the first part is set through. baseUrl() when creating the retrofit instance, and the second part is set in the network interface annotation, such as "/ user" of the above interface. The complete address of the network request Url = Retrofit instance. baseUrl() + network request interface annotation ().
Let's take a look at the get request method with parameters:
 @GET("user")
 Call<ResponseBody> getData2(@Query("id") long idLon, @Query("name") String nameStr);
- @Query request Parameter annotation, used for parameters in Get request
- The "id" / "name" parameter field should be consistent with the field given by the background
- Parameter type declared by long/String
- idLon/nameStr actual parameters
Add parameter add @ Query in the method bracket, followed by parameter type and parameter field, indicating that the value of idLon is the value of "Id" and the value of nameStr is the value of "name", which is actually a key value pair. Retrofit will splice the two fields into the interface and append them to "/ user". For example: baseUrl is https://api.github.com/ , then the address in the network interface annotation is spliced and becomes: https://api.github.com/user , we need to pass in id = 10006, name = "Liu Yifei", then the splicing parameter is followed by the complete request address: https://api.github.com/user?id=10006&name= Liu Yifei.
 @GET("user")
 Call<ResponseBody> getData3(@QueryMap Map<String, Object> map);
- @QueryMap requests parameter annotations, similar to @ Query, for uncertain form parameters
- Map < string, Object > map passes in uncertain parameters through map, which is equivalent to multiple Query parameters
If there are uncertain form parameters, we can use the @ QueryMap annotation to add parameters, store the uncertain parameters in the Map, and then bring them to the network interface in the method body, which is equivalent to multiple Query parameters. See the following usage:
  Map<String, Object> map = new HashMap<>();
  map.put("id", 10006);
  map.put("name", "Liu Yifei");
  Call<ResponseBody> call = retrofit.create(Api.class).getData3(map);
(2) Use of @ POST, @ FormUrlEncoded, @ File, @ FileMap, @ Body
Let's look at the request of the post method without parameters:
@POST("user/emails")
Call<ResponseBody> getPostData();
- @The post request method annotation indicates that the post method is used to access the network request, and the URL address of the part is followed by the brackets
For the POST request network method, the @ POST annotation needs to be added to the method header to indicate that the POST method is used to access the network request. There are no parameters here. How should the POST request method with parameters be written?
@FormUrlEncoded
@POST("user/emails")
Call<ResponseBody> getPostData2(@Field("name") String nameStr, @Field("sex") String sexStr);
- @FormUrlEncoded requests format annotation. The request entity is a From form. Each key value pair needs @ Field annotation
- @The Field request Parameter annotation and the form Field submitting the request must be added and used in conjunction with @ FormUrlEncoded
- The "name" / "sex" parameter field should be consistent with the field given by the background
- Parameter type of String declaration
- nameStr/sexStr actual parameter, indicating that the value of the following nameStr is the value of "name", and the value of sexStr is the value of "sex"
If there are parameters in the Post request, you need to add @ FormUrlEncoded annotation in the header, indicating that the request entity is a From form. Each key value pair needs to use @ Field annotation and use @ Field to add parameters. This is the form Field that must be added when submitting the request when sending the Post request, and it needs to be used in conjunction with @ FormUrlEncoded
 @FormUrlEncoded
 @POST("user/emails")
 Call<ResponseBody> getPsotData3(@FieldMap Map<String, Object> map);
 Map<String, Object> fieldMap = new HashMap<>();
 map.put("name", "Liu Yifei");
 map.put("sex", "female");
  Call<ResponseBody> psotData3 = retrofit.create(Api.class).getPostData3(map);
- @FieldMap requests Parameter annotation, which is consistent with @ Field. It is used to determine form parameters
- Map < string, Object > map passes in uncertain parameters through map, which is equivalent to multiple Field parameters
When there are multiple uncertain parameters, we can use @ FieldMap annotation. The role of @ FieldMap is the same as that of @ Field. It can be used to add multiple uncertain parameters, such as @ QueryMap. The key of Map is used as the key of the form and the value of Map is used as the value of the form.
Another annotation @ Body is applicable to post requests. @ Body can pass custom type data to the server. It is mostly used to send non form data in post requests. For example, it can annotate many things, such as HashMap and entity class. Let's take a look at its usage:
@POST("user/emails")
Call<ResponseBody> getPsotDataBody(@Body RequestBody body);
- @The Body uploads json format data and directly passes it into the entity. It will be automatically converted into json. This conversion method is defined by GsonConverterFactory
Special note: @ Body annotation cannot be used for the encoding of forms or forms supporting file upload, that is, it cannot be used together with @ FormUrlEncoded and @ Multipart annotations, otherwise an error will be reported, as shown in the following figure:

We found the source code of @ Body and found that when isFormEncoded is true or isMultipart is true, the exception will be thrown if any of the conditions are met. It can be seen from the variable name that @ FormUrlEncoded or @ Multipart tag is used.
if (annotation instanceof Body) {
    if (isFormEncoded || isMultipart) {
       throw parameterError(method, p,
          "@Body parameters cannot be used with form or multi-part encoding.");
     }
  }
(3)@HTTP
@HTTP annotation is used to replace @ GET, @ POST, @ PUT, @ DELETE, @ HEAD and more extended functions
@HTTP(method = "GET", path = "user/keys", hasBody = false)
Call<ResponseBody> getHttpData();
- Method represents the requested method. It is case sensitive. The value retrofit here will not be processed any more. It must be correct
- Path network request address path
- Whether hasBody has request body and boolean type
@HTTP annotation can flexibly set the specific request method through the method field, and set the network request address through the path, which is less used@ HTTP replaces @ POST, @ PUT, @ DELETE, @ HEAD and other methods with similar usage, which will not be explained one by one here.
(4)@Path
 @GET("orgs/{id}")
 Call<ResponseBody> getPathData(@Query("name") String nameStr, @Path("id") long idLon);
- @The annotation of Query get request method parameters has been explained above, and will not be repeated here
- @Path request Parameter annotation, used for placeholder {} in Url, all parameters in Url
@The Path annotation is used for the placeholder {} in the Url. All parameters in the Url, such as the id of @ GET("orgs/{id}") above, mark the id through the {} placeholder, and use the @ Path annotation to pass in the value of idLon. Note that some URLs have both placeholders and key value pairs after "?". In fact, @ Query and @ Path can be shared. When the request is initiated, {id} is replaced with the value idLon of the second parameter in the method.
(5)@Url
If you need to re address the interface address, you can use @ Url to pass in the address as a parameter. If there is @ Url annotation, the Url passed in by GET can be omitted.
@GET
Call<ResponseBody> getUrlData(@Url String nameStr, @Query("id") long idLon);
- @Url indicates the specified request path, which can be passed in as a parameter
(6)@Header,@Headers
We can add a request Header in the method parameters, @ Header is used to add an unfixed request Header. The parameters acting on the method are passed in as method parameters, and the annotation will update the existing request Header.
 @GET("user/emails")
 Call<ResponseBody> getHeaderData(@Header("token") String token);
- @The header request header annotation is used to add an unfixed request header
When we want to add a fixed request header to a method, we can refer to the following writing method, @ headers is used to add a fixed request header. Acting on the method, multiple request headers can be added at the same time. The request headers added through this annotation will not overlap each other, but exist together.
 @Headers({"phone-type:android", "version:1.1.1"})
 @GET("user/emails")
 Call<ResponseBody> getHeadersData();
- @The headers request header annotation is used to add fixed request headers. Multiple headers can be added
(7)@Streaming
 @Streaming
 @POST("gists/public")
 Call<ResponseBody> getStreamingBig();
- @Streaming indicates that the data of the response body is returned in the form of stream. It is used to return large data. This annotation is particularly useful when downloading large files
We need to add @ Streaming annotation when downloading large files
(8)@Multipart,@part,@PartMap
@Multipart
@POST("user/followers")
Call<ResponseBody> getPartData(@Part("name") RequestBody name, @Part MultipartBody.Part file);
- @Multipart means that the request entity is a form that supports file upload. It needs to be used with @ Part and @ PartMap. It is suitable for file upload
- @Part is used for form fields and is applicable to file upload. @ part supports three types: RequestBody, MultipartBody.Part and any type
- @PartMap is used for multi file upload, which is similar to the use of @ FieldMap and @ QueryMap
The above usage is to upload text and files. When using @ Part annotation, you need to add @ Multipart annotation in the header to support file upload. Let's see how to use the above code:
//Declaration type, here is the text type
 MediaType textType = MediaType.parse("text/plain");
//To create a RequestBody according to the declared type is to convert it into a RequestBody object
RequestBody name = RequestBody.create(textType, "Here is the text you need to write: Liu Yifei");

//Create a file here to demonstrate image upload
File file = new File("File path");
if (!file.exists()) {
   file.mkdir();
 }

//Convert file to RequestBody object
//When you need to upload files in the form, you need to use this format: multipart / form data
RequestBody imgBody = RequestBody.create(MediaType.parse("image/png"), file);
//Convert the file to MultipartBody.Part
//The first parameter: the key of the uploaded file; The second parameter: file name; The third parameter: RequestBody object
MultipartBody.Part filePart = MultipartBody.Part.createFormData("file", file.getName(), imgBody);

Call<ResponseBody> partDataCall = retrofit.create(Api.class).getPartData(name, filePart);
First declare the type, and then convert it into a RequestBody object according to the type, return RequestBody or convert it into MultipartBody.Part. When you need to upload files in the form, you need to use this format: multipart / form data.
@The use of PartMap is similar to that of @ FieldMap and @ QueryMap. It is used for multi file upload. Let's look at the code directly:
@Multipart
 @POST("user/followers")
 Call<ResponseBody> getPartMapData(@PartMap Map<String, MultipartBody.Part> map);
    File file1 = new File("File path");
    File file2 = new File("File path");
        if (!file1.exists()) {
        file1.mkdir();
    }
        if (!file2.exists()) {
        file2.mkdir();
    }

    RequestBody requestBody1 = RequestBody.create(MediaType.parse("image/png"), file1);
    RequestBody requestBody2 = RequestBody.create(MediaType.parse("image/png"), file2);
    MultipartBody.Part filePart1 = MultipartBody.Part.createFormData("file1", file1.getName(), requestBody1);
    MultipartBody.Part filePart2 = MultipartBody.Part.createFormData("file2", file2.getName(), requestBody2);

    Map<String,MultipartBody.Part> mapPart = new HashMap<>();
        mapPart.put("file1",filePart1);
        mapPart.put("file2",filePart2);

    Call<ResponseBody> partMapDataCall = retrofit.create(Api.class).getPartMapData(mapPart);
MultipartBody.Part in the above (@ partmap, map < String, multipartbody. Part > map) method parameters can be RequestBody, String, MultipartBody.Part and other types, which can be replaced according to individual needs, which will not be described here.
2. retrofit is easy to use in projects (get requests)
Let's formally use retrofit in the project. The following steps are required:
(1) Add network permissions to manifest file
retrofit is a network request framework. There is no doubt that you must add network permissions to the AndroidManifest.xml file
<uses-permission android:name="android.permission.INTERNET"/>
(2) Add dependent libraries for retrofit
Add the Retrofit dependent Library in the build.gradle file. Since Retrofit has been encapsulated with okhttp, there is no need to add the okhttp library
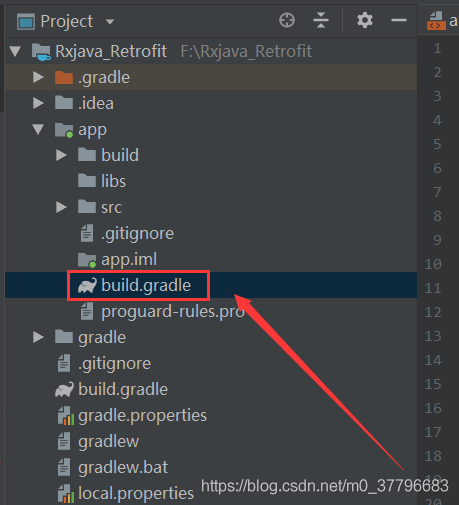
implementation 'com.squareup.retrofit2:retrofit:2.5.0'
(3) Create a class that accepts data returned by the server
In the formal request network data, the outer nested part of the returned data is the same. It carries the status code, status information and entity data. We can encapsulate it into a unified data callback class.
public class Data<T> {
    private int code;
    private String message;
    private T data;

    public int getCode() {
        return code;
    }

    public void setCode(int code) {
        this.code = code;
    }

    public String getMessage() {
        return message;
    }

    public void setMessage(String message) {
        this.message = message;
    }

    public T getData() {
        return data;
    }

    public void setData(T data) {
        this.data = data;
    }
}
(4) Create a class that describes the network interface
This class is the interface class that Retrofit abstracts the okhttp request into java, describes and configures the network request parameters with annotations, and encapsulates the Url address and network data request
public interface Api {
    //get request
    @GET("api/rand.music")
    Call<Data<Info>> getJsonData(@Query("sort") String sort, @Query("format") String format);
}
Add @ get annotation to the method header to indicate that the get method is used to access the network request. In parentheses, the address of the request (part of the Url), where the return type is call < * >, * represents the class receiving Data, Data is a unified public class receiving Data encapsulated above, add parameters, add @ Query in method parentheses, followed by parameter types and parameter fields, In fact, it is the form of key value pairs.
(5) Create a Retrofit instance
//Build Retrofit instance
    Retrofit retrofit = new Retrofit.Builder()
            //Set network request BaseUrl address
            .baseUrl("https://api.uomg.com/")
            //Set up data parser
            .addConverterFactory(GsonConverterFactory.create())
            .build();
Build the retrofit instance object through new retrofit. Builder(). Build(), and set the baseUrl address. Retrofit divides the URL of the network request into two parts:
Part 1: when creating a Retrofit instance, set it through. baseUrl(),
.baseUrl("https://api.uomg.com/")
The address above will be spliced with the address above the method request annotation. The baseUrl address must end with "/", otherwise an error will be reported,
Part II: annotation settings on the network request interface, that is, the string annotated with GET in the APi interface above:
@GET("api/rand.music")
The complete address after the above address splicing is: https://api.uomg.com/api/rand.music?sort=&format= Then, set the data interpreter through addConverterFactory, and the Gson interpreter is added here. This is to make the json results from the interface automatically resolve into json object acceptance classes with defined fields and types. There is no Converter in Retrofit 2.0. You need to create a Converter yourself. Otherwise, Retrofit can only receive string results. Finally, you need to resolve it yourself.
Add Converter dependency in build.gradle:
implementation 'com.squareup.retrofit2:converter-gson:2.0.2'
Retrofit supports a variety of data parsing. You need to add dependencies in Gradle:
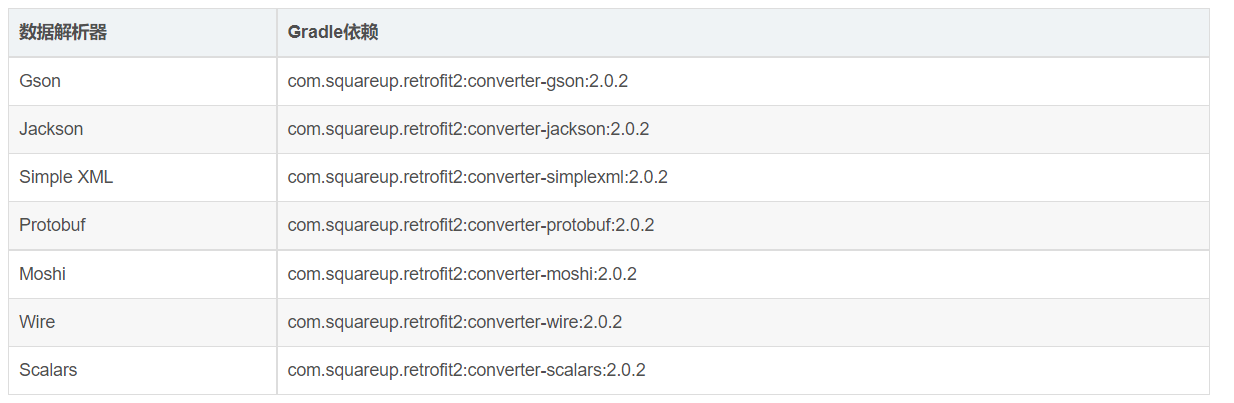
(6) Create network request interface instance
//Create network request interface object instance
Api api = mRetrofit.create(Api.class);
//Encapsulate the send request
Call<Data<Info>> dataCall = api.getJsonData("New song list", "json");
Call the Retrofit instance object create() method, pass in the network interface class, get the interface object instance, and call the methods in the interface class.
(7) Send network request (synchronous / asynchronous)
//Asynchronous request
dataCall.enqueue(new Callback<Data<Info>>() {
    //Request successful callback
     @Override
     public void onResponse(Call<Data<Info>> call, Response<Data<Info>> response) {
       }
    //Request failure callback
     @Override
     public void onFailure(Call<Data<Info>> call, Throwable t) {
       }
  });
//Synchronization request
Response<Data<Info>> data= dataCall.execute();
(8) Processing returned data
 dataCall.enqueue(new Callback<Data<Info>>() {
     @Override
     public void onResponse(Call<Data<Info>> call, Response<Data<Info>> response) {
           Toast.makeText(MainActivity.this, "get Callback succeeded:Asynchronous execution", Toast.LENGTH_SHORT).show();
           Data<Info> body = response.body();
           if (body == null) return;
           Info info = body.getData();
           if (info == null) return;
           mTextView.setText("Returned data:" + "\n\n" + info.getName() + "\n" + info.getPicurl());
     }

      @Override
      public void onFailure(Call<Data<Info>> call, Throwable t) {
         Log.e(TAG, "Callback failed:" + t.getMessage() + "," + t.toString());
          Toast.makeText(MainActivity.this, "Callback failed", Toast.LENGTH_SHORT).show();
      }
 });
Process the data returned asynchronously, and the network loading is completed. get Your request address is: https://api.uomg.com/api/rand.music?sort=%E6%96%B0%E6%AD%8C%E6%A6%9C&format=json
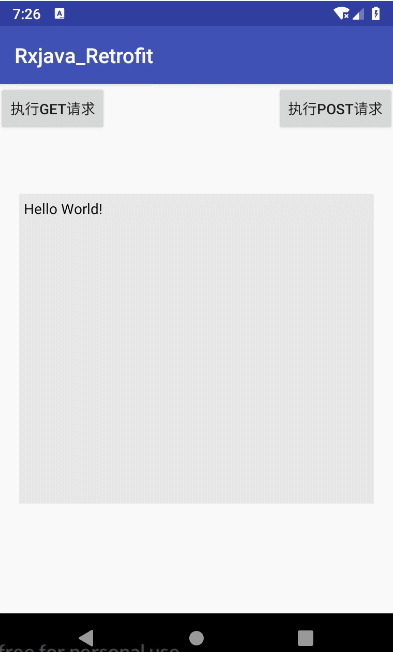
The effect is shown in the following figure:

Click the execute get request button, the code executes the get request, and the result of the request is returned after a period of time.
3. Simple use of post request
Referring to the example of get request above, we will not repeat the steps one by one. Let's take a look at the different parts:
Create network request interface:
public interface Api {
   //In the post request, if there are parameters that need to be annotated with @ FormUrlEncoded, it is used in conjunction with @ Field
    @FormUrlEncoded
    @POST("api/comments.163")
    Call<Object> postDataCall(@Field("format") String format);
}
Call the network request interface instance to process the returned data:
        //Step 4: create a Retrofit object
        Retrofit retrofit = new Retrofit.Builder()
                .baseUrl("https://api.uomg.com / ") / / set the network request baseUrl
                .addConverterFactory(GsonConverterFactory.create()) //Set to use Gson parsing
                .build();

        // Step 5: create an instance of the network request interface
        Api request = retrofit.create(Api.class);

        //Step 6: encapsulate the sending request:
        Call<Translation> call = request.postDataCall("JSON");

        //Step 7: send network request (asynchronous)
        call.enqueue(new Callback<Translation>() {
            //Callback on successful request
            @Override
            public void onResponse(Call<Translation> call, Response<Translation> response) {
                //Step 8: request processing and output results
                Object body = response.body();
                if (body == null) return;
                mTextView.setText("Returned data:" + "\n\n" + response.body().toString());
                Toast.makeText(MainActivity.this, "post Callback succeeded:Asynchronous execution", Toast.LENGTH_SHORT).show();
            }

            //Callback on request failure
            @Override
            public void onFailure(Call<Translation> call, Throwable throwable) {
                Log.e(TAG, "post Callback failed:" + throwable.getMessage() + "," + throwable.toString());
                Toast.makeText(MainActivity.this, "post Callback failed", Toast.LENGTH_SHORT).show();
            }
        });
Process the data returned asynchronously, and the network loading is completed. The request address and parameters of post are printed as follows:
The data printing effect is as follows:
Click the execute post request button, the code executes the post request, and the result of the request is returned after a period of time.