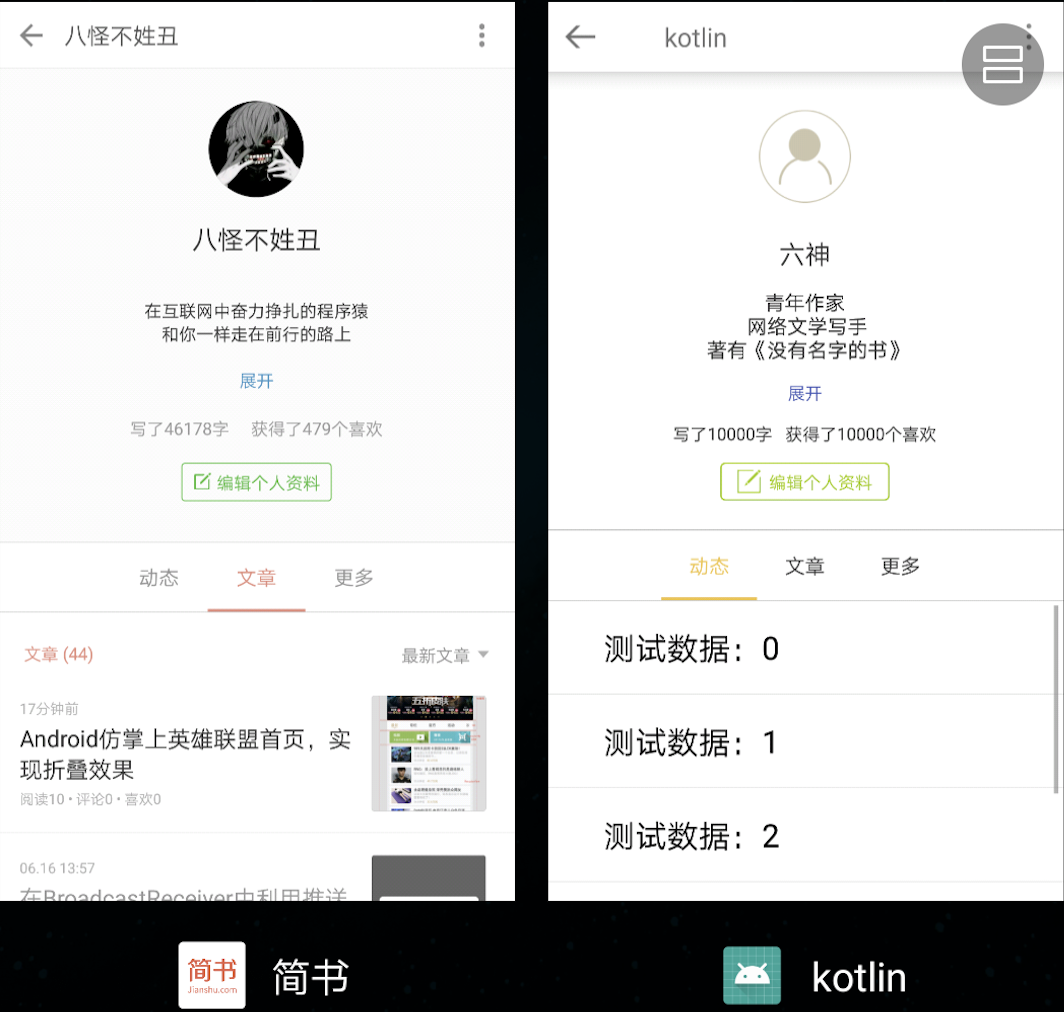
The interface is ugly, but basically functional.
To learn the recently popular kotlin language, try writing a demo.
Refer to the previous article Palm-like League of Heroes Effect.

1. Prepare before you start
-
Import the kotlin development environment:
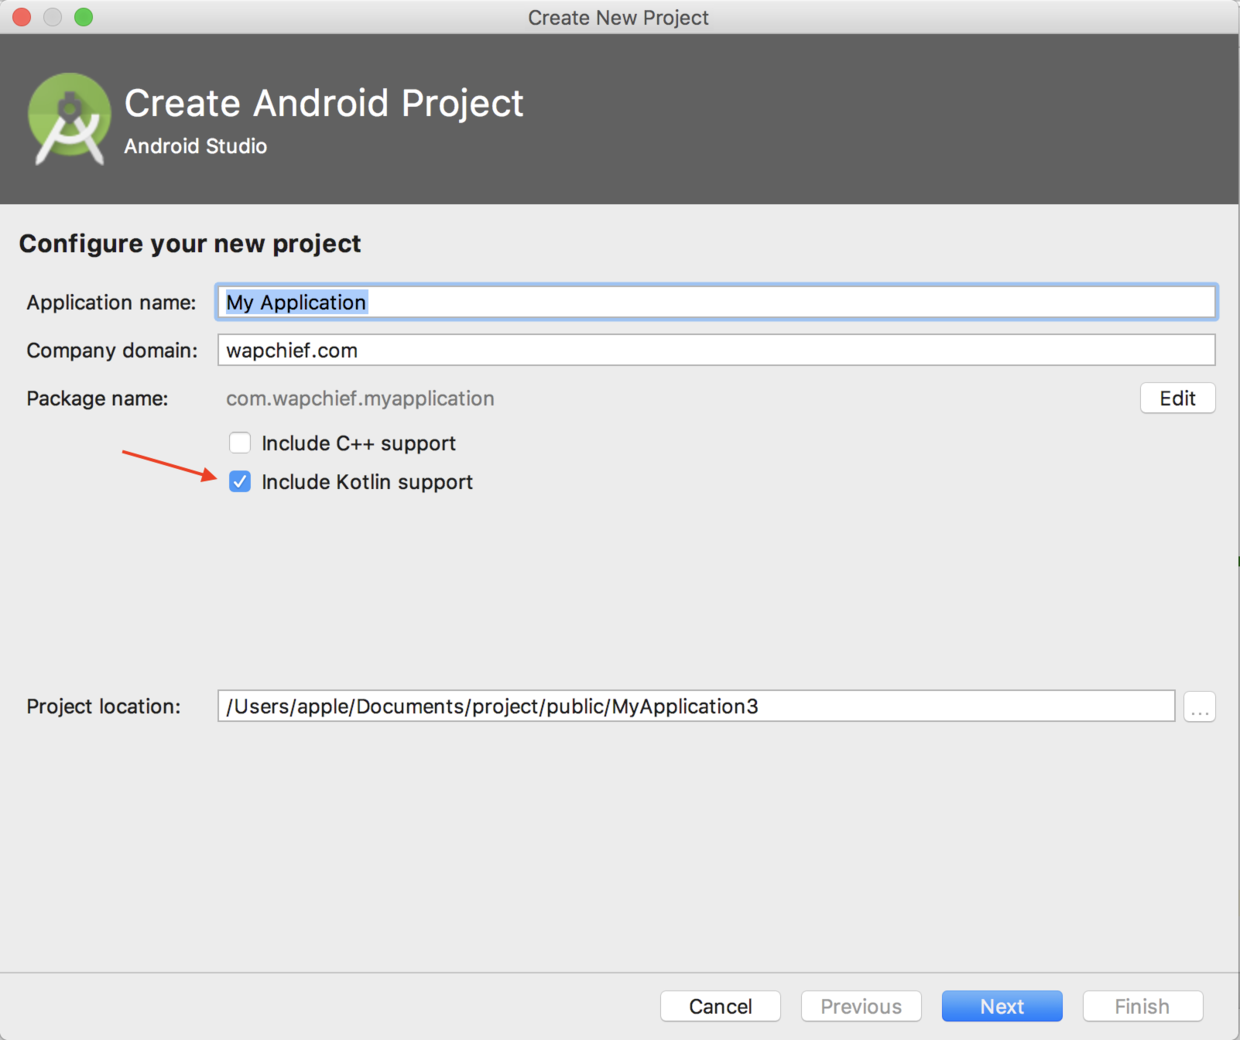
The Android Studio 3.0 version is already integrated by default.Checking include Kotlin support directly when creating a project will automatically help us create a project in the kotlin language.No check is java. image.png
 -
If you are manually integrating kotlin:
Two places to configure
1. project - build.gradle in the root directorybuildscript { ext.kotlin_version = '1.1.2-4' ....//Omit some code } } dependencies { classpath 'com.android.tools.build:gradle:2.3.0' classpath "org.jetbrains.kotlin:kotlin-gradle-plugin:$kotlin_version" }2,model - build.gradle
apply plugin: 'kotlin-android'
apply plugin: 'kotlin-android-extensions'
dependencies { compile "org.jetbrains.kotlin:kotlin-stdlib-jre7:$kotlin_version" .....//Omit some code }
Note that if there is no apply plugin by default for automatic integration:'kotlin-android-extensions'
This method needs to be added manually, but it will be useful later.
2. Add controls to create layouts
One of the controls mentioned earlier is scrollablelayout, which has been around for a long time in GitHub.
The layout needed for folding is already provided.
compile 'com.github.cpoopc:scrollablelayoutlib:1.0.1'
Scrollable requires three sub view s to show: the folded part, the title part, and the scrolled part.

So the layout is basically a title bar + a ScrollacleLayout
<?xml version="1.0" encoding="utf-8"?>
<LinearLayout xmlns:android="http://schemas.android.com/apk/res/android"
    xmlns:tools="http://schemas.android.com/tools"
    android:layout_width="match_parent"
    android:layout_height="match_parent"
    android:orientation="vertical"
    tools:context="com.wapchief.kotlin.MainActivity">
    <!--title bar-->
    <include layout="@layout/action_bar"/>
    <!--Wrap three View-->
    <com.cpoopc.scrollablelayoutlib.ScrollableLayout
        android:layout_width="match_parent"
        android:layout_height="match_parent"
        android:background="@android:color/white"
        android:orientation="vertical">
        <!--header-->
        <include layout="@layout/main_header" />
        <!--tab-->
        <include layout="@layout/main_tablayout" />
        <!--footer-->
        <android.support.v4.view.ViewPager
            android:id="@+id/vp"
            android:layout_width="match_parent"
            android:layout_height="match_parent" />
    </com.cpoopc.scrollablelayoutlib.ScrollableLayout>

</LinearLayout>
The layout here is the same as that in java, just write it the way you normally would.It's mainly the change in activity.
3. Instantiating in activity
-
Instantiation control:
Unlike java, kotlin does not require findviewby to get controls.If you have multiple view file layouts in java, you need to create multiple views. For example, I use lnclude here. If you are in java, you need to create four view objects.Instantiate them separately.
In kotlin, a simpler method is provided: get the control directly by importing the package.import kotlinx.android.synthetic.main.activity_main.* import kotlinx.android.synthetic.main.action_bar.* import kotlinx.android.synthetic.main.main_tablayout.* import kotlinx.android.synthetic.main.main_header.*This gives you all the controls in all the views you use,. * is all the IDS in the instantiated view,
If you want to instantiate a single id, it is import kotlinx.android.synthetic.main_header.id.- When instantiating through kotlinx, I first encountered the problem of not finding the method and later found that the kotiln created automatically by androidStudio did not have the apply plugin:'kotlin-android-extensions'line of code.
So when you create a project, check to see if it exists.
- When instantiating through kotlinx, I first encountered the problem of not finding the method and later found that the kotiln created automatically by androidStudio did not have the apply plugin:'kotlin-android-extensions'line of code.
-
Initialize fragment:
Since fragments are used for switching between viewpager s, create a collection to hold fragmentsvar fragments: MutableList<Fragment> = ArrayList<Fragment>() fragments.add(Fragment1()) fragments.add(Fragment1()); fragments.add(Fragment1());Unlike java, kotlin uses a MutableList and the variable name is in front of it.
And adding a Fragment doesn't require a new Fragment object, is it much simpler? -
Associated viewpager:
Many get and set methods have been simplified in kotlin, such as setAdapter calling adapter directly. To set the display or hide of a control, header_1.visibility=View.GONEvp.adapter=viewPagerAdapter(supportFragmentManager,fragments)viewpager requires an adapter to create a viewPagerAdapter using an internal class.
fm and list are parameters respectively, and FragmentManager and List <Fragment>are types.
FragmentPagerAdapter is equivalent to extending FragmentPagerAdapter inheriting this class.//Inherit FragmentPagerAdapter to create adapter class viewPagerAdapter(fm: FragmentManager?, var list: List<Fragment>) : FragmentPagerAdapter(fm) { override fun getItem(position: Int): Fragment { return list.get(position) } override fun getCount(): Int { return list.size } } -
Listen for view pager events:
Here you will listen to the viewpager for the effect of switching Framgment s
Override the onPagerSelected method.
when is a loop equivalent to a switch case statement
You don't need to add {} if only one method is executedoverride fun onPageSelected(position: Int) { //Determines if the page selected after sliding has its corresponding label selected when (position) { 0 -> { initTabLayout(tab1_tv, tab1_v) clearTabLayout(tab2_tv, tab2_v) clearTabLayout(tab3_tv, tab3_v) } 1 -> { initTabLayout(tab2_tv, tab2_v) clearTabLayout(tab1_tv, tab1_v) clearTabLayout(tab3_tv, tab3_v) } 2 -> { initTabLayout(tab3_tv, tab3_v) clearTabLayout(tab2_tv, tab2_v) clearTabLayout(tab1_tv, tab1_v) } }Controls do not need to be instantiated, the type of control is defined in the method, the control id is passed directly when it needs to be called, and the resource id is referenced. Same example: resources replaces getResources in java
/*Initialize tab label*/ private fun initTabLayout(tv: TextView,tv2: TextView) { tv.setTextColor(resources.getColor(R.color.tab_select)) tv2.setBackgroundColor(resources.getColor(R.color.tab_select)) } /*Reset tab label color*/ private fun clearTabLayout(tv: TextView,tv2: TextView){ tv.setTextColor(resources.getColor(R.color.tab_clear)) tv2.setBackgroundColor(Color.WHITE) } -
The last thing to use is listening:
It is also one of the most commonly used methods. Instead of instantiating listening events, listening is implemented in kotlin using a single line of code calltab1.setOnClickListener { vp.setCurrentItem(0) initTabLayout(tab1_tv, tab1_v) clearTabLayout(tab2_tv, tab2_v) clearTabLayout(tab3_tv, tab3_v) }
4. Fragment Setting False Data
Most of the data used to write demo is false, so it is easy to see the effect, and the data is added incrementally through a for loop
    private fun getData(): List<String> {

        val data = ArrayList<String>()
        for (i in 0..30) {
            data.add(i,"Test data:"+i)
        }
        return data
    }
END
Try writing a small demo with Kotlin, one of Kotlin's great features is that it saves developers more time, and the syntax is well understood.A little like php.It's easy for android developers to get started.
Related resources: