Because there is no rich text editor in django background management, the pages displayed are ugly, and the WYG editing method cannot be achieved, we need to introduce a third-party rich text editor.
Previously, many documents have been found before the blog to make this function. Although some blogs write well, after all, they are not written by themselves in many places or not comprehensive enough, or do not understand, sorting out some gods.
Blog, so this time I decided to write this blog record, if there is a need in the future, do not need to look for information everywhere, but also share it with you to see, provide reference. This time I'm using Kindditor Rich
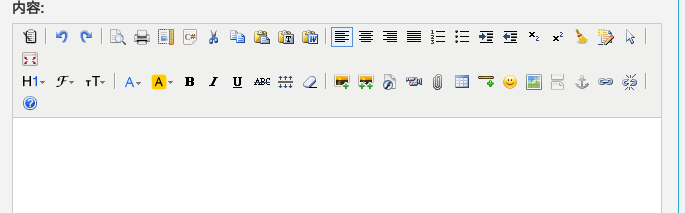
Text editor. The main reason for choosing this editor is that it is full-featured and beautiful. Here's a picture of a kindeditor. That's right. There are so many functions, and the appearance is so good.
Okay, let's start our django using the kindeditor road.
Use in applications
Step one:
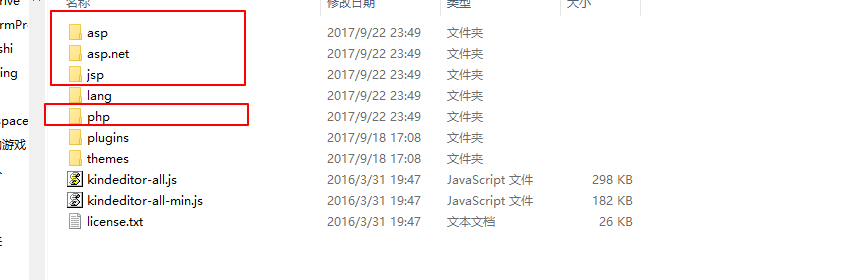
Download to the official website kindeditor
When downloaded, delete the files asp,asp.net,jsp,php. which are not available in django.
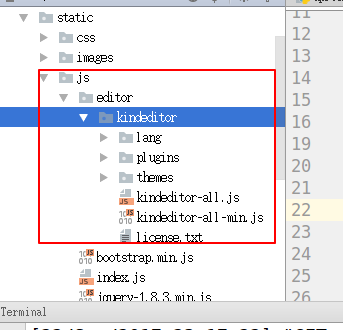
Step 2: Introduce deleted files into your project. static/js/editor in the root directory/
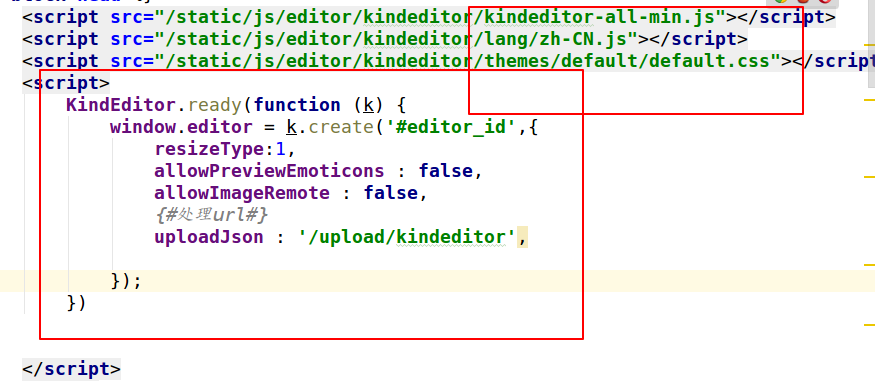
The third step is to introduce the js file of kindeditor into the web page to be a rich text editor.
    <script src="/static/js/editor/kindeditor/kindeditor-all-min.js"></script>
    <script src="/static/js/editor/kindeditor/lang/zh-CN.js"></script>
    <script src="/static/js/editor/kindeditor/themes/default/default.css"></script>
    <script>
        KindEditor.ready(function (k) {
            window.editor = k.create('#editor_id',{
                resizeType:1,
                allowPreviewEmoticons : false,
                allowImageRemote : false,
                {#Handle url#}
                uploadJson : '/upload/kindeditor',

            });
        })


    </script>
I introduced screenshots in my project. upload Json is the url address of the upload file. This should be changed according to how your url is configured. The url configuration is discussed below.
The fourth step is to add an id=editor_id to the textarea of thml, which is the rich text editing box. This ID is useful in the last step of js, which needs attention.
<textarea id="editor_id" name="content" style="height: 400px" >{{ text }}</textarea>
The rich text edit box has come out to do this step. Here's how to configure it in django.
Configuration in django
Step 1: Configure the static file upload directory, where the uploaded files in the editor will be saved.
MEDIA_URL = '/static/media/'
MEDIA_ROOT = os.path.join(BASE_DIR, "static/media")
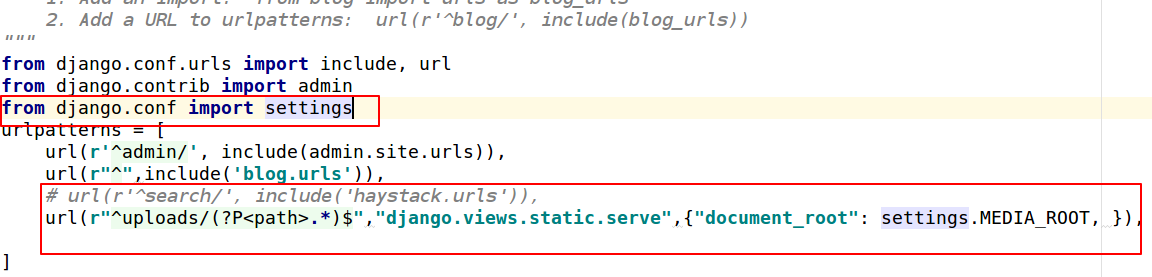
Step 2: Configure in the project's urls configuration file
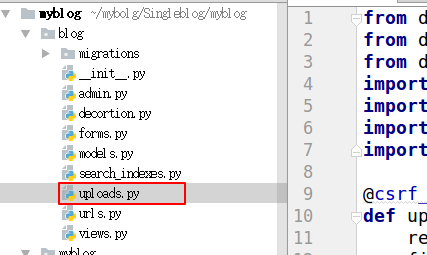
Step 3: Create a module named uploads.py in your application.
Here's my blog application. When it's created, copy the following code into a file
from django.http import HttpResponse
from django.conf import settings
from django.views.decorators.csrf import csrf_exempt
import os
import uuid
import json
import datetime as dt

@csrf_exempt
def upload_image(request, dir_name):
    result = {"error": 1, "message": "Upload error"}
    files = request.FILES.get("imgFile", None)
    if files:
        result = image_upload(files, dir_name)
    return HttpResponse(json.dumps(result), content_type="application/json")
# directories creating

def upload_generation_dir(dir_name):
    today = dt.datetime.today()
    dir_name = dir_name + '/%d/%d/' % (today.year, today.month)
    if not os.path.exists(settings.MEDIA_ROOT + dir_name):
        os.makedirs(settings.MEDIA_ROOT + dir_name)
    return dir_name

# Picture upload
def image_upload(files, dir_name):
    # Allow upload of file type
    allow_suffix = ['jpg', 'png', 'jpeg', 'gif',
                    'bmp', 'zip', "swf", "flv",
                    "mp3", "wav", "wma", "wmv",
                    "mid", "avi", "mpg", "asf",
                    "rm", "rmvb", "doc", "docx",
                    "xls", "xlsx", "ppt", "htm",
                    "html", "txt", "zip", "rar",
                    "gz", "bz2"]
    file_suffix = files.name.split(".")[-1]
    if file_suffix not in allow_suffix:
        return {"error": 1, "message": "The picture format is incorrect"}
    relative_path_file = upload_generation_dir(dir_name)
    path = os.path.join(settings.MEDIA_ROOT, relative_path_file)
    if not os.path.exists(path):  # Create a directory if it does not exist
        os.makedirs(path)
    file_name = str(uuid.uuid1()) + "." + file_suffix
    path_file = os.path.join(path, file_name)
    file_url = settings.MEDIA_URL + relative_path_file + file_name
    open(path_file, 'wb').write(files.file.read())
    return {"error": 0, "url": file_url}
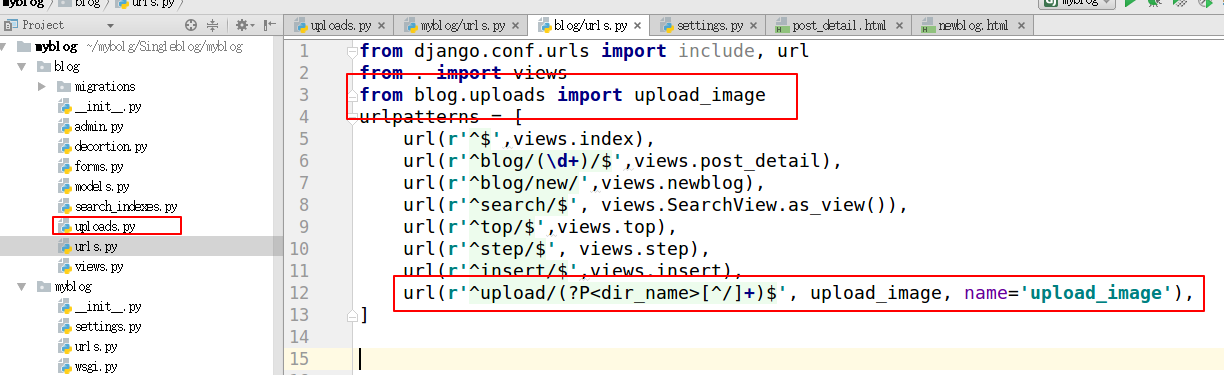
Step 4: Configuring URLs in applications
Import the view file uploads.py just written into the application urls.py
from blog.uploads import upload_image
url(r'^upload/(?P<dir_name>[^/]+)$', upload_image, name='upload_image'),
from blog.uploads import upload_image
urlpatterns = [
    url(r'^upload/(?P<dir_name>[^/]+)$', upload_image, name='upload_image'),
]
The rich text editor of the above steps should be able to work properly, including uploading pictures and videos.
Let's look at the use of admin backend management
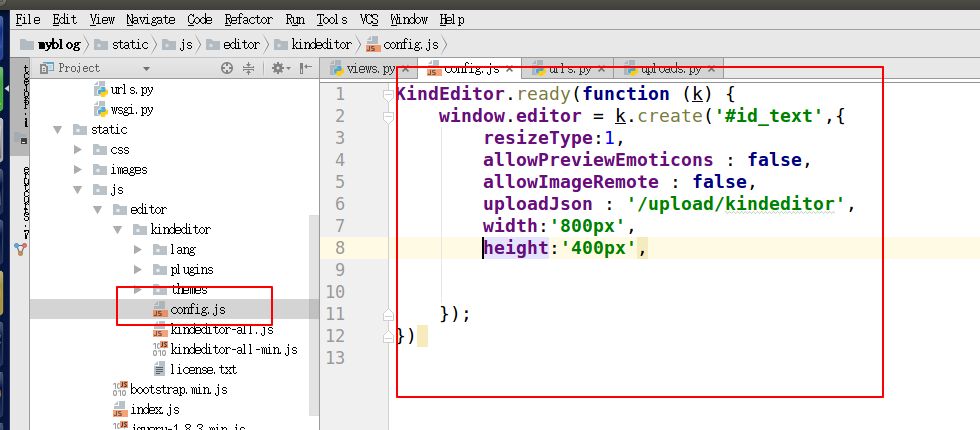
First, create a new config.js file in the kindeditor directory we downloaded earlier to write this code in the same way we used in previous applications.
KindEditor.ready(function (k) {
    window.editor = k.create('#id_text',{    #This is where you need to pay attention; if you use text = models.TextField() in the model class, the ID is id_text. If it's an advance field type, it can be checked in the browser to get the ID of the element that needs to use a rich text editor.
        resizeType:1,
        allowPreviewEmoticons : false,
        allowImageRemote : false,
        uploadJson : '/upload/kindeditor', #This is the url for background processing of uploading pictures.
        width:'800px',
        height:'400px',


    });
})
KindEditor.ready(function (k) {
    window.editor = k.create('#id_text',{
        resizeType:1,
        allowPreviewEmoticons : false,
        allowImageRemote : false,
        uploadJson : '/upload/kindeditor',
        width:'800px',
        height:'400px',


    });
})
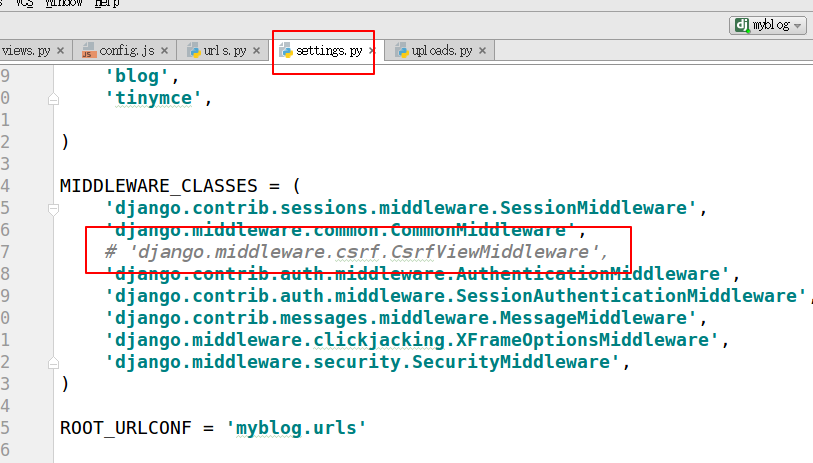
It is suggested that csrf in settings.py middleware be commented out, otherwise it is not possible that post requests will report errors. In fact, this function is not very useful.
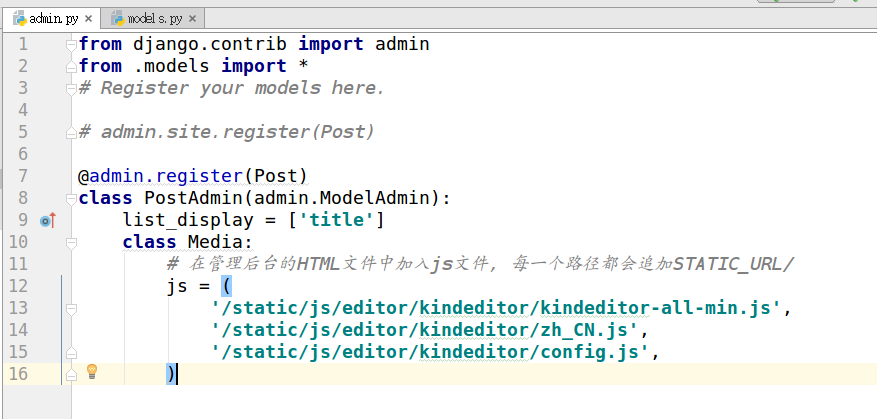
Next you need to register the model class in admin.py. Introduce its kindeditor js file into admin
Import the model class, where my model class is Post, which can be modified according to its own model class. The original registration method # admin.site.register(Post) is commented out directly.
from django.contrib import admin
from .models import *
# Register your models here.

# admin.site.register(Post)

@admin.register(Post)
class PostAdmin(admin.ModelAdmin):
    list_display = ['title']
    class Media:
        # In the management background HTML Add to the document js file, Every path will be added. STATIC_URL/
        js = (
            '/static/js/editor/kindeditor/kindeditor-all-min.js',
            '/static/js/editor/kindeditor/zh_CN.js',
            '/static/js/editor/kindeditor/config.js',
        )
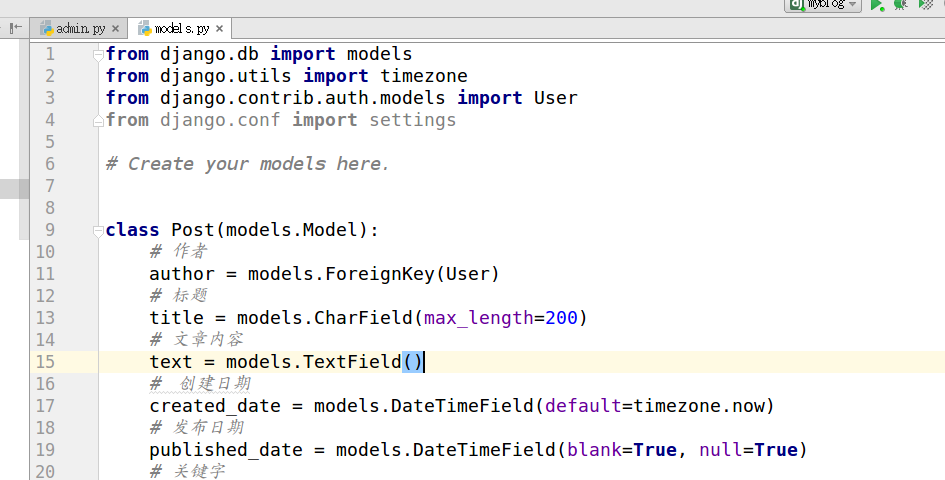
My model class is like this. Rich text editors are used on the text field.
Because each person may write different code, there are some places that are not completely universal, so you have to think about revising them yourself. The first use of kinddetior, but also a great effort, read numerous blogs, patchwork out