Corosync Details
Overview of OpenAIS
OpenAIS is an application interface specification based on SA Forum standard cluster framework. OpenAIS provides a cluster model, which includes cluster framework, cluster member management, communication mode, cluster monitoring, etc. It can provide cluster interfaces for cluster software or tools to meet AIS standards, but it has no cluster resource management function and can not form a cluster independently. OpenAIS components include AMF,CLM,CKPT,EVT,LCK,MSG, TMR,CPG,EVS and so on. Because of the different branches of OpenAIS, the components are slightly different. OpenAIS mainly includes three branches: Picacho, Whitetank and Wilson. Wilson separates Openais core architecture components into Corosync (Corosync is a cluster management engine). (See official documents for details)
Overview of Corosync
Corosync is an open cluster engine project derived from the development of OpenAIS to Wilson version (it can be said that Corosync is part of OpenAIS project). Corosync contains the core framework of OpenAIS for the use and management of Wilson's standard interface. It provides a cluster execution framework for commercial or open-source clusters. At present, Corosync is divided into 1 version and 2 version. The first version does not have voting function, and the second version has voting function.
Overview of Pacemaker
Overview of Pacemaker
Pacemaker is a cluster resource manager. It uses messages and membership capabilities provided by the preferred cluster infrastructure (OpenAIS or heartbeat) to detect and recover faults from auxiliary nodes and systems, and achieves high availability of cluster services (also known as resources). Pacemaker is a CRAM component that is separated from Heartbeat V3 and dedicated to providing high availability clusters.
Pacemaker features
- Host and application level fault detection and recovery
- Almost any redundant configuration is supported
- Support multiple cluster configuration modes at the same time
- Configuration strategy to deal with quorum loss (when multiple machines fail)
- Support application startup/shutdown sequence
- Supports applications that must / must run on the same machine
- Applications that support multiple modes (e.g., master/slave)
- You can test any failure or cluster state
Pacemaker internal components

- crmd (resource management daemon): mainly as a message agent for pengine and lrm, it also has to elect a leader to coordinate the activities of the management cluster (including the stop and start of cluster resources)
- Stonithd (Heart beat system): In Pacemaker, STONITH devices are easily monitored as resources (and configured in CIB), but Stonithd will pay attention to understanding STONITH topology, such as its client requesting isolation of a node, which will restart the machine.
- CIB (Cluster Information Base): In the system, CIB acts as the original configuration of resources in the current cluster and the dynamic state after that. Statistical Information Collection and Distribution Center is a constantly updated information base (including all cluster options, nodes, resources and their relationships and definitions of the current state). When he collects any changes in resources and node statistics, he will integrate the latest information of the current cluster and distribute it to each node of the cluster.
- pengine (Policy Engine): It is mainly responsible for calculating the next state of the cluster according to the various settings in the configuration file (based on the current state and configuration). Generate a transition map that includes a series of actions and dependencies.
Corosync+Pacemaker combination

Installation of Corosync and Acemake
Structural deployment diagram 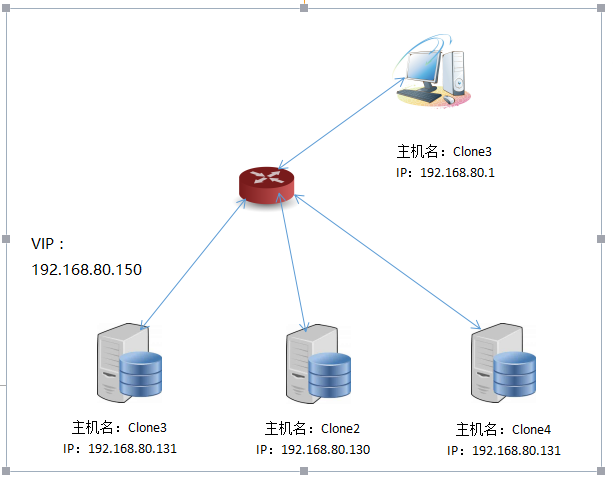
preparation in advance
1. Check the hostname and uname-n in / etc/sysconfig/network with the same results
[root@Clone3 ~]# cat /etc/sysconfig/network | grep "HOSTNAME" | cut -d "=" -f2 > network.txt
[root@Clone3 ~]# uname -n > hostname.txt
[root@Clone3 ~]# diff network.txt hostname.txt
2. Configuring DNS
A.modify/etc/resolv.conf
B.modify/etc/hosts.conf
    [root@Clone3 ~]# vim /etc/hosts
    127.0.0.1   localhost localhost.localdomain localhost4 localhost4.localdomain4
    ::1         localhost localhost.localdomain localhost6 localhost6.localdomain6
    192.168.80.130  Clone2
    192.168.80.131  Clone3
    192.168.80.132  Clone4
3. Configuring Mutual Trust ssh
generate ssh Public key and key
    [root@Clone3 ~]# ssh-keygen -t rsa
    Generating public/private rsa key pair.
    Enter file in which to save the key (/root/.ssh/id_rsa):
    Created directory '/root/.ssh'.
    Enter passphrase (empty for no passphrase):
    Enter same passphrase again:
    Your identification has been saved in /root/.ssh/id_rsa.
    Your public key has been saved in /root/.ssh/id_rsa.pub.
    The key fingerprint is:
66:03:85:51:93:de:e9:7b:ed:b1:42:36:d6:05:bc:17 root@Clone3
    The key's randomart image is:
    +--[ RSA 2048]----+
    |      .++.   .   |
    |      ....    oE |
    |      .. . .   o.|
    |       .. o   . o|
    |        S.   . o |
    |       o .. = .  |
    |           = o.  |
    |          . o .o |
    |           . oo  |
    +-----------------+
//Copy the Convention to a substitute node
    [root@Clone3 ~]# ssh-copy-id -i .ssh/id_rsa.pub root@Clone2
    The authenticity of host 'clone2 (192.168.80.130)' can't be established.
    RSA key fingerprint is d7:64:9b:c6:a0:81:61:70:8a:df:d4:b4:a4:01:54:08.
    Are you sure you want to continue connecting (yes/no)? yes
    Warning: Permanently added 'clone2,192.168.80.130' (RSA) to the list of known hosts.
    root@clone2's password:
    Now try logging into the machine, with "ssh 'root@Clone2'", and check in:
      .ssh/authorized_keys
    to make sure we haven't added extra keys that you weren't expecting.
Corosync installation
1.yum Source Installation
[root@Clone3 ~]# yum install corosync2. Compile and Install
Download:
    [root@Clone3 ~]# wget http://build.clusterlabs.org/corosync/releases/corosync-2.4.2.tar.gz
//Decompression:
    [root@Clone3 ~]# tar -xzf corosync-2.4.2.tar.gz
//Install the necessary software:
    [root@Clone3 ~]# yum install gcc ncc-devel libqb libqb-devel
//Compile and install:
    [root@Clone3 ~]#  cd corosync-2.4.2
    [root@Clone3 corosync-2.4.2]# ./configure --prefix=/usr/local/corosync --sbindir=/usr/local/sbin --bindir=/usr/local/bin --sysconfdir=/etc
    [root@Clone3 corosync-2.4.2]# make && make install
Corosync Profile Details
[root@Clone3 ~]# vim /etc/corosync/corosync.conf
totem {
        version: 2                //version number
        crypto_cipher: none
        crypto_hash: none
        secauth: on      //Whether to Open Authentication
        thread: 0        //When implementing authentication, the number of concurrent threads, 0, is the default
        interface {
                ringnumber: 0      //Ring number, which defines a unique ring number for this network card to avoid heartbeat message ring sending
                bindnetaddr: 192.168.1.0    //Binding network address
                mcastaddr: 239.255.1.1      //Broadcast address
                mcastport: 5405            //Broadcasting Port
                ttl: 1                     //Broadcast outward only once
        }
}
logging {
        fileline: off
        to_stderr: no
        to_logfile: yes
        logfile: /var/log/cluster/corosync.log
        to_syslog: yes
        debug: off
        timestamp: on
        logger_subsys {
                subsys: QUORUM
                debug: off
        }
}
service {               //Define a service to start pacemaker
    ver: 0              //Defined version
    name: pacemaker    //This means that pacemaker is automatically started when corosync is started
}
aisexec {                 //Represents which user to run as
    user: root
    group: root
}
Pacemaker installation
yum source installation
[root@Clone3 ~]# yum install pacemakerFollow-up steps
1. Use commands to generate corosync keys and copy them to each node
[root@Clone3 ~]# corosync-keygen
[root@Clone3 ~]# scp /etc/corosync/authkey root@Clone2:/etc/corosync/
2. Copy the corosync configuration file to each node
[root@Clone3 ~]# scp /etc/corosync/corosync.conf root@Clone2:/etc/corosync/corosync.conf3. Download and install crmsh, pssh
[root@Clone3 ~]# wget http://pan.baidu.com/s/1i5qsl3R
[root@Clone3 ~]# wget http://pan.baidu.com/s/1pKESkhd
[root@Clone3 ~]# yum install pssh-2.3.1-2.el6.x86_64.rpm crmsh-1.2.6-4.el6.x86_64.rpm
Start and test 
[root@Clone3 ~]# crm_mon 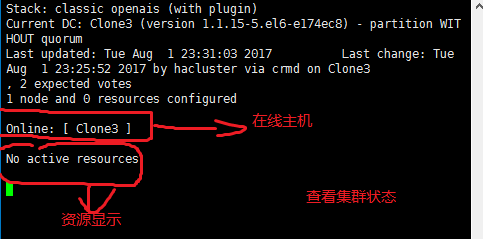
Note: Because pacemaker has a lot of configuration content, I will focus on crmsh to configure highly available resources in the next blog, as well as common servers using corosync+pacemaker to build high availability.
Hearbeat implements high availability: http://www.crazyrui.pw:8088/index.php/2017/07/31/heartbeat/
Or: http://lnsane784.blog.51cto.com/1226518/1952393
Automated deployment tool ansible: http://www.crazyrui.pw:8088/index.php/2017/07/27/linux_ansiable/
Or: http://lnsane784.blog.51cto.com/1226518/1951496
LVS load balancing: http://www.crazyrui.pw:8088/index.php/2017/07/24/linux_lvs/
Or: http://lnsane784.blog.51cto.com/1226518/1950589
DHCP,HTTPD,TOMCAT build: http://www.crazyrui.pw:8088/index.php/category/linux-server/