Configure Bootstrap 4
Bootstrap is an open source front-end framework for Web site development ("front-end" refers to the interface presented to end users) that provides font typesetting, forms, buttons, navigation, and a variety of other components to facilitate the development of dynamic Web pages and Web applications.
Several versions of Bootstrap are popular, so we chose the latest version of Bootstrap 4: Download Address And unzip it.
Then create a new directory, static/bootstrap/, in the project root directory to store the Bootstrap static files.Static files are usually those that do not change.The css, js files in Bootstrap are static files.
Copy the css and js folders you just extracted.
Because bootstrap.js relies on jquery.js and popper.js to function properly, we also need to download and save both files.Attach a download link from your official website (go to the download page and copy and paste the code into a new file):
It's not clear how popper.js downloaded the stamp This link:
https://unpkg.com/popper.js@1.14.4/dist/umd/popper.js
Once in, the page shows a long code, copy it all; create a new file called popper.js in the project, and copy the code you just copied in.Many open source JS files are downloaded this way.
Now our static/directory structure looks like this:
my_blog
│
├─article
└─my_blog
│ ...
└─static
    └─bootstrap
    │   ├─css # Folder
    │   └─js # Folder
    └─jquery
    │   └─jquery-3.3.1.js # file
    └─popper
        └─popper-1.14.4.js # file
Because static files need to be specified in Django to be referenced correctly in the template.So at the end of settings.py add:
my_blog/settings.py

...

STATICFILES_DIRS = (
    os.path.join(BASE_DIR, "static"),
)
Verify again that there is a STATIC_URL ='/static/'field in settings.py, and if it is not, add it after it.
Writing templates
In templates/at the root directory, create three new files:
-
base.html is the template base for the entire project, from which all web pages inherit;
-
header.html is the navigation bar at the top of the page;
-
footer.html is the footer at the bottom of the page.
-
These three files are usually the same on each page. Being independent can avoid duplicating the same code and improve maintainability.
Now templates\ is structured like this:
templates
│
├─base.html
├─header.html
├─footer.html
└─article
    └─list.html # Created in the previous chapter
Add the previous list.html and rewrite the four files.
Bootstrap is a very good front-end framework, simple to start with, and so popular.
The official website is the most authoritative document.You can learn systematically on the official website: https://getbootstrap.com/docs/4.1/getting-started/introduction/
Write base.html first:
templates/base.html

<!-- Load static file -->
{% load staticfiles %}

<!DOCTYPE html>
<!-- Website Main Language -->
<html lang="zh-cn">

<head>
    <!-- Character encoding used by websites -->
    <meta charset="utf-8">
    <!-- Reserve the location of the site title -->
    <title>{% block title %}{% endblock %}</title>
    <!-- Introduce bootstrap Of css file -->
    <link rel="stylesheet" href="{% static 'bootstrap/css/bootstrap.min.css' %}">
</head>

<body>
    <!-- Introduce Navigation Bar -->
    {% include 'header.html' %}
    <!-- Reserve the location of specific pages -->
    {% block content %}{% endblock content %}
    <!-- Introducing footnotes -->
    {% include 'footer.html' %}
    <!-- bootstrap.js rely on jquery.js and popper.js,So here we introduce -->
    <script src="{% static 'jquery/jquery-3.3.1.js' %}"></script>
    <script src="{% static 'popper/popper-1.14.4.js' %}"></script>
    <!-- Introduce bootstrap Of js file -->
    <script src="{% static 'bootstrap/js/bootstrap.min.js' %}"></script>
</body>

</html>- Before you can use {% static'path'%} to reference a static file, add {% load staticfiles%} to the template.
- In HTML syntax, all content is wrapped in tags; tags and their attributes can be used to print, explain, and so on.
- The <head></head> tag contains the metadata of the page and will not be displayed on the page.Inside the <body></body> tag is what the web page will display.
- Notice how Bootstrap's css and js files were introduced
- jquery.js and popper.js are introduced before bootstrap.js.
Then header.html:
templates/header.html

<!-- Define navigation bar -->
<nav class="navbar navbar-expand-lg navbar-dark bg-dark">
  <div class="container">

    <!-- Navigation Bar Trademark -->
    <a class="navbar-brand" href="#">My Blog</a>

    <!-- Navigation Entry -->
    <div>
      <ul class="navbar-nav">
        <!-- entry -->
        <li class="nav-item">
          <a class="nav-link" href="#">Article</a>
        </li>
      </ul>
    </div>

  </div>
</nav>
The class attribute within the tag is how the Bootstrap style is defined.Try rewriting or deleting some of them to see how the page changes.
Then overwrite the previous list.html:
templates/article/list.html

<!-- extends Indicates that this page inherits from base.html file -->
{% extends "base.html" %}
{% load staticfiles %}

<!-- Write in base.html Defined in title -->
{% block title %}
    //home page
{% endblock title %}

<!-- Write in base.html Defined in content -->
{% block content %}

<!-- Define the div container -->
<div class="container">
    <div class="row mt-2">

        {% for article in articles %}
        <!-- Article Content -->
        <div class="col-4 mb-4">
        <!-- Card Container -->
            <div class="card h-100">
                <!-- Title -->
                <h4 class="card-header">{{ article.title }}</h4>
                <!-- abstract -->
                <div class="card-body">
                    <p class="card-text">{{ article.body|slice:'100' }}...</p>
                </div>
                <!-- Footnote -->
                <div class="card-footer">
                    <a href="#"Class=" BTN btn-primary ">Read this </a>
                </div>
            </div>
        </div>
        {% endfor %}

    </div>
</div>
{% endblock content %}- Notice how {% block title%} and {% block content%} correspond to base.html.
- The {{article.body|slice:'100'}} in the summary takes out the body of the article; where |slice:'100' is Django's filter syntax, meaning the first 100 characters of the body are taken out to avoid the summary being too long.
Finally, write footer.html:
{% load staticfiles %}
<!-- Footer -->
<div>
<br><br><br>
</div>
<footer class="py-3 bg-dark fixed-bottom">
<div class="container">
<p class="m-0 text-center text-white">Copyright © www.dusaiphoto.com 2018</p>
</div>
</footer>
Let's take a look at what's happening:
When we access list.html through a url, {% extends "base.html"%} at the top tells Django: "This file inherits base.html, you can call it."
Django then renders the base.html file honestly:
- The {%include'header.html'%} indicates that the header.html content needs to be added here
- {% include'footer.html'%} Add content from footer.html
- {% block content%}{% endblock content%} indicates that the content of the corresponding block in list.html should be added here
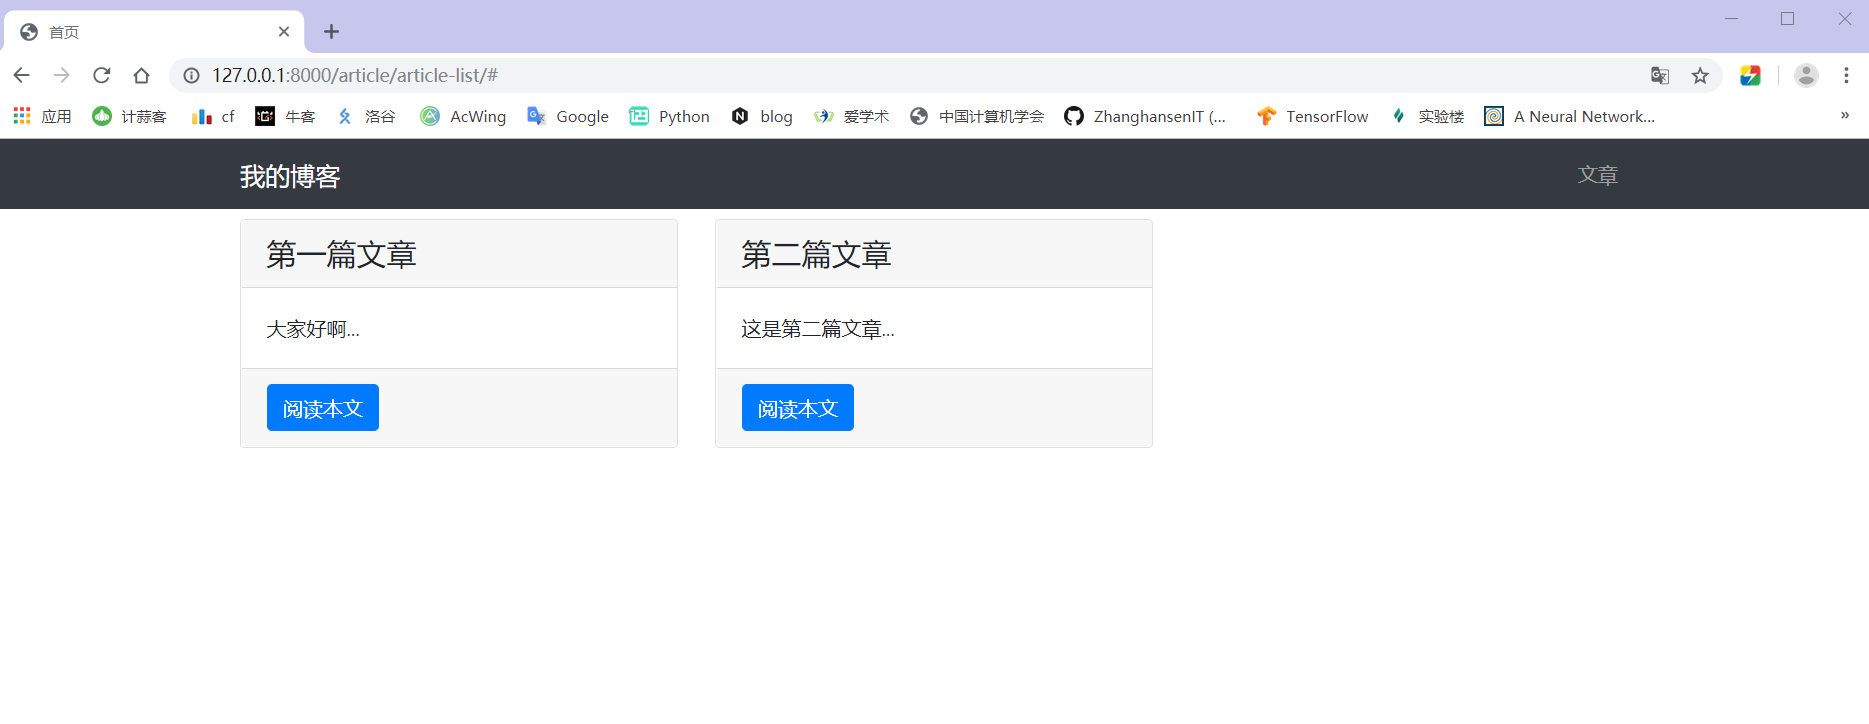
Run Server
As a rule, save all your files, enter the virtual environment, run the development server, type http://127.0.0.1:8000/article/article-list/ in your browser and see the following pages: