1. Upgrade of kubernetes cluster
-
be careful:
- Small version upgrade, less general problems.
- For large version upgrade, adaptation and testing must be done well.
-
Rolling upgrade is recommended:
- master node:
- First remove a master node from the Kube LB on the node node, and then add it again after upgrading.
- Then remove the remaining two master nodes from the Kube LB on the node node and join them again after upgrading.
- node:
- The service needs to be stopped for upgrading, and the node node is upgraded one by one.
- After replacing the binary files of kubelet and Kube proxy, quickly restart the service.
- master node:
1.1 Master node upgrade
1.1.1 remove the master Node to be upgraded from the Node (the Master goes offline)
On all node nodes, remove the master node to be upgraded from Kube lb
root@node1:~# vim /etc/kube-lb/conf/kube-lb.conf
user root;
worker_processes 1;

error_log  /etc/kube-lb/logs/error.log warn;

events {
    worker_connections  3000;
}

stream {
    upstream backend {
        server 192.168.6.81:6443    max_fails=2 fail_timeout=3s;
        #server 192.168.6.79:6443    max_fails=2 fail_timeout=3s;  #Comment out the master node to be upgraded
        server 192.168.6.80:6443    max_fails=2 fail_timeout=3s;
    }

    server {
        listen 127.0.0.1:6443;
        proxy_connect_timeout 1s;
        proxy_pass backend;
    }
}

root@node1:~# systemctl restart kube-lb.service    #Restart the service and the configuration takes effect
1.1.2 replace relevant binary files on the offline Master
Upgrading on the Master involves the following components
- kube-apiserver
- kube-controller-manager
- kube-proxy
- kube-scheduler
- kubectl
- kubelet
1.1.2.1 download the installation package of the corresponding version, upload it to the server and unzip it
root@master1:~/1.21.5# ls
kubernetes-client-linux-amd64.tar.gz  kubernetes-node-linux-amd64.tar.gz  kubernetes-server-linux-amd64.tar.gz  kubernetes.tar.gz
root@master1:~/1.21.5# tar xf kubernetes-client-linux-amd64.tar.gz
root@master1:~/1.21.5# tar xf kubernetes-node-linux-amd64.tar.gz
root@master1:~/1.21.5# tar xf kubernetes-server-linux-amd64.tar.gz
root@master1:~/1.21.5# tar xf kubernetes.tar.gz
Location of binary executable program required on Server side
root@master1:~/1.21.5/kubernetes/server/bin# pwd
/root/1.21.5/kubernetes/server/bin

root@master1:~/1.21.5/kubernetes/server/bin# ./kube-apiserver --version
Kubernetes v1.21.5

root@master1:~/1.21.5/kubernetes/server/bin# ll
total 1075596
drwxr-xr-x 2 root root      4096 Sep 16 05:22 ./
drwxr-xr-x 3 root root        66 Sep 16 05:27 ../
-rwxr-xr-x 1 root root  50790400 Sep 16 05:22 apiextensions-apiserver*
-rwxr-xr-x 1 root root  48738304 Sep 16 05:22 kube-aggregator*
-rwxr-xr-x 1 root root 122322944 Sep 16 05:22 kube-apiserver*
-rw-r--r-- 1 root root         8 Sep 16 05:21 kube-apiserver.docker_tag
-rw------- 1 root root 127114240 Sep 16 05:21 kube-apiserver.tar
-rwxr-xr-x 1 root root 116359168 Sep 16 05:22 kube-controller-manager*
-rw-r--r-- 1 root root         8 Sep 16 05:21 kube-controller-manager.docker_tag
-rw------- 1 root root 121150976 Sep 16 05:21 kube-controller-manager.tar
-rwxr-xr-x 1 root root  43360256 Sep 16 05:22 kube-proxy*
-rw-r--r-- 1 root root         8 Sep 16 05:21 kube-proxy.docker_tag
-rw------- 1 root root 105362432 Sep 16 05:21 kube-proxy.tar
-rwxr-xr-x 1 root root  47321088 Sep 16 05:22 kube-scheduler*
-rw-r--r-- 1 root root         8 Sep 16 05:21 kube-scheduler.docker_tag
-rw------- 1 root root  52112384 Sep 16 05:21 kube-scheduler.tar
-rwxr-xr-x 1 root root  44851200 Sep 16 05:22 kubeadm*
-rwxr-xr-x 1 root root  46645248 Sep 16 05:22 kubectl*
-rwxr-xr-x 1 root root  55305384 Sep 16 05:22 kubectl-convert*
-rwxr-xr-x 1 root root 118353264 Sep 16 05:22 kubelet*
-rwxr-xr-x 1 root root   1593344 Sep 16 05:22 mounter*
1.1.2.2 shutdown of relevant services
root@master1:~/1.21.5/kubernetes/server/bin# systemctl stop kube-apiserver kube-proxy.service kube-controller-manager.service kube-scheduler.service kubelet.service
1.1.2.3 forced binary replacement
root@master1:~/1.21.5/kubernetes/server/bin# \cp kube-apiserver kube-controller-manager kube-proxy kube-scheduler kubelet kubectl /usr/local/bin/
1.1.3 restart relevant services
root@master1:~/1.21.5/kubernetes/server/bin# systemctl start kube-apiserver kube-proxy.service kube-controller-manager.service kube-scheduler.service kubelet.service
1.1.4 verification
root@master1:~/1.21.5/kubernetes/server/bin# kubectl get node -A
NAME           STATUS                     ROLES    AGE     VERSION
192.168.6.79   Ready,SchedulingDisabled   master   6d16h   v1.21.5    #Change to new version
192.168.6.80   Ready,SchedulingDisabled   master   6d16h   v1.21.0
192.168.6.81   Ready,SchedulingDisabled   master   53m     v1.21.0
192.168.6.89   Ready                      node     6d15h   v1.21.0
192.168.6.90   Ready                      node     6d15h   v1.21.0
192.168.6.91   Ready                      node     45m     v1.21.0
1.1.5 use the same method to upgrade other Master nodes
1.1.5.1 offline other two Master nodes
- Operate on all node nodes
root@node1:~# vim /etc/kube-lb/conf/kube-lb.conf
user root;
worker_processes 1;

error_log  /etc/kube-lb/logs/error.log warn;

events {
    worker_connections  3000;
}

stream {
    upstream backend {
        #server 192.168.6.81:6443    max_fails=2 fail_timeout=3s;
        server 192.168.6.79:6443    max_fails=2 fail_timeout=3s;
        #server 192.168.6.80:6443    max_fails=2 fail_timeout=3s;
    }

    server {
        listen 127.0.0.1:6443;
        proxy_connect_timeout 1s;
        proxy_pass backend;
    }
}
root@node1:~# systemctl restart kube-lb
1.1.5.2 replace the binary executable file and restart the service
root@master2:~/1.21.5# tar xf kubernetes-client-linux-amd64.tar.gz
root@master2:~/1.21.5# tar xf kubernetes-node-linux-amd64.tar.gz
root@master2:~/1.21.5# tar xf kubernetes-server-linux-amd64.tar.gz
root@master2:~/1.21.5# tar xf kubernetes.tar.gz
root@master2:~/1.21.5# cd kubernetes/server/bin/

root@master2:~/1.21.5/kubernetes/server/bin# systemctl stop kube-apiserver kube-proxy.service kube-controller-manager.service kube-scheduler.service kubelet.service

root@master2:~/1.21.5/kubernetes/server/bin# \cp kube-apiserver kube-controller-manager kube-proxy kube-scheduler kubelet kubectl /usr/local/bin/

root@master2:~/1.21.5/kubernetes/server/bin# systemctl start kube-apiserver kube-proxy.service kube-controller-manager.service kube-scheduler.service kubelet.service


root@master3:~/1.21.5# tar xf kubernetes-client-linux-amd64.tar.gz
root@master3:~/1.21.5# tar xf kubernetes-node-linux-amd64.tar.gz
root@master3:~/1.21.5# tar xf kubernetes-server-linux-amd64.tar.gz
root@master3:~/1.21.5# tar xf kubernetes.tar.gz
root@master3:~/1.21.5# cd kubernetes/server/bin/

root@master3:~/1.21.5/kubernetes/server/bin# systemctl stop kube-apiserver kube-proxy.service kube-controller-manager.service kube-scheduler.service kubelet.service

root@master3:~/1.21.5/kubernetes/server/bin# \cp kube-apiserver kube-controller-manager kube-proxy kube-scheduler kubelet kubectl /usr/local/bin/

root@master3:~/1.21.5/kubernetes/server/bin# systemctl start kube-apiserver kube-proxy.service kube-controller-manager.service kube-scheduler.service kubelet.service
1.1.5.3 verification
root@master1:~/1.21.5/kubernetes/server/bin# kubectl get node -A
NAME           STATUS                        ROLES    AGE     VERSION
192.168.6.79   Ready,SchedulingDisabled      master   6d16h   v1.21.5
192.168.6.80   Ready,SchedulingDisabled      master   6d16h   v1.21.5
192.168.6.81   NotReady,SchedulingDisabled   master   67m     v1.21.5
192.168.6.89   Ready                         node     6d16h   v1.21.0
192.168.6.90   Ready                         node     6d16h   v1.21.0
192.168.6.91   Ready                         node     60m     v1.21.0
1.1.5.4 re launch the upgraded Master node
- Operate on all node nodes
root@node1:~# vim /etc/kube-lb/conf/kube-lb.conf
user root;
worker_processes 1;

error_log  /etc/kube-lb/logs/error.log warn;

events {
    worker_connections  3000;
}

stream {
    upstream backend {
        server 192.168.6.81:6443    max_fails=2 fail_timeout=3s;
        server 192.168.6.79:6443    max_fails=2 fail_timeout=3s;
        server 192.168.6.80:6443    max_fails=2 fail_timeout=3s;
    }

    server {
        listen 127.0.0.1:6443;
        proxy_connect_timeout 1s;
        proxy_pass backend;
    }
}
root@node1:~# systemctl restart kube-lb
1.2 Node upgrade
- Node upgrade involves two services, kubectl upgrade
- kube-proxy
- kubelet
- Upgrade node by node
1.2.1 stop service of node
root@node1:~# systemctl stop kubelet kube-proxy
1.2.2 replace the binary executable file and restart the service
root@master1:~/1.21.5/kubernetes/server/bin# scp kubelet kube-proxy  kubectl root@192.168.6.89:/usr/local/bin/

root@node1:~# systemctl start kubelet kube-proxy
1.2.3 verification
root@master1:~/1.21.5/kubernetes/server/bin# kubectl get node -A
NAME           STATUS                     ROLES    AGE     VERSION
192.168.6.79   Ready,SchedulingDisabled   master   6d16h   v1.21.5
192.168.6.80   Ready,SchedulingDisabled   master   6d16h   v1.21.5
192.168.6.81   Ready,SchedulingDisabled   master   83m     v1.21.5
192.168.6.89   Ready                      node     6d16h   v1.21.5
192.168.6.90   Ready                      node     6d16h   v1.21.0
192.168.6.91   Ready                      node     75m     v1.21.0
2. Yaml file
You need to create the yaml file in advance, and create the namespace, yaml file, etc. required for pod operation
2.1 create a business namespace yaml file
apiVersion: v1   #API version
kind: Namespace  #The type is namespace
metadata:        #Define metadata
  name: n56      #namespace name
2.2 create and validate namespace
root@master1:~# kubectl apply -f n56-namespace.yaml
namespace/n56 created
root@master1:~# kubectl get ns
NAME                   STATUS   AGE
default                Active   6d19h
kube-node-lease        Active   6d19h
kube-public            Active   6d19h
kube-system            Active   6d19h
kubernetes-dashboard   Active   6d17h
n56                    Active   4s
2.3 yaml and json
Online yaml and json editors: https://www.bejson.com/validators/yaml_editor/
2.3.1 json format
{
	"Personnel list": {
		"Zhang San": {
			"Age": 18,
			"occupation": "Linux Operation and maintenance engineer",
			"hobby": ["read a book", "study", "work overtime"]
		},
		"Li Si": {
			"Age": 20,
			"occupation": "java Development Engineer",
			"hobby": ["open source ", "Microservices", "Distributed storage"]
		}
	}
}
- Features of json
- json cannot be annotated
- Poor readability of json
- json syntax is very strict
- It is more suitable for the return value of API and can also be used for configuration files
2.3.2 yaml format
Personnel list:
  Zhang San:
    Age: 18
    occupation: Linux Operation and maintenance engineer
    hobby:
      - read a book
      - study
      - work overtime
  Li Si:
    Age: 20
    occupation: java Development Engineer
    hobby:
      - open source
      - Microservices
      - Distributed storage
- yaml format features:
- Case sensitive
- Use indentation to represent hierarchical relationships
- Elements in the list are represented by "-"
- You cannot use the tab key when indenting. Only spaces are allowed
- The number of indented spaces is not important, as long as the elements of the same level are aligned to the left
- Using # to represent a comment, the interpreter ignores it from this character to the end of the line
- It is more suitable as a configuration file than json
2.3.3 main features of yaml document
Yaml files in k8s and yaml files in other scenarios mostly include the following types:
- supervisor-subordinate Guanxi
- list
- Key value pair (also known as maps and kv key value pair data)
2.3.4 take nginx.yaml as an example to illustrate the compilation of yaml file
If there is no template file, you can use the following method to query
kubectl explain namespace
kubectl explain namespace.metadata
#nginx.yaml
kind: Deployment  #Type: deployment controller, kubectl explain deployment
apiVersion: apps/v1  #API edition,# kubectl explain  Deployment.apiVersion
metadata: #Metadata information of pod, kubectl explain deployment.metadata
  labels: #custom pod The label of the,# kubectl explain  Deployment.metadata.labels
    app: n56-nginx-deployment-label #The tag name is app and the value is n56 nginx deployment label, which will be used later
  name: n56-nginx-deployment #Name of pod
  namespace: n56 #The namespace of the pod is default
spec: #Define the details of the container in the deployment, kubectl explain deployment.spec
  replicas: 1 #The number of copies of created pods, that is, how many pods. The default value is 1
  selector: #Define label selector
    matchLabels: #To define a matching label, you must set it
      app: n56-nginx-selector #Matching target tags,
  template: #A template must be defined to describe the pod to be created
    metadata: #Define template metadata
      labels: #Define the template label, Deployment.spec.template.metadata.labels
        app: n56-nginx-selector #Define a label equal to Deployment.spec.selector.matchLabels
    spec:
      containers:
      - name: n56-nginx-container #Container name
        image: nginx:1.16.1
        #command: ["/apps/tomcat/bin/run_tomcat.sh"] #The command or script that the container starts executing
        #imagePullPolicy: IfNotPresent
        imagePullPolicy: Always #Pull image strategy
        ports: #Define container port list
        - containerPort: 80 #Define a port
          protocol: TCP #Port protocol
          name: http #Port name
        - containerPort: 443 #Define a port
          protocol: TCP #Port protocol
          name: https #Port name
        env: #Configure environment variables
        - name: "password" #Variable name. Must be enclosed in quotation marks
          value: "123456" #The value of the current variable
        - name: "age" #Another variable name
          value: "18" #The value of another variable
        resources: #Request and limit settings for resources
          limits: #Resource limit setting, upper limit
            cpu: 500m  #The CPU limit is in the number of core s. You can write CPU compression values such as 0.5 or 500m
            memory: 512Mi #Memory limit. The unit can be Mib/Gib. It will be used for the docker run --memory parameter
          requests: #Settings for resource requests
            cpu: 200m #The number of CPU requests, the initial available number of container startup, and the CPU compression value of 0.5 or 500m can be written
            memory: 256Mi #The size of memory request and the initial available quantity of container startup are used when scheduling pod
      nodeSelector:
        #group: python57
        project: linux56 #Schedule containers only to node s with the label project=linux56

#nginx-svc.yaml
kind: Service #The type is service
apiVersion: v1 #service API version, service.apiVersion
metadata: #Define service metadata, service.metadata
  labels: #Custom labels, service.metadata.labels
    app: n56-nginx #Define the contents of the service tag
  name: n56-nginx-service #Define the name of the service, which will be resolved by DNS
  namespace: n56 #The namespace name to which the service belongs, that is, the namespace to which the service is created
spec: #Define the details of the service, service.spec
  type: NodePort #The type of service, which defines the access method of the service. The default is ClusterIP, service.spec.type
  ports: #Define access port, service.spec.ports
  - name: http #Define a port name
    port: 81 #Service port 80, client traffic - > Firewall - > Load Balancing - > nodeport: 30001 - > service port: 81 - > targetpod: 80
    protocol: TCP #Protocol type
    targetPort: 80 #Port of target pod
    nodePort: 30001 #Exposed port of node
  - name: https #SSL port
    port: 1443 #service 443 port
    protocol: TCP #Port protocol
    targetPort: 443 #Target pod port
    nodePort: 30043 #SSL port exposed by node node
  selector: #The tag selector of the service defines the target pod to access
    app: n56-nginx-selector #The flow path to the selected pod must be equal to Deployment.spec.selector.matchLabels
3. ETCD client usage, data backup and recovery
3.1 heartbeat detection
root@etcd1:~# export node_ip='192.168.6.84 192.168.6.85 192.168.6.86'
root@etcd1:~# for i in ${node_ip}; do ETCDCTL_API=3 /usr/local/bin/etcdctl --endpoints=https://${i}:2379 --cacert=/etc/kubernetes/ssl/ca.pem --cert=/etc/kubernetes/ssl/etcd.pem --key=/etc/kubernetes/ssl/etcd-key.pem  endpoint health; done
https://192.168.6.84:2379 is healthy: successfully committed proposal: took = 14.162089ms
https://192.168.6.85:2379 is healthy: successfully committed proposal: took = 16.070919ms
https://192.168.6.86:2379 is healthy: successfully committed proposal: took = 12.748962ms
3.2 display member information
root@etcd1:~# ETCDCTL_API=3 /usr/local/bin/etcdctl --write-out=table member list --endpoints=https://192.168.6.84:2379 --cacert=/etc/kubernetes/ssl/ca.pem --cert=/etc/kubernetes/ssl/etcd.pem --key=/etc/kubernetes/ssl/etcd-key.pem
+------------------+---------+-------------------+---------------------------+---------------------------+------------+
|        ID        | STATUS  |       NAME        |        PEER ADDRS         |       CLIENT ADDRS        | IS LEARNER |
+------------------+---------+-------------------+---------------------------+---------------------------+------------+
| 308a1368f27ba48a | started | etcd-192.168.6.85 | https://192.168.6.85:2380 | https://192.168.6.85:2379 |      false |
| c16e08c8cace2cd3 | started | etcd-192.168.6.86 | https://192.168.6.86:2380 | https://192.168.6.86:2379 |      false |
| ffe13c54256e7ab9 | started | etcd-192.168.6.84 | https://192.168.6.84:2380 | https://192.168.6.84:2379 |      false |
+------------------+---------+-------------------+---------------------------+---------------------------+------------+
3.3 display detailed node status in tabular form
root@etcd1:~# export node_ip='192.168.6.84 192.168.6.85 192.168.6.86'
root@etcd1:~# for i in ${node_ip}; do ETCDCTL_API=3 /usr/local/bin/etcdctl --write-out=table endpoint status --endpoints=https://${i}:2379 --cacert=/etc/kubernetes/ssl/ca.pem --cert=/etc/kubernetes/ssl/etcd.pem --key=/etc/kubernetes/ssl/etcd-key.pem; done

+---------------------------+------------------+---------+---------+-----------+------------+-----------+------------+--------------------+--------+
|         ENDPOINT          |        ID        | VERSION | DB SIZE | IS LEADER | IS LEARNER | RAFT TERM | RAFT INDEX | RAFT APPLIED INDEX | ERRORS |
+---------------------------+------------------+---------+---------+-----------+------------+-----------+------------+--------------------+--------+
| https://192.168.6.84:2379 | ffe13c54256e7ab9 |  3.4.13 |  3.9 MB |      true |      false |        16 |     102137 |             102137 |        |
+---------------------------+------------------+---------+---------+-----------+------------+-----------+------------+--------------------+--------+
+---------------------------+------------------+---------+---------+-----------+------------+-----------+------------+--------------------+--------+
|         ENDPOINT          |        ID        | VERSION | DB SIZE | IS LEADER | IS LEARNER | RAFT TERM | RAFT INDEX | RAFT APPLIED INDEX | ERRORS |
+---------------------------+------------------+---------+---------+-----------+------------+-----------+------------+--------------------+--------+
| https://192.168.6.85:2379 | 308a1368f27ba48a |  3.4.13 |  3.9 MB |     false |      false |        16 |     102137 |             102137 |        |
+---------------------------+------------------+---------+---------+-----------+------------+-----------+------------+--------------------+--------+
+---------------------------+------------------+---------+---------+-----------+------------+-----------+------------+--------------------+--------+
|         ENDPOINT          |        ID        | VERSION | DB SIZE | IS LEADER | IS LEARNER | RAFT TERM | RAFT INDEX | RAFT APPLIED INDEX | ERRORS |
+---------------------------+------------------+---------+---------+-----------+------------+-----------+------------+--------------------+--------+
| https://192.168.6.86:2379 | c16e08c8cace2cd3 |  3.4.13 |  3.9 MB |     false |      false |        16 |     102137 |             102137 |        |
+---------------------------+------------------+---------+---------+-----------+------------+-----------+------------+--------------------+--------+
3.4 viewing etcd data
3.4.1 view all key s
root@etcd1:~# ETCDCTL_API=3 etcdctl get / --prefix --keys-only  #View all key s in path mode

pod Information:
root@etcd1:~# ETCDCTL_API=3 etcdctl get / --prefix --keys-only| grep pods
/registry/pods/kube-system/calico-kube-controllers-759545cb9c-jw8c2
/registry/pods/kube-system/calico-node-67bv2
/registry/pods/kube-system/calico-node-hjm5j
/registry/pods/kube-system/calico-node-lkhdp
/registry/pods/kube-system/calico-node-m5nbf
/registry/pods/kube-system/calico-node-n2vxw
/registry/pods/kube-system/calico-node-wpxj4
/registry/pods/kube-system/coredns-69d445fc94-wsp2w
/registry/pods/kubernetes-dashboard/dashboard-metrics-scraper-67c9c47fc7-fcqzq
/registry/pods/kubernetes-dashboard/kubernetes-dashboard-86d88bf65-l2qh5

namespace Information:
root@etcd1:~# ETCDCTL_API=3 etcdctl get / --prefix --keys-only| grep namespaces
/registry/namespaces/default
/registry/namespaces/kube-node-lease
/registry/namespaces/kube-public
/registry/namespaces/kube-system
/registry/namespaces/kubernetes-dashboard

Controller information:
root@etcd1:~# ETCDCTL_API=3 etcdctl get / --prefix --keys-only| grep deployments
/registry/deployments/kube-system/calico-kube-controllers
/registry/deployments/kube-system/coredns
/registry/deployments/kubernetes-dashboard/dashboard-metrics-scraper
/registry/deployments/kubernetes-dashboard/kubernetes-dashboard

calico Information:
root@etcd1:~# ETCDCTL_API=3 etcdctl get / --prefix --keys-only| grep calico
/calico/ipam/v2/assignment/ipv4/block/10.200.147.192-26
/calico/ipam/v2/assignment/ipv4/block/10.200.187.192-26
/calico/ipam/v2/assignment/ipv4/block/10.200.213.128-26
/calico/ipam/v2/assignment/ipv4/block/10.200.255.128-26
/calico/ipam/v2/assignment/ipv4/block/10.200.67.0-26
/calico/ipam/v2/assignment/ipv4/block/10.200.99.64-26
3.4.2 viewing the specified key
root@etcd1:~# ETCDCTL_API=3 etcdctl get /calico/ipam/v2/assignment/ipv4/block/10.200.147.192-26
/calico/ipam/v2/assignment/ipv4/block/10.200.147.192-26
{"cidr":"10.200.147.192/26","affinity":"host:node3.k8s.local","allocations":[0,null,null,null,null,null,null,null,null,null,null,null,null,null,null,null,null,null,null,null,null,null,null,null,null,null,null,null,null,null,null,null,null,null,null,null,null,null,null,null,null,null,null,null,null,null,null,null,null,null,null,null,null,null,null,null,null,null,null,null,null,null,null,null],"unallocated":[1,2,3,4,5,6,7,8,9,10,11,12,13,14,15,16,17,18,19,20,21,22,23,24,25,26,27,28,29,30,31,32,33,34,35,36,37,38,39,40,41,42,43,44,45,46,47,48,49,50,51,52,53,54,55,56,57,58,59,60,61,62,63],"attributes":[{"handle_id":"ipip-tunnel-addr-node3.k8s.local","secondary":{"node":"node3.k8s.local","type":"ipipTunnelAddress"}}],"deleted":false}
3.4.3 view all calico data
root@etcd1:~# ETCDCTL_API=3 etcdctl get  --keys-only  --prefix /calico | grep local
/calico/ipam/v2/handle/ipip-tunnel-addr-master1.k8s.local
/calico/ipam/v2/handle/ipip-tunnel-addr-master2.k8s.local
/calico/ipam/v2/handle/ipip-tunnel-addr-master3.k8s.local
/calico/ipam/v2/handle/ipip-tunnel-addr-node1.k8s.local
/calico/ipam/v2/handle/ipip-tunnel-addr-node2.k8s.local
/calico/ipam/v2/handle/ipip-tunnel-addr-node3.k8s.local
/calico/ipam/v2/host/master1.k8s.local/ipv4/block/10.200.213.128-26
/calico/ipam/v2/host/master2.k8s.local/ipv4/block/10.200.67.0-26
/calico/ipam/v2/host/master3.k8s.local/ipv4/block/10.200.187.192-26
/calico/ipam/v2/host/node1.k8s.local/ipv4/block/10.200.255.128-26
/calico/ipam/v2/host/node2.k8s.local/ipv4/block/10.200.99.64-26
/calico/ipam/v2/host/node3.k8s.local/ipv4/block/10.200.147.192-26
/calico/resources/v3/projectcalico.org/felixconfigurations/node.master1.k8s.local
/calico/resources/v3/projectcalico.org/felixconfigurations/node.master2.k8s.local
/calico/resources/v3/projectcalico.org/felixconfigurations/node.master3.k8s.local
/calico/resources/v3/projectcalico.org/felixconfigurations/node.node1.k8s.local
/calico/resources/v3/projectcalico.org/felixconfigurations/node.node2.k8s.local
/calico/resources/v3/projectcalico.org/felixconfigurations/node.node3.k8s.local
/calico/resources/v3/projectcalico.org/nodes/master1.k8s.local
/calico/resources/v3/projectcalico.org/nodes/master2.k8s.local
/calico/resources/v3/projectcalico.org/nodes/master3.k8s.local
/calico/resources/v3/projectcalico.org/nodes/node1.k8s.local
/calico/resources/v3/projectcalico.org/nodes/node2.k8s.local
/calico/resources/v3/projectcalico.org/nodes/node3.k8s.local
/calico/resources/v3/projectcalico.org/workloadendpoints/kube-system/node2.k8s.local-k8s-coredns--69d445fc94--wsp2w-eth0
/calico/resources/v3/projectcalico.org/workloadendpoints/kubernetes-dashboard/node1.k8s.local-k8s-dashboard--metrics--scraper--67c9c47fc7--fcqzq-eth0
/calico/resources/v3/projectcalico.org/workloadendpoints/kubernetes-dashboard/node2.k8s.local-k8s-kubernetes--dashboard--86d88bf65--l2qh5-eth0
3.5 etcd addition, deletion, modification and query data
#Add data
root@etcd1:~# ETCDCTL_API=3 /usr/local/bin/etcdctl put /name "tom"
OK
#Query data
root@etcd1:~# ETCDCTL_API=3 /usr/local/bin/etcdctl get /name
/name
tom
#Modify data. If the data already exists, it is directly overwritten, that is, modify
root@etcd1:~# ETCDCTL_API=3 /usr/local/bin/etcdctl put /name "jack"
OK
#Validation modification succeeded
root@etcd1:~# ETCDCTL_API=3 /usr/local/bin/etcdctl get /name
/name
jack
#Delete data
root@etcd1:~# ETCDCTL_API=3 /usr/local/bin/etcdctl del /name
1
root@etcd1:~# ETCDCTL_API=3 /usr/local/bin/etcdctl get /name
root@etcd1:~#
3.6 etcd watch mechanism
Based on the monitoring of data, the client is actively notified when changes occur. etcd v3's watch mechanism supports watching a specific key or the range of a key. Compared with v2, some major changes in v3 are as follows:
- The interface provides rpc interface through grpc and abandons the v2 http interface. The advantage is that the efficiency of long-term connection is significantly improved. The disadvantage is that it is not as convenient to use as before, especially in scenarios where it is inconvenient to maintain long-term connections.
- The original directory structure is abandoned and becomes a pure kv. Users can simulate the directory through the front-end matching mode.
- value is no longer saved in memory. The same memory can support storing more key s.
- The watch mechanism is more stable. Basically, the complete synchronization of data can be realized through the watch mechanism.
- Batch operation and transaction mechanism are provided. Users can realize the CAS mechanism of etcd v2 through batch transaction request (batch transaction supports if condition judgment).
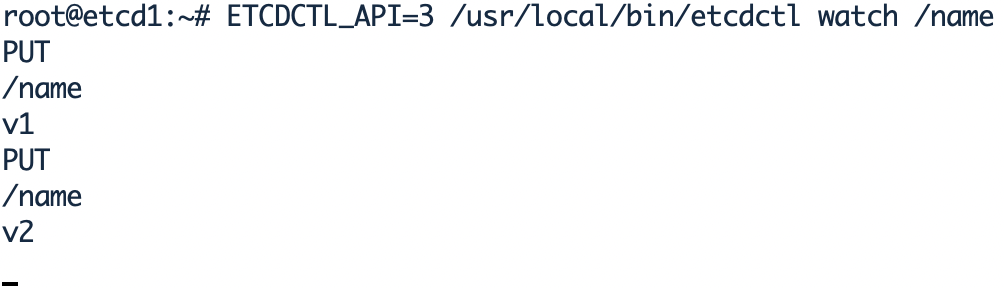
#Watch a key on etcd node1. You can watch without a key. You can create it later
root@etcd1:~# ETCDCTL_API=3 /usr/local/bin/etcdctl watch /name   #After the watch, the terminal will be occupied

root@etcd2:~# ETCDCTL_API=3 /usr/local/bin/etcdctl put /name "v1"
OK
root@etcd2:~# ETCDCTL_API=3 /usr/local/bin/etcdctl put /name "v2"
OK
3.7 etcd data backup and recovery
WAL is the abbreviation of write ahead log. It is to write a log and pre write a log before performing a real write operation.
Wal: store the pre write log. Its greatest function is to record the whole process of data changes. In etcd, all data modifications must be written to wal before submission.
3.7.1 automatic backup and recovery of etcd data (v3)
#backups
root@master1:/etc/kubeasz# ./ezctl  backup k8s-01
root@master1:/etc/kubeasz/clusters/k8s-01/backup# ls
snapshot.db  snapshot_202110061653.db
#recovery
root@master1:/etc/kubeasz# ./ezctl  restore k8s-01  #The service will be stopped during recovery
3.7.2 manual backup and recovery of etcd data (v3)
#Backup of data
root@etcd1:~# ETCDCTL_API=3 /usr/local/bin/etcdctl snapshot save snapshot.db
{"level":"info","ts":1633509687.2031326,"caller":"snapshot/v3_snapshot.go:119","msg":"created temporary db file","path":"snapshot.db.part"}
{"level":"info","ts":"2021-10-06T16:41:27.203+0800","caller":"clientv3/maintenance.go:200","msg":"opened snapshot stream; downloading"}
{"level":"info","ts":1633509687.2040484,"caller":"snapshot/v3_snapshot.go:127","msg":"fetching snapshot","endpoint":"127.0.0.1:2379"}
{"level":"info","ts":"2021-10-06T16:41:27.233+0800","caller":"clientv3/maintenance.go:208","msg":"completed snapshot read; closing"}
{"level":"info","ts":1633509687.2372715,"caller":"snapshot/v3_snapshot.go:142","msg":"fetched snapshot","endpoint":"127.0.0.1:2379","size":"3.9 MB","took":0.034088666}
{"level":"info","ts":1633509687.2373474,"caller":"snapshot/v3_snapshot.go:152","msg":"saved","path":"snapshot.db"}
Snapshot saved at snapshot.db
root@etcd1:~# ls
Scripts  snap  snapshot.db

#Data recovery
root@etcd1:~# ETCDCTL_API=3 /usr/local/bin/etcdctl snapshot restore snapshot.db --data-dir=/opt/etcd-testdir
#--If the directory specified by data dir does not exist or is empty, it will fail to restore. If you need to restore to / var/lib/etcd / (i.e. the data storage path in the configuration file), stop etcd and restore after deleting it in rm -rf /var/lib/etcd /.

{"level":"info","ts":1633510235.7426238,"caller":"snapshot/v3_snapshot.go:296","msg":"restoring snapshot","path":"snapshot.db","wal-dir":"/opt/etcd-testdir/member/wal","data-dir":"/opt/etcd-testdir","snap-dir":"/opt/etcd-testdir/member/snap"}
{"level":"info","ts":1633510235.7613802,"caller":"mvcc/kvstore.go:380","msg":"restored last compact revision","meta-bucket-name":"meta","meta-bucket-name-key":"finishedCompactRev","restored-compact-revision":85382}
{"level":"info","ts":1633510235.767152,"caller":"membership/cluster.go:392","msg":"added member","cluster-id":"cdf818194e3a8c32","local-member-id":"0","added-peer-id":"8e9e05c52164694d","added-peer-peer-urls":["http://localhost:2380"]}
{"level":"info","ts":1633510235.7712433,"caller":"snapshot/v3_snapshot.go:309","msg":"restored snapshot","path":"snapshot.db","wal-dir":"/opt/etcd-testdir/member/wal","data-dir":"/opt/etcd-testdir","snap-dir":"/opt/etcd-testdir/member/snap"}

#Automatic backup data script
root@etcd1:~# mkdir /data/etcd-backup-dir/ -p
root@etcd1:~# vim bp-script.sh
#!/bin/bash
source /etc/profile
DATE=`date +%Y-%m-%d_%H-%M-%S`
ETCDCTL_API=3 /usr/local/bin/etcdctl snapshot save /data/etcd-backup-dir/etcd-snapshot-${DATA}.db
3.8 etcd data recovery process
When the number of etcd cluster downtime exceeds more than half of the total cluster nodes, the whole cluster will be unavailable, and the data needs to be recovered later. The recovery process is as follows:
- Recovery service system
- Redeploy etcd cluster
- Stop Kube apiserver / Controller Manager / scheduler / kubelet / Kube proxy
- Stop etcd cluster
- All etcd nodes recover the same data
- Start each node and verify the etcd cluster to verify that there is only one leader
- Start Kube apiserver / Controller Manager / scheduler / kubelet / Kube proxy
- Verify k8s master status and pod status
3.9 deleting and adding etcd nodes
root@master1:/etc/kubeasz# ./ezctl del-etcd  <cluster>  <ip>
root@master1:/etc/kubeasz# ./ezctl add-etcd  <cluster>  <ip>
4. Kubernetes cluster maintenance and common commands
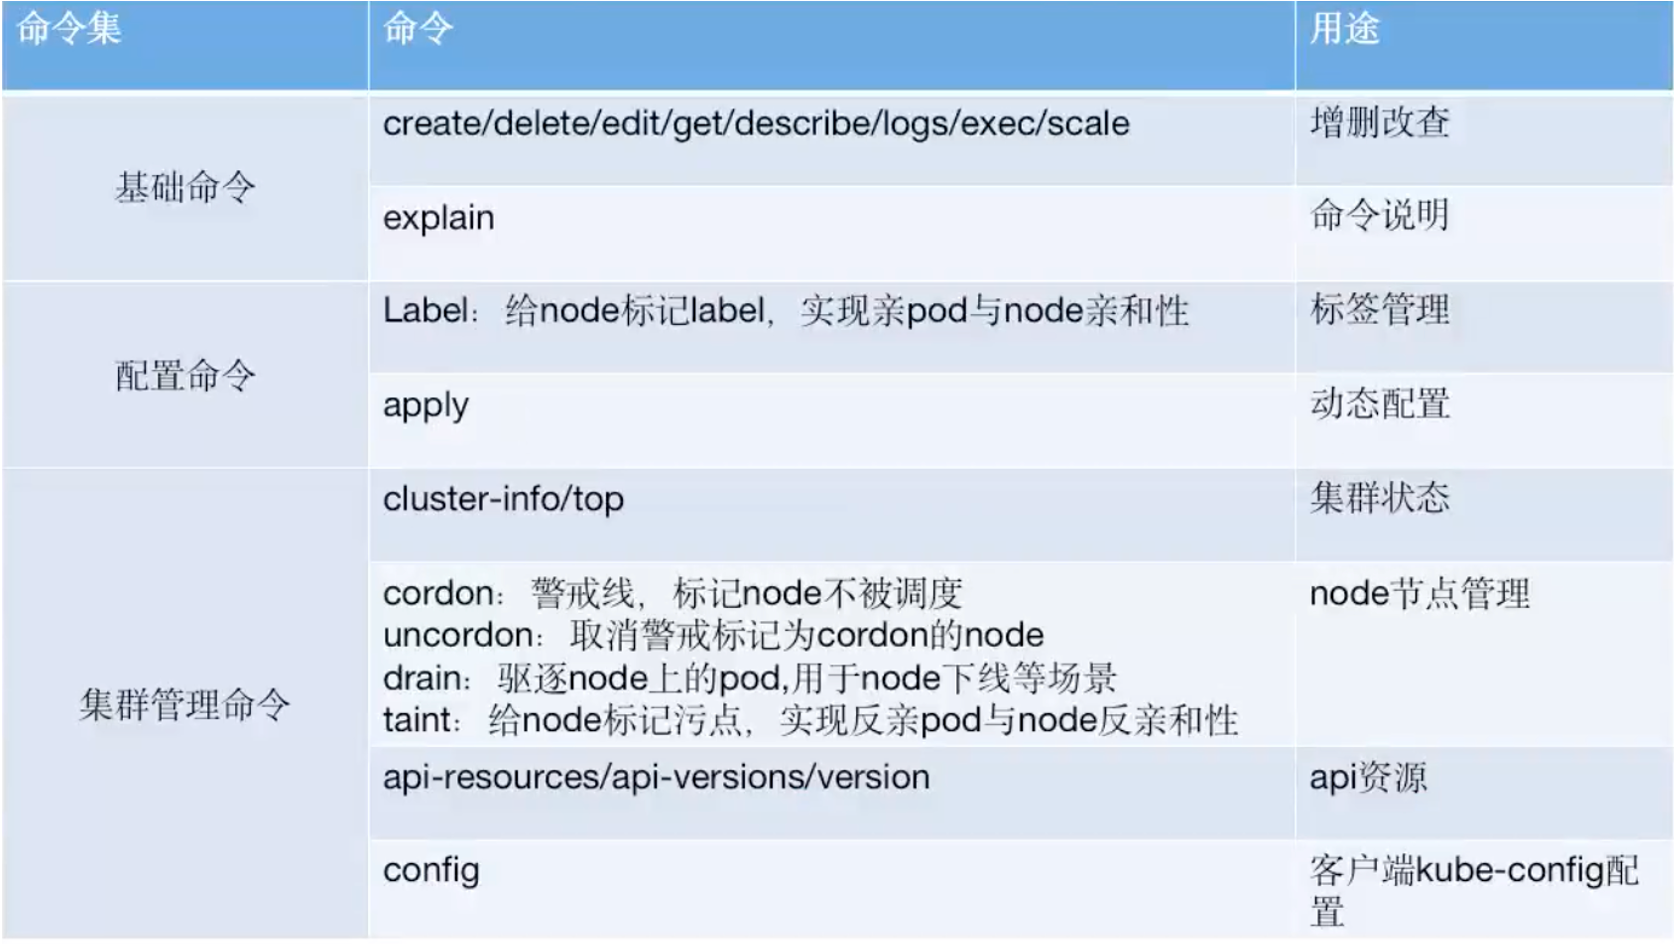
kubectl get service -A -o wide
kubectl get pod -A -o wide
kubectl get nodes -A -o wide
kubectl get deployment  -A
kubectl get deployment -n n56 -o wide
kubectl describe pod n56-nginx-deployment-857fc5cb7f-llxmm -n n56 #When the image is not up, first look at the description, the log, and the system log on the node (ubuntu: syslog, centos: message)
kubectl create -f nginx.yaml #If the yaml file changes in the later stage, you can only delete the previous one to create it. If you first create it with create, you can't even apply it. Therefore, generally use apply, or add -- save config when executing create for the first time.
kubectl apply -f nginx.yaml
kubectl delete -f nginx.yaml
kubectl create -f nginx.yaml --save-config --record
kubectl apply -f nginx.yaml --record #Version information is recorded. The new version is OK without.
kubectl exec -it n56-nginx-deployment-857fc5cb7f-llxmm -n n56
kubectl logs n56-nginx-deployment-857fc5cb7f-llxmm -n n56
kubectl delete pod n56-nginx-deployment-857fc5cb7f-llxmm -n n56
kubectl edit svc n56-nginx-service -n n56 #Modify the API object, and the modification takes effect immediately. Will not be saved to the configuration file.
kubectl scale -n n56 deployment n56-nginx-deployment  --replicas=2 #The number of copies of modified pod is 2
kubectl label node 192.168.6.91 project=linux56 #To add a label to a node node, you can cooperate with deployment.spec.template.spec.nodeSelector to specify in the yaml file that a specific container will only run on a node with a specific label.
kubectl label node 192.168.6.91 project- #Remove the label
kubectl cluster-info
kubectl top node/pod #To view the resource usage of node or pod, you need to install the Metrics API separately
kubectl cordon 192.168.6.89 #Specifies that a node does not participate in scheduling
kubectl uncordon 192.168.6.89
kubectl drain 192.168.6.89 --force --ignore-daemonsets --delete-emptydir-data #After the pod is dispersed, it will be marked as not participating in the scheduling
kubectl api-resources #The API resource name is displayed, including its name abbreviation and API version
kubectl config view #You can view the current Kube config configuration and refer to the generated configuration file
http://kubernetes.io/docs/reference/generated/kubectl/kubectl-commands
https://kubernetes.io/zh/docs/concepts/workloads/controllers/deployment/
5. Resource object of kubernetes cluster
5.1 k8s core concepts
5.1.1 design concept
5.1.1.1 layered architecture
http://docs.kubernetes.org.cn/251.html
5.1.1.2 API design principles
https://www.kubernetes.org.cn/kubernetes%e8%ae%be%e8%ae%a1%e7%90%86%e5%bf%b5
- All APIs should be declarative. As mentioned earlier, declarative operations, compared with imperative operations, have a stable effect on repeated operations, which is very important for distributed environments prone to data loss or duplication. In addition, declarative operations are easier to be used by users, which can make the system hide the implementation details from users. While hiding the implementation details, it also retains the possibility of continuous optimization of the system in the future. In addition, the declarative API implies that all API objects are nouns, such as Service and Volume. These nouns describe a target distributed object expected by the user.
- API objects are complementary and composable. This actually encourages API objects to meet the requirements of object-oriented design as much as possible, that is, "high cohesion and loose coupling", and have an appropriate decomposition of business-related concepts to improve the reusability of decomposed objects. In fact, K8s, a distributed system management platform, is also a business system, but its business is to schedule and manage container services.
- The high-level API is designed based on the operation intention. How to design API well has something in common with how to design application system with object-oriented method. High level design must start from business rather than technical implementation too early. Therefore, the high-level API design for K8s must be based on the business of K8s, that is, the operation intention of the system scheduling management container.
- The low-level API is designed according to the control needs of the high-level API. The purpose of designing and implementing low-level APIs is to be used by high-level APIs to reduce redundancy and improve reusability. The design of low-level APIs should also be based on requirements and try to resist the temptation affected by technical implementation.
- Try to avoid simple encapsulation, and do not have internal hidden mechanisms that cannot be explicitly known by external APIs. Simple encapsulation does not actually provide new functions, but increases the dependence on the encapsulated API. The internal hidden mechanism is also a design method that is very unfavorable to system maintenance. For example, PetSet and ReplicaSet are originally two kinds of Pod sets, so K8s uses different API objects to define them, instead of using the same ReplicaSet, and uses special algorithms to distinguish whether the ReplicaSet is stateful or stateless.
- The complexity of API operations is proportional to the number of objects. This is mainly from the perspective of system performance. In order to ensure that the performance of the whole system will not slow down rapidly to be unusable with the expansion of the system scale, the minimum limit is that the operation complexity of API cannot exceed O(N), and N is the number of objects, otherwise the system will not have horizontal scalability.
- The API object state cannot depend on the network connection state. As we all know, in the distributed environment, network disconnection often occurs. Therefore, to ensure that the API object state can cope with the instability of the network, the API object state cannot depend on the network connection state.
- Try to avoid making the operation mechanism dependent on the global state, because it is very difficult to ensure the synchronization of the global state in the distributed system.
5.2 k8s the core of resource management - API object
5.2.1 how to operate
5.2.2 what to do
5.3 important API objects
5.3.1 some necessary fields of API object (which must be included in yaml file)
| field | explain |
|---|---|
| apiVersion | The version of the k8s API used to create the object. |
| kind | The type of object you want to create. |
| metadata | Help identify object uniqueness data, including name and optional namespace. |
| spec | |
| status | After the pod is created, k8s the status is automatically generated. |
- Each API object has three types of attributes: metadata, specification, and status
- Difference between spec and status
- spec is the desired state
- Status is the actual status
5.3.2 Pod
- pod is the smallest unit in k8s.
- A pod can run one container or multiple containers.
- Run multiple containers that are scheduled together.
- The life cycle of a pod is short and does not heal itself. It is an entity that is destroyed when it is used up.
- Generally, the controller is used to create and manage the pod.
5.3.2.1 life cycle of pod

- Initialize container
- Operation before startup
- Ready probe
- Survival probe
- Delete pod operation
5.3.2.2 livenessProbe and readinessProbe
- livenessProbe survival probe
- Check whether the application is used in case of failure (no service, timeout, etc.).
- Detection failed, restart pod
- readinessProbe ready probe
- Check whether the application is ready and can provide services after the pod is started.
- The pod starts receiving traffic only after the detection is successful.
5.3.3 Controller
- Replication Controller # first generation pod replica controller
- ReplicaSet # 2nd generation pod replica controller
- Deployment # 3rd generation pod replica controller
5.3.3.1 Rc, RS and Deployment
- Replication Controller: Replica controller (selector =! =)
- https://kubernetes.io/zh/docs/concepts/workloads/controllers/replicationcontroller/
- https://kubernetes.io/zh/docs/concepts/overview/working-with-objects/labels/
apiVersion: v1
kind: ReplicationController
metadata:
  name: ng-rc
spec:
  replicas: 2
  selector:
    app: ng-rc-80
    #app1: ng-rc-81
  template:
    metadata:
      labels:
        app: ng-rc-80
        #app1: ng-rc-81
    spec:
      containers:
      - name: ng-rc-80
        image: nginx
        ports:
        - containerPort: 80
- ReplicaSet: Replica control set, different from replica controller: support for selector (selector also supports In and Notin)
- https://kubernetes.io/zh/docs/concepts/workloads/controllers/replicaset/
#apiVersion: extensions/v1beta1
apiVersion: apps/v1
kind: ReplicaSet
metadata:
  name: frontend
spec:
  replicas: 2
  selector:
#    matchLabels:
#      app: ng-rs-80
    matchExpressions:
      - {key: app, operator: In, values: [ng-rs-80,ng-rs-81]} #If both ng-rs-80 and ng-rs-81 have labels, one will be built in each of the two labels, and the total number is also two. Generally, it is expected to build two in each of the two labels, so this broad matching is not used much.
  template:
    metadata:
      labels:
        app: ng-rs-80
    spec:
      containers:
      - name: ng-rs-80
        image: nginx
        ports:
        - containerPort: 80
- Deployment: a controller higher than rs. in addition to RS, it also has many advanced functions, including the most important: rolling upgrade, rollback, etc. The ReplicaSet controller is actually called.
- https://kubernetes.io/zh/docs/concepts/workloads/controllers/deployment/
- Pod naming features: deployment name + rs controller name (k8s self generated) + pod name
#apiVersion: extensions/v1beta1
apiVersion: apps/v1
kind: Deployment
metadata:
  name: nginx-deployment
spec:
  replicas: 2
  selector:
    #app: ng-deploy-80 #rc
    matchLabels: #rs or deployment
      app: ng-deploy-80

#    matchExpressions:
#      - {key: app, operator: In, values: [ng-deploy-80,ng-rs-81]}
  template:
    metadata:
      labels:
        app: ng-deploy-80
    spec:
      containers:
      - name: ng-deploy-80
        image: nginx:1.16.1
        ports:
        - containerPort: 80
- Control process of Deployment controller
5.3.4 Service
After the pod is rebuilt, the IP of the pod may change, and the access between the pods will have problems. Therefore, it is necessary to decouple the service and object, that is, declare a service object.
There are two common service s:
- The service: selector in the k8s cluster specifies a pod and automatically creates an Endpoint.
- k8s services outside the cluster: manually create an Endpoint and specify the IP, port and protocol of the external service.
5.3.4.1 relationship between Kube proxy and service
kube-proxy—watch–>k8s-apiserver
Kube proxy will listen to k8s apiserver. Once the service resource changes (call k8s API to modify the service information), Kube proxy will generate corresponding load scheduling adjustment to ensure the latest state of the service.
5.3.4.2 three scheduling models of Kube proxy
- userspace: k8s before v1.1
- iptables: k8s before v1.10
- ipvs: k8s after v1.11, if ipvs is not enabled, it will be automatically degraded to iptables
#deploy_pod.yaml
#apiVersion: extensions/v1beta1
apiVersion: apps/v1
kind: Deployment
metadata:
  name: nginx-deployment
spec:
  replicas: 1
  selector:
    #matchLabels: #rs or deployment
    #  app: ng-deploy3-80
    matchExpressions:
      - {key: app, operator: In, values: [ng-deploy-80,ng-rs-81]}
  template:
    metadata:
      labels:
        app: ng-deploy-80
    spec:
      containers:
      - name: ng-deploy-80
        image: nginx:1.16.1
        ports:
        - containerPort: 80
      #nodeSelector:
      #  env: group1

#svc-service.yaml  #Cluster internal access
apiVersion: v1
kind: Service
metadata:
  name: ng-deploy-80
spec:
  ports:
  - name: http
    port: 88
    targetPort: 80
    protocol: TCP
  type: ClusterIP
  selector:
    app: ng-deploy-80

#svc_NodePort.yaml #For external access to the cluster, the rules take effect on all nodes. Load balancing is configured on the HA outside the k8s cluster to achieve external access. This method has high efficiency. If you add ingress (layer 7 load) to realize the matching of multiple services (layer 7 load) according to the domain name, after the nodeport and before the service, layer 2 and layer 7 are responsible for the actual external traffic access. When the traffic is particularly large, a bottleneck may occur. The forwarding rules of ingress are less supported and difficult to configure.
apiVersion: v1
kind: Service
metadata:
  name: ng-deploy-80
spec:
  ports:
  - name: http
    port: 90
    targetPort: 80
    nodePort: 30012
    protocol: TCP
  type: NodePort
  selector:
    app: ng-deploy-80
5.3.5 Volume
Data and image should be decoupled to realize data sharing between containers, k8s abstract an object to save data for storage.
5.3.5.1 several commonly used volume types
- emptyDir: local temporary volume
- hostPath: local volume
- nfs: shared volume
- configmap: configuration file
https://kubernetes.io/zh/docs/concepts/storage/volumes/
5.3.5.2 emptyDir
When the pod is assigned to the node, the emptyDir volume is created first, and as long as the pod runs on the node, the volume will exist. As described in the object name, it is initially spatiotemporal. Containers in the pod can read and write the same files in the emptyDir volume, although the volume can be mounted on the same or different paths in each container. When the pod is deleted from the node for any reason, the data in the emptyDir volume will be permanently deleted.
Volume path on host: / var / lib / kubelet / pods / ID / volumes / kubernetes.io ~ empty dir / cache volume / file
apiVersion: apps/v1
kind: Deployment
metadata:
  name: nginx-deployment
spec:
  replicas: 1
  selector:
    matchLabels: #rs or deployment
      app: ng-deploy-80
  template:
    metadata:
      labels:
        app: ng-deploy-80
    spec:
      containers:
      - name: ng-deploy-80
        image: nginx
        ports:
        - containerPort: 80
        volumeMounts:
        - mountPath: /cache
          name: cache-volume-n56
      volumes:
      - name: cache-volume-n56
        emptyDir: {}
5.3.5.3 hostPath
Mount the files or directories in the file system on the host node to the cluster. When the pod is deleted, the volume will not be deleted
#apiVersion: extensions/v1beta1
apiVersion: apps/v1
kind: Deployment
metadata:
  name: nginx-deployment
spec:
  replicas: 1
  selector:
    matchLabels:
      app: ng-deploy-80
  template:
    metadata:
      labels:
        app: ng-deploy-80
    spec:
      containers:
      - name: ng-deploy-80
        image: nginx
        ports:
        - containerPort: 80
        volumeMounts:
        - mountPath: /data/n56
          name: cache-n56-volume
      volumes:
      - name: cache-n56-volume
        hostPath:
          path: /opt/n56
5.3.5.4 shared storage such as NFS
NFS volumes allow existing NFS shares to be mounted to containers. Unlike emptyDir, when a pod is deleted, the contents of the NFS volume are retained and the volume is only dismounted, which means that NFS volumes can be pre filled with data and switched between multiple pods. NFS can be mounted by multiple writers at the same time. In fact, NFS is mounted on node and mapped to container.
- Create multiple pod s and test mounting the same NFS
#apiVersion: extensions/v1beta1
apiVersion: apps/v1
kind: Deployment
metadata:
  name: nginx-deployment-site2
spec:
  replicas: 1
  selector:
    matchLabels:
      app: ng-deploy-81
  template:
    metadata:
      labels:
        app: ng-deploy-81
    spec:
      containers:
      - name: ng-deploy-81
        image: nginx
        ports:
        - containerPort: 80
        volumeMounts:
        - mountPath: /usr/share/nginx/html/mysite
          name: my-nfs-volume
      volumes:
      - name: my-nfs-volume
        nfs:
          server: 172.31.1.103
          path: /data/k8sdata

---
apiVersion: v1
kind: Service
metadata:
  name: ng-deploy-81
spec:
  ports:
  - name: http
    port: 80
    targetPort: 80
    nodePort: 30017
    protocol: TCP
  type: NodePort
  selector:
    app: ng-deploy-81
- Create multiple pods and test that each pod mounts multiple NFS
#apiVersion: extensions/v1beta1
apiVersion: apps/v1
kind: Deployment
metadata:
  name: nginx-deployment
spec:
  replicas: 1
  selector:
    matchLabels:
      app: ng-deploy-80
  template:
    metadata:
      labels:
        app: ng-deploy-80
    spec:
      containers:
      - name: ng-deploy-80
        image: nginx
        ports:
        - containerPort: 80
        volumeMounts:
        - mountPath: /usr/share/nginx/html/mysite
          name: my-nfs-volume
        - mountPath: /usr/share/nginx/html/js
          name: my-nfs-js
      volumes:
      - name: my-nfs-volume
        nfs:
          server: 172.31.7.109
          path: /data/magedu/n56
      - name: my-nfs-js
        nfs:
          server: 172.31.7.109
          path: /data/magedu/js
---
apiVersion: v1
kind: Service
metadata:
  name: ng-deploy-80
spec:
  ports:
  - name: http
    port: 81
    targetPort: 80
    nodePort: 30016
    protocol: TCP
  type: NodePort
  selector:
    app: ng-deploy-80
5.3.5.5 configmap
Decouple the configuration information from the image, store the configuration information in the configmap object, and then import the configmap object in the pod object to realize the import configuration operation. Declare a configmap object and mount it into the pod as volume.
apiVersion: v1
kind: ConfigMap
metadata:
  name: nginx-config
data:
 default: |
    server {
       listen       80;
       server_name  www.mysite.com;
       index        index.html;

       location / {
           root /data/nginx/html;
           if (!-e $request_filename) {
               rewrite ^/(.*) /index.html last;
           }
       }
    }


---
#apiVersion: extensions/v1beta1
apiVersion: apps/v1
kind: Deployment
metadata:
  name: nginx-deployment
spec:
  replicas: 1
  selector:
    matchLabels:
      app: ng-deploy-80
  template:
    metadata:
      labels:
        app: ng-deploy-80
    spec:
      containers:
      - name: ng-deploy-80
        image: nginx
        ports:
        - containerPort: 80
        volumeMounts:
        - mountPath: /data/nginx/html
          name: nginx-static-dir
        - name: nginx-config
          mountPath:  /etc/nginx/conf.d
      volumes:
      - name: nginx-static-dir
        hostPath:
          path: /data/nginx/linux39
      - name: nginx-config
        configMap:
          name: nginx-config
          items:
             - key: default
               path: mysite.conf

---
apiVersion: v1
kind: Service
metadata:
  name: ng-deploy-80
spec:
  ports:
  - name: http
    port: 81
    targetPort: 80
    nodePort: 30019
    protocol: TCP
  type: NodePort
  selector:
    app: ng-deploy-80
apiVersion: v1
kind: ConfigMap

metadata:
  name: nginx-config
data:
  username: user1


---
#apiVersion: extensions/v1beta1
apiVersion: apps/v1
kind: Deployment
metadata:
  name: nginx-deployment
spec:
  replicas: 1
  selector:
    matchLabels:
      app: ng-deploy-80
  template:
    metadata:
      labels:
        app: ng-deploy-80
    spec:
      containers:
      - name: ng-deploy-80
        image: nginx
        env:
        - name: MY_USERNAME
          valueFrom:
            configMapKeyRef:
              name: nginx-config
              key: username
        ports:
        - containerPort: 80