In the last study, we finished the enemy's AI compilation, but there is a problem that the enemy will run out of the map, so we need to start initializing the map this time.
21. Initialize the creation of map tool
We create a new game object, named MapCreation, to create a map, and hang it in a MapCreation script to initialize the map.
//0. Hometown 1. Wall 2. Obstacle 3. Birth effect 4. River 5. Grass 6. Air wall
public GameObject[] item;//Array of objects required for the initial map
private void Awake()//Instantiate map
{
//Instantiate hometown
CreateItem(item[0], new Vector3(0, -8, 0), Quaternion.identity);
CreateItem(item[1], new Vector3(-1, -8, 0), Quaternion.identity);//The protective wall next to my hometown
CreateItem(item[1], new Vector3(1, -8, 0), Quaternion.identity);//The protective wall next to my hometown
CreateItem(item[1], new Vector3(-1, -7, 0), Quaternion.identity);//The protective wall next to my hometown
CreateItem(item[1], new Vector3(0, -7, 0), Quaternion.identity);//The protective wall next to my hometown
CreateItem(item[1], new Vector3(1, -7, 0), Quaternion.identity);//The protective wall next to my hometown
}
private void CreateItem(GameObject obj,Vector3 pos,Quaternion qua)//Create objects into Map
{
GameObject createObj = Instantiate(obj, pos, qua);//Instantiate game object
createObj.transform.SetParent(gameObject.transform);//Set parent
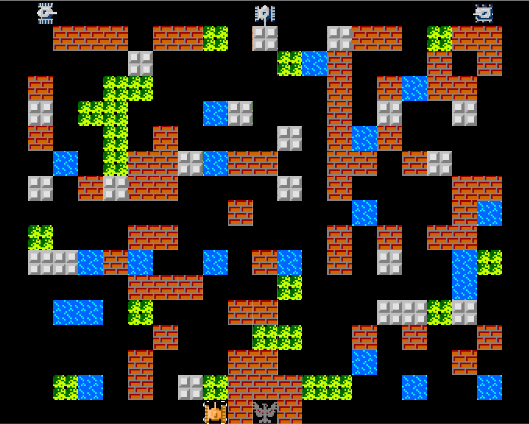
}We mount the required prefabrication to the MapCreation script, and then directly create the hometown in the map. The following is the effect:
22. Write a method to generate random positions
Next, we need to create some other objects, but because the location information of these objects cannot be the same in every round, we need to make these objects generate random positions.
    public List<Vector3> itemPosList=new List<Vector3>();//Used to store the generated location

    private Vector3 CreatePosRandomly()//Generate random position
    {
        //Constrains the outermost boundary of non-living organisms to ensure passage (x=-10,10,y=-8,8)
        while(true)
        {
            Vector3 tempPos = new Vector3(Random.Range(-9,10),Random.Range(-7,8),0);//Generate a random position
            for (int i = 0; i < itemPosList.Count; i++) //Determine whether the location exists in the list
            {
                if (tempPos == itemPosList[i])
                    continue;
            }
            return tempPos;
        }
    }
Then we instantiate the outer air wall and implement it in the Awake function:
        //Air wall of instanced boundary
        for (int i = -11; i < 12; i++)
        {
            CreateItem(item[6], new Vector3(i, 9, 0), Quaternion.identity);//The wall above
            CreateItem(item[6], new Vector3(i, -9, 0), Quaternion.identity);//The wall below
        }

        for(int i = -8; i < 9; i++)
        {
            CreateItem(item[6], new Vector3(-11, i, 0), Quaternion.identity);//The wall on the left
            CreateItem(item[6], new Vector3(11, i, 0), Quaternion.identity);//The fence on the right
        }
23. Initialize other game objects in the map
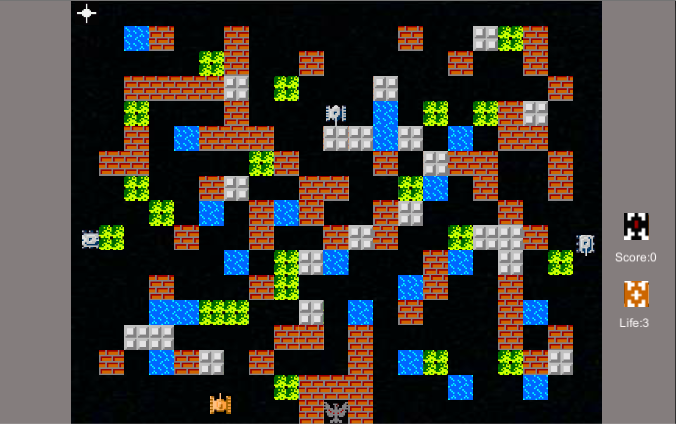
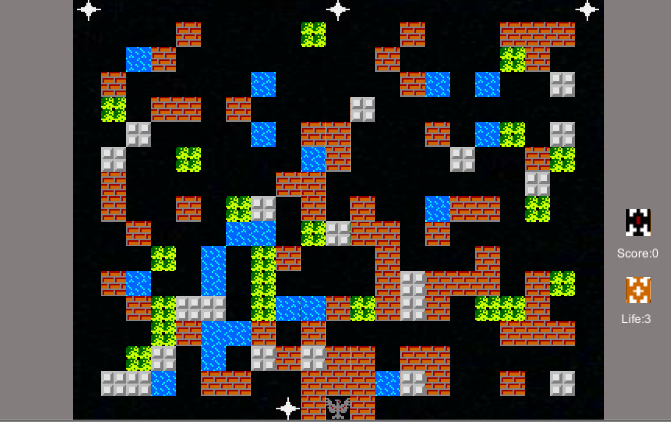
Let's initialize the other objects in the game. Here we initialize the grass, water, walls and obstacles
        //Instantiate map other objects
        for (int i = 0; i < 20; i++)//20 for each species
        {
            CreateItem(item[1], CreatePosRandomly(), Quaternion.identity);//Instancing walls
            CreateItem(item[1], CreatePosRandomly(), Quaternion.identity);//Instancing walls
            CreateItem(item[1], CreatePosRandomly(), Quaternion.identity);//Instancing walls
            CreateItem(item[2], CreatePosRandomly(), Quaternion.identity);//Instantiation barrier
            CreateItem(item[4], CreatePosRandomly(), Quaternion.identity);//Instanced River
            CreateItem(item[5], CreatePosRandomly(), Quaternion.identity);//Instanced grass
        }
Then we add players and enemies, which are all done in the Awake function
        //Instantiate player
        GameObject player = Instantiate(item[3], new Vector3(-2, -8, 0), Quaternion.identity);
        itemPosList.Add(new Vector3(-2, -8, 0));//Add player's location to the list
        player.GetComponent<Born>().createPlayer = true;

        //Instantiate enemy
        CreateItem(item[3], new Vector3(-10, 8, 0), Quaternion.identity);
        CreateItem(item[3], new Vector3(0, 8, 0), Quaternion.identity);
        CreateItem(item[3], new Vector3(10, 8, 0), Quaternion.identity);

        InvokeRepeating("CreateEnemy", 4f, 5f);//Delay call, randomly generate enemies after the first 4s, and then generate enemies every 5s
Which calls the function CreateEnemy() generated randomly.
    private void CreateEnemy()//Make enemies
    {
        int num = Random.Range(0, 3);
        Vector3 enemyPos=new Vector3();
        if (num == 0)
            enemyPos = new Vector3(-10, 8, 0);
        else if(num==1)
            enemyPos = new Vector3(0, 8, 0);
        else if (num == 2)
            enemyPos = new Vector3(10, 8, 0);
        CreateItem(item[3], enemyPos, Quaternion.identity);//Generate enemies at random locations
    }
Let's see how the game works:
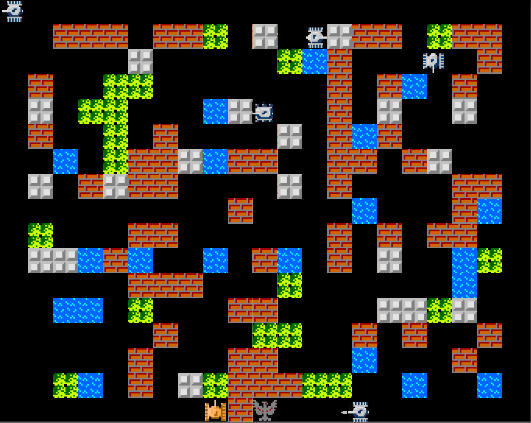
24. Optimization of enemy AI
We found that when there are too many enemies, they may gather together. To solve this problem, we let the two enemies meet and change their direction immediately:
    private void OnCollisionEnter2D(Collision2D collision)//collision detection
    {
        if (collision.gameObject.tag == "Enemy")//If two enemies meet each other, they will change their direction. They don't have to crowd together
            DirChangeTime = 4;
    }
25. Management of player status
Now we need to manage the player's state, including player's life, player's annihilated enemies and other information. We need to create a new empty object, named PlayerManage, and mount the script PlayerManage with the same name
    //attribute
    public int playerLife = 3;//Player's health
    public int playerScore = 0;//Player's score
    public bool isDead;//Is the player dead

    //quote
    public GameObject Born;//Special effects of rebirth

    //Single case
    private static PlayerManage instance;

    public static PlayerManage Instance
    {
        get => instance;
        set => instance = value;
    }

    private void Awake()
    {
        Instance = this;
    }

    // Start is called before the first frame update
    void Start()
    {

    }

    // Update is called once per frame
    void Update()
    {
        if (isDead)
            Reborn();//If dead, enter the rebirth function
    }

    private void Reborn()
    {
        if (playerLife == 0)
            ;
        else
        {
            playerLife--;//HP minus 1
            GameObject palyer = Instantiate(Born, new Vector3(-2, -8, 0), Quaternion.identity);
            palyer.GetComponent<Born>().createPlayer = true;//Set as reborn player
            isDead = false;
        }
    }
Then we change the value of IsDead to true when the tank dies in PlayerAI, and increase the score when the enemy dies in EnemyAI:
    //PlayerAI

    private void TankDie()//Death of tank
    {
        if (isDefended)//If the player is invincible, he will not die
            return;

        PlayerManage.Instance.isDead = true;//Set player status to dead

        //Generate explosive effects
        Instantiate(explosionPrefab, transform.position, transform.rotation);

        //death
        Destroy(gameObject);
    }


    //EnemyAI

    private void TankDie()//Death of tank
    {
        PlayerManage.Instance.playerScore++;//Kill an enemy and add one point

        //Generate explosive effects
        Instantiate(explosionPrefab, transform.position, transform.rotation);

        //death
        Destroy(gameObject);
    }
Here are the effects:
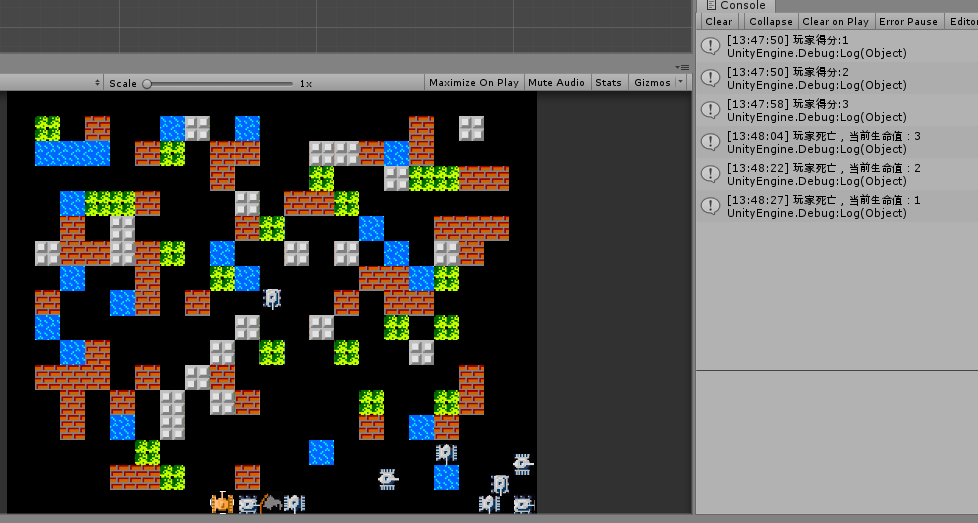
26. Production of UI
Most of the functions of the game have been completed. Now let's design the UI to display the player's status and score. First, we set the game screen ratio to 16:10, so that we can leave a blank part beside to display the UI. Set the background color of the whole UI to gray, and then drag in a pure black background as the background of the game. Set the rendering priority to - 2, so that we won't Block game objects.
We first create two new images to show the tank's life and score, and then add text boxes to show the score and health value respectively:
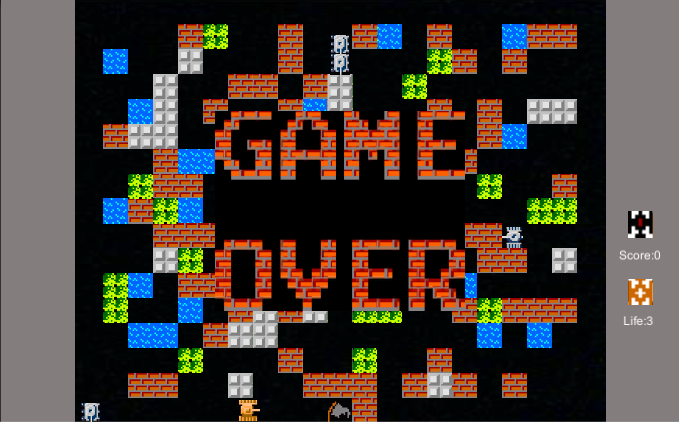
We modify these two values in real time in the code, and then we add the game ending handler. When the hometown dies or the life value is 0, the game ending interface will be displayed. We add the handler in the Update of PlayerManage script, and transfer the ending UI interface to the public variable of the script:
    public GameObject gameOver;//Game ending interface

    void Update()
    {
        if (isDead)
            Reborn();//If dead, enter the rebirth function

        if (isDefeat)
        {
            gameOver.SetActive(true);//Set the game ending interface
            return;
        }

        //Update UI in real time
        scoreText.text = "Score:"+playerScore.ToString();
        lifeText.text = "Life:" + playerLife.ToString();
    }
Here are the effects:
27. Production of the first scene
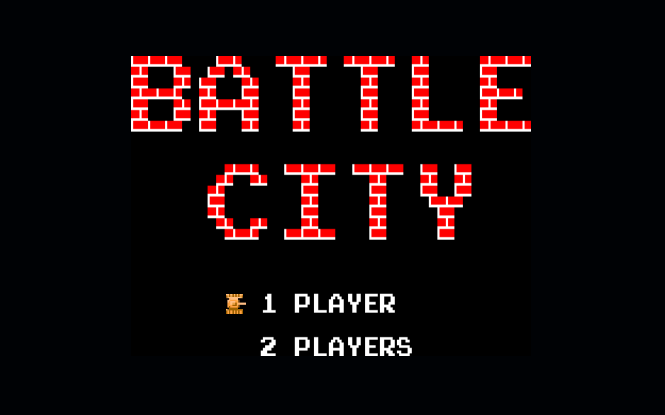
The scene of the game is basically finished. Next, we will create the scene when the game is just opened. We will ctrl+N to create a new scene, named Begin, and save it to the current project. We add an image in the new scene, set the image source as the title image in the resource file, and set the appropriate size.
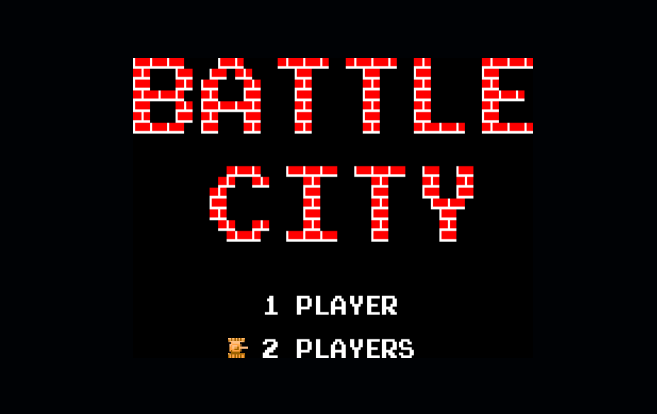
Then we create a new image to set the selection pointer. We take the right image of the tank as the rendering image, and set the corresponding position and size:
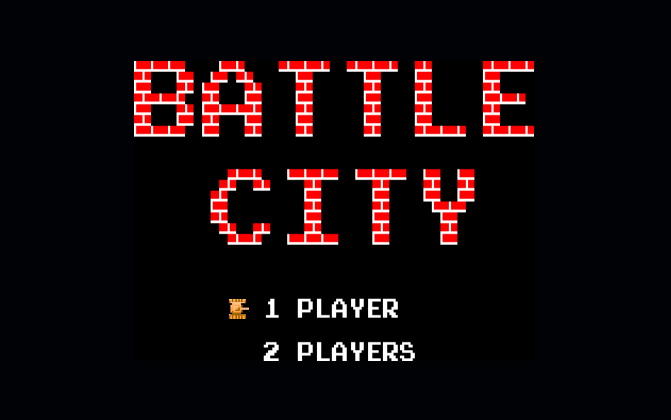
Then we create two new empty objects, give the position and size information of the pointer to the two empty objects, and then move the second empty object down to the second selection, so that we can set up two position information, and then directly access the two position information to move when selecting. We create a new script to mount to the selection pointer:
using System.Collections;
using System.Collections.Generic;
using UnityEngine;
using UnityEngine.SceneManagement;

public class ChooseOptions : MonoBehaviour
{
    //attribute
    private int choose = 1;//Record player choices

    //quote
    public GameObject posOne;//Select 1's location
    public GameObject posTwo;//Select 2's location

    // Start is called before the first frame update
    void Start()
    {

    }

    // Update is called once per frame
    void Update()
    {
        if (Input.GetKeyDown(KeyCode.UpArrow))
        {
            choose = 1;
            transform.position = posOne.transform.position;//Move selection pointer to selection 1
        }
        else if(Input.GetKeyDown(KeyCode.DownArrow))
        {
            choose = 2;
            transform.position = posTwo.transform.position;//Move selection pointer to selection 1
        }

        if(choose==1&&Input.GetKeyDown(KeyCode.Space))//If the player selects 1 and presses the space to confirm
        {
            SceneManager.LoadScene("Main");
        }
    }
}
In order to be able to select the game mode and load it into our Main game scene, we need to drag our two scenes into Build Settings, the first is Begin, and the second is Main:

Then here are the effects:
28. Adding sound effects
Next, we will simply add the sound effect function of the game. First, we will add the sound effect to the death of our hometown, add a reference to the sound effect in HeartAI, and then play it when we die:
    public AudioClip heartdieVoice;//Home death sound effect

    public void HeartDie()//Home shot, game over
    {
        Instantiate(explosionPrefab, transform.position, transform.rotation);//Generate explosive effects
        spriteRenderer.sprite = HeartBroken;//Replace pictures after explosion
        PlayerManage.Instance.isDefeat = true;//game over
        AudioSource.PlayClipAtPoint(heartdieVoice,transform.position);//Play dead sound
    }
Just entrust the Die sound effect in the resource to the heartbeat voice. Then we add the explosion sound effect. We directly add an Audio Source component to the explosion animation, and select play on wake as the check state, so that the sound effect will be played when the explosion effect is initialized. But remember to set the sound source for the Audio Clip.
Then we add a sound effect of the bullet hitting the obstacle. We add a script to the obstacle prefabrication:
    //quote
    public AudioClip hitVoice;//Sound effects of bullets hitting obstacles

    public void PlayAudio()//Play sound
    {
        AudioSource.PlayClipAtPoint(hitVoice, transform.position);
    }
Then call this function when the bullet hits an obstacle
        //For example only
        switch(collision.tag)//Respond to an event based on the label of the colliding object
        {
            case "Barrier":
                collision.SendMessage("PlayAudio");//Play hit sound
                Destroy(gameObject);//Destroy bullets
        }
Then we add the sound effect of the game start and the sound effect of the bullet launch, set the components and the sound source, check and call directly in the Awake function.
Finally, the sound effect of tank movement. We create two new variables for the PlayerAI script. One is the component of Audio and the other is the resource of sound effect. Drag and assign values respectively:
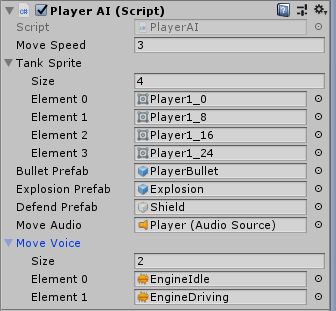
Then we play different sound effects depending on whether the tank is moving or not.