preface
This game can be regarded as a game of Unity chicken. In the real sense, it follows the tutorial from beginning to end and steps into the pit step by step to complete it.
This blog is mainly used to summarize and learn the game project. Well, let's start.
(PS: this game is based on the angry birds tutorial of Siki college. Station b address: [Siki college Unity] Unity elementary case - angry birds beep beep bilibili bili
Download address of course materials, source code and notes on the official website: http:// http://www.sikiedu.com/course/134 )
Tip: the following is the main content of this article. The following cases can be used for reference
1, Game logic and design
As an entry-level Unity project, the implementation logic of this game is not complex. Firstly, the game scenes are divided into three:
Loading interface
Level selection interface
Game interface
Among them, the loading interface and level selection interface can be realized by selecting the UI function of Unity, that is, using Image to display the background picture, each key and other component layout;
The game interface, such as bird, pig, wood block, background and grass, is realized by creating an empty object and adding pictures. Then, for example, the pause window, victory window and failure window can be realized by using the UI. Put all windows in a Canvas, and then cancel the display by default. When the target function is achieved (such as level victory, failure, clicking pause button, etc.), set its corresponding components to the active state, so as to achieve the function of interface display;
Then there is the logic of the game. Because of the angry bird, its main core of the game is actually collision.
So here, most of the game logic is actually realized through collision and trigger. We add rigid bodies and colliders to components such as birds, pigs and obstacles, and then add triggers for special individual components according to needs. Then we can determine whether there is a logical collision of game objects by judging the collision and trigger States, and then select Select and execute the corresponding code.
2, Game scene construction
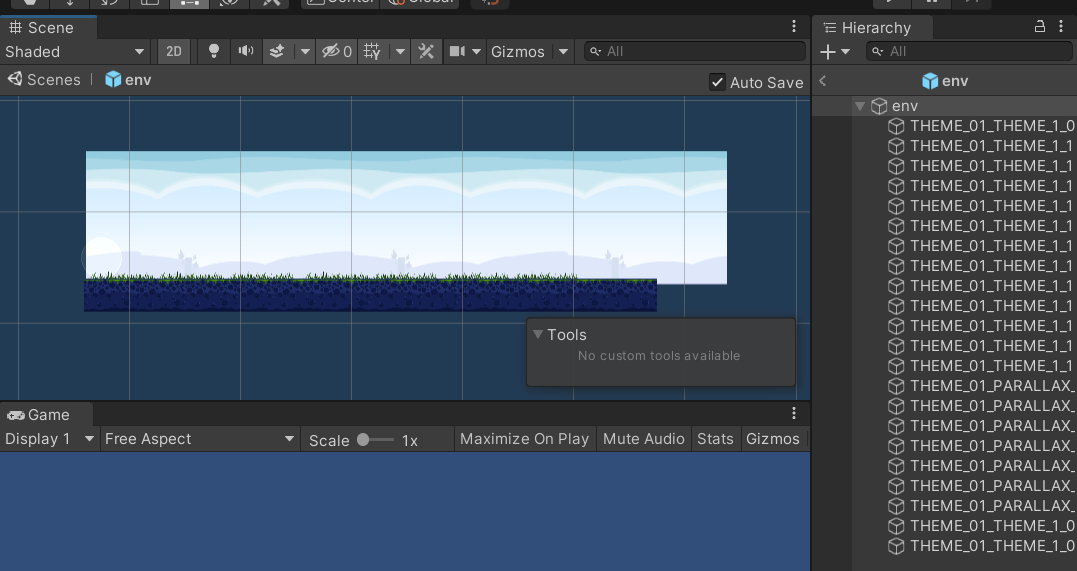
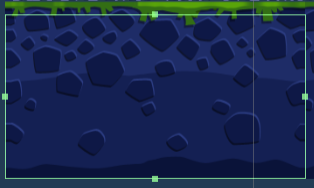
1. Game background
The game background is composed of several pictures (background picture, ground and grass), and a Collider (BoxCollider2D) is added to the ground so that birds and enemy units will not fall all the time.

2. Player module
The player module consists of the following objects:
Left part of catapult
Catapult right
Current bird
Prepare the bird
For birds, you need to add their rigid body and collider components, and adjust the collision range according to the size of different birds;
For the "slingshot simulation" operation of birds, the Spring Joint2D component is used here. The center point is the center of birds, and the left and right points are set at the appropriate positions on the left and right slingshots respectively. Then the distance and frequency can be adjusted according to the situation, so that the effect similar to the slingshot spring can be initially realized (it can't fly out at present);
Next, for the function of dragging birds to form a Line drawing, LineRender is used to draw lines. In the script, when the Line drawing operation can be carried out (the current bird has been activated but has not yet flown), set two points of each Line and draw lines;
/// <summary>
///Scribe
/// </summary>
public void Line()
{
right.enabled = true;
left.enabled = true;

right.SetPosition(0, rightPos.position);
right.SetPosition(1, this.transform.position);

left.SetPosition(0, leftPos.position);
left.SetPosition(1, this.transform.position);
}
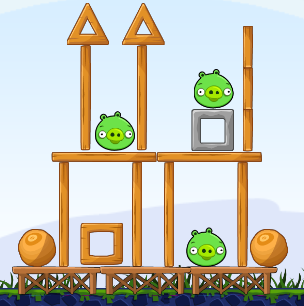
3. Enemy module
The enemy module plays by itself, sets its rigid body and Collider (mainly the size of the Collider) for different objects (pigs, wood blocks, wood strips, iron blocks, columns...), then sets its blood volume (minimum and maximum bearing speed), injury pictures and other variables, and then designs different levels according to their own imagination and design;

3, Game code module
1. Birds (including special birds)
The status of the current bird and the waiting bird can be distinguished by controlling canMove. When the bird is in the active state, canMove is true. You can execute the Line (slingshot drawing Line) and Fly (flight process) methods to control and Fly the slingshot. When in the flight state, reset canMove to false (to prevent repeated operations) The operation of controlling the bird is performed by the mouse. In the code, it is monitored in OnMouseUp and OnMouseDown;
During the flight, you can call the ShowSkill method to perform the skill operation of the special bird by clicking the mouse. This method can be written as a virtual method, which can be rewritten and called in the later special bird; when the bird flies out, you can call the Next method by delaying to destroy the current bird and activate the Next waiting bird;
using System.Collections;
using System.Collections.Generic;
using UnityEngine;
using UnityEngine.EventSystems;

public class Bird : MonoBehaviour
{
public bool isClick = false;

public float maxDis = 1.5f;
[HideInInspector]
public SpringJoint2D sp;
protected Rigidbody2D rg;

public LineRenderer right;
public LineRenderer left;
public Transform rightPos;
public Transform leftPos;

public GameObject boom;
protected TestMyTrail myTrail;
[HideInInspector]
public bool canMove = false;
public float amooth = 3;

public AudioClip select;
public AudioClip fly;
private bool isFlay;
public bool isReleased = false;

public Sprite hurt;
public SpriteRenderer render;

public void Awake()
{
sp = GetComponent<SpringJoint2D>();
rg = GetComponent<Rigidbody2D>();
render = GetComponent<SpriteRenderer>();
myTrail = GetComponent<TestMyTrail>();

}
private void OnMouseDown()
{
if (canMove)
{
AudioPlay(select);
isClick = true;
rg.isKinematic = true;
}
}

private void OnMouseUp()
{
if (canMove)
{
isClick = false;
rg.isKinematic = false;
Invoke("Fly", 0.1f);
right.enabled = false;
left.enabled = false;

canMove = false;
}
}

public void Update()
{
//If you click the UI interface, you can return directly
if (EventSystem.current.IsPointerOverGameObject())
{
return;
}


if (isClick)
{
this.transform.position = Camera.main.ScreenToWorldPoint(Input.mousePosition);

this.transform.position += new Vector3(0, 0, -Camera.main.transform.position.z);

if(Vector3.Distance(this.transform.position,rightPos.position) > maxDis)
{
Vector3 pos = (this.transform.position - rightPos.position).normalized;
pos *= maxDis;
this.transform.position = pos + rightPos.position;
}

Line();
}
//Camera follow
CamereMove();
//While flying, click the left button
if (isFlay)
{
if (Input.GetMouseButtonDown(0))
{
ShowSkill();
}
}
}
public void CamereMove()
{
float posX = this.transform.position.x;
Camera.main.transform.position = Vector3.Lerp(Camera.main.transform.position, new Vector3(Mathf.Clamp(posX,0,17),Camera.main.transform.position.y,
Camera.main.transform.position.z), amooth*Time.deltaTime);
}

public void Fly()
{
isReleased = true;
isFlay = true;
AudioPlay(fly);
myTrail.StartTrail();
sp.enabled = false;
Invoke("Next", 3);
}

/// <summary>
///Scribe
/// </summary>
public void Line()
{
right.enabled = true;
left.enabled = true;

right.SetPosition(0, rightPos.position);
right.SetPosition(1, this.transform.position);

left.SetPosition(0, leftPos.position);
left.SetPosition(1, this.transform.position);
}

public virtual void Next()
{
Gamemanager._instance.birds.Remove(this);
Destroy(this.gameObject);
Instantiate(boom, this.transform.position, Quaternion.identity);
Gamemanager._instance.NextBird();
}

public void OnCollisionEnter2D(Collision2D collision)
{
isFlay = false;
myTrail.ClearTrail();

}

public void AudioPlay(AudioClip clip)
{
AudioSource.PlayClipAtPoint(clip,this.transform.position);
}

public virtual void ShowSkill()
{
isFlay = false;
}

public void Hurt()
{
render.sprite = hurt;
}
}
The remaining yellow bird (acceleration), green bird (roundabout) and blackbird (explosion) inherit the redbird class, and then rewrite the ShowSkill method as required;
public class YellowBird : Bird
{
public override void ShowSkill()
{
base.ShowSkill();
rg.velocity *= 2;
}
}
public class GreenBird : Bird
{
public override void ShowSkill()
{
base.ShowSkill();
Vector3 speed = rg.velocity;
speed.x *= -1;
rg.velocity = speed;
}
}
Among them, BlackBird needs to judge the explosion effect by triggering and destroy it directly after explosion, so it needs to write several additional methods to realize it
public class BlackBird : Bird
{
public List<Pig> blocks = new List<Pig>();

/// <summary>
///Enter trigger area
/// </summary>
/// <param name="collision"></param>
private void OnTriggerEnter2D(Collider2D collision)
{
if(collision.gameObject.tag == "Enemy")
{
blocks.Add(collision.gameObject.GetComponent<Pig>());
}

}

/// <summary>
///Exit trigger area
/// </summary>
/// <param name="collision"></param>
private void OnTriggerExit2D(Collider2D collision)
{
if (collision.gameObject.tag == "Enemy")
{
blocks.Remove(collision.gameObject.GetComponent<Pig>());
}
}

public override void ShowSkill()
{
base.ShowSkill();
if( blocks!=null && blocks.Count > 0)
{
for(int i = 0; i < blocks.Count; i++)
{
blocks[i].Dead();
}
}

OnClear();
}

public void OnClear()
{
rg.velocity = Vector3.zero;
Instantiate(boom, this.transform.position, Quaternion.identity);
render.enabled = false;
GetComponent<CircleCollider2D>().enabled = false;
myTrail.ClearTrail();
}

public override void Next()
{
Gamemanager._instance.birds.Remove(this);
Destroy(this.gameObject);
Gamemanager._instance.NextBird();
}
}
2. Enemies (including pigs, wood blocks and other obstacles)
This is mainly to adjust the enemy's "HP", but the HP here is not deducted bit by bit, but to make a judgment. When the object collides with the Player (bird), and when
When collision speed > Maxspeed, the enemy will die
When minspeed < collision speed < Maxspeed, the enemy is adjusted to the injured state
When the collision speed is < minspeed, the enemy will not be injured
Then write a Dead method to deal with the operation after death (playing death music, explosion effects, destroying objects, etc.)
public class Pig : MonoBehaviour
{
public float maxSpeed = 10;
public float minSpeed = 4;
private SpriteRenderer render;
public Sprite hurt;
public GameObject boom;
public GameObject score;
public bool isPig = false;
public AudioClip hurtClip;
public AudioClip dead;
public AudioClip birdCollision;


private void Awake()
{
render = GetComponent<SpriteRenderer>();
}

private void OnCollisionEnter2D(Collision2D collision)
{
if(collision.gameObject.tag == "Player")
{
AudioPlay(birdCollision);
collision.transform.GetComponent<Bird>().Hurt();
}

if(collision.relativeVelocity.magnitude > maxSpeed)
{
Dead();
}
else if( collision.relativeVelocity.magnitude>minSpeed && collision.relativeVelocity.magnitude < maxSpeed)
{
AudioPlay(hurtClip);
render.sprite = hurt;
}
}


public void Dead()
{
if (isPig)
{
Gamemanager._instance.pigs.Remove(this);
}
AudioPlay(dead);
Destroy(this.gameObject);
Instantiate(boom, this.transform.position, Quaternion.identity);
GameObject go = Instantiate(score, this.transform.position + new Vector3(0,0.5f,0), Quaternion.identity);
Destroy(go, 1.5f);
}

public void AudioPlay(AudioClip clip)
{
AudioSource.PlayClipAtPoint(clip, this.transform.position);
}
}
3. Game manager
The game manager is used to control the game logic. Here, two lists are defined to store all birds and all pigs,
At the beginning, the first object to activate the bird list is the current bird. The other birds wait. When the current bird is flying, it calls the Next method to delete the launched bird, and activates the next waiting bird to operate.
When the number of Birds = 0 or the number of piglets = 0, make logical judgment
When the number of pigs = 0, victory!
When the number of pigs < 0 and the number of Birds = 0, it fails!
Then the corresponding UI interface is displayed. When winning, the number of stars obtained is the current number of remaining birds + 1, which is used for scoring judgment, and the data is stored in the form of key value pairs (key is the current level name) through the PlayerPrefs class of Unity;
The rest is to define the binding methods of some UI keys, such as
Next next level
SaveData when the game wins, save the current level score (take the maximum)
Home return to the game home page
RePlay restarts the current game level
public class Gamemanager : MonoBehaviour
{
public List<Bird> birds;
public List<Pig> pigs;
public static Gamemanager _instance;
public Vector3 originPos; //initial position
public GameObject win;
public GameObject lose;
public GameObject[] starts;
public int starsNum = 0;
public int totalNum = 5;

public void Start()
{
Initialized();
}

public void Awake()
{
_instance = this;
originPos = birds[0].transform.position;
}
/// <summary>
///Initialize bird
/// </summary>
private void Initialized()
{
for(int i = 0; i < birds.Count; i++)
{
if (i == 0)//The first bird
{
birds[0].transform.position = originPos;
birds[i].enabled = true;
birds[i].sp.enabled = true;
birds[i].canMove = true;
}
else
{
birds[i].enabled = false;
birds[i].sp.enabled = false;
}
}
}


public void NextBird()
{
if (pigs.Count > 0)
{
if (birds.Count > 0)
{
//Next bird
Initialized();
}
else
{
//Lost
lose.SetActive(true);
}
}
else
{
//Win
win.SetActive(true);
}
}

public void ShowStarts()
{
StartCoroutine("show");
//Debug.Log("victory!!!" + birds.Count);

}

IEnumerator show()
{
for (; starsNum < birds.Count + 1; starsNum++)
{
if(starsNum >= starts.Length)
{
break;
}
yield return new WaitForSeconds(0.2f);
//Debug.Log(starts[i].name);
starts[starsNum].SetActive(true);
}
}

public void RePlay()
{
SaveData();
SceneManager.LoadScene(2);
}

public void Home()
{
SaveData();
SceneManager.LoadScene(1);
}

public void Next()
{
SaveData();
string currentLevel = PlayerPrefs.GetString("nowLevel");
Debug.Log(currentLevel);
int num = int.Parse(currentLevel.Substring(5,1)) + 1;
string nextLevel = currentLevel.Substring(0, currentLevel.Length - 1) + System.Convert.ToString(num);
Debug.Log("The next level is: " + nextLevel);
//Load next level
PlayerPrefs.SetString("nowLevel", nextLevel);
SceneManager.LoadScene(2);
}

public void SaveData()
{
Debug.Log("The number of stars in the current level is: " + starsNum);

//Update and store when the current number of stars is greater than the number of stored stars
if (starsNum > PlayerPrefs.GetInt(PlayerPrefs.GetString("nowLevel")))
{
PlayerPrefs.SetInt(PlayerPrefs.GetString("nowLevel"), starsNum);
}

//Store the number of all stars
int sum = 0;
for(int i = 1; i <= totalNum; i++)
{
sum += PlayerPrefs.GetInt("level" + i.ToString());
//Debug.Log("the star off" + i.ToString() + "is:" + PlayerPrefs.GetInt("level" + i.ToString()));
//Debug.Log("sum is:" + sum);
}
Debug.Log("The total number of stars to store is: " + sum);
PlayerPrefs.SetInt("totalNum", sum);

}
}
4. Map selection
The map UI is designed into the following four parts, of which the last part has no function implementation, so the real level is actually only the first three parts

At the beginning, we first read the sum of the number of stars in all cleared levels. When the number of stars is greater than the set number of stars in the map, the map will be unlocked. Set isSelect=true. Otherwise, lock the level and set isSelect=false;
When the map is clicked, the map view is hidden and the level view is displayed
public class MapSelect : MonoBehaviour
{

public int starsNum;
public bool isSelect = false;

public GameObject locks;
public GameObject starts;
public GameObject map;
public GameObject panel;

public Text startsText;
public int startNum = 1;
public int endNum = 5;
public void Start()
{
//Clear all game data
//PlayerPrefs.DeleteAll();

if(PlayerPrefs.GetInt("totalNum",0) >= starsNum)
{
Debug.Log("The total number of stars is: " + PlayerPrefs.GetInt("totalNum"));
isSelect = true;
}

if (isSelect)
{
locks.SetActive(false);
starts.SetActive(true);

//TODO:Text display
TextShow();
}
}

public void TextShow()
{
int count = 0;

for (int i = startNum; i <= endNum; i++)
{
count += PlayerPrefs.GetInt("level" + i.ToString(), 0);
}

startsText.text = count.ToString() + "/15";
}

public void Selected()
{
if (isSelect)
{
panel.SetActive(true);
map.SetActive(false);
}
}

public void PanelSelect()
{
panel.SetActive(false);
map.SetActive(true);
}
}
5. Level selection
When activating the level view, first activate the first level, set isSelect = true, then traverse the remaining levels, and obtain the stored data through PlayerPrefs. When the number of stars in the target level is > 0, activate the level, otherwise lock it;
When a level is activated, the number of stars of the level should be obtained through PlayerPrefs, and then the stars can be displayed by controlling star[i] (Star list);
Then define a Slect method to select a level. When a level is clicked, set the current level as a click level through PlayerPrefs, and read the scene through SceneManager
public class LevelSelect : MonoBehaviour
{
public bool isSelect = false;
public Sprite levelBG;
public Image img;

public GameObject[] stars;

public void Awake()
{
img = GetComponent<Image>();
}

public void Start()
{
//It's the first level
if(this.transform.name == this.transform.parent.GetChild(0).name)
{
isSelect = true;
}
else
{
int beforeNum = int.Parse(this.gameObject.name) - 1;
if( PlayerPrefs.GetInt("level"+beforeNum.ToString()) > 0)
{
isSelect = true;
}
}

//Activate level
if (isSelect)
{
img.overrideSprite = levelBG;
this.transform.Find("num").gameObject.SetActive(true);

//Read the number of stars
int count = PlayerPrefs.GetInt("level" + this.gameObject.name);
if (count > 0)
{
for(int i = 0; i < count; i++)
{
stars[i].SetActive(true);
}
}
}
}


public void Selected()
{
if (isSelect)
{
PlayerPrefs.SetString("nowLevel", "level" + this.gameObject.name);
SceneManager.LoadScene(2);
//Debug.Log("selection succeeded");
}
}
}
6. Pause interface
Design a pause interface through the UI. When it is activated, it is outside the game window. When activated, move the UI interface into the game window through animation;
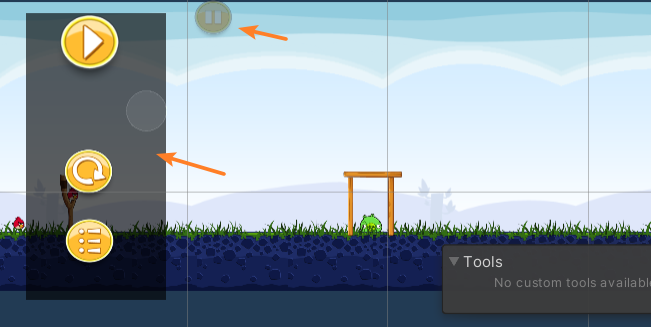
Define the method Pause. When clicking the pause button, call the method, then call the pause animation, and move the UI window to the game interface.
Set Time.timeScale = 0 to pause the game and hide the pause button;
Then define the Resume method. When you click the restore button, call the method, call the restore animation, remove the UI window from the game interface again, set the first bird to the active state, and display the pause button;
Next, define the Home method and Retry method to return to the Home page and restart the level respectively. Here, you can call the Home and Retry methods in gamemanager, but pay attention to setting Time.timeScale = 1 in advance to prevent the game from continuing to pause;
public class PausePanel : MonoBehaviour
{
private Animator anim;
public GameObject button;
public void Awake()
{
anim = GetComponent<Animator>();
}
/// <summary>
///Home button
/// </summary>
public void Home()
{
Time.timeScale = 1;
Gamemanager._instance.Home();

}
/// <summary>
///Retry key
/// </summary>
public void Retry()
{
Time.timeScale = 1;
Gamemanager._instance.RePlay();
}
/// <summary>
///Pause key
/// </summary>
public void Pause()
{
anim.SetBool("isPause", true);
button.SetActive(false);

//suspend
if (Gamemanager._instance.birds.Count > 0)
{
if(Gamemanager._instance.birds[0].isReleased == false)
{
Gamemanager._instance.birds[0].canMove = false;
}
}
}

/// <summary>
///Resume key
/// </summary>
public void Resume()
{
Time.timeScale = 1;
anim.SetBool("isPause", false);

//reduction
if (Gamemanager._instance.birds.Count > 0)
{
if (Gamemanager._instance.birds[0].isReleased == false)
{
Gamemanager._instance.birds[0].canMove = true;
}
}
}

/// <summary>
//Call after pause animation
/// </summary>
public void PauseAnimEnd()
{
Time.timeScale = 0;
}
/// <summary>
//Call after resume animation
/// </summary>
public void ResumeAnimEnd()
{
button.SetActive(true);
}
}
4, Combination and collocation between scenes
A game scene consists of the following modules:
Main Camera
Player player module, including slingshot, current bird and ready bird
Enemy enemy module, including all enemy units: pigs, wood blocks and other obstacles
env game background: background picture, ground, grass
Cavas UI canvas, where all UI components are placed to manage all UI operations
UICamera UI camera, view UI lens
Gamemaneger game manager, mount gamemaneger script, and manage almost all game logic and function modules
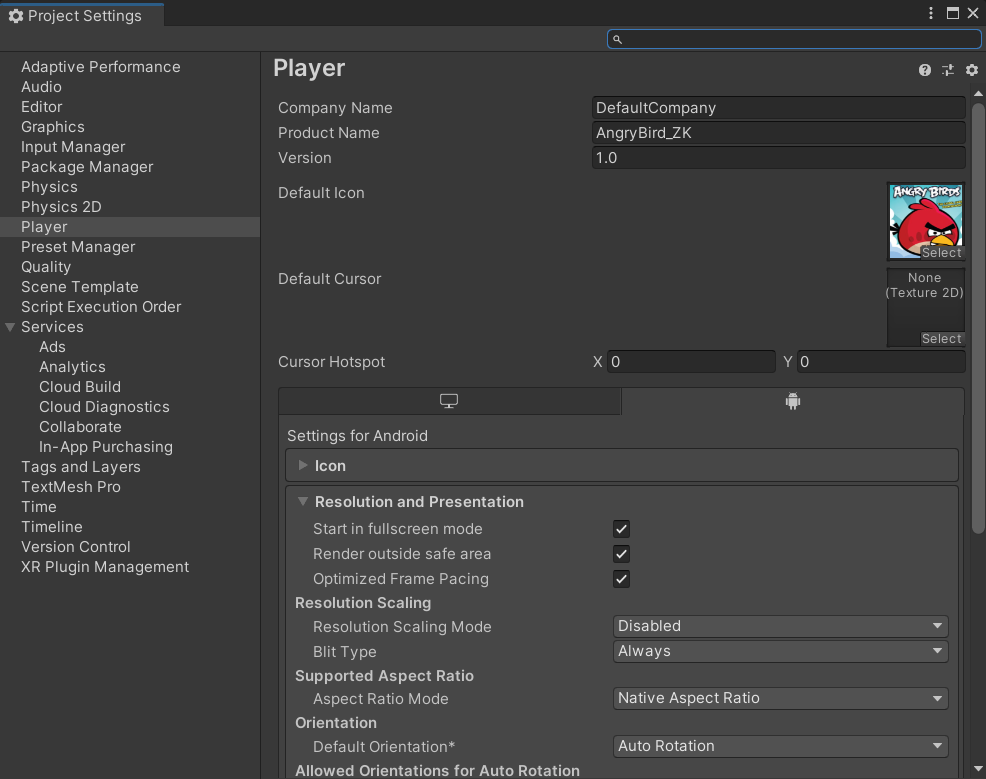
5, Game release
For the release of the game, first set your game screen, game icon, mouse icon and other settings in the project settings
Then go to Build Settings, set the Scenes to be published, and publish the game on different platforms according to the needs. Here, the platforms I choose to publish are Windows and Android (Android publishing requires setting environment configurations such as jdk, sdk, ndk, etc.)
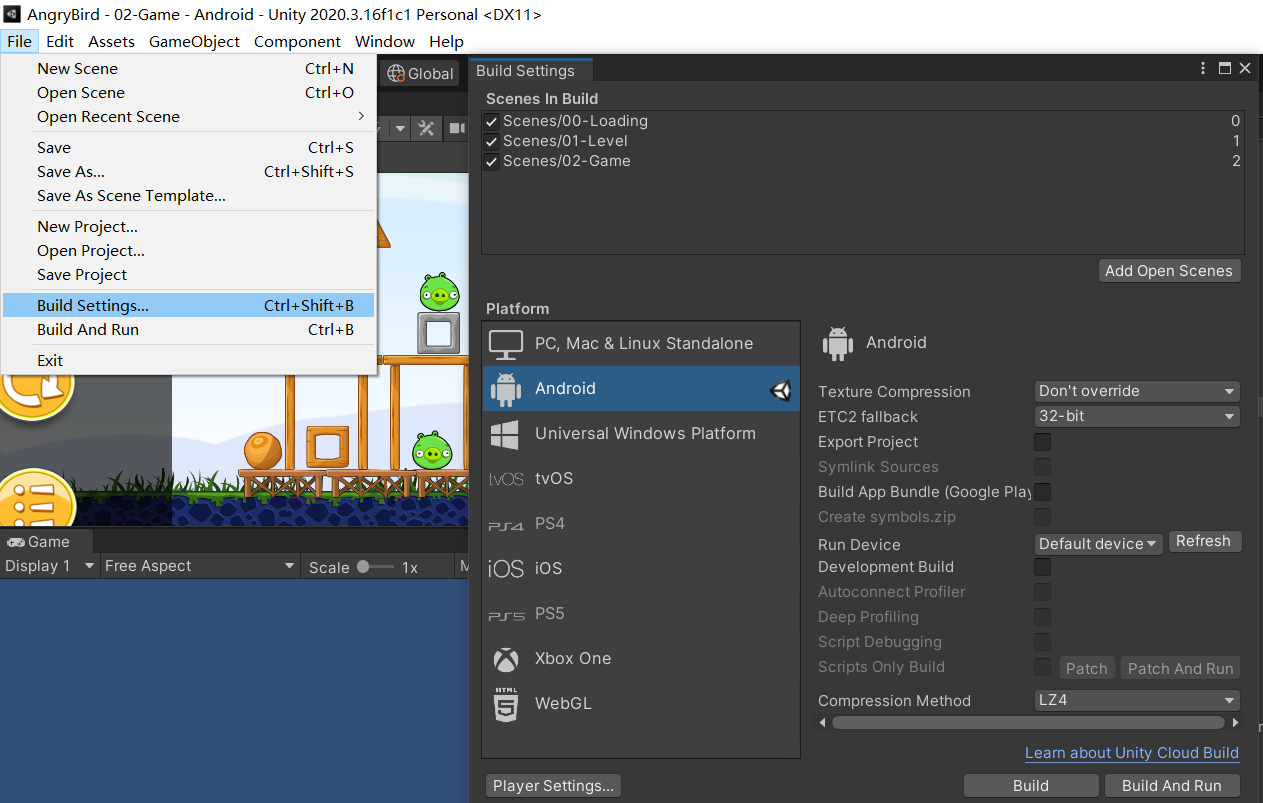
Finally, click Build, Dangdang, and you're done~
summary
The above is an entry-level 2D game project developed by Unity. This paper is mainly used for learning and summarizing. If there is anything wrong, I hope you can correct it.
The following is the successfully published game Ontology:
PC and Android: https://pan.baidu.com/s/1Q6SH-YWx7u4qF5DFDjOVqw Extraction code: 9xpx
Android (blue cloud): https://www.lanzouw.com/b02oe9adi Password: 2zp4