- Let's start with chestnuts, a pile of candy. We want to classify them by color
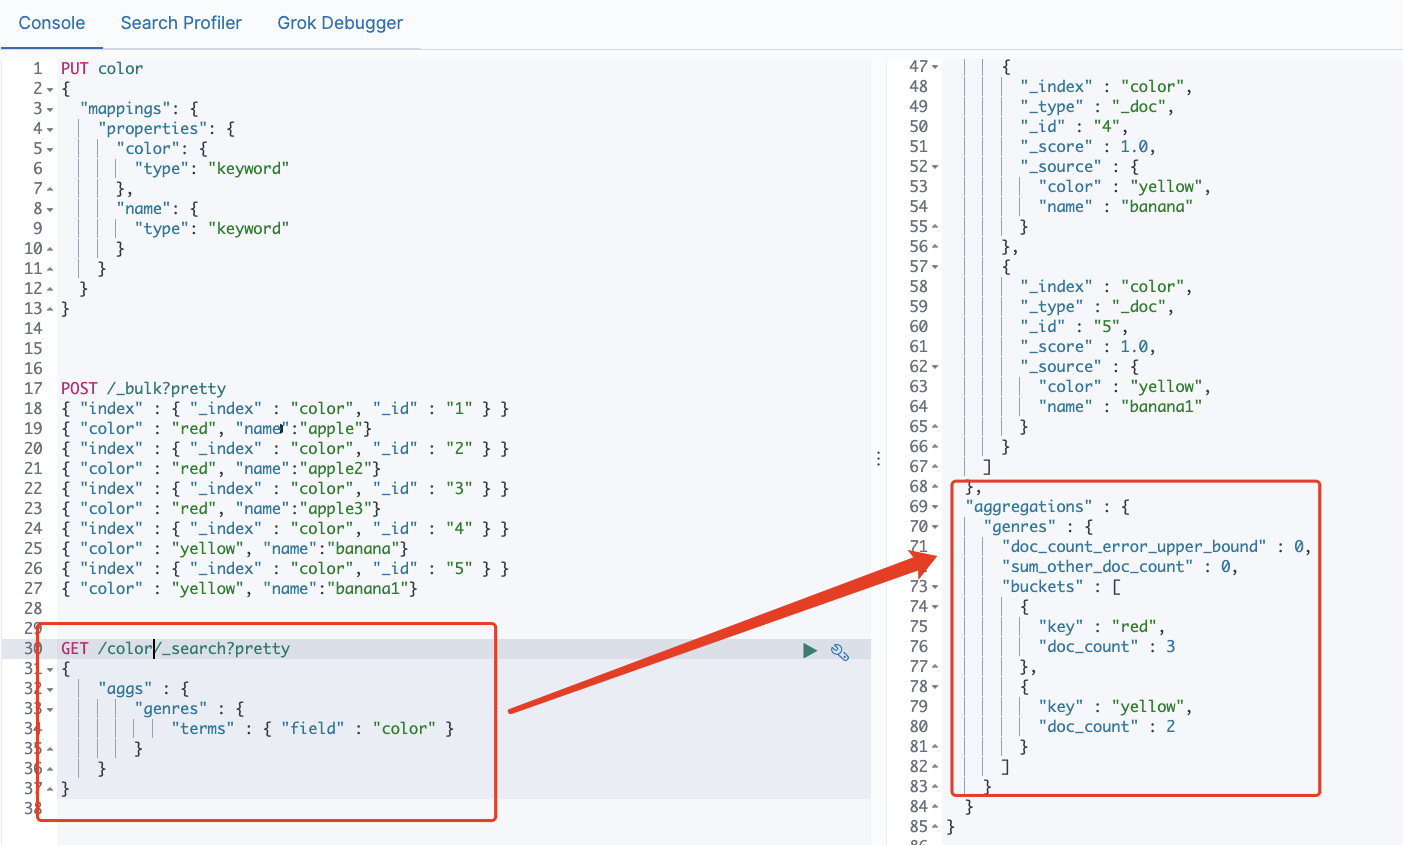
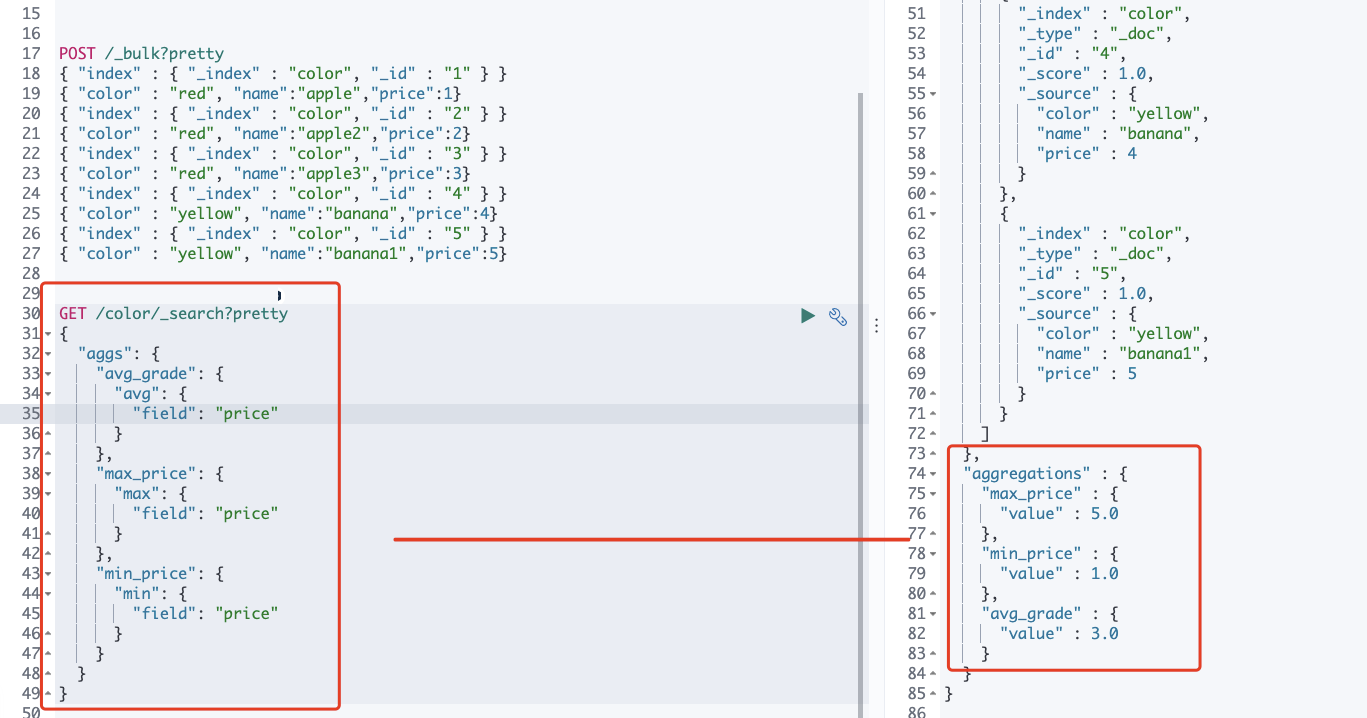
- We also seem to find some maximum, minimum and average values (Note: aggregation can be nested)
Hot and cold cluster architecture
- elastic nodes support specified types, such as specifying which nodes are hot nodes and which are cold nodes. There are two configurations
Configure through elasticsearch.yml
node.attr.hotwarm_type: hot #heat
node.attr.hotwarm_type: warm #cold
- Specified when creating an index
PUT /logs_2019-10-01
{
  "settings": {
    "index.routing.allocation.require.hotwarm_type": "hot",
    "number_of_replicas": 0
  }
}


PUT /logs_2019-08-01
{
  "settings": {
    "index.routing.allocation.require.hotwarm_type": "warm",
    "number_of_replicas": 0
  }
}
- Specify by template
PUT _template/logs_2019-08-template
{
  "index_patterns": "logs_2019-08-*",
  "settings": {
    "index.number_of_replicas": "0",
    "index.routing.allocation.require.hotwarm_type": "warm"
  }
}
PUT _template/logs_2019-10-template
{
  "index_patterns": "logs_2019-10-*",
  "settings": {
    "index.number_of_replicas": "0",
    "index.routing.allocation.require.hotwarm_type": "hot"
  }
}
Rethinking elastic clusters
-
cluster
Cluster: an ES cluster is composed of one or more nodes. Each cluster has a cluster name as its ID -
node
Node, an ES instance is a node, and a machine can have multiple instances. Therefore, it can not be said that a machine is a node. In most cases, each node runs in an independent environment or virtual machine. -
index
An index is a collection of a series of documents -
shard
Sharding, ES is a distributed search engine. Each index has one or more Shards. The data of the index is allocated to each shard, which is equivalent to a bucket of water filled with n cups. Sharding helps to expand horizontally. N shards will be evenly distributed on different nodes as much as possible (for example, you have 2 nodes and 4 primary shards (regardless of backup) , then each node will be divided into two slices. Later, if you add two nodes, there will be one slice on each of your four nodes. This process is called relocation, which is automatically completed after ES perception). The slice is independent. For a Search Request behavior, each slice will execute the Request. In addition, each slice is a Lucene Index, so a slice can only be saved Put integer.max_value - 128 = 2147483519 docs. It is recommended that the size of a single slice be set between 30-50 GB. The default maximum number of documents for a slice is 2 billion. Half the memory size of the host and 31GB, whichever is the minimum. -
replica
Replication can be understood as backup sharding. Accordingly, there is a primary shard. The primary shard and the standby shard will not appear on the same node (to prevent a single point of failure). By default, one index creates five shards and one backup (that is, 5primary+5replica=10 shards). If you have only one node, all five replicas cannot be allocated (unassigned) , the cluster status will change to Yellow. The main functions of replica include:
1. Disaster recovery: if the primary partition is lost, the replica partition will be pushed up to become a new primary partition. At the same time, a new replica will be created according to the new primary partition, and the cluster data will be safe and sound
2. Improve query performance: the data of replica and primary partition are the same. Therefore, for a query, you can check both primary partition and standby partition. Within an appropriate range, the performance of multiple replicas will be better (but the resource occupation will also increase [cpu/disk/heap]). In addition, index request can only occur on the primary partition, and replica cannot execute index request.
For an index, the number of partitions (number_of_shards) cannot be adjusted unless the index is rebuilt, but the number of replicas (number_of_replicas) can be adjusted at any time.
storage space
If your Elasticsearch cluster node has insufficient disk space, it will affect the cluster performance.
Once the available storage space falls below a certain threshold limit, it will start to block write operations, which will affect the entry of data into the cluster.
Many students may encounter the following errors: elasticsearchstatusexception [elasticsearch exception [type = cluster_block_exception, reason = blocked by: [forward / 12 / index read only / allow. This is the prompt of the protection mechanism when the disk is almost full.
Three default alert watermarks for the disk.
- Low warning water level
The default value is 85% of the disk capacity. Elasticsearch does not allocate new partitions to nodes with disk utilization of more than 85%. It can also be set to an absolute byte value (such as 500mb) to prevent elasticsearch from allocating partitions when it is less than the specified amount of free space. This setting does not affect the primary partition of the newly created index, especially those that have never been allocated before.
cluster.routing.allocation.disk.watermark.low
- High warning water level
The default value is 90% of the disk capacity. Elasticsearch will attempt to reassign partitions to nodes with disk utilization exceeding 90% (transfer the data of the current node to other nodes) . it can also be set to an absolute byte value to reallocate a node from the node when it is less than the specified amount of free space. This setting affects the allocation of all tiles, whether previously allocated or not.
cluster.routing.allocation.disk.watermark.high
- Flood warning water level
The default is 95% of the disk capacity. Elasticsearch enforces a read-only index block (index.blocks.read_only_allow_delete) for each index. This is the last resort to prevent nodes from running out of disk space. The read-only mode needs to be manually deactivated when the disk space is sufficient. Therefore, it is very important to monitor the available storage space in the cluster.
cluster.routing.allocation.disk.watermark.flood_stage
Document deletion
The documents in elasticsearch cannot be modified and cannot be modified. Therefore, all update operations will mark the existing documents as deleted, including deleted documents. In fact, the documents will not be deleted immediately, but marked as deleted. When we search again, we will search all and filter out the documents with deletion marks. Therefore, this index is not valid The disk space occupied by the reference will not be released immediately with the operation of the API. The disk space will not be released until the next segment merging. On the contrary, the deletion process of the queried document tag also needs to occupy disk space. At this time, you will find that the disk is not released when the API operation is triggered Instead, disk utilization has increased.
In the general production environment, the indexes operated by using this API are very large, and the documents are tens of millions or even hundreds of millions. The index size is hundreds of G or even a few T. therefore, this operation is recommended in the low peak period of business or at night, because deleting a large amount of data requires more i/o CPU resources, which is easy to affect the production cluster. It should be determined during the deletion process The cluster disk has a certain margin, because mark deletion takes up disk space. If the disk space is insufficient, the failure rate of this operation is still very high.
Elasticsearch has background threads that perform segment merging operations regularly according to lucene's merge rules. Generally, users do not need to worry or take any action. The deleted document will be deleted only when merged. Before merging again, it will still occupy the file cache, disk and other resources of JVM heap and operating system. In some specific cases, we need ES to force it Segment merging to release a large amount of system, disk and other resources occupied by it. POST /index_name/_forcemerge.
_ The forcemerge command forces a segment merge and deletes all documents marked for deletion. Segment merging consumes CPU and a lot of I/O resources, so it must be carried out when your ElasticSearch cluster is in the maintenance window and has enough I/O space (such as SSD); Otherwise, it is likely to cause cluster crash and data loss.
Refresh of document
Elasticsearch refresh is the process of making a document searchable.
By default, it refreshes every second. If the main goal is to adjust the index of ingestion speed, you can change the default refresh interval of Elasticsearch from 1 second to 30 seconds. After 30 seconds, this will make the document visible for search, optimizing indexing speed.
- You can also specify a refresh rate for an index
PUT my_index/_settings
{
  "index": {
    "refresh_interval": "30s"
  }
}
copy
Replica in order to avoid data loss caused by problems in the primary partition, the primary partition and replica will not appear on the same node. However, this will inevitably affect the efficiency of writing, right? Because the replica needs to synchronize data from the primary partition, you can disable the replica before starting the replica after data initialization
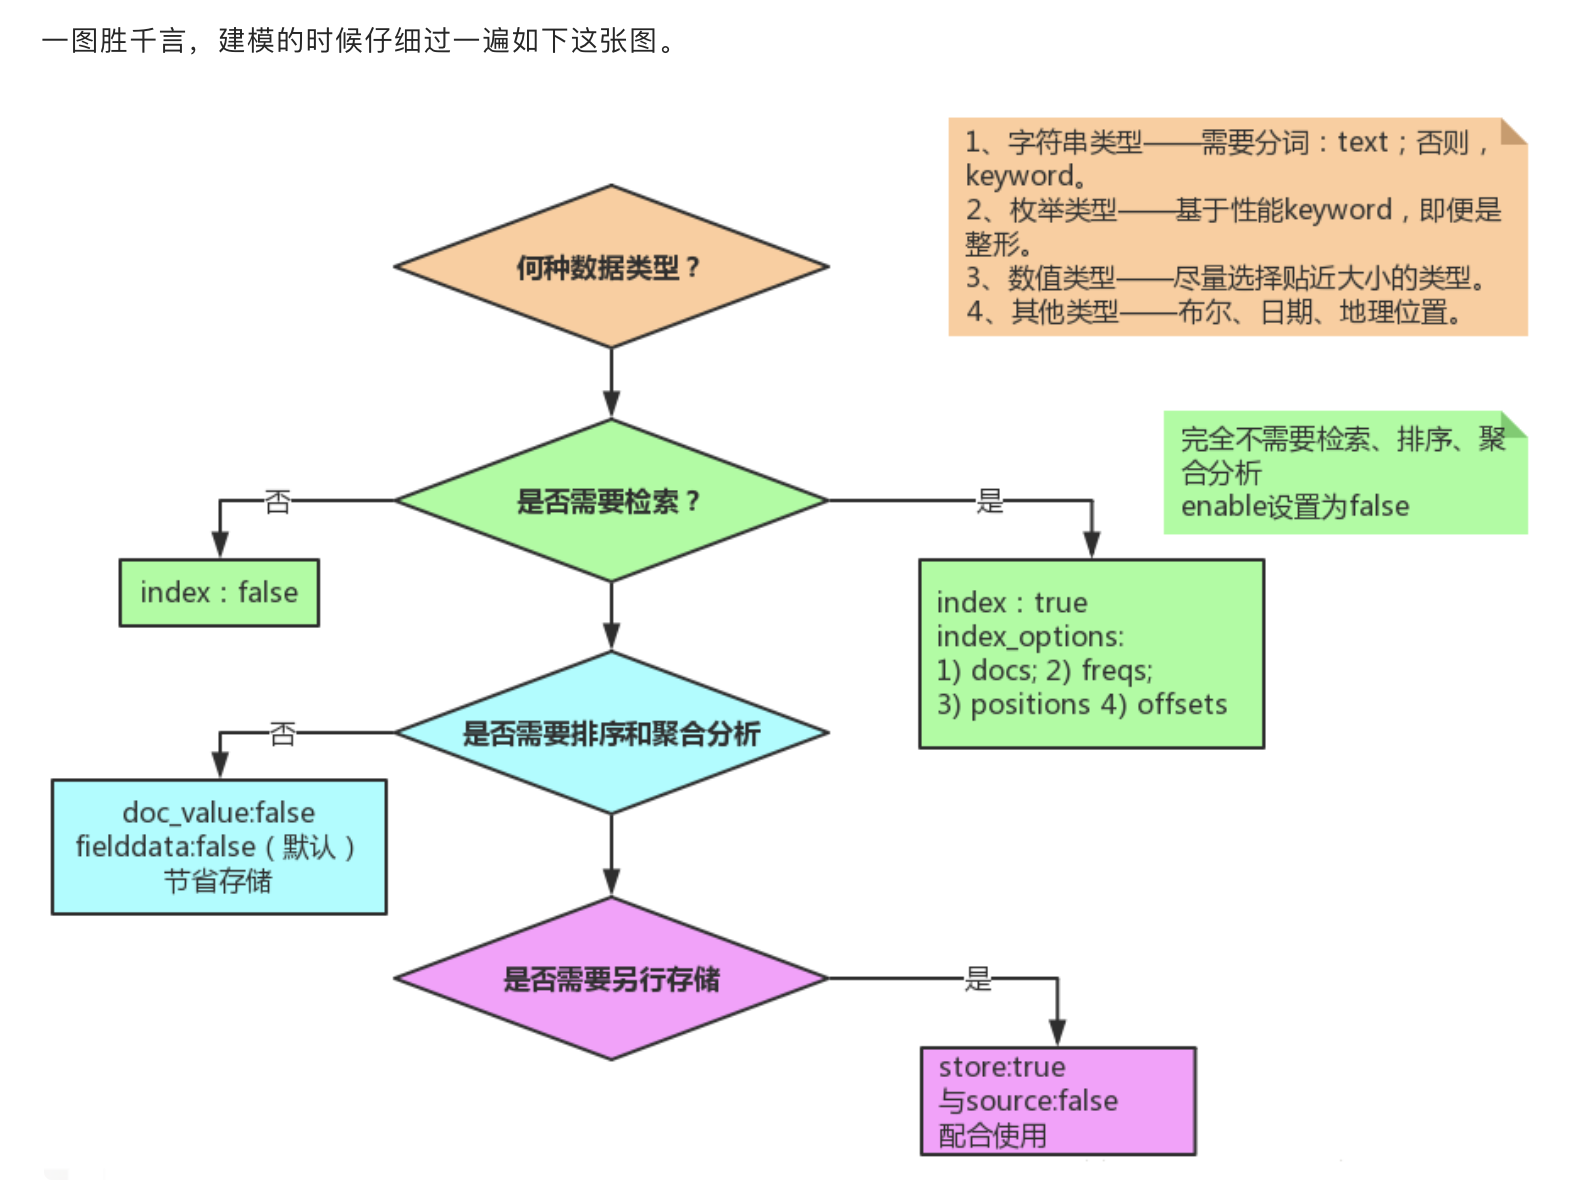
Selection of field type
Enable slow query log
It is recommended that you enable slow query logging in the Elasticsearch cluster to solve performance problems and capture queries that run longer or exceed the set threshold.
For example, if your search SLA is 2 seconds, you can configure search queries as follows, and any queries that exceed this threshold will be recorded.
PUT my_index/_settings
{
    "index.search.slowlog.threshold.query.warn" : "2s"
}
Set user name and password [stand alone version]
- Start stand-alone service using docker
zhangguofu@zhangguofudeMacBook-Pro Downloads $ docker run -d --name es -p 9212:9200 -p 9313:9300 -e "discovery.type=single-node"   elasticsearch:7.2.0
be9b65b0aa5770c5421752e935c54343c17cd9b86edfbe9f09b721a6e2d3bbca
- Enter container configuration file
zhangguofu@zhangguofudeMacBook-Pro Downloads $ docker exec -it be bash
[root@be9b65b0aa57 elasticsearch]# ls
LICENSE.txt  NOTICE.txt  README.textile  bin  config  data  jdk  lib  logs  modules  plugins
- Reference articles Click to view

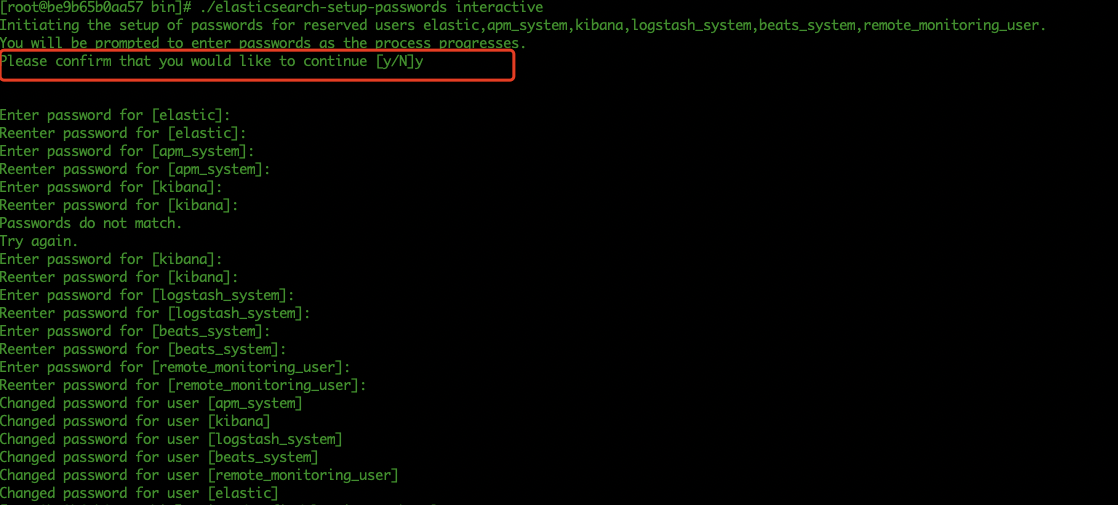
- Restart the container and add the user name and password (if it has not been set before, it needs to be restarted; if the elastic.yml file has not been changed, it does not need to be restarted)
Multi node configuration
-
To configure user names and passwords for multiple elastic nodes, we need to issue certificates Reference articles
-
Download the elastic package, unzip it, and copy it to create an elastic cluster. Let's take a look at the directory
-

-
Let's configure elastic1, that is, elasticsearch.yml of node 1 (in elasticsearch1/config/elasticsearch.yml)
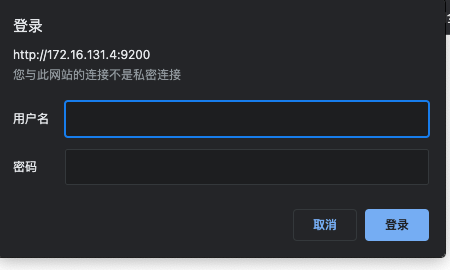
# Cluster name
cluster.name: cluster2
#Node name
node.name: node1
# Can be the master node
node.master: true
#Can be used as a data node
node.data: true
# Remote connections are not supported
cluster.remote.connect: false
# Address of this machine (please fill in the specific IP address if external network access is required, 127.0.0.1 can't be accessed by LAN)
network.host: 172.16.131.4
# External service port
http.port: 9200
# Segment opening for cluster data exchange
transport.port: 9300
# The seed node 9201 9301 is the port number of other nodes
discovery.seed_hosts: ["172.16.131.4:9300","172.16.131.4:9301"]
# Initialized master node (note here that there will be changes later)
cluster.initial_master_nodes: ["172.16.131.4:9300","172.16.131.4:9301"]
- Configure node 2
# Cluster name
cluster.name: cluster2
#Node name
node.name: node2
# Can be the master node
node.master: true
#Can be used as a data node
node.data: true
# Remote connections are not supported
cluster.remote.connect: false
# Address of this machine (please fill in the specific IP address if external network access is required, 127.0.0.1 can't be accessed by LAN)
network.host: 172.16.131.4
# External service port
http.port: 9201
# Segment opening for cluster data exchange
transport.port: 9301
# Seed node
discovery.seed_hosts: ["172.16.131.4:9300","172.16.131.4:9301"]
# Initialized master node (note here that there will be changes later)
cluster.initial_master_nodes: ["172.16.131.4:9300","172.16.131.4:9301"]
After configuration, we start the nodes respectively
- Note that I started directly because I didn't configure a node once before, and then added a new node. Later, the elastic1/data/nodes directory was deleted and the restart took effect. It is estimated that if the first startup is a single machine startup, the new node will not be found later
Generate certificate
- Shut down each service node
- When talking about stand-alone encryption, we also said that the following configuration information needs to be added to elasticsearch.yml
xpack.security.enabled: true
xpack.security.transport.ssl.enabled: true
- In the cluster, we need to add the configuration of xpack.security.enabled: true to illustrate that the cluster uses security encryption.
- Generate certificate
# Generate certificate
bin/elasticsearch-certutil ca
# Generate certificate and private key
bin/elasticsearch-certutil cert --ca elastic-stack-ca.p12
- At this time, the elastic-certificates.p12 file will be generated in the elastic1 directory. We copy this file to the config directory of each node, configure it in each elasticsearch.yml, and then start each node
xpack.security.transport.ssl.enabled: true
xpack.security.transport.ssl.verification_mode: certificate
# This is the certificate we just generated and put it in the config directory. If you want to specify a relative or absolute path, you can (the relative default directory is config)
xpack.security.transport.ssl.keystore.path: elastic-certificates.p12
xpack.security.transport.ssl.truststore.path: elastic-certificates.p12
- When I started, I found an error
{"error":{"root_cause":[{"type":"master_not_discovered_exception","reason":null}],"type":"master_not_discovered_exception","reason":null},"status":503}
- If the primary node is not found, you need to specify the primary node at this time. I use elasticsearch2, that is, node 2 is the primary node to see the configuration of node 2
cluster.name: cluster2
node.name: node2
node.master: true
node.data: true
cluster.remote.connect: false
network.host: 172.16.131.4
http.port: 9201
transport.port: 9301
discovery.seed_hosts: ["172.16.131.4:9300","172.16.131.4:9301"]
#Yes, you can directly specify the master node here
cluster.initial_master_nodes: node2
xpack.security.enabled: true
xpack.security.transport.ssl.enabled: true
xpack.security.transport.ssl.verification_mode: certificate
xpack.security.transport.ssl.keystore.path: elastic-certificates.p12
xpack.security.transport.ssl.truststore.path: elastic-certificates.p12
- After all start-up, I generate a password in the directory of the master node. During my test, if the master node changes, such as node 1, then I need to set the user name and password for node 1
bin/elasticsearch-setup-passwords interactive
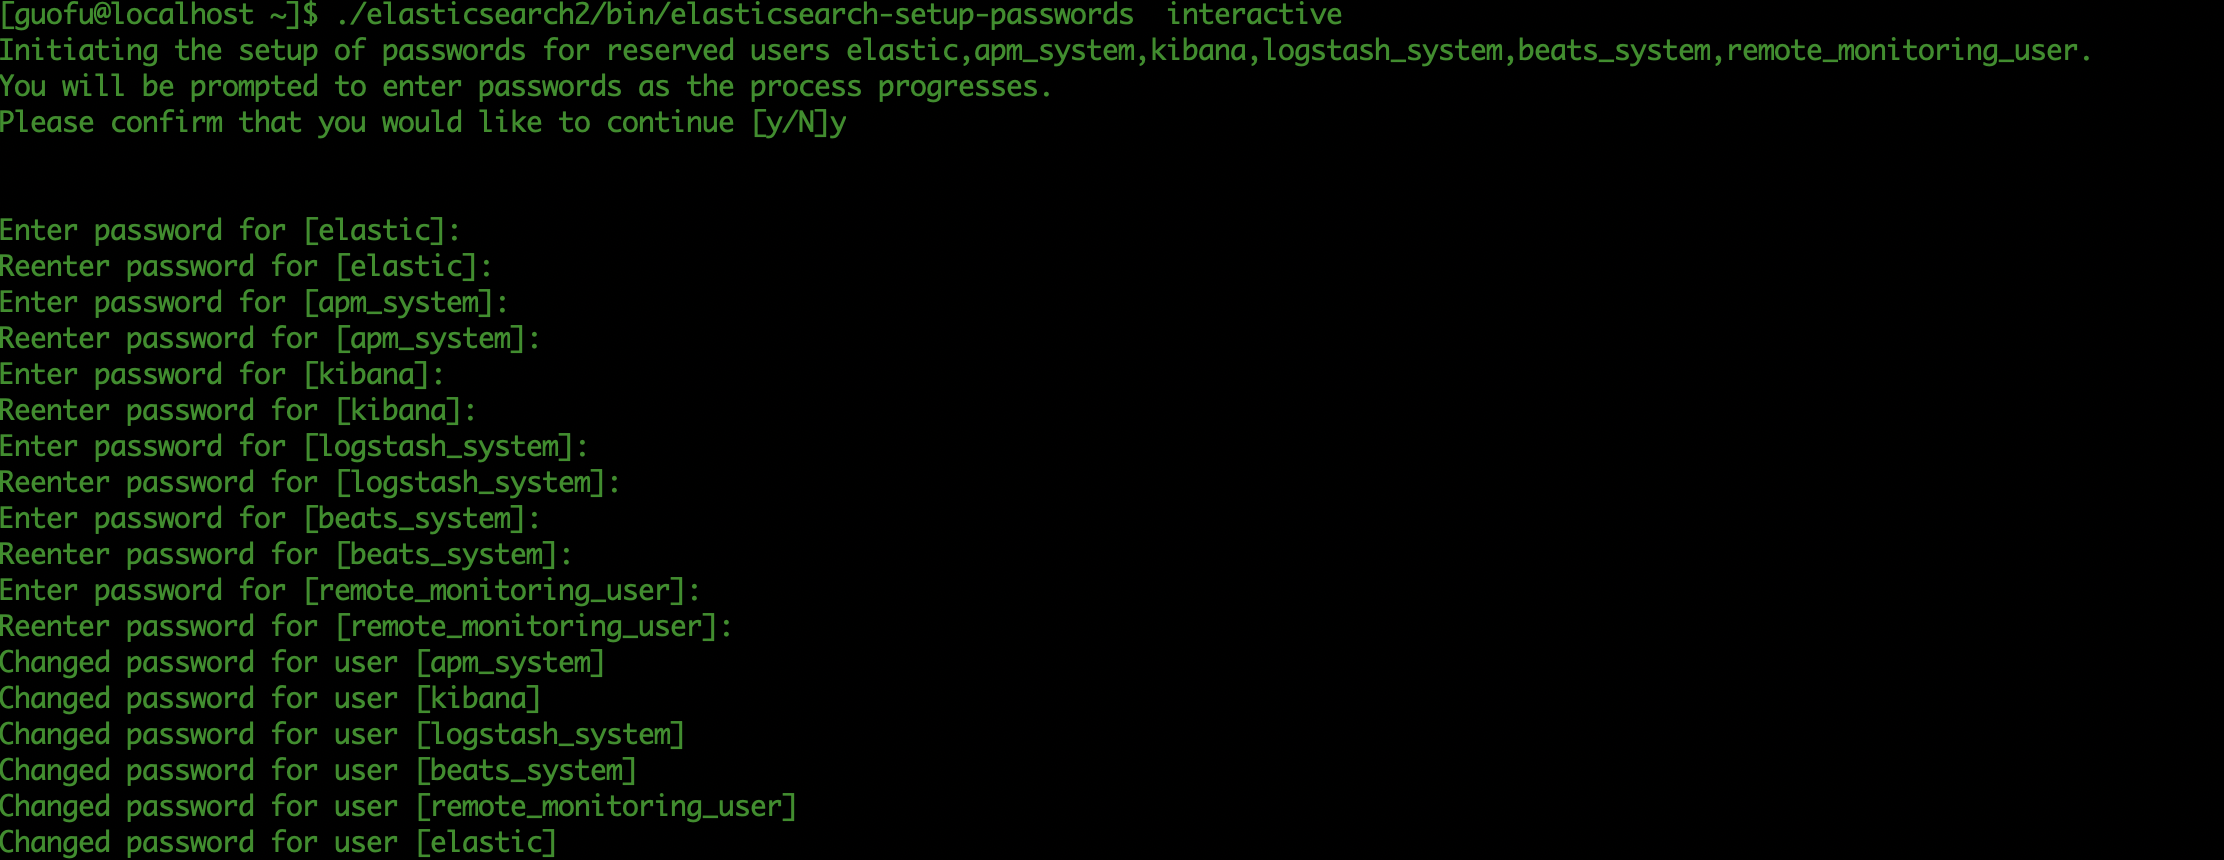
- After setting the password, when you visit 9200 again, you need to enter the user name and password. The user name is elastic and the password is the password you set