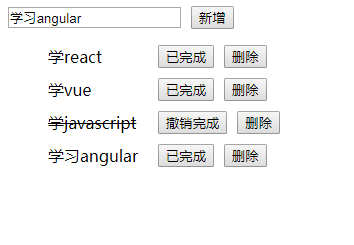
After reading the React document for one day, I have mastered some basic syntax. I can't wait to roll out a Demo. Similar to Notepad, you can add, delete, and mark items. A basic data communication change.
Vue has always been used in the technology stack. When writing Demo, the logic used is also Vue's idea. It is inevitable that many places have made detours, and can only be said to implement the function in a rough way. Otherwise, how can React be so complex?
Import files
<script crossorigin src="https://unpkg.com/react@16/umd/react.production.min.js"></script>
<script crossorigin src="https://unpkg.com/react-dom@16/umd/react-dom.production.min.js"></script>
<script src="https://cdnjs.cloudflare.com/ajax/libs/babel-core/5.8.23/browser.min.js"></script>
Import the React file respectively. Because React can't be recognized by browser directly, it needs to introduce Babel file for compilation.
Introducing code core js
<script type="text/babel" src="./reactList.js"></script>
Note that for files that need to be compiled with Babel, type="text/babel" needs to be added.
css style and root container
The comment part is the HTML structure to be displayed after the final compilation.
<body>
    <div id="root">
        <!-- <div class="input-wrap">
            <input type="text">
            <button>Newly added</button>
        </div>
        <ul class="list-wrap">
            <li>
                <div>xxxx</div>
                <button>Completed</button>
                <button>delete</button>
            </li>
        </ul> -->
    </div>
</body>
Start writing react list.js
Interface layout

Just as Vue needs to pass in an el or mount container, React provides a ReactDOM object on which all top-level API s can call
React dom. Range: renders a react element in the provided container and returns a reference to the component
There are two parameters in the render, one is the content to be rendered, and the other is the container to be stored after content rendering.
It is worth noting that the first parameter, just like the < template > of a component in Vue, can only have one root element. After that, all render content is the same.
ReactDOM.render(
    <div>
    <div class="input-wrap">
            <input type="text">
            <button>Newly added</button>
        </div>
        <ul class="list-wrap">
            <li>
                <div>xxxx</div>
                <button>Completed</button>
                <button>delete</button>
            </li>
        </ul>
  </div>,
    document.getElementById('root')
)
In React, JSX is used to render elements - a JavaScript syntax extension that looks like XML.
In Vue, we use {}} to bind data in template. If the event to be bound is @ xxx, the bound variable is: xxx.
In JSX, expressions are filled in braces {}.
React.Component supports defining components with Class in ES6.
We can define a component called Layout instead of HTML in the range.
class Layout extends React.Component {
    render() {
        return (
            <div>
                <InputBox />
              <List />
            </div>
        )
    }
}
class InputBox extends React.Component {
    render() {
        return (
            <div class="input-wrap">
                <input type="text" />
                <button>Newly added</button>
            </div>
        )
    }
}

class List extends React.Component {
    render() {
        return (
            <ul>
                <li>
                    <div>xxxx</div>
                    <button>Completed</button>
                    <button>delete</button>
                </li>
            </ul>
        )
    }
}

ReactDOM.render(
    <Layout/>,
    document.getElementById('root')
)
Be careful:
1. The case of the user-defined component name and class name should be the same, and the initial should be uppercase.
2. One render in each Class returns the JSX after processing.
3. If return is multiline code, you need to use ().
Initialization data
1. Each Class has a constructor constructor, which can not be written out explicitly. By default, the constructor initializes the data when the instance is created and only executes once.
2. The data in React is maintained in state, just like the data() {} in Vue.
3. The difference is that the data in state cannot be changed directly, and the stateSet method is needed.
4. The data in stateSet is directly overwritten, not updated. For complex data structures, you need to process them externally before passing them into stateSet.
5. The direction of this in Class is complex, please refer to the article in the knowledge base. The direction of this in class
Data and event binding
Unlike Vue's two-way data binding, React's idea is one-way data flow.
The parent component passes data to the child component through props.
The child component notifies the parent component through a callback function bound to the child component. Similar to Vue's this.$emit, React directly calls the callback function passed in by the parent component through props.
class Layout extends React.Component {
    // To be intuitive, annotate the extra code
    ...
    render() {
        return (
            <div>
                <InputBox
                  newEvent={this.state.newEvent}
                  addItem={this.addItem}
                />
                <List list={this.state.data}
                  deleteItem={this.deleteItem}
                  finishItem={this.finishItem}
                />
            </div>
        )
    }
}
In the Layout component, there are two sub components < InputBox > and < list > respectively. We uniformly maintain the data in the < Layout > component. When the data in the parent component < Layout > changes, the data in the child component will send changes accordingly. After the child component operates, it informs the parent component to process the data through the bound callback functions (such as finishItem, deleteItem, addItem). In order to achieve the interaction between brother components.
class Layout extends React.Component {

    constructor(props) {
        super(props)
        this.state = {
            data: [
                {
                    name: 'learn react',
                    finish: false
                },
                {
                    name: 'learn vue',
                    finish: false
                },
                {
                    name: 'learn javascript',
                    finish: true
                }
            ],
            newEvent: ''
        };

        this.addItem = this.addItem.bind(this)
        this.deleteItem = this.deleteItem.bind(this)
        this.finishItem = this.finishItem.bind(this)
    }
    // To be intuitive, annotate the extra code
    ...
    render() {
        return (
            <div>
                <InputBox
                  newEvent={this.state.newEvent}
                  addItem={this.addItem}
                />
                <List list={this.state.data}
                  deleteItem={this.deleteItem}
                  finishItem={this.finishItem}
                />
            </div>
        )
    }
}
When binding an event on a Dom element, you need to bind the execution context of the event, or use the arrow function. The purpose is to prevent the implicit loss of this.
Take < layout > as an example. For the events bound on the subcomponents, we explicitly bind the point of this in the constructor.
Because the direction of this in the function does not depend on the scope, but on the direction of this in the execution context. Because the click event is called in Dom, the function is implicitly bound to window when clicking, but the strict mode is used in the React class, so this points to undefined.
Solve this problem
To solve the problem of this orientation, I know four forms at present.
1. Explicitly bind this in the constructor
class Layout extends React.Component {
    constructor(props) {
        this.finishItem = this.finishItem.bind(this)
    }
    finishItem() {
      console.log(this)
    }
}
2. Bind this to the click event of Dom
    render() {
        return (
            <div>
                <InputBox addItem={this.addItem.bind(this)}/>
            </div>
        )
    }
3. Use arrow function
Because this of arrow function is bound when defining function, not when executing.
    render() {
        return (
            <div>
                <InputBox addItem={() => this.addItem}/>
            </div>
        )
    }
4. Use React.createClass to define the class
There is a big difference between React.createClass and React.Component in creating classes. It can be said that React.createClass is more convenient, and React itself has been implemented, including this binding.
const Layout = React.createClass({
  render() {
    return (
      <div>
          <InputBox addItem={() => this.addItem}/>
      </div>
    );
  }
});
Code overview
<!DOCTYPE html>
<html lang="en">
<head>
    <meta charset="UTF-8">
    <meta name="viewport" content="width=device-width, initial-scale=1.0">
    <meta http-equiv="X-UA-Compatible" content="ie=edge">
    <script crossorigin src="https://unpkg.com/react@16/umd/react.production.min.js"></script>
    <script crossorigin src="https://unpkg.com/react-dom@16/umd/react-dom.production.min.js"></script>
    <script src="https://cdnjs.cloudflare.com/ajax/libs/babel-core/5.8.23/browser.min.js"></script>
    <!-- Operation list core logic -->
    <script type="text/babel" src="./reactList.js"></script>
    <title>Document</title>
</head>
<style>
.input-wrap {
    display: flex;
    align-items: center;

}
.input-wrap button {
    margin-left:10px;
}
li {
    display: flex;
    align-items: center;
    margin-bottom: 10px;
}
li button {
    margin-left: 10px;
}
li div {
    width: 100px;
}
.finishItem {
    text-decoration: line-through;
}

</style>
<body>
    <div id="root">
        <!-- <div class="input-wrap">
            <input type="text">
            <button>Newly added</button>
        </div>
        <ul class="list-wrap">
            <li>
                <div>xxxx</div>
                <button>Completed</button>
                <button>delete</button>
            </li>
        </ul> -->
    </div>
</body>
</html>
class Layout extends React.Component {
    constructor(props) {
        super(props)
        this.state = {
            data: [
                {
                    name: 'learn react',
                    finish: false
                },
                {
                    name: 'learn vue',
                    finish: false
                },
                {
                    name: 'learn javascript',
                    finish: true
                }
            ],
            newEvent: ''
        };

        this.addItem = this.addItem.bind(this)
        this.deleteItem = this.deleteItem.bind(this)
        this.finishItem = this.finishItem.bind(this)
    }
    addItem(val) {
        if (!val) {
            alert('Please fill in the project name!')
            return
        }
        console.log(this.state.data)
        // Overwrite directly instead of updating
        const newData = this.state.data.concat({ name: val, finish: false })
        this.setState({
            data: newData
        })
    }
    finishItem(index) {
        console.log(index)
        const list = this.state.data
        list[index].finish = !list[index].finish
        this.setState({
            data: list
        })
    }
    deleteItem(index) {
        console.log(index)
        const list = this.state.data
        list.splice(index, 1)
        this.setState({
            data: list
        })
    }
    render() {
        return (
            <div>
                <InputBox newEvent={this.state.newEvent} addItem={this.addItem}/>
                <List list={this.state.data} deleteItem={this.deleteItem} finishItem={this.finishItem}/>
            </div>
        )
    }
}

class InputBox extends React.Component {
    constructor(props) {
        super(props)
        this.state = {
            newEvent: props.newEvent
        }
        this.handleChange = this.handleChange.bind(this)
    }
    handleChange(e) {
        this.setState({
            newEvent: e.target.value
        })
    }
    render() {
        return (
            <div class="input-wrap">
                <input type="text" value={this.state.newEvent} onChange={this.handleChange} />
                <button onClick={() => this.props.addItem(this.state.newEvent)}>Newly added</button>
            </div>
        )
    }
}

class List extends React.Component {
    render() {
        return (
            <ul>
                {this.props.list.map((i, index) => {
                    return (
                        <li>
                            <div class={i.finish ? 'finishItem' : ''}>{i.name}</div>
                            <button onClick={() => this.props.finishItem(index)}>{i.finish ? 'Revocation completed' : 'Completed' }</button>
                            <button onClick={() => this.props.deleteItem(index)}>delete</button>
                        </li>
                    )
                })}
            </ul>
        )
    }
}


ReactDOM.render(
    <Layout/>,
    document.getElementById('root')
)