Made by two couples
1. Basic environment preparation
Step 1: download the installation package
# wget  -P  /app/tools/   https://mirrors.tuna.tsinghua.edu.cn/apache/tomcat/tomcat-8/v8.5.50/bin/apache-tomcat-8.5.50.tar.gz
# wget   -P  /app/tools/   http://47.111.238.157/jdk-8u241-linux-x64.tar.gz
**Step 2: extract to the specified directory**
# tar -xf /app/tools/jdk-8u241-linux-x64.tar.gz -C /app/jdk
# tar -xf /app/tools/apache-tomcat-8.5.50.tar.gz -C /app/tomcat_8080
Step 3: add environment variables and load
# cat  >>/etc/profile<<EOF
export JAVA_HOME=/app/jdk
export PATH=$JAVA_HOME/bin:$JAVA_HOME/jre/bin:$PATH
export CLASSPATH=.$CLASSPATH:$JAVA_HOME/lib:$JAVA_HOME/jre/lib:$JAVA_HOME/lib/tools.jar
export TOMCAT_HOME=/app/tomcat
EOF
#. /etc/profile
Step 4: add multiple instances
# cp -r /app/tomcat_8080 /app/tomcat_8081
# cp -r /app/tomcat_8080 /app/tomcat_8082
Step 5: change the multi instance configuration file
# sed  -i.bak  's#8080#8081#g'  tomcat_8081/conf/server.xml
# sed  -i.bak  's#8005#8006#g'  tomcat_8081/conf/server.xml
# sed  -i.bak  's#8009#8010#g'  tomcat_8081/conf/server.xml
# sed  -i.bak  's#8080#8082#g'  tomcat_8082/conf/server.xml
# sed  -i.bak  's#8005#8007#g'  tomcat_8082/conf/server.xml
# sed  -i.bak  's#8009#8011#g'  tomcat_8082/conf/server.xml
Step 6: start the service (check the port process)
# /app/tomcat_8080/bin/startup.sh
# /app/tomcat_8081/bin/startup.sh
# /app/tomcat_8082/bin/startup.sh
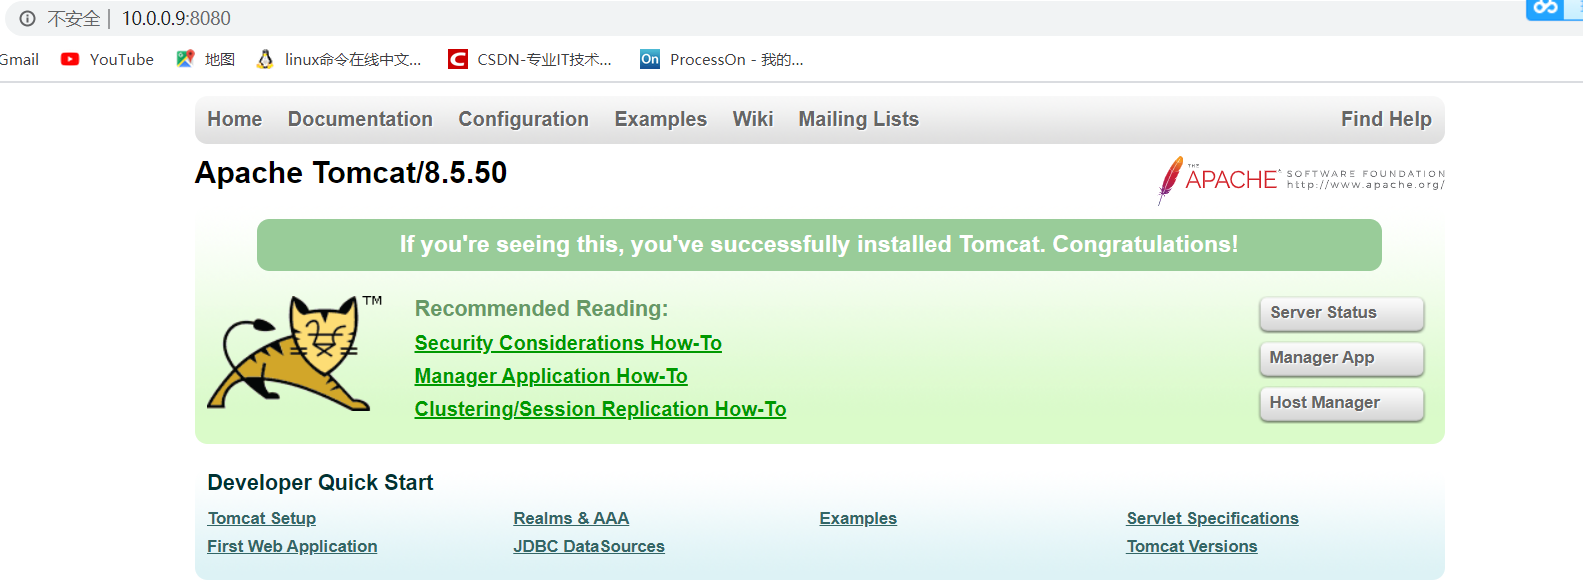
Step 7: access test
10.0.0.9:8080
10.0.0.9:8081
10.0.0.9:8082
2. Build jpress website
Step 1: download the site directory war package (automatic decompression)
# wget  -P  /app/tools/    http://47.111.238.157/jpress.war
# cp /app/tools/jpress.war  /app/tomcat_8080/webapps/
# cp /app/tools/jpress.war  /app/tomcat_8081/webapps/
# cp /app/tools/jpress.war  /app/tomcat_8082/webapps/
# mv /app/tomcat_8080/webapps/jpress-v3.0.6 /app/tomcat_8080/webapps/jpress
# mv /app/tomcat_8081/webapps/jpress-v3.0.6 /app/tomcat_8081/webapps/jpress
# mv /app/tomcat_8082/webapps/jpress-v3.0.6 /app/tomcat_8082/webapps/jpress
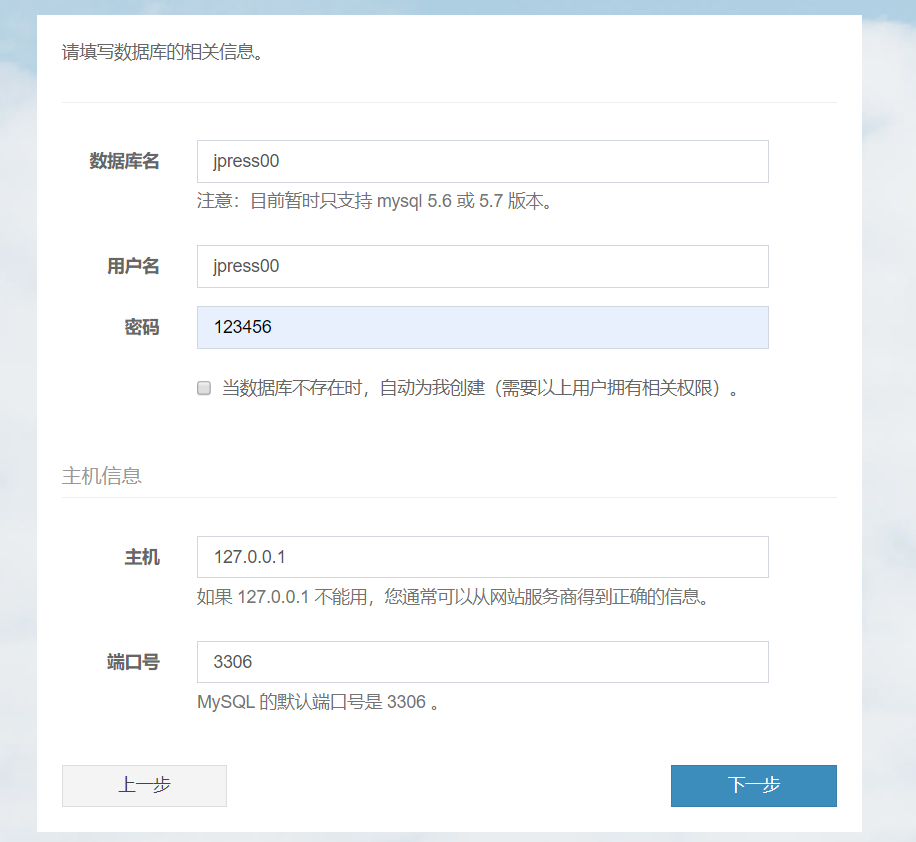
Step 2: create the database and authorize it (here is the local database)
MariaDB [(none)]> create database jpress00  charset utf8;
MariaDB [(none)]> grant all on  jpress00.*  to  jpress00@'localhost'  identified by '123456';
MariaDB [(none)]> create database jpress01  charset utf8;
MariaDB [(none)]> grant all on  jpress01.*  to  jpress01@'localhost'  identified by '123456';
MariaDB [(none)]> create database jpress02  charset utf8;
MariaDB [(none)]> grant all on  jpress02.*  to  jpress02@'localhost'  identified by '123456';
Step 3: restart the database (check the power on and self start)
# systemctl restart mariadb.service
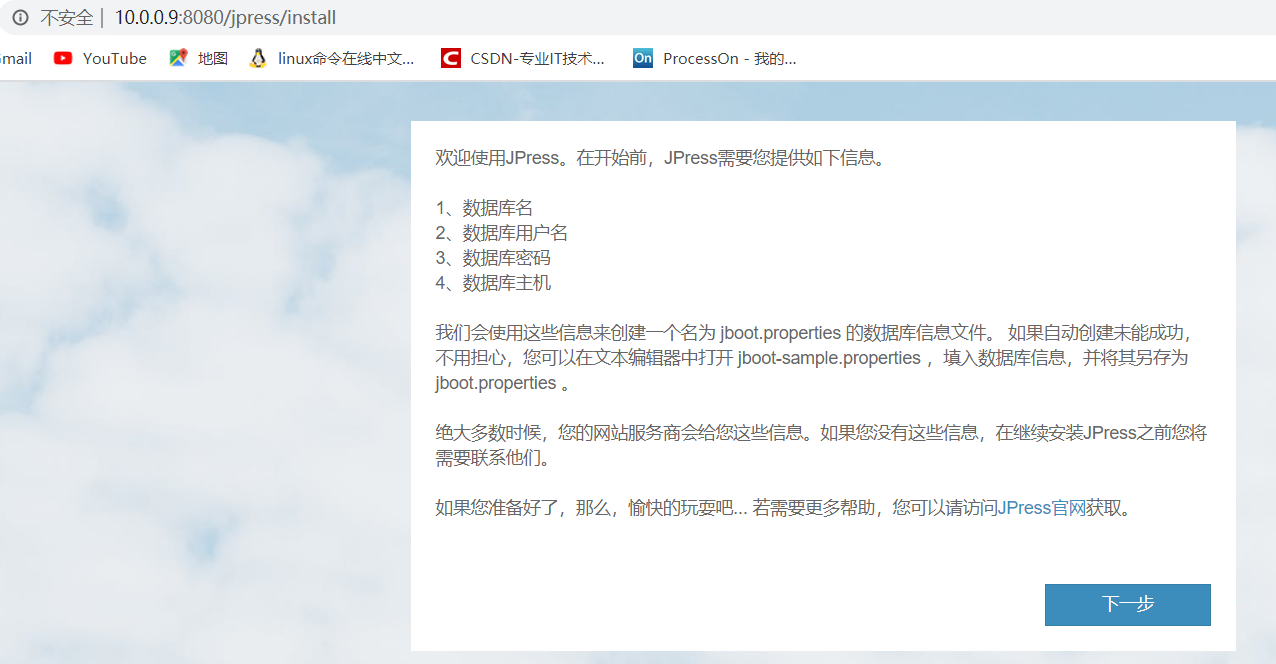
Step 5: visit the website to configure the website database information
10.0.0.9:8080/jpress
10.0.0.9:8081/jpress
10.0.0.9:8082/jpress
Simple and honest Mei 21:00:07
1. Basic environment preparation
Step 1: download the installation package
# wget  -P  /app/tools/   https://mirrors.tuna.tsinghua.edu.cn/apache/tomcat/tomcat-8/v8.5.50/bin/apache-tomcat-8.5.50.tar.gz
# wget   -P  /app/tools/   http://47.111.238.157/jdk-8u241-linux-x64.tar.gz
**Step 2: extract to the specified directory**
# tar -xf /app/tools/jdk-8u241-linux-x64.tar.gz -C /app/jdk
# tar -xf /app/tools/apache-tomcat-8.5.50.tar.gz -C /app/tomcat_8080
Step 3: add environment variables and load
# cat  >>/etc/profile<<EOF
export JAVA_HOME=/app/jdk
export PATH=$JAVA_HOME/bin:$JAVA_HOME/jre/bin:$PATH
export CLASSPATH=.$CLASSPATH:$JAVA_HOME/lib:$JAVA_HOME/jre/lib:$JAVA_HOME/lib/tools.jar
export TOMCAT_HOME=/app/tomcat
EOF
#. /etc/profile
Step 4: add multiple instances
# cp -r /app/tomcat_8080 /app/tomcat_8081
# cp -r /app/tomcat_8080 /app/tomcat_8082
Step 5: change the multi instance configuration file
# sed  -i.bak  's#8080#8081#g'  tomcat_8081/conf/server.xml
# sed  -i.bak  's#8005#8006#g'  tomcat_8081/conf/server.xml
# sed  -i.bak  's#8009#8010#g'  tomcat_8081/conf/server.xml
# sed  -i.bak  's#8080#8082#g'  tomcat_8082/conf/server.xml
# sed  -i.bak  's#8005#8007#g'  tomcat_8082/conf/server.xml
# sed  -i.bak  's#8009#8011#g'  tomcat_8082/conf/server.xml
Step 6: start the service (check the port process)
# /app/tomcat_8080/bin/startup.sh
# /app/tomcat_8081/bin/startup.sh
# /app/tomcat_8082/bin/startup.sh
Step 7: access test
10.0.0.9:8080
10.0.0.9:8081
10.0.0.9:8082
2. Build jpress website
Step 1: download the site directory war package (automatic decompression)
# wget  -P  /app/tools/    http://47.111.238.157/jpress.war
# cp /app/tools/jpress.war  /app/tomcat_8080/webapps/
# cp /app/tools/jpress.war  /app/tomcat_8081/webapps/
# cp /app/tools/jpress.war  /app/tomcat_8082/webapps/
# mv /app/tomcat_8080/webapps/jpress-v3.0.6 /app/tomcat_8080/webapps/jpress
# mv /app/tomcat_8081/webapps/jpress-v3.0.6 /app/tomcat_8081/webapps/jpress
# mv /app/tomcat_8082/webapps/jpress-v3.0.6 /app/tomcat_8082/webapps/jpress
Step 2: create the database and authorize it (here is the local database)
MariaDB [(none)]> create database jpress00  charset utf8;
MariaDB [(none)]> grant all on  jpress00.*  to  jpress00@'localhost'  identified by '123456';
MariaDB [(none)]> create database jpress01  charset utf8;
MariaDB [(none)]> grant all on  jpress01.*  to  jpress01@'localhost'  identified by '123456';
MariaDB [(none)]> create database jpress02  charset utf8;
MariaDB [(none)]> grant all on  jpress02.*  to  jpress02@'localhost'  identified by '123456';
Step 3: restart the database (check the power on and self start)
# systemctl restart mariadb.service
Step 5: visit the website to configure the website database information
10.0.0.9:8080/jpress
10.0.0.9:8081/jpress
10.0.0.9:8082/jpress

