Tomcat server is a free open-source Web application server, which belongs to lightweight application server. It is widely used in small and medium-sized systems and concurrent users in many occasions, and is the first choice for developing and testing JSP programs. Generally speaking, Tomcat, like apache or Nginx web servers, has the ability to process HTML pages, but its ability to process static pages is far less than that of apache or Nginx, so Tomcat is generally used as a servlet and JSP container, running on the back-end alone.
Please refer to the official website for Tomcat directory and configuration file details: https://tomcat.apache.org/
1, Deploy Tomcat
preparation:
One CentOS 7.3 server
• download the required packages: https://pan.baidu.com/s/1Meys8bsvBsdwVUYak9srKQ
• extraction code: 5bic
1. Start deployment:
[root@tomcat /]# rpm -qa | grep jdk           # Testing the jdk environment of rpm installation
copy-jdk-configs-1.2-1.el7.noarch
java-1.8.0-openjdk-headless-1.8.0.102-4.b14.el7.x86_64
java-1.8.0-openjdk-1.8.0.102-4.b14.el7.x86_64
java-1.7.0-openjdk-1.7.0.111-2.6.7.8.el7.x86_64
java-1.7.0-openjdk-headless-1.7.0.111-2.6.7.8.el7.x86_64
# Uninstall the package with headless
[root@tomcat /]# rpm -e --nodeps java-1.8.0-openjdk-headless-1.8.0.102-4.b14.el7.x86_64      # Uninstall both versions
[root@tomcat /]# rpm -e --nodeps java-1.7.0-openjdk-headless-1.7.0.111-2.6.7.8.el7.x86_64
[root@tomcat /]# mkdir tomcat
[root@tomcat /]# cd tomcat/
[root@tomcat tomcat]# rz          # xshell environment uploads required packages directly
[root@tomcat tomcat]# ls
apache-tomcat-8.5.35.tar.gz  jdk-8u211-linux-x64.tar.gz  tomcat  Monitoring page.txt
[root@tomcat tomcat]# tar zxf jdk-8u211-linux-x64.tar.gz -C /usr/local/        # Extract the jdk package to the specified directory
[root@tomcat tomcat]# tar zxf apache-tomcat-8.5.35.tar.gz         # Unzip Tomcat source package
[root@tomcat tomcat]# mv apache-tomcat-8.5.35 /usr/local/tomcat        # Move Tomcat to the specified path and change the directory name to Tomcat
[root@tomcat tomcat]# vim /etc/profile           # Edit the environment variable and add the following lines at the end of the file
.............           // Omit part of the content
export JAVA_HOME=/usr/local/jdk1.8.0_211
export JRE_HOME=/usr/local/jdk1.8.0_211/jre
export CLASSPATH=$JAVA_HOME/lib/tools.jar:$JAVA_HOME/lib/dt.jar
export PATH=$JAVA_HOME/bin:$JRE_HOME/bin:$PATH
[root@tomcat tomcat]# . /etc/profile           # Execution makes it effective
[root@tomcat /]# java -version            # Check the Java version to make sure it is installed successfully
java version "1.8.0_211"
Java(TM) SE Runtime Environment (build 1.8.0_211-b12)
Java HotSpot(TM) 64-Bit Server VM (build 25.211-b12, mixed mode)
[root@tomcat /]# /usr/local/tomcat/bin/startup.sh          # Start Tomcat service
Using CATALINA_BASE:   /usr/local/tomcat
Using CATALINA_HOME:   /usr/local/tomcat
Using CATALINA_TMPDIR: /usr/local/tomcat/temp
Using JRE_HOME:        /usr/local/jdk1.8.0_211/jre
Using CLASSPATH:       /usr/local/tomcat/bin/bootstrap.jar:/usr/local/tomcat/bin/tomcat-juli.jar
Tomcat started.
[root@tomcat /]# netstat -anput | grep 8080           # Check whether the port is listening normally
tcp6       0      0 :::8080                 :::*                    LISTEN      3712/java
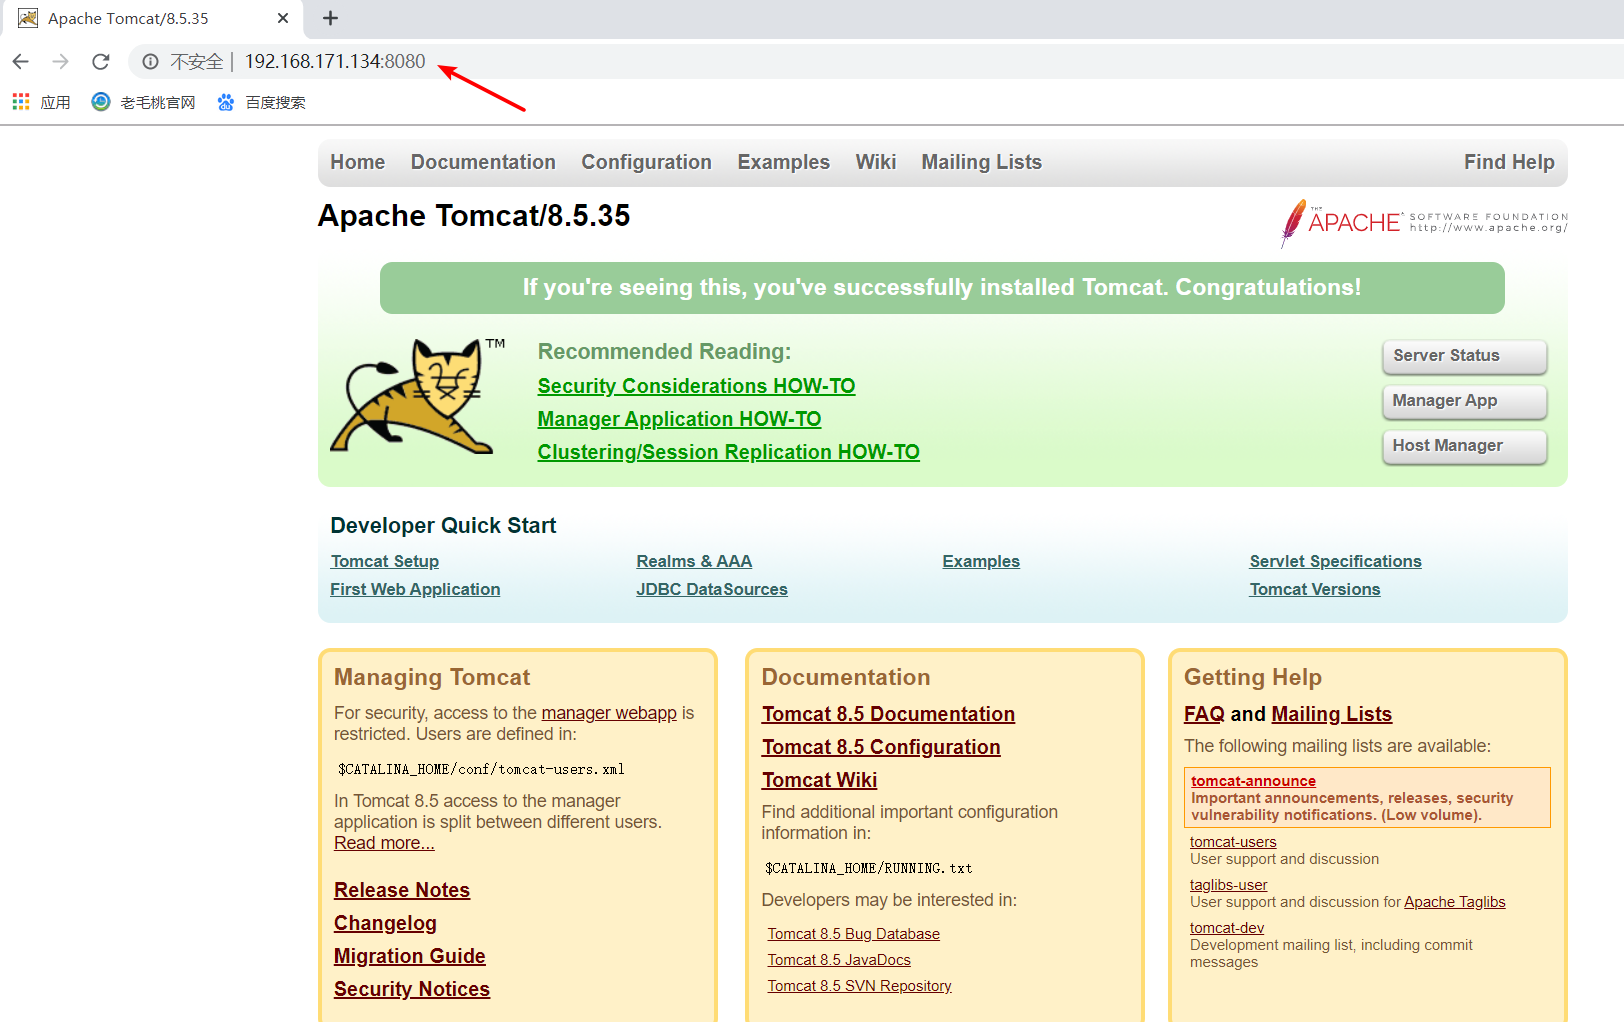
You can use the client to access the Tomcat server IP+8080 port, and you can see the following page:
2, Define Tomcat multiple instances
The so-called multi instance is to run multiple Tomcat services on a server. Therefore, it should be noted that when defining multiple instances of tomcat, there should be no port conflict
[root@tomcat local]# cp -r tomcat tomcat2             # Make a copy of Tomcat
[root@tomcat local]# vim tomcat2/conf/server.xml         # Edit the copied Tomcat master profile
#All port numbers of the configuration file need to be modified except those with notes,
#As long as the configuration item has "port" and is followed by a number, it is the port number
#It can be changed according to the situation
[root@tomcat local]# /usr/local/tomcat2/bin/startup.sh             # Start Tomcat for replication
Using CATALINA_BASE:   /usr/local/tomcat2
Using CATALINA_HOME:   /usr/local/tomcat2
Using CATALINA_TMPDIR: /usr/local/tomcat2/temp
Using JRE_HOME:        /usr/local/jdk1.8.0_211/jre
Using CLASSPATH:       /usr/local/tomcat2/bin/bootstrap.jar:/usr/local/tomcat2/bin/tomcat-juli.jar
Tomcat started.
[root@tomcat local]# netstat -anput | grep 8081      # See that the monitoring has started
tcp6       0      0 :::8081                 :::*                    LISTEN      3936/java
You can use the client to access the Tomcat server IP+8081 port, and you can see the following pages (because the Tomcat directory before is completely copied, the same page is seen):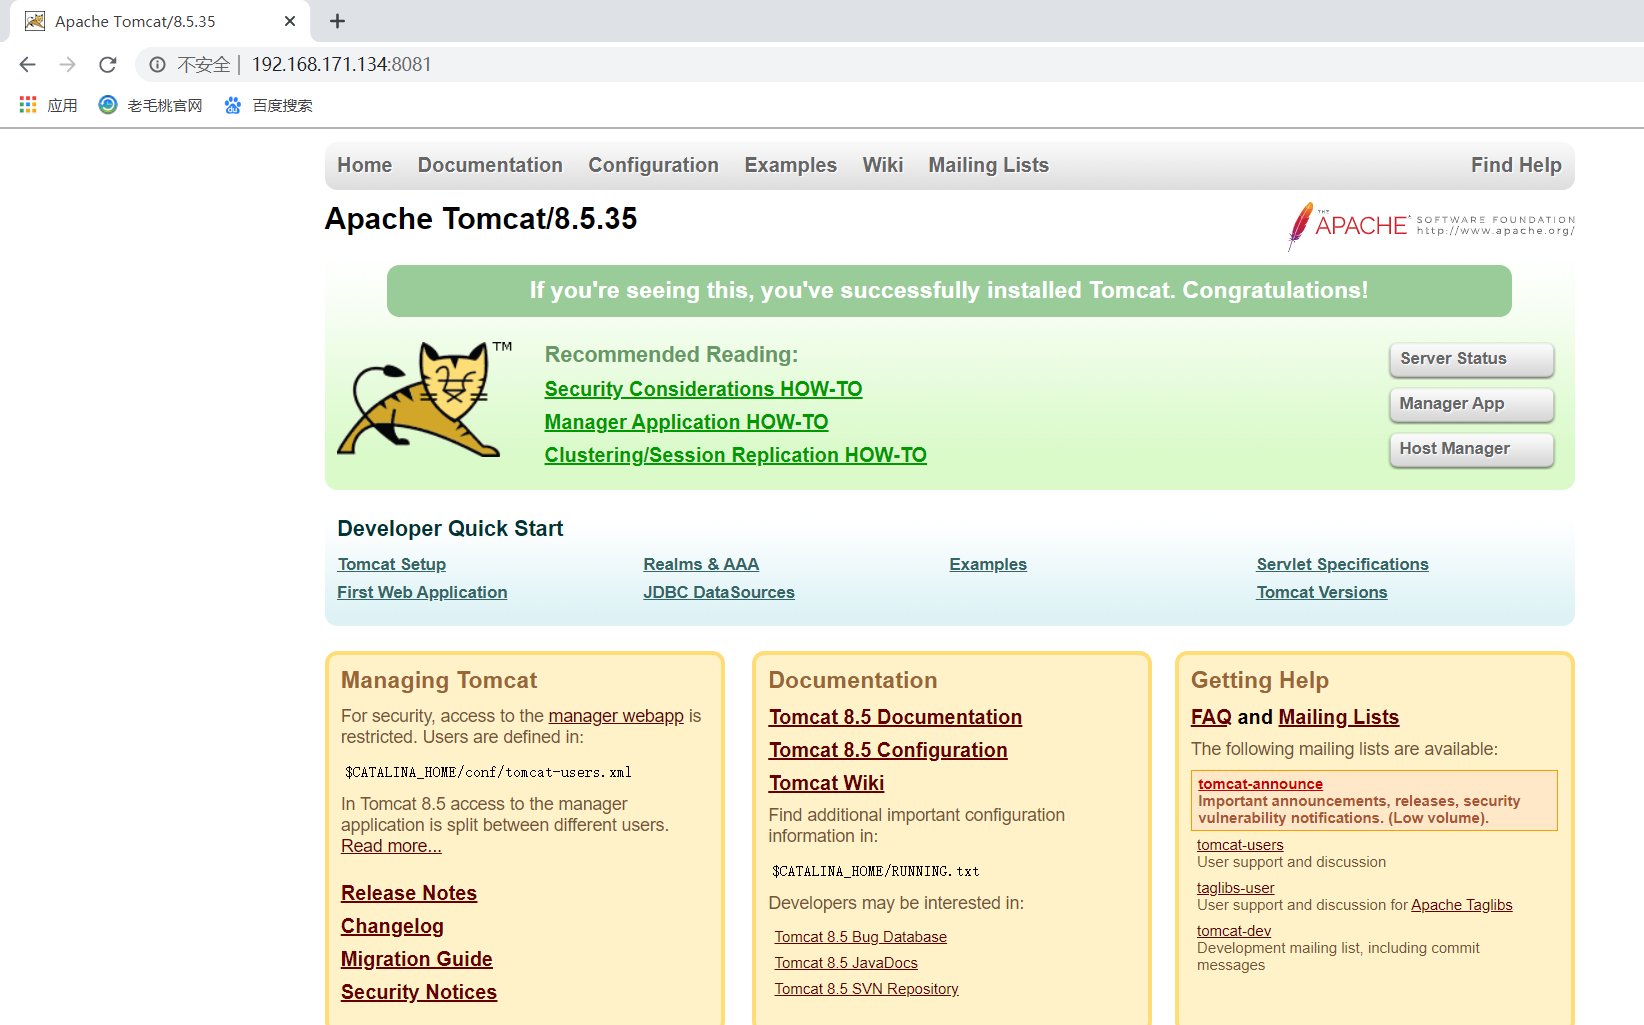
3, Configure Tomcat custom directory
[root@tomcat /]# mkdir -p /data/project # Create custom site root
[root@tomcat /]# echo aaa > /data/project/index1.jsp # Edit two test pages
[root@tomcat /]# echo bbb > /data/project/index2.jsp
[root@tomcat /]# vim /usr/local/tomcat/conf/server.xml # Edit Master profile
......................... // Omit part of the content
<Host name="localhost" appBase="webapps" unpackWARs="true" autoDeploy="true">
.................. # Locate the Host element and add the following
<Context path = "/shop" docBase="/data/project" debug="0" reloadable="false" crossContext="true">
</Context>
</Host>
#Another way to write the above < context.... > label is < context.... / >
#The configuration added above is explained as follows:
#Path: indicates the path of client access;
#docBase: Specifies the storage path of the web page;
#Debug: Specifies that the level of debug is 0, the output information is the least, and 9 provides the most information;
#reloadable: if it is true, it means that the web.xml file will be loaded automatically when there is any change, and the service does not need to be restarted;
#CorssContext: when true, it means that different contexts share a session (session pool);
[root@tomcat /]# /usr/local/tomcat/bin/shutdown.sh # Execute these two commands to restart the service for the configuration to take effect
[root@tomcat /]# /usr/local/tomcat/bin/startup.sh
Visit https://192.168.171.134:8080/shop/index1.jsp validation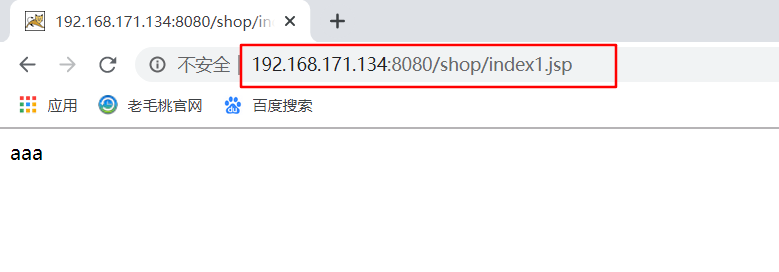
Visit https://192.168.171.134:8080/shop/index2.jsp validation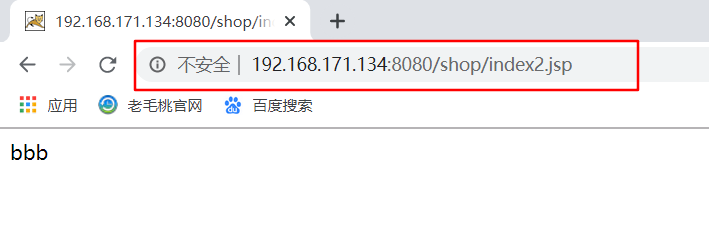
4, Enable Tomcat directory traversal
In apache or Nginx, their directory traversal is on by default, while in Tomcat service, its directory traversal is off by default. In some cases, we need to turn on its directory traversal function
If you directly visit 192.168.171.134:8080/shop/ for testing, an Error 404 will be reported: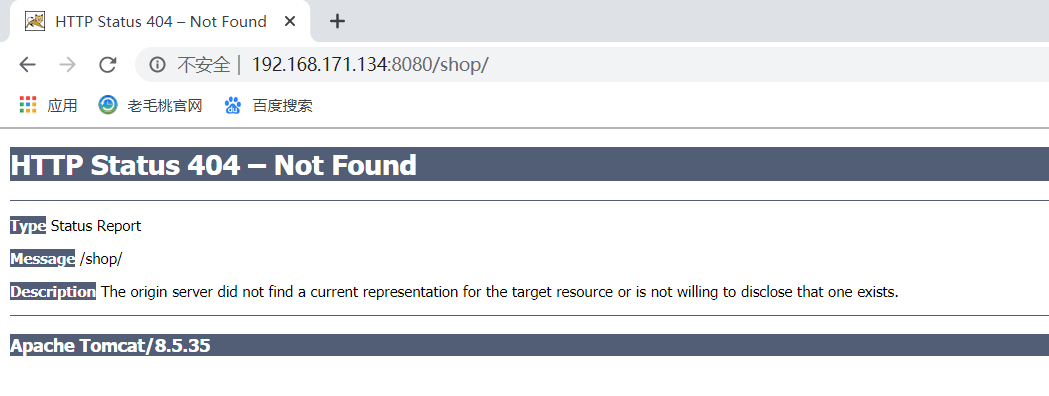
Enable the traversal function of tomcat:
[root@tomcat /]# vim /usr/local/tomcat/conf/web.xml
...................                //Omit part of the content
 <init-param>
            <param-name>listings</param-name>
            <param-value>true</param-value>            # Search for false and find this line. Change false to true
        </init-param>
[root@tomcat /]# /usr/local/tomcat/bin/shutdown.sh          # Restart tomcat for configuration to take effect
[root@tomcat /]# /usr/local/tomcat/bin/startup.sh
Visit 192.168.171.134:8080/shop/ again to test: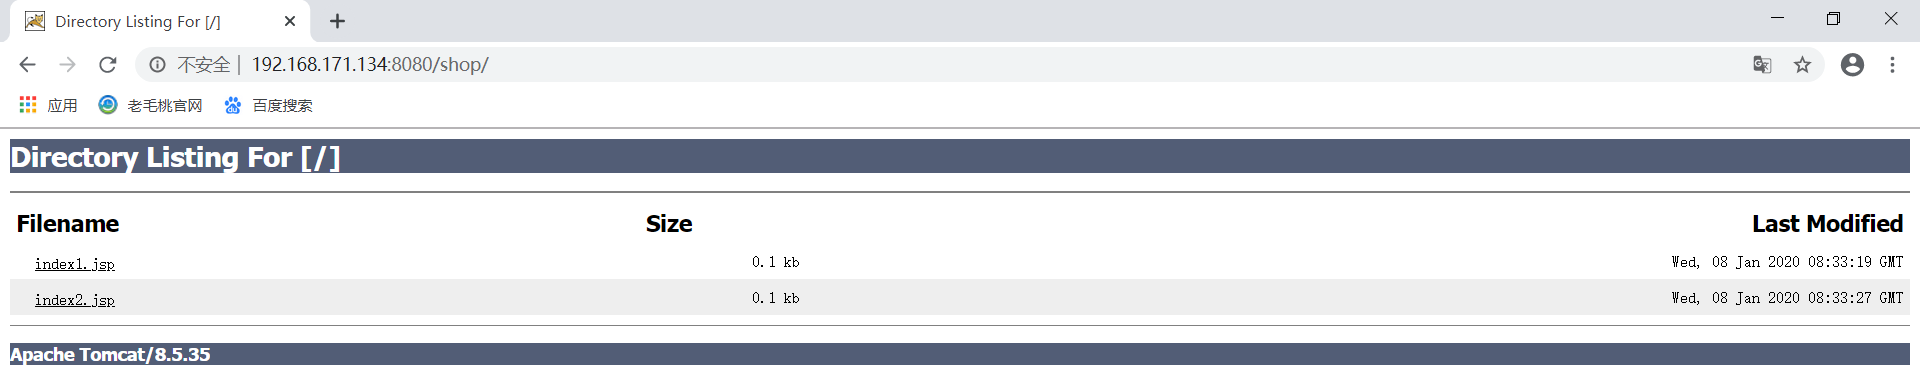
5, Tomcat configuration https
[root@tomcat /]# keytool -genkey -v -alias tomcat -keyalg RSA -keystore /usr/local/tomcat/conf/tomcat.eystore -validity 36500 # Obtaining certificates
Enter keystore password: # Fill in key
Re-enter new password:
What is your first and last name? # What's your last and first name?
[Unknown]: zyz
What is the name of your organizational unit? # What is the name of your organization?
[Unknown]: hh
What is the name of your organization? # What is the name of your organization?
[Unknown]: test
What is the name of your City or Locality? # What is the name of your city or area?
[Unknown]: bj
What is the name of your State or Province? # What is the name of your state or province?
[Unknown]: bj
What is the two-letter country code for this unit? # What is the country code of this unit?
[Unknown]: cn
Is CN=zyz, OU=, O=test, L=bj, ST=bj, C=cn correct? # Are you sure?
[no]: y
Generating 2,048 bit RSA key pair and self-signed certificate (SHA256withRSA) with a validity of 36,50 days
for: CN=zyz, OU=, O=test, L=bj, ST=bj, C=cn
Enter key password for <tomcat>
(RETURN if same as keystore password): # Just return
[Storing /usr/local/tomcat/conf/tomcat.keystore]
[root@tomcat /]# vim /usr/local/tomcat/conf/server.xml
................ // Omit part of the content
#Add the following to the service element
<Connector port="443" protocol="org.apache.coyote.http11.Http11NioProtocol"
maxThreads="150" SSLEnabled="true"
keystoreFile="/usr/local/tomcat/conf/tomcat.keystore" # Specify file storage location
keystorePass="123.com" > # Designated key
</Connector>
[root@tomcat /]# /usr/local/tomcat/bin/shutdown.sh # Restart service for configuration to take effect
[root@tomcat /]# /usr/local/tomcat/bin/startup.sh
[root@tomcat /]# netstat -anput | grep 443 # Check whether the port listens
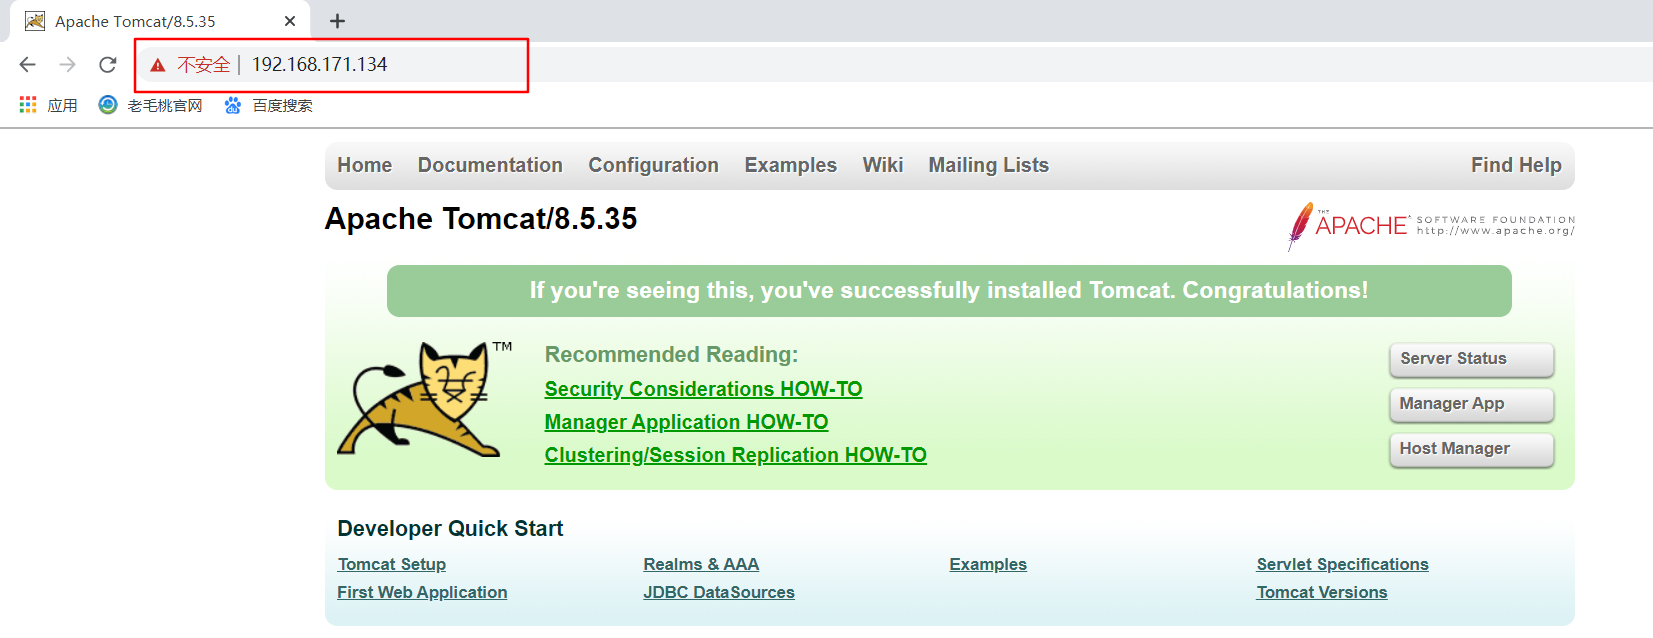
tcp6 0 0 :::443 :::* LISTEN 4795/javaVisit https://192.168.171.134 to verify: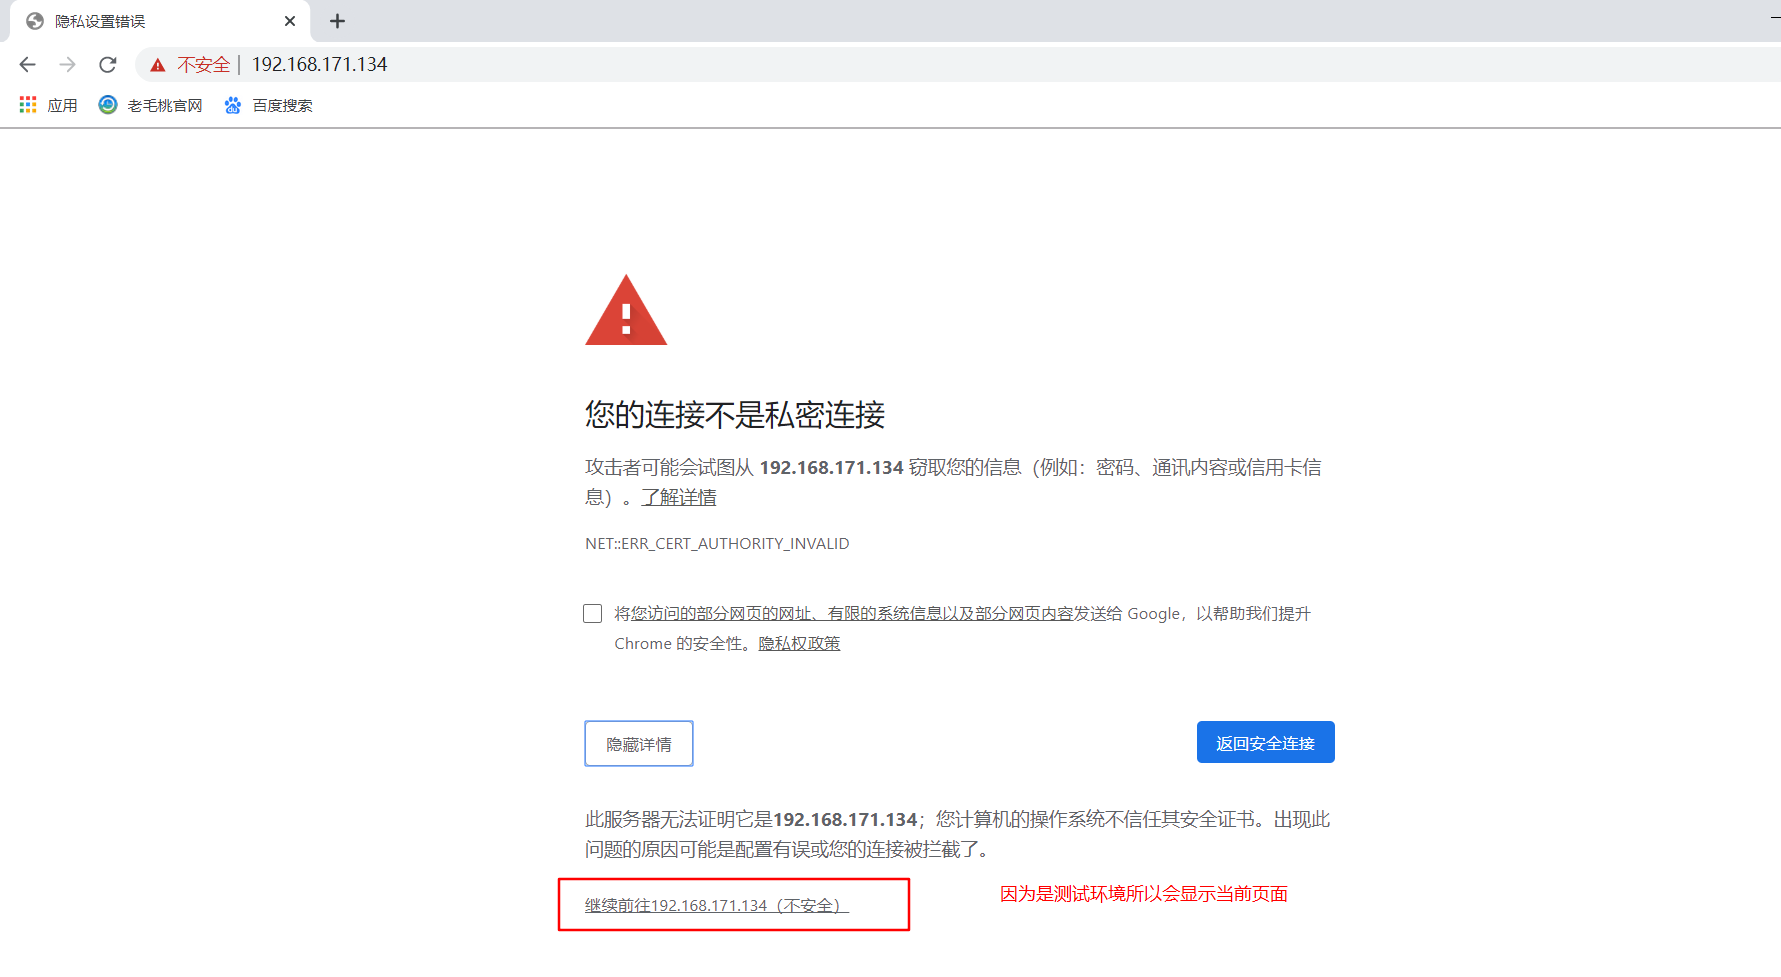
6, Using Tomcat to monitor the resource usage of JVM virtual machine in real time
[root@tomcat /]# vim /usr/local/tomcat/conf/server.xml
<Host name="localhost"  appBase="webapps"
            unpackWARs="true" autoDeploy="true">
        <Context path = "/shop" docBase="/data/project" debug="0" reloadable="false" crossContext="true">
                # Add the following to the zai host element
        </Context>        <Context path = "/jiankong" docBase="/data/jiankong" debug="0" reloadable="flase" crossContext="true"/>
</Host>
[root@tomcat /]# mkdir -p /data/jiankong        # Create test site root
[root@tomcat /]# vim /data/jiankong/index.jsp          # Edit test file
<%
Runtime rtm = Runtime.getRuntime();
long mm = rtm.maxMemory()/1024/1024;
long tm = rtm.totalMemory()/1024/1024;
long fm = rtm.freeMemory()/1024/1024;

out.println("JVM memory detail info :<br>");
out.println("Max memory:"+mm+"MB"+"<br>");
out.println("Total memory: "+tm+"MB"+"<br>");
out.println("Free memory: "+fm+"MB"+"<br>");
out.println("Available memmory can be used is :"+(mm+fm-tm)+"MB"+"<br>");
%>
[root@tomcat /]# /usr/local/tomcat/bin/shutdown.sh          # Restart service for configuration to take effect
[root@tomcat /]# /usr/local/tomcat/bin/startup.sh
Visit http://192.168.171.134:8080/jing/verify: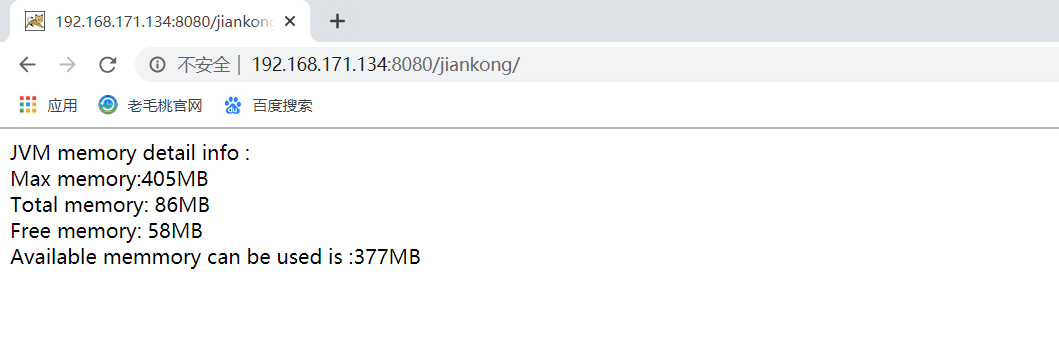
7, Enable JMX remote debugging function
[root@tomcat /]# vim /usr/local/tomcat/bin/catalina.sh            # Edit this file to line 306
export JDK_JAVA_OPTIONS                # Add the following below this line
CATALINA_OPTS=" $CATALINA_OPTS  -Dcom.sun.management.jmxremote  -Dcom.sun.management.jmxremote.port=8888 -Dcom.sun.management.jmxremote.ssl=false  -Dcom.sun.management.jmxremote.authenticate=true"
[root@tomcat /]# cd /usr/local/jdk1.8.0_211/jre/lib/management/
[root@tomcat management]# cp jmxremote.password.template jmxremote.password
[root@tomcat management]# vim jmxremote.password
#Go to the last line and add the following
zyz     123.com
#wq is required because it is read-only! Force save to exit
[root@tomcat management]# vim jmxremote.access
#Add the following to the last line
zyz   readwrite \
              create javax.management.monitor.*,javax.management.timer.* \
              unregister
[root@tomcat management]# chmod 600 jmxremote.password jmxremote.access         #Its permission must be modified to 600, otherwise it will fail
[root@tomcat management]# /usr/local/tomcat/bin/shutdown.sh       # Restart service for configuration to take effect
[root@tomcat management]# /usr/local/tomcat/bin/startup.sh
[root@tomcat /]# . /etc/profile          # Execute refresh variable
[root@tomcat /]# jconsole         # Execute this command
Verify its remote debugging function. Because it needs graphical support, it needs to enter its graphical desktop environment. The following operations cannot be performed on xshell: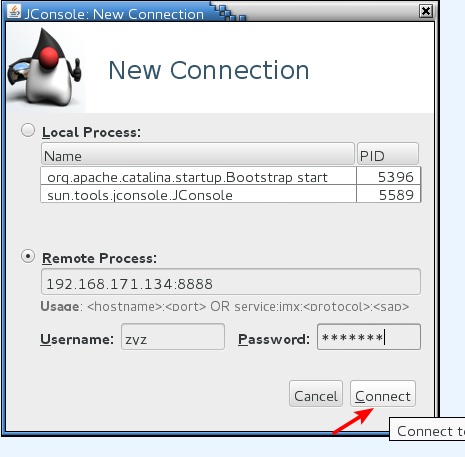
Then click on the following: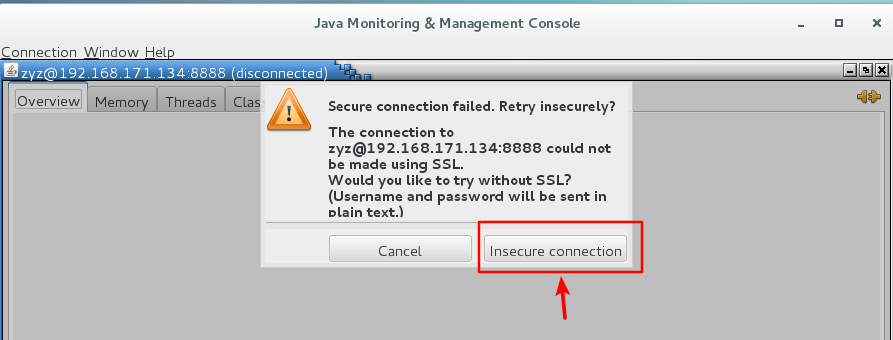
Then you can see the following interface to display the usage of JVM virtual machine: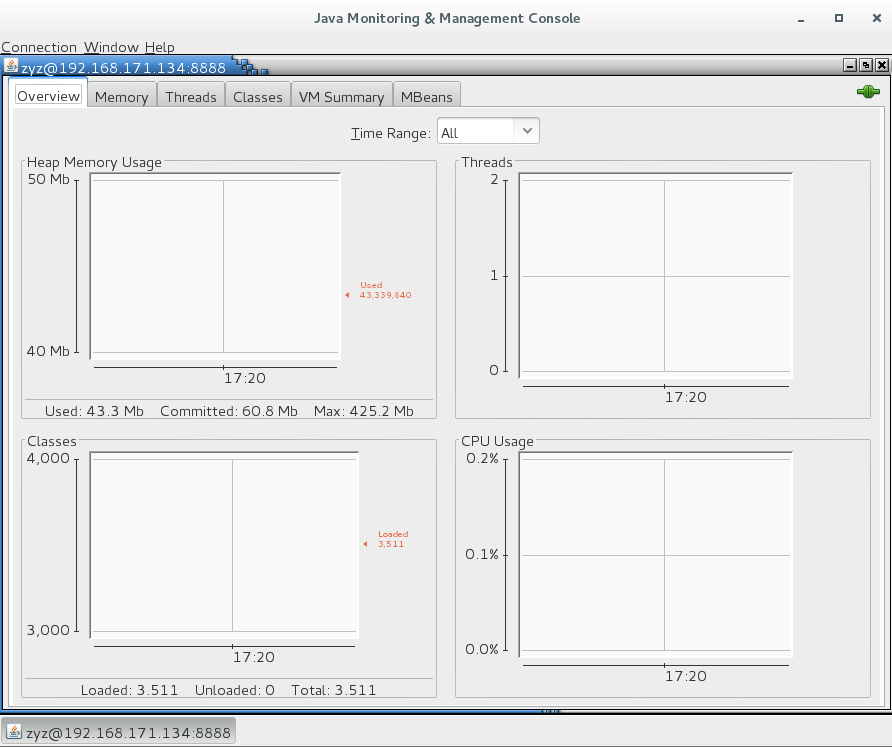
8, Open mangent management page
1. When accessing Tomcat's default interface, there is a "Manager App" box, as follows: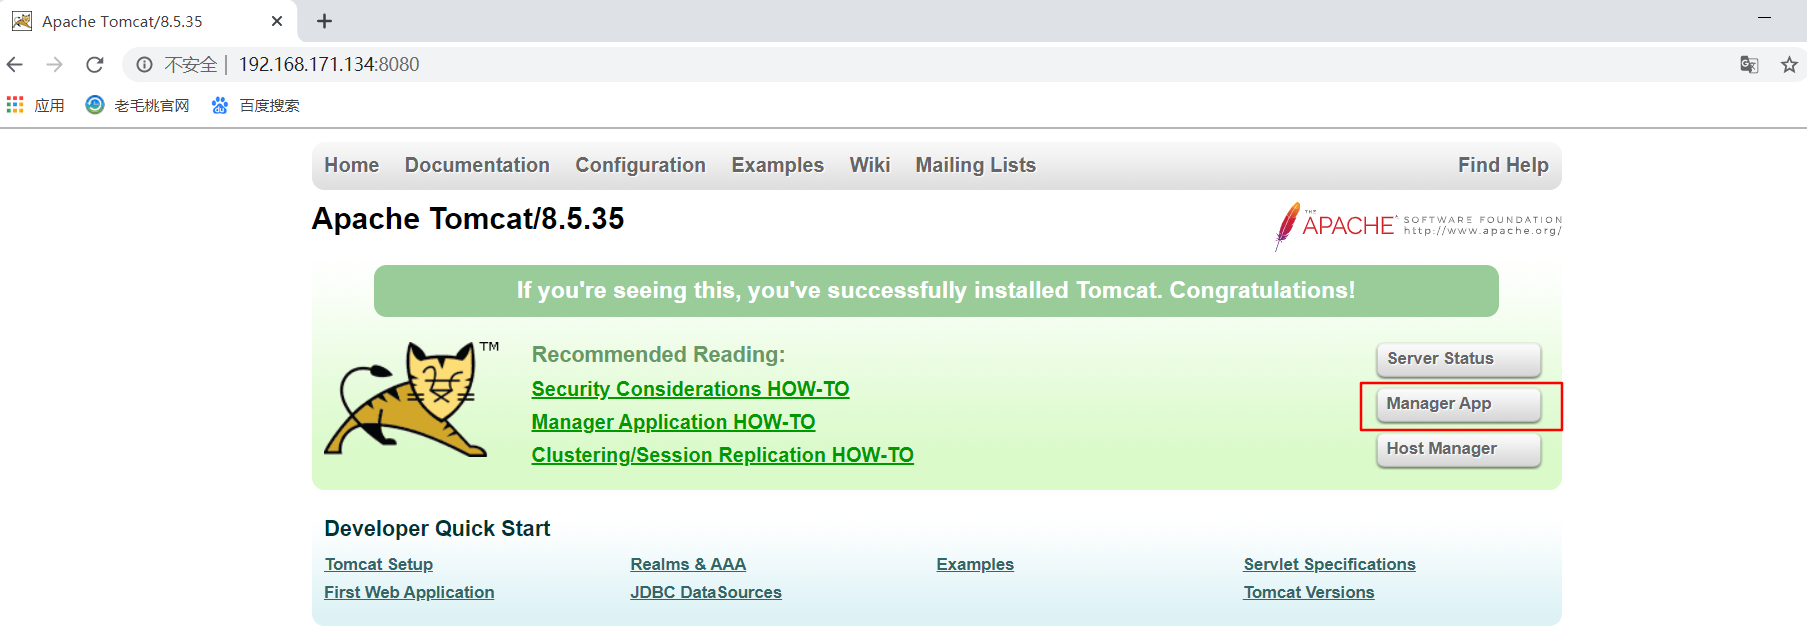
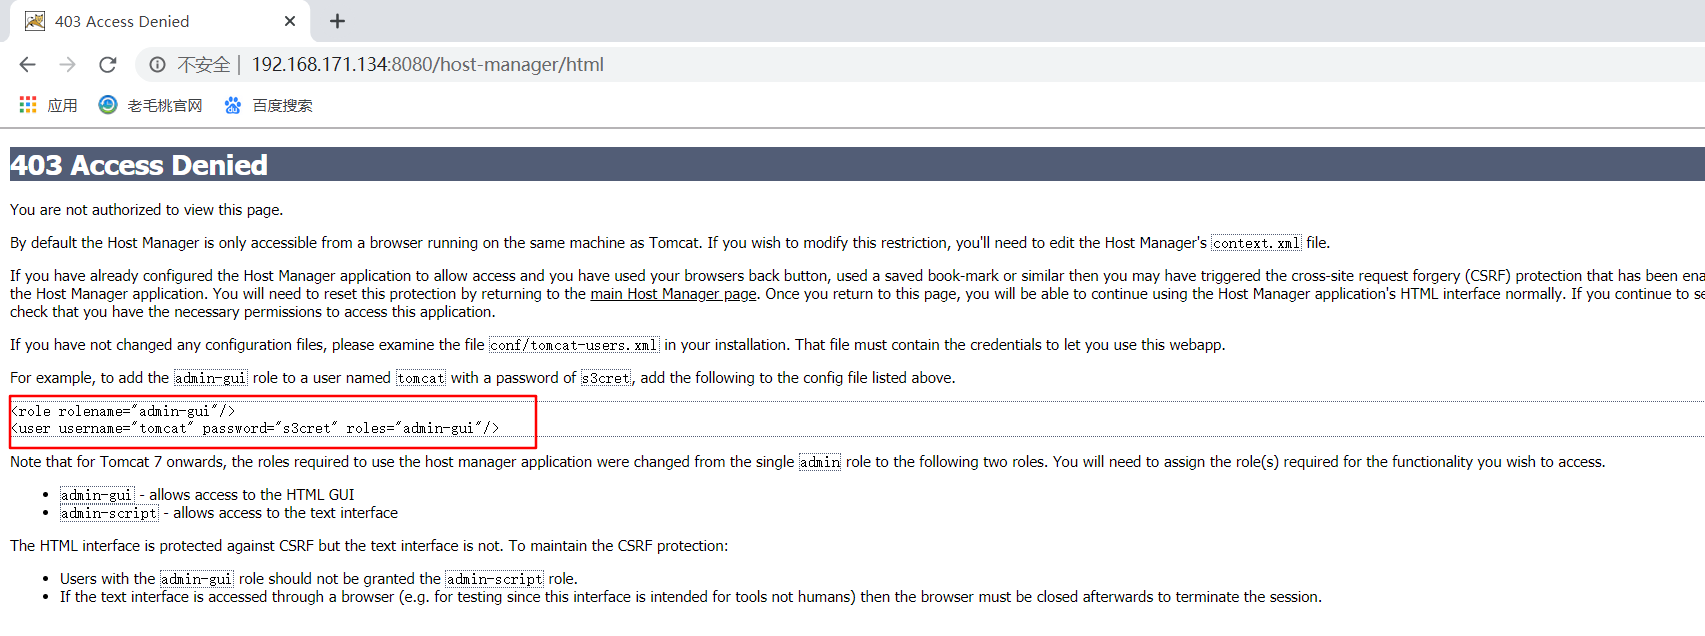
2. Click to enter, you will see the following 403 error page, and we need to copy the code prompted by it:
On this error page, the reason and how to configure the write have been made clear.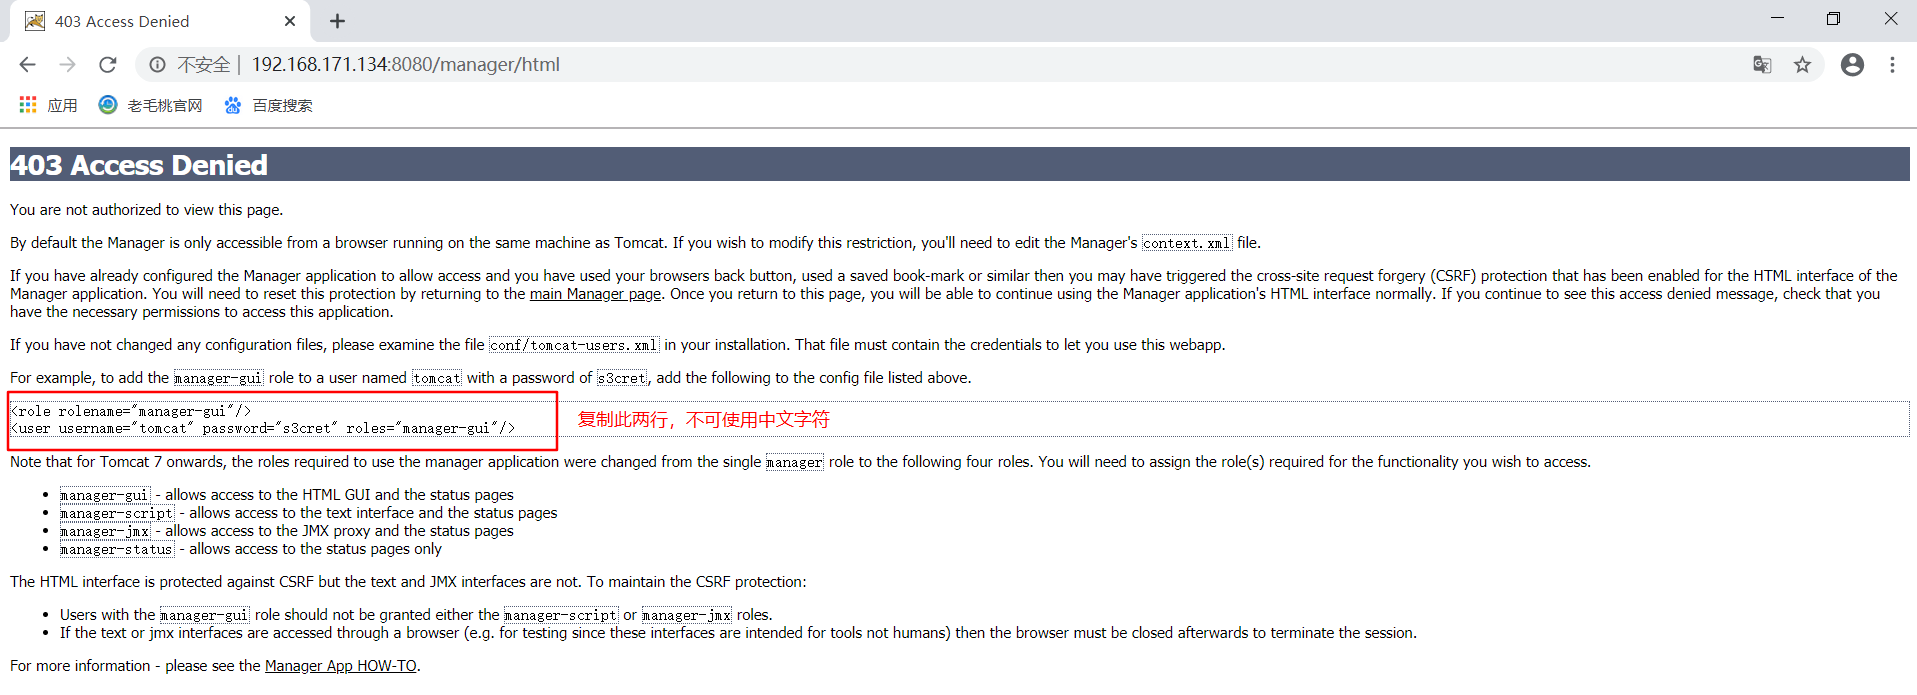
3. Configure to open its manager management page:
[root@tomcat /]# vim /usr/local/tomcat/conf/tomcat-users.xml
#Add the following two lines at the end
<role rolename="manager-gui"/>
<user username="tomcat" password="s3cret" roles="manager-gui"/>
</tomcat-users> # You don't have to write at the end of this line
[root@tomcat /]# vim /usr/local/tomcat/webapps/manager/META-INF/context.xml
<Context antiResourceLocking="false" privileged="true" >
<Valve className="org.apache.catalina.valves.RemoteAddrValve"
allow="192.168.171.134|192.168.171.1|127\.\d+\.\d+\.\d+|::1|0:0:0:0:0:0:0:1" />
#Add the IP allowed to access after "allow =" above, split by the pipe character "|"
<Manager sessionAttributeValueClassNameFilter="java\.lang\.(?:Boolean|Integer|Long|Number|String)|org\.apache\.catalina\.filters\.CsrfPreventionFilter\$LruCache(?:\$1)?|java\.util\.(?:Linked)?HashMap"/>
</Context>
[root@tomcat /]# /usr/local/tomcat/bin/shutdown.sh
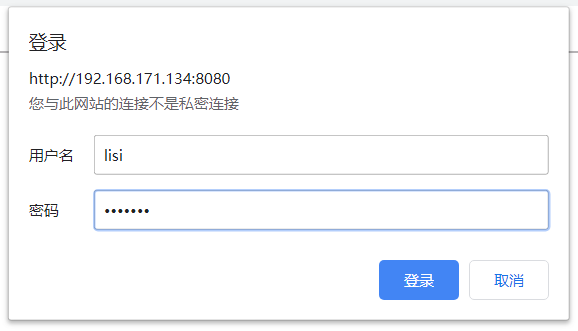
[root@tomcat /]# /usr/local/tomcat/bin/startup.shClient authentication:
Click again to prompt for password:
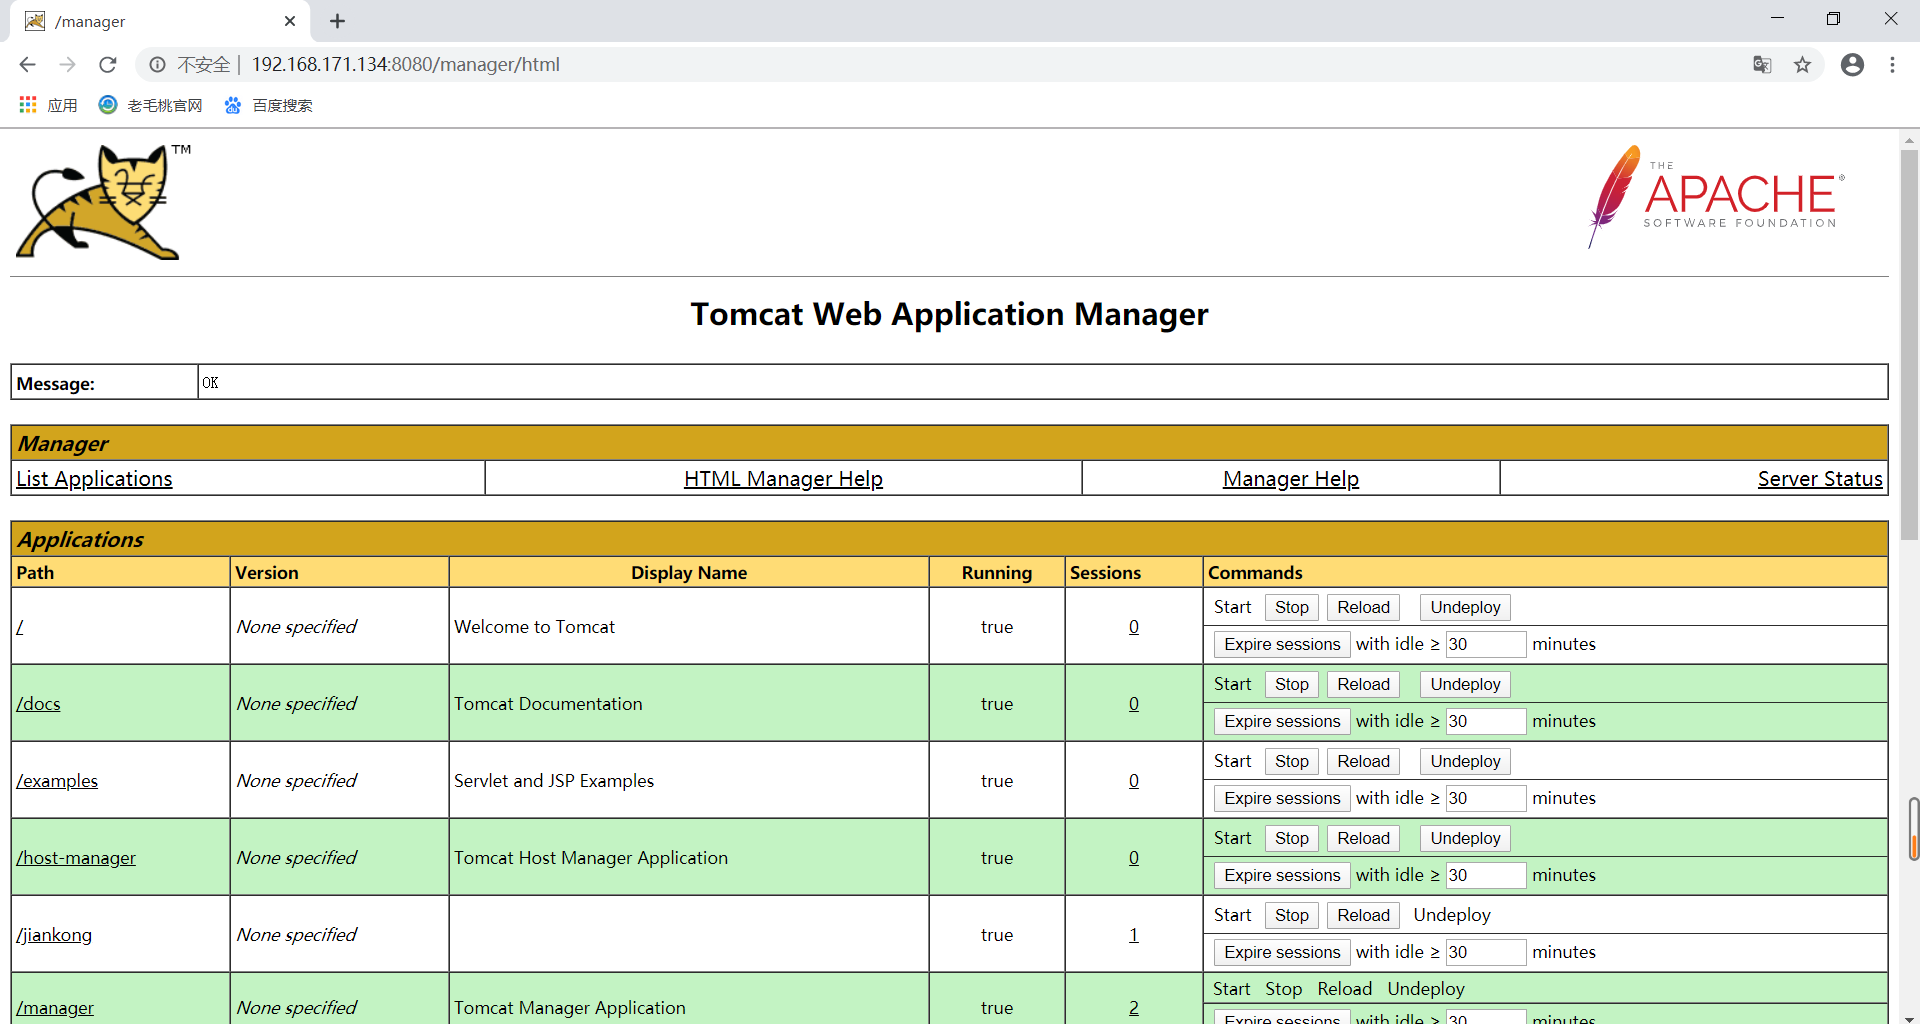
4. Drop down page, you can add a custom directory through the war package:
Prepare war package
[root@tomcat test]# cat index.jsp
test
test
test
test
test
test
...................
[root@tomcat test]# jar -cvf test.war index.jsp
added manifest
adding: index.jsp(in = 80) (out= 10)(deflated 87%)
In the web graphical interface, add the war package: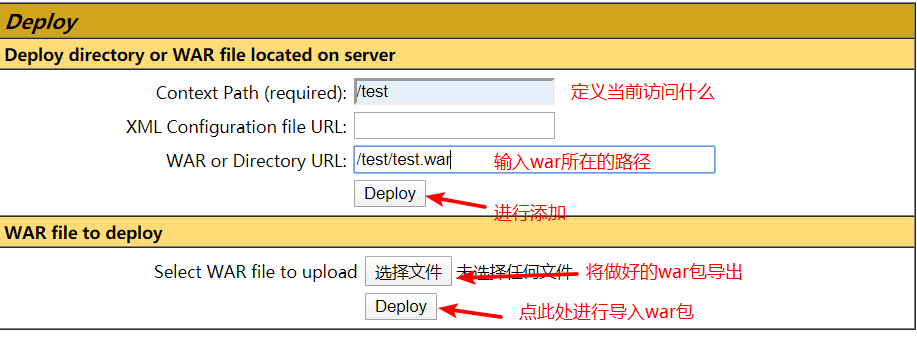
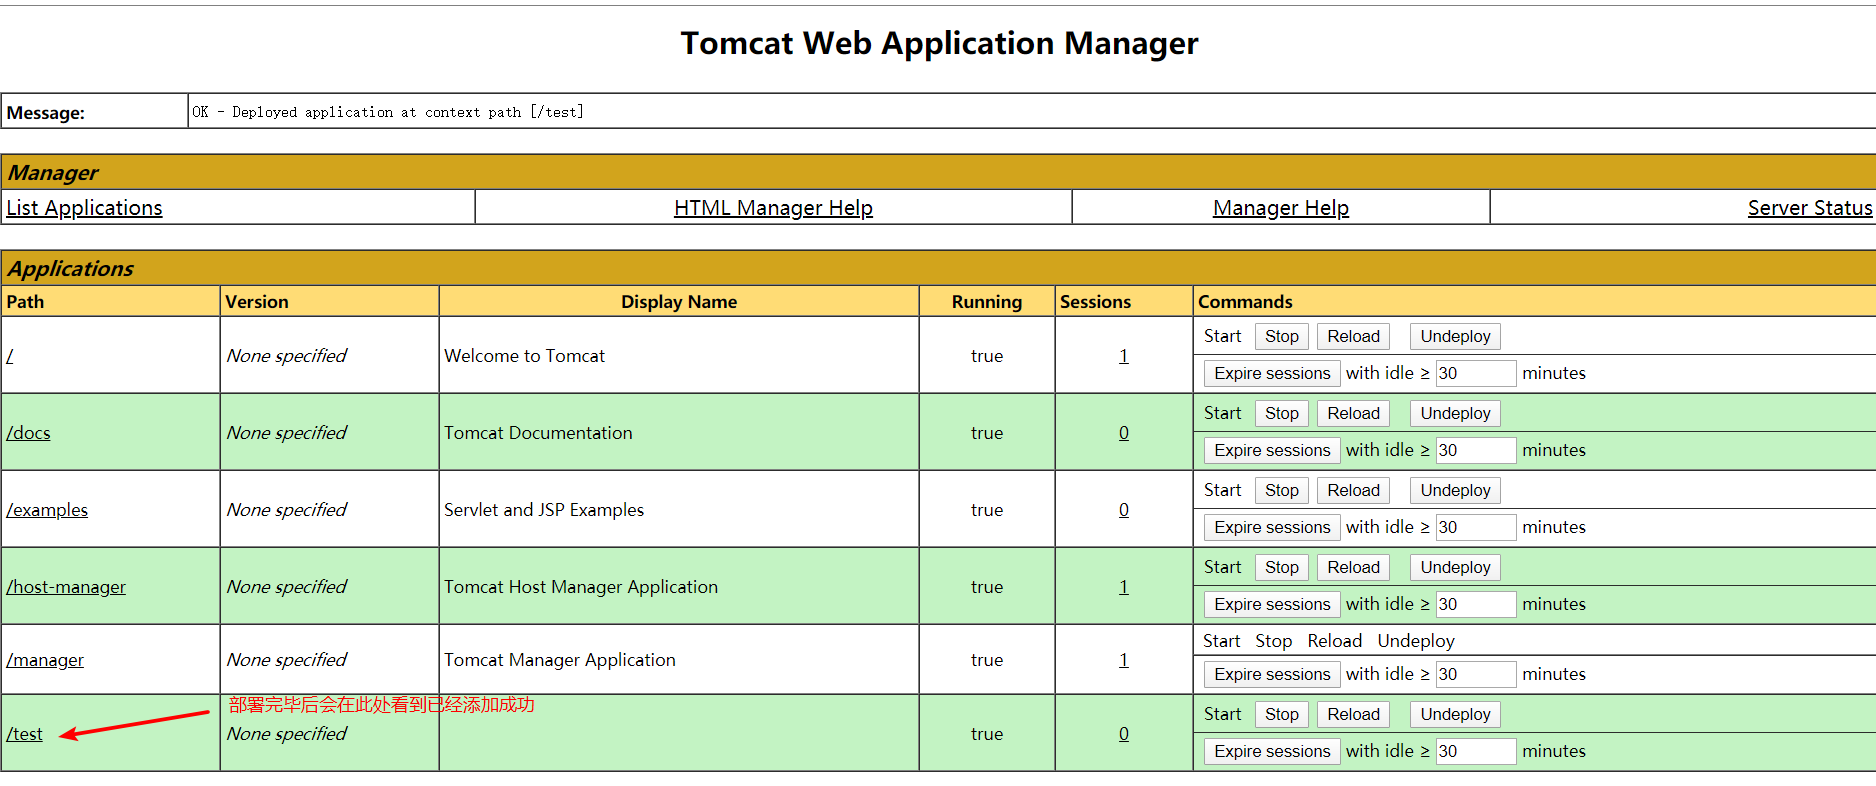
The client can access TomcatIP+8080 port + / test for access test. Its content is the content of our war package, as follows: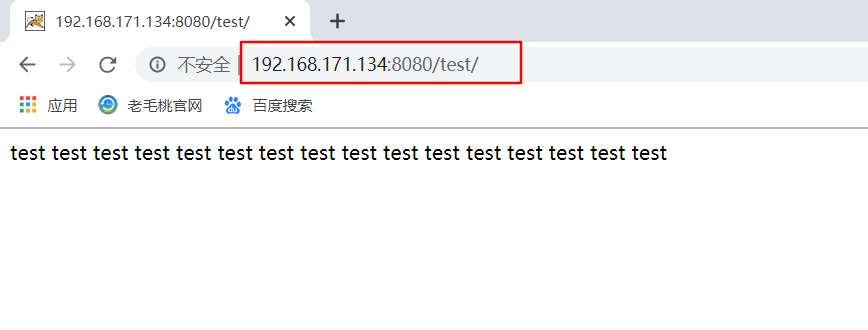
9, Open the host mangent management page
[root@tomcat /]# vim /usr/local/tomcat/conf/tomcat-users.xml
.......... // Add the following two lines at the end
<role rolename="admin-gui"/>
<user username="zyz" password="123.com" roles="admin-gui"/>
</tomcat-users>
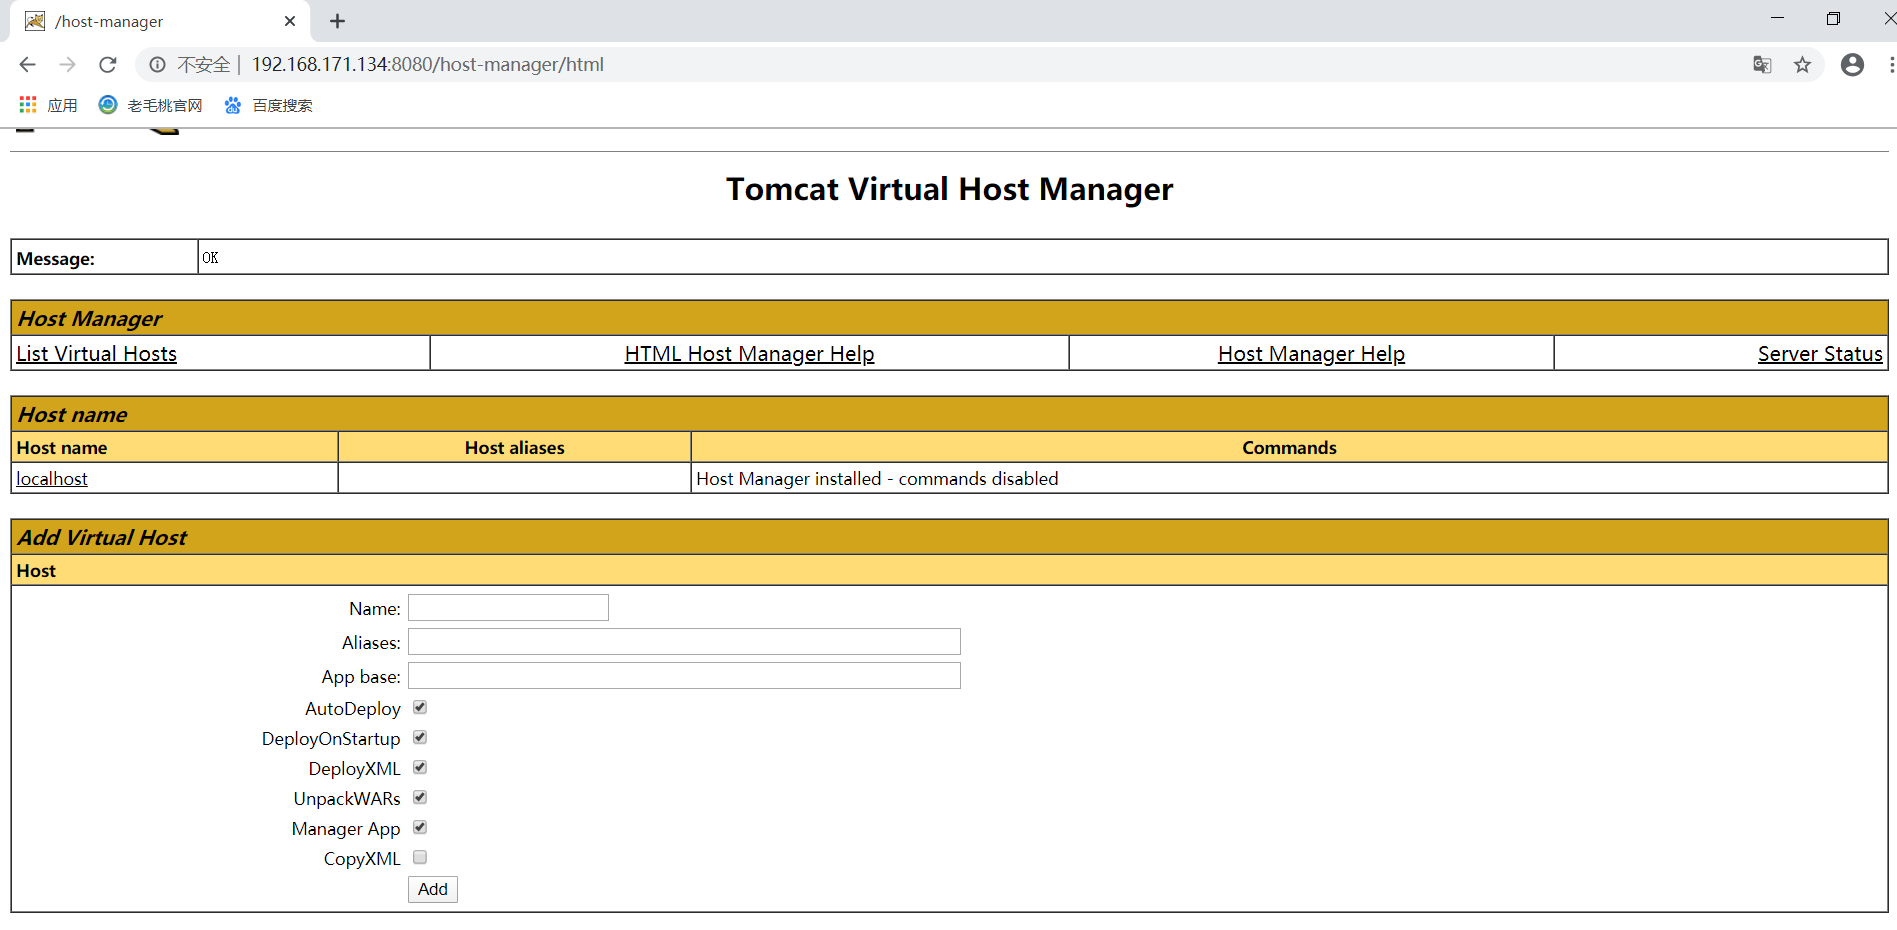
[root@tomcat /]# vim /usr/local/tomcat/webapps/host-manager/META-INF/context.xml
<Context antiResourceLocking="false" privileged="true" >
<Valve className="org.apache.catalina.valves.RemoteAddrValve"
allow="192.168.171.134|192.168.171.1|127\.\d+\.\d+\.\d+|::1|0:0:0:0:0:0:0:1" />
//Add allowed IP after allow, separated by "|"
<Manager sessionAttributeValueClassNameFilter="java\.lang\.(?:Boolean|Integer|Long|Number|String)|org\.apache\.catalina\.filters\.CsrfPreventionFilter\$LruCache(?:\$1)?|java\.util\.(?:Linked)?HashMap"/>
</Context>
Client authentication: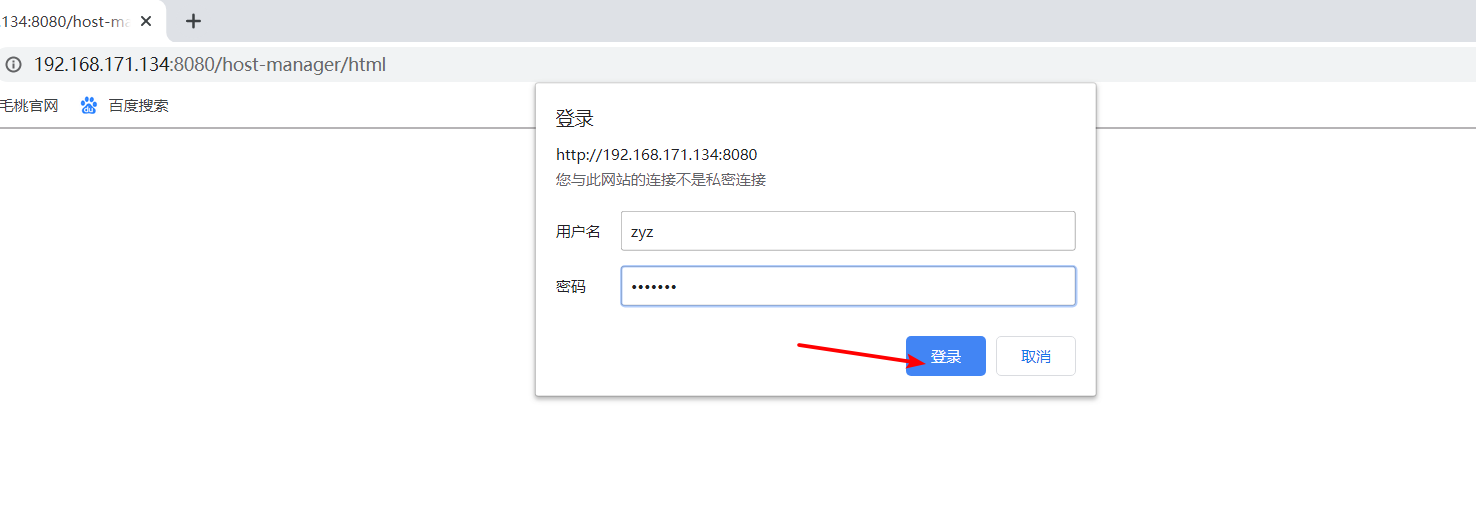
10, Log cutting of Tomcat
cronolog is a third-party log cutting tool, which is convenient and fast, and is a powerful tool for log cutting. Use this third-party tool here.
[root@tomcat tomcat]# tar zxf cronolog-1.6.2.tar.gz      # Unpacking
[root@tomcat tomcat]# cd cronolog-1.6.2/
[root@tomcat cronolog-1.6.2]# ./configure && make && make install          # Compile and install
[root@tomcat cronolog-1.6.2]# which cronolog       # Make sure you can find the cronolog command
/usr/local/sbin/cronolog
[root@tomcat cronolog-1.6.2]# vim /usr/local/tomcat/bin/catalina.sh       # Edit this file
//Search for the touch and comment out: "touch" $Catalina? Out "
//Go to line 470 or so to modify
org.apache.catalina.startup.Bootstrap "$@" start 2>&1 | /usr/local/sbin/cronolog /usr/local/tomcat/logs/test.%Y-%m-%d.out >> /dev/null &
//Comment out: × > > 2 > & 1 "&"
[root@tomcat cronolog-1.6.2]# /usr/local/tomcat/bin/shutdown.sh           # Restart verification
[root@tomcat cronolog-1.6.2]# /usr/local/tomcat/bin/startup.sh
[root@tomcat logs]# ls            # Ensure test.2020-01-12.out
catalina.2020-01-12.log      localhost.2020-01-12.log             test.2020-01-12.out
catalina.out                 localhost_access_log.2020-01-12.txt
host-manager.2020-01-12.log  manager.2020-01-12.log
11, Define the page returned by Tomcat 404 error
By default, when the client accesses a nonexistent directory on the Tomcat server, it will prompt 404 errors and display the version information of our Tomcat. This is a taboo for us. The error page returned by the default 404 is as follows:
The solution is to redirect the 404 status code so that we can customize the returned page information as follows:
[root@tomcat logs]# cat /usr/local/tomcat/webapps/ROOT/error.jsp
Access Error...
[root@tomcat logs]# vim /usr/local/tomcat/conf/web.xml
  version="3.1">                # Add the following near line 22
<error-page>
<error-code>404</error-code>
<location>/error.jsp</location>
</error-page>
[root@tomcat /]# /usr/local/tomcat/bin/shutdown.sh       # Restart verification
[root@tomcat /]# /usr/local/tomcat/bin/startup.sh
Visit a page that does not exist again to verify: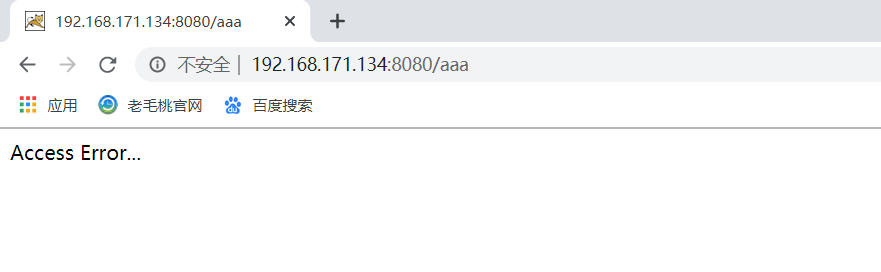
12, Memory optimization of Tomcat
[root@tomcat ~]# vim /usr/local/tomcat/bin/catalina.sh    #Edit this file

#!/bin/sh          #Add the following below the first line
JAVA_OPTS="-Dfile.encoding=UTF-8
-server
-Xms1023M
-Xmx1024M
-XX:NewSize=512M
-XX:MaxNewSize=1020M
-XX:NewRatio=2
-XX:ParallelGCThreads=15
-XX:+DisableExplicitGC"
#After adding, save and exit, restart Tomcat to take effect,
#It can be viewed and verified through the previous real-time monitoring of JVM virtual machine resource usage
#If the version before Tomcat 8.0 is available, you can add the following two configuration items to it, and the version after 8.0 will be removed:
#-XX:PermSize=256M
#-XX:MaxPermSize=356M
The added configuration items are explained as follows:
-Xms: indicates the initial memory size of the JVM, or the size of the Java initialization heap, - Xms is set to the same value as - Xmx, so as to avoid repeated memory re application by the JVM, resulting in dramatic performance fluctuation. The default value is 1 / 64 of the physical memory
-Xmx: indicates the maximum Java heap size. When the memory required by the application exceeds the maximum heap size, the virtual machine will prompt for memory overflow and cause the application service to crash. Therefore, it is generally recommended that the maximum heap size be set to 80% of the maximum available memory.
-Xmn: set the minimum memory of JVM (128-256 is enough, generally not set)
-20: Newsize: set the memory size of the new generation. In the new generation, the memory space allocated when the object is newly created. In the old generation, after the garbage collector recycles, the object is still not recycled, and the object will move to the old generation
-20: Permsize: set the memory size of persistent generation to store static files. Now Java classes, methods, etc. Long term generation has no significant impact on garbage collection, but some of them should
Some classes can be generated or called dynamically. The persistent band is also called method area. The method area stores the structure information of each java class, such as constant pool, field and method data at runtime, bytecode content of constructors and common methods, and special methods needed for class, instance and interface initialization. PermGen Space has been put into JDK8 The meta space is replaced by the meta space. Metaspace occupies local memory and no more virtual machine memory.
-20: Maxpermsize: set the maximum persistent generation memory size. The persistent generation does not belong to heap memory. Heap memory only includes the new generation and the old generation
-20: New ratio: change the ratio of the old space to the new space, which means that the size of the new space is 1 / 8 of the old space (the default is 8)
-20: Parallelgcthreads can be used to increase parallelism, requiring multiple CPUs
-20: + disableexplicitgc: close System.gc(), which is simply understood to close the memory recycling mechanism in java
13, Optimization of Tomcat thread pool
[root@tomcat /]# vim /usr/local/tomcat/conf/server.xml    # Edit main profile
<Service name="Catalina">     # Add the following below line 53
        <Executor name="tomcatThreadPool" namePrefix="catalina-exec-" maxThreads="500" minSpareThread="4"/>
<Connector port="8080" protocol="HTTP/1.1"       # Add the following below line 69
                executor="tomcatThreadPool"
Important parameters of the above Excutor:
- Name: the name of the shared thread pool. This is the name that the connector will refer to in order to share the thread pool. The name must be unique
- namePrefix: on the JVM, each running thread can have a name string. This property sets a prefix for the name string of each thread in the thread pool. Tomcat will append the thread number to this prefix. The default value is Tomcat Exec-
- maxThreads: the maximum number of threads that the thread pool can hold. The default is 200
- minSpareThreads: the minimum number of inactive threads that Tomcat should always open, 25 by default
- Connector parameter description
- executor: indicates the thread pool corresponding to the parameter value.
14, Modify the request mode of Tomcat service
Tomcat supports three request modes: BIO, NIO and APR.
- Bio: blocking I/O operation. The version below Tomcat 7 runs in bio mode by default. Each request needs to be processed by creating a thread. The thread overhead is large, which is not suitable for high concurrency scenarios, and the performance is the lowest;
- NIO: Based on buffer, it can provide non blocking I/O operation, and has better concurrent performance compared with traditional BIO
- APR (Apache portable run-time libraries): simple understanding is to solve the asynchronous IO problem from the operating system level, greatly improve the processing and corresponding performance of the server, and is also the preferred mode for Tomcat to run high concurrency
The main function modules provided by APR include: memory allocation and memory pool, atomic operation, file I/O, lock, memory mapping, hash table, network I/O, polling, process and thread operation, etc. by adopting APR, Tomcat can obtain high scalability and superior performance, and can better integrate with local server technology, so as to make Tomcat as a general purpose Web server, not just as a lightweight application server. In this case, Java will no longer be a back-end programming language, but also can be more used for mature web server platform.
1. Change the request mode to NIO (Note: for Tomcat 8 and above, NIO mode is used by default, no additional modification is required)
[root@tomcat /]# vim /usr/local/tomcat/conf/server.xml    # Edit main profile
<Connector port="8080" protocol="org.apache.coyote.http11.Http11NioProtocol"           # Modified to nio
                executor="tomcatThreadPool"
               connectionTimeout="20000"
               redirectPort="8443" />
After restarting, check the "catalina.out" log. If there are the following words, it means that the request is received in nio, as follows (I cut the catalina.out log above, so I need to check the cut log file):
2. Change its request mode to APR mode
Enabling this mode is a little bit cumbersome. You need to install some dependency libraries. The following is Tomcat/8.5.35 configuration based on centos 7.3 environment.
To install the apr dynamic library:
[root@tomcat /]# yum -y install apr-devel openssl-devel gcc make
[root@tomcat /]# cd /usr/local/tomcat/bin/
[root@tomcat bin]# tar zxf tomcat-native.tar.gz
[root@tomcat bin]# cd tomcat-native-1.2.18-src/native/
[root@tomcat native]# ./configure && make && make install
#After the compilation and installation, the apr dynamic library is installed in / usr/local/apr/lib directory by default.
Configure the search path from APR local library to system shared library:
Set the LD? Library? Path and LD? Run? Path environment variables to the / usr/local/apr/lib directory, which can be configured into the / etc/profile file. As follows:
[root@tomcat native]# vim /etc/profile              #Edit the global variable and write the following two lines at the end of the file
export LD_LIBRARY_PATH=$LD_LIBRARY_PATH:/usr/local/apr/lib
export LD_RUN_PATH=$LD_RUN_PATH:/usr/local/apr/lib
[root@tomcat native]# . /etc/profile        #Reload environment variables
#Restart verification
[root@tomcat ~]# /usr/local/tomcat/bin/shutdown.sh
[root@tomcat ~]# /usr/local/tomcat/bin/startup.sh
[root@tomcat native]# vim /usr/local/tomcat/conf/server.xml
 <Connector port="8080" protocol="org.apache.coyote.http11.Http11AprProtocol"     # xiugai changed to apr
                executor="tomcatThreadPool"
               connectionTimeout="20000"
               redirectPort="8443" />
