I. Preliminary Analysis of Cluster Technology
1. tomcat cluster multi-application servers, sharing pressure and ensuring high availability of services, using tomcat cluster to achieve cluster environment, Manager is responsible for managing session sharing.
2. The web server adopts Apache, which is responsible for load balancing between application servers.
3. There are actually three connection methods between apache server and tomcat: mod_JK, http_proxy and ajp_proxy. This paper adopts mod_JK mode.
4,Steal a picture As follows: 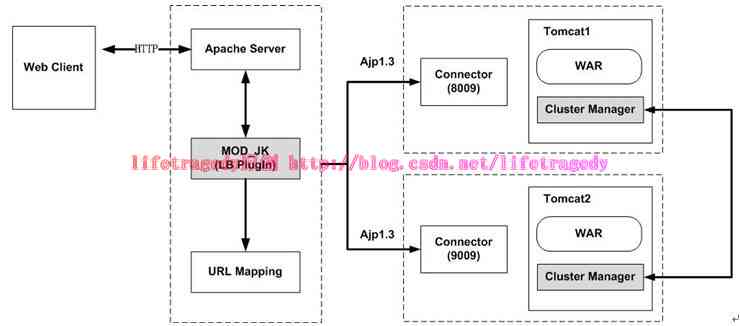
II. Installation and Configuration of tomcat Cluster Environment
1. Download the Tomcat server. This paper uses apache-tomcat-7.0.64 version and duplicates two copies, Tomcat 1 and Tomcat 2 respectively. Configure server.xml. Take Tomcat 1 as an example, the configuration code is as follows:
<!-- Service Close Port -->
<Server port="8005" shutdown="SHUTDOWN">
<Listener className="org.apache.catalina.startup.VersionLoggerListener" />
<Listener className="org.apache.catalina.core.AprLifecycleListener" SSLEngine="on" />
<Listener className="org.apache.catalina.core.JasperListener" />
<Listener className="org.apache.catalina.core.JreMemoryLeakPreventionListener" />
<Listener className="org.apache.catalina.mbeans.GlobalResourcesLifecycleListener" />
<Listener className="org.apache.catalina.core.ThreadLocalLeakPreventionListener" />
<!-- Global JNDI resources
Documentation at /docs/jndi-resources-howto.html
-->
<GlobalNamingResources>
<!-- Editable user database that can also be used by
UserDatabaseRealm to authenticate users
-->
<Resource name="UserDatabase" auth="Container"
type="org.apache.catalina.UserDatabase"
description="User database that can be updated and saved"
factory="org.apache.catalina.users.MemoryUserDatabaseFactory"
pathname="conf/tomcat-users.xml" />
</GlobalNamingResources>
<!-- A "Service" is a collection of one or more "Connectors" that share
a single "Container" Note: A "Service" is not itself a "Container",
so you may not define subcomponents such as "Valves" at this level.
Documentation at /docs/config/service.html
-->
<Service name="Catalina">
<!-- http Connector usage nio Non-blocking mode, Excutor Provide thread pool support as an executor -->
<Executor name="tomcatThreadPool" namePrefix="catalina-exec-"
maxThreads="150" minSpareThreads="10"/>
<!-- Responsible for establishing HTTP Connect, use nio Non-blocking mode, configuration usage executor Actuator, using connection pool -->
<Connector port="8080" protocol="org.apache.coyote.http11.Http11NioProtocol"
connectionTimeout="20000"
redirectPort="8443"
executor="tomcatThreadPool"/>
<!-- Define an AJP 1.3 Connector on port 8009 -->
<!-- AJP Connector, listen on port 8009, use AJP Protocol, Connection tomcat Server and http The server(as Apache The server),Realize the communication between them -->
<Connector port="8009" protocol="AJP/1.3" redirectPort="8443" />
<!-- You should set jvmRoute to support load-balancing via AJP ie :
<Engine name="Catalina" defaultHost="localhost" jvmRoute="jvm1">
-->
<!-- Use AJP Protocol to achieve load balancing, need jvmRoute Parameter, value customization
Tomcat Will be created session It will be based on jvmRoute The value of sessionID Back up route value
//Requests for tracking distribution
-->
<Engine name="Catalina" defaultHost="localhost" jvmRoute="tomcat1">
<!-- Cluster: Configuration management cluster nodes, the main components include: Manager,Channel,Valve,ClusterListenner etc.
//Manager is used to manage session session session information; Channel serves as the communication channel connecting each node and manages connecting each node; Cluster Listener listener listens for messages received by Cluster components and transmits information to Manager; Valve filter or valve
Cluster Node properties:
className: Cluster Implementation class
channelSendOptions: Can be set to 2, 4, 8, 10, each number represents a way
2 = Channel.SEND_OPTIONS_USE_ACK(Confirm send)
4 = Channel.SEND_OPTIONS_SYNCHRONIZED_ACK(Synchronous transmission)
8 = Channel.SEND_OPTIONS_ASYNCHRONOUS(Asynchronous transmission)
10 = In asynchronous mode, you can send by adding confirmation(Acknowledge)To improve reliability
-->
<Cluster className="org.apache.catalina.ha.tcp.SimpleTcpCluster" channelSendOptions="8">
<!-- session manager -->
<!--
Manager: Determining how to manage clusters Session There are two implementations of information in cluster environment: DeltaManager and BackupManager,What is often used is DeltaManager
DeltaManager,It synchronizes all session changes to each node in the cluster
BackupManager: Changes in a node's session will only be synchronized to another or several nodes in the cluster, not to all nodes, and will only be used for session backup.
Manager Node properties:
className: Manager Implementation class
expireSessionsOnShutdown:Set to true When a node closes, it causes all of the nodes in the cluster Session Invalid
notifyListenersOnReplication:Inter-node under Cluster Session Whether to notify asynchronously when copying or deleting operations Cluster Listener
maxInactiveInterval: Under Cluster Session Effective time(Company:s).
maxInactiveInterval: Inactive Session,Will be Tomcat Recycling. The default value is 1800(30min)
-->
<Manager className="org.apache.catalina.ha.session.DeltaManager"
expireSessionsOnShutdown="false"
notifyListenersOnReplication="true"/>
<!--
Channel: The communication channels between the nodes in the cluster are used to manage and connect the nodes.;
//It is an abstract port, similar to socket, through which each node of the cluster receives and receives information.
Channel It consists of four components: Membership,Receiver,Sender,Interceptor(Optional)
-->
<Channel className="org.apache.catalina.tribes.group.GroupChannel">
<!-- Membership: Multicast channel to maintain the list of available nodes in the cluster;
//All nodes have the same configuration.
//It can detect new nodes or nodes without heartbeat.
//Each node in the cluster is registered in the multicast channel by multicast address and multicast port number to achieve the effect of managing each node by membership.
Membership Node properties:
address: multicast
port: Multicast port
frequency: Send heartbeat(Send to multicast address UDP data packet)Time interval(Company:ms). The default value is 500
dropTime: Membership stay dropTime(Company:ms)If the heartbeat of a node is not received, the node is deleted from the list of available nodes. The default value is 3000
-->
<Membership className="org.apache.catalina.tribes.membership.McastService"
address="228.0.0.4"
port="45564"
frequency="500"
dropTime="3000"/>
<!--
Reciver: Receiver, for Channel How does each node in the system get from other nodes? Sender There are two implementation modes for receiving replicated data: blocking mode and non-blocking mode.
1)BioReceiver( org.apache.catalina.tribes.transport.bio.BioReceiver )
2)NioReceiver( org.apache.catalina.tribes.transport.nio.NioReceiver )
Reciver Node properties:
address: The address used to receive the message can be understood as the address registered by the consumer.
port: The port number used to receive messages, multiple tomcat Nodes on a physical server should use different ports
autoBind: Change interval of port, if uuuuuuuuuuuu port For 4000, autoBind For 100, the receiver will be at 4000-4099 Take a port between them and listen on it.
selectorTimeout: Receiver Overtime for internal polling monitoring
maxThreads: Maximum number of threads in thread pool
-->
<Receiver className="org.apache.catalina.tribes.transport.nio.NioReceiver"
address="auto"
port="4001"
autoBind="100"
selectorTimeout="100"
maxThreads="6"/>
<!--
Sender: Sender, responsible for sending replication messages,Synchronized to other nodes, essentially responsible for sending messages is embedded Transport assembly
-->
<Sender className="org.apache.catalina.tribes.transport.ReplicationTransmitter">
<!--
Transport There are two modes of implementation:
org.apache.catalina.tribes.transport.bio.PooledMultiSender(Blocking type),
org.apache.catalina.tribes.transport.nio.PooledParallelSender(Non blocking type)
-->
<Transport className="org.apache.catalina.tribes.transport.nio.PooledParallelSender"/>
</Sender>
<!-- Interceptor : Cluster Interceptor -->
<Interceptor className="org.apache.catalina.tribes.group.interceptors.TcpFailureDetector"/>
<Interceptor className="org.apache.catalina.tribes.group.interceptors.MessageDispatch15Interceptor"/>
<Interceptor className="org.apache.catalina.tribes.group.interceptors.ThroughputInterceptor"/>
</Channel>
<!--
Valve: Valves, filters, used to detect or perform certain operations before the node responds to the client
ReplicationValve: Used to detect whether the current response involves Session Data updates, as configured below filter,That is, when accessing static pages, pictures, etc., it will not be done. session replication
-->
<Valve className="org.apache.catalina.ha.tcp.ReplicationValve" filter=".*/.gif;.*/.js;.*/.jpg;.*/.png;.*/.htm;.*/.html;.*/.css;.*/.txt;"/>
<!--JvmRouteBinderValve: When a node crash When the access jumps to another node, at this point session ID Will jvmRoute Values and previous session Id Bind together -->
<Valve className="org.apache.catalina.ha.session.JvmRouteBinderValve"/>
<Deployer className="org.apache.catalina.ha.deploy.FarmWarDeployer"
tempDir="/tmp/war-temp/"
deployDir="/tmp/war-deploy/"
watchDir="/tmp/war-listen/"
watchEnabled="false"/>
<!--
ClusterListener : Monitor, monitor Cluster The component receives the message and passes it on to the Manager
//When using Delta Manager, the information received by Cluster is passed to Delta Manager through Cluster Session Listener
-->
<ClusterListener className="org.apache.catalina.ha.session.ClusterSessionListener"/>
</Cluster>
<ClusterListener className="org.apache.catalina.ha.session.ClusterSessionListener"/>
<!-- Use the LockOutRealm to prevent attempts to guess user passwords
via a brute-force attack -->
<Realm className="org.apache.catalina.realm.LockOutRealm">
<!-- This Realm uses the UserDatabase configured in the global JNDI
resources under the key "UserDatabase". Any edits
that are performed against this UserDatabase are immediately
available for use by the Realm. -->
<Realm className="org.apache.catalina.realm.UserDatabaseRealm"
resourceName="UserDatabase"/>
</Realm>
<Host name="localhost" appBase="webapps"
unpackWARs="true" autoDeploy="true">
<!-- SingleSignOn valve, share authentication between web applications
Documentation at: /docs/config/valve.html -->
<!--
<Valve className="org.apache.catalina.authenticator.SingleSignOn" />
-->
<!-- Access log processes all example.
Documentation at: /docs/config/valve.html
Note: The pattern used is equivalent to using pattern="common" -->
<Valve className="org.apache.catalina.valves.AccessLogValve" directory="logs"
prefix="localhost_access_log." suffix=".txt"
pattern="%h %l %u %t "%r" %s %b" />
</Host>
</Engine>
</Service>
</Server>Supplementary configuration:
<! - If mu lt iple Tomcats are deployed on the same machine, the service shutdown ports should be different, such as the configuration of tomcat 2 changed from 8005 to 9005 - >
<Server port="9005" shutdown="SHUTDOWN">
In addition, there are the following configurations:
<!-- http Connection port and request forwarding port, 8080 changed to 8090, 8443 changed to 9443 -->
<Connector port="8090" protocol="org.apache.coyote.http11.Http11NioProtocol"
               connectionTimeout="20000"
               redirectPort="9443"
           executor="tomcatThreadPool"/>
<! - - AJP connector port, changed from 8009 to 9009, 8443 to 9443 - > uuuuuuuuuuuu <Connector port="9009" protocol="AJP/1.3" redirectPort="9443" />
<! -- Configuration for session information tracking. In Tomcat 2, jvmRoute= "tomcat 1" -->
<Engine name="Catalina" defaultHost="localhost"  jvmRoute="tomcat2">
<!-- The port used by the receiver was changed from 4001 to 5001 -->
<Receiver className="org.apache.catalina.tribes.transport.nio.NioReceiver"
    address="auto"
    port="4001"
    autoBind="100"
    selectorTimeout="100"
    maxThreads="6"/>
Note: The ports mentioned above, don't forget to modify the firewall iptables open port, otherwise there will be no access.
2. Modifying WEN-INF/web.xml of the project
Add between <web-app> and </web-app>:
<distributable/>3. Start the tomcat service to test whether it is accessible
Installation and configuration of Apache server
1. Download Apache 2.0.25, official address: http://httpd.apache.org Download address: Click Download Apache 2.0.25
After downloading the file: apache_2.0.55-win32-x86-no_ssl.msi, double-click installation and run.
During the installation process, Network Domain and Server Name fill in the contents. If used for local test, you can directly localhost, otherwise fill in the remote host address.
2. Download and configure mod_jk.so
Because mod_jk mode is adopted, the mod_jk.so plug-in needs to be downloaded. mod_jk-apache-2.0.55.so
Copy the downloaded mod_jk-apache-2.0.55.so file to the modules directory of the Apache installation directory
3. Modify apache configuration file conf/http.conf
Open and revise:
ServerName localhost:80Add the following code at the end of the document:
include conf/mod_jk.conf4. Configure mod_jk.conf
Create mod_jk.conf file in the same directory as http.conf, as follows:
#Loading mod_jk module
LoadModule jk_module modules/mod_jk-apache-2.0.55.so
#Load the mod_jk.so configuration file
JkWorkersFile conf/workers.properties
#Specify those requests to tomcat for processing, and "controller" is the load allocation controller specified in workers. properties
JkMount /* controller
5. Configure workers.properties
Under the same directory as http.conf, create workers.properties file as follows:
###server list
###jvm1 needs to note that this name corresponds to server.xml < Engine name = "Catalina" defaultHost = "localhost" jvmRoute = "tomcat1">
worker.list = controller,tomcat1,tomcat2
###tomcat1
###ajp13 port number, server.xml configuration under tomcat, default 8009
worker.tomcat1.port=8009
worker.tomcat1.host=192.168.0.10
worker.tomcat1.type=ajp13
###The weighted proportion of server, the higher the value, the more requests to share.
worker.tomcat1.lbfactor=1

###tomcat2
worker.tomcat2.port=9009
worker.tomcat2.host=192.168.0.10
worker.tomcat2.type=ajp13
worker.tomcat2.lbfactor=1

###controller
worker.controller.type=lb
###Specify tomcat to share requests
worker.controller.balance_workers=tomcat1,tomcat2
worker.controller.sticky_session=1
6. Start Apache Services
IV. Testing Cluster Environment
1. In tomcat1 and tomcat2, the project creates two pages: session_set.jsp and session_get.jsp.
tomcat1 medium
session_set.jsp:
<%@ page language="java" pageEncoding="UTF-8"%>
<%
    request.getSession().setAttribute("name", "tomcat1");
    System.out.println("tomcat1 set attribute success!");
%>
<!DOCTYPE html>
<html>
  <head>
    <title>test</title>
    <meta http-equiv="content-type" content="text/html; charset=UTF-8">
  </head>
  <body>
    tomcat1 set attribute success!<br>
  </body>
</html>
session_get.jsp:
<%@ page language="java" pageEncoding="UTF-8"%>
<%
    Object name = request.getSession().getAttribute("name");
    System.out.println("tomcat1 get attribute: "+name);
%>
<!DOCTYPE html>
<html>
  <head>
    <title>test</title>
    <meta http-equiv="content-type" content="text/html; charset=UTF-8">
  </head>
  <body>
    tomcat1 get attribute: <%=name %><br>
  </body>
</html>
tomcat2 medium
session_set.jsp:
<%@ page language="java" pageEncoding="UTF-8"%>
<%
    request.getSession().setAttribute("name", "tomcat2");
    System.out.println("tomcat2 set attribute success!");
%>
<!DOCTYPE html>
<html>
  <head>
    <title>test</title>
    <meta http-equiv="content-type" content="text/html; charset=UTF-8">
  </head>
  <body>
    tomcat2 set attribute success!<br>
  </body>
</html>
session_get.jsp:
<%@ page language="java" pageEncoding="UTF-8"%>
<%
    Object name = request.getSession().getAttribute("name");
    System.out.println("tomcat2 get attribute: "+name);
%>
<!DOCTYPE html>
<html>
  <head>
    <title>test</title>
    <meta http-equiv="content-type" content="text/html; charset=UTF-8">
  </head>
  <body>
    tomcat2 get attribute: <%=name %><br>
  </body>
</html>
Load balancing test:
After starting Tomcat 1, Tomcat 2, Apache services, access them multiple times with different browsers http://localhost/test/session_set.jsp,
http://localhost/test/session_get.jsp
See if the results request is distributed to Tomcat 1 and Tomcat 2, and if so, load balancing.
High Availability Testing:
After the load balancing test is completed, close tomcat2 and refresh session_get.jsp page of the session on tomcat2 to see if the value of name is tomcat2. If so, the session information of tomcat2 is synchronized to tomcat1, which realizes high availability.
Reference:
http://blog.csdn.net/yipanbo/article/details/44079083/
http://blog.csdn.net/zhuying_linux/article/details/6590700