Click to read angular (1)
Click to read angular (2)
Check out nicknames and get a full set of angular video tutorials
I. Angular 6.0
1.1 Custom Directives
1.1.1 icktBind
Binding this data to an element, similar to interpolation syntax
1 // Introducing services

2 import { Directive, ElementRef } from '@angular/core';

3

4 @Directive({

5  selector: '[icktBind]',

6  // Registered variables

7  inputs: ['icktBind']

8 })

9 export class IcktBindDirective {

10  // Declare the type of data received by attribute variables

11  icktBind:string;

12  // Parameter injection and storage services

13  constructor(public el: ElementRef) { }

14  // Monitoring data changes

15  ngOnChanges(e) {

16   console.log(e)

17   // Rendering content

18   this.el.nativeElement.innerHTML = this.icktBind;

19  }

20 }

21
1.1.2 icktClass
There are three ways to implement binding to classes of elements
A string is a set of classes
Array, each member representing a group of classes
Object whose attribute value is true stores the class
1 // Introducing services

2 import { Directive, ElementRef } from '@angular/core';

3

4 @Directive({

5  selector: '[icktClass]',

6  // Registration data

7  inputs: ['icktClass']

8 })

9 export class IcktClassDirective {

10  // Type of declaration

11  icktClass: any;

12  // Injection service, storage service

13    constructor(protected el: ElementRef) { }

14    // Monitoring changes in data

15    ngOnChanges() {

16     // Define the added class string

17     let cls:string = '';

18     // Judging data type

19     if (typeof this.icktClass === 'string') {

20      // Direct Storage String

21      cls = this.icktClass;

22     // Judge the array instanceof, constructor, Array.isArray Object.prototype.toString.call,

23     } else if (Array.isArray(this.icktClass)) {

24      // Converting an array to a string

25      cls = this.icktClass.join(' ');

26     } else {

27      // Traversing objects

28      for (let key in this.icktClass) {

29       // this.icktClass[key] represents the attribute value

30       if (this.icktClass[key]) {

31        // Storage key

32        cls += ' ' + key;

33       }

34      }

35      // Delete the first space

36      cls = cls.slice(1);

37     }

38     // console.log(this.icktClass)

39     // Update element classes

40     this.el.nativeElement.className = cls;

41    }

42

43 }

44
1.2 Component Life Cycle
To illustrate the process of component creation, existence and destruction, ng6 provides us with the life cycle of components.
In ng6, components are instructions, and the lifecycle of components is also applicable to instructions (very similar).
Creation period
The constructor represents the component constructor, which executes the instructions, and the component has already been created
ngOnInit component starts initialization
Data initialization of ngAfterContentInit component
View initialization of ngAfterViewInit component
Existence Period: When the data of a component (instruction) changes, it enters the Existence Period.
ngOnChanges indicates that the instruction's data has changed (the method specific to the instruction)
A parameter is an object that changes data.
Current Value current value
A value on previousValue
Is first Change the first (during creation) data change?
ngDoCheck component detects whether data has changed
The data of ngAfterContentChecked component has been updated
The view of ngAfterViewChecked component has been updated
Destruction Period
The ngOn Destory component is about to be destroyed
Be careful
1 When a component enters the creation phase, the creation phase method and the lifetime method are executed alternately
2 When a component enters its lifetime, it will only execute lifetime methods, not creation-time methods.
The scope of all three methods (this) is a component-time object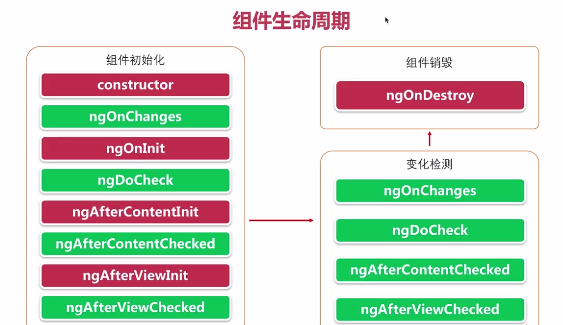
1 // Introducing services

2 import { Directive, ElementRef } from '@angular/core';

3

4 @Directive({

5  selector: '[icktBind]',

6  // Registered variables

7  inputs: ['icktBind']

8 })

9 export class IcktBindDirective {

10  // Declare the type of data received by attribute variables

11  icktBind:string;

12  // Component constructor

13  constructor() {

14   console.log(111, 'constructor', this, arguments)

15  }

16  // Component Initialization

17  ngOnInit() {

18   console.log(222, 'ngOnInit', this, arguments)

19  }

20  // Start updating data

21  ngAfterContentInit() {

22   console.log(333, 'ngAfterContentInit', this, arguments)

23  }

24  // Start updating views

25  ngAfterViewInit() {

26   console.log(444, 'ngAfterViewInit', this, arguments)

27  }

28  // Existence period

29  // The data starts to change, and the specific method of instruction

30  ngOnChanges() {

31   console.log(1, 'ngOnChanges', this, arguments)

32  }

33  // Start checking for updates

34  ngDoCheck() {

35   console.log(2, 'ngDoCheck', this, arguments)

36  }

37  // Data Update Completed

38  ngAfterContentChecked() {

39   console.log(3, 'ngAfterContentChecked', this, arguments)

40  }

41  // View Update Completed

42  ngAfterViewChecked() {

43   console.log(4, 'ngAfterViewChecked', this, arguments)

44  }

45  // Components are about to be destroyed

46  ngOnDestory() {

47   console.log(1234, 'ngOnDestory', this, arguments)

48  }

49 }

50
1.3 Pipeline
Pipes are filters in vue. We can use pipes in interpolation grammar or instructions to process data rendered to pages.
ng6 has a large number of pipes built in, which we can use and process data.
Syntax {Data | Pipeline Name: Parameter 1: Parameter 2 | Pipeline 2}
The output of the former pipe will be the input of the next pipe.
1.3.1 Built-in Pipeline
number Pipeline
Used to process numbers into readable formats.
Add commas every three places in the integer section
By default, three decimal places are reserved and the last one rounded.
A parameter represents a formatted string
slice pipeline
Cut arrays or strings
The first parameter represents the starting position
The second parameter represents the end position (not included)
data pipeline
Dates in any format can be created.
parameter
It can be a built-in date template name.
The default is mediumDate
It can be a template identifier
y represents the year
M stands for month
d Representative Day
E stands for week
H | h stands for hours
m Representation Score
s stands for seconds
...
Different numbers render different formats, usually
Four digits or full spelling in English
Three-digit or English abbreviation
Two-digit digits
One digit
1 <!-- Use of pipes -->

2 <h1>{{num | number : '1.0-4'}}</h1>

3 <h1>{{msg | slice : 3 : 7}}</h1>

4 <h1>{{colors | slice : 2 : 4}}</h1>

5 <h1>{{date | date}}</h1>

6 <h1>{{date | date : 'mediumDate'}}</h1>

7 <!-- 09-22 09:16 -->

8 <h1>{{date | date : 'MM-dd hh:mm'}}</h1>

9 <!-- 2018-09-22 -->

10 <h1>{{date | date : 'yyyy-MM-dd'}}</h1>

11
1.3.2 Custom Pipeline
The built-in pipeline is limited. If we want to reuse more logic, we need to customize the pipeline.
Like creating custom instructions, components, classes, etc., we can create them through ng instructions
ng g pipe pipe name (add path)
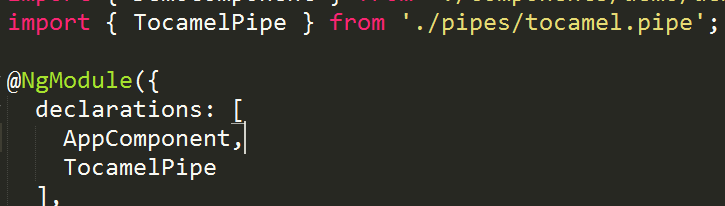
Two files were created and the global module files were updated

Custom pipes are declared globally, so we can use them anywhere.
annotation
In the pipeline, some information is injected into the pipeline class through the Pipe pipeline annotation class
Define its name through the name attribute
Conversion method
The transform method in the pipeline class is used to process the data. Every time the data is updated, it will be executed.
The first parameter represents the processed data
Starting with the second parameter, it represents the data passed.
The return value is the result of rendering.
1 import { Pipe, PipeTransform } from '@angular/core';

2

3 @Pipe({

4  name: 'tocamel'

5 })

6 export class TocamelPipe implements PipeTransform {

7

8  transform(value: string, firstCharIsUpper?: boolean): string {

9   // If the initial letter is capitalized

10   if (firstCharIsUpper) {

11    value = value[0].toUpperCase() + value.slice(1);

12   }

13   // console.log(arguments)

14   // Remove and -, and capitalize the lowercase letters that follow.

15   return value.replace(/[-_]([a-z])?/g, (match, $1 = '') => $1.toUpperCase())

16   // return null;

17   // return'Aichuang Classroom';

18  }

19

20 }

21
1.4 Data Binding
Bi-directional data binding through v-model instruction in vue
ng6 is also implemented based on MVVM mode, so it also supports bidirectional data binding, which is also implemented through ngModel instructions.
Bidirectional data binding has two directions
Data from model to view
To achieve this through data binding, you need to bind a variable to the instruction, so you use [] grammatical sugar.
Data enters the model from view
Implemented through event monitoring is to bind an event to an instruction, so use () grammatical sugar.
So in ng6, to realize data bidirectional binding, we need to use two grammatical sugars [], ()
Binding data must be declared in component classes
We need to bind implementations before binding data, so we write () inside []
Grammar [(ngModel)]="key"
If there are many form elements in the page, there will be more data bound at this time. In order to access conveniently, we usually put them in the same namespace. But in order for ng6 to receive these, we need to understand the structure of the namespace, so we can define model classes to illustrate it.
Note: We use bi-directional data binding, which is the content of the form module, so we need to install the form module.
formModel module is introduced in global configuration. In the imports configuration, inject the module so that you can use the form module anywhere.
1 <p>

2  <label>User name</label>

3  <!-- Using data bidirectional binding -->

4  <!-- <input type="text" [(ngModel)]="username"> -->

5  <input type="text" [(ngModel)]="data.username">

6  <span>{{username}}</span>

7 </p>

8 <p>

9  <label>Password</label>

10  <!-- <input type="text" [(ngModel)]="password"> -->

11  <input type="text" [(ngModel)]="data.password">

12 </p>

13 <p>

14  <button (click)="showResult()">View data</button>

15 </p>
1.5 Form Check
When we interact with form elements, we input information data to form elements. Is the input information legitimate? ng6 provides form validation technology.
When we use the form element in the page, the formsModule module is installed globally. At this point, an ngForm instruction is automatically added to the form element. We can view the ngForm instruction object through template variable technology.
#f="ngForm"
Since we assign values to f variables, f represents the form instruction object, not the source DOM element.
We can pass this variable to the event callback function to see the specific information.
1.5.1 Four Attributes
Form instruction object has four attributes
Has dirty been entered
true means input
false means no input
Has pristine not been entered?
true means no input
false means input
So dirty and pristine are opposite (mutually exclusive)
Is valid legal
true denotes legitimate
false denotes illegal
Is invalid illegal
true denotes illegality
false denotes legitimacy
So valid and invalid are opposite (mutually exclusive)
In the form instruction object, there is a control attribute, which stores all the sub-form elements. Like the form instruction object, it also has these four attributes.
There are two conditions for the occurrence of a subform element instruction object in the control attribute
1 Must use ngModel instructions
2 The name attribute must be defined
Through these four fields, we can check the data entered in the form.
1.5.2 Form Constraints
Form element support h5 in ng6 provides form constraint attributes, such as required, maxlength, minlength, pattern, etc.
Where required starts checking before input
Form elements can be constrained by these attributes. valid and invalid work at this point
According to the four attributes of the form, we can show the prompt copy of the hidden form.
In vue, the built-in v-show is used to control the explicit and implicit elements, but in ng6, the explicit and implicit elements can be implemented through the h5 attribute hidden or customized explicit and implicit instructions, such as icktShow.
For hidden attributes, if the attribute value
true: Hide this element
false: Display this element
In order for variables to control hidden attribute values, we use [] grammatical sugar.
In ng6, in order to access the instruction object of the sub-element conveniently, we can obtain the instruction object from the template variable on the element.
#key="ngModel"
summary
If a subform element is entered, the form is entered.
If a subform element is illegal, the form is illegal
1.5.3 Data submission
We can trigger submit events by buttons, submit data, submit to form form form elements, and submit buttons trigger
We can use the disabled attribute provided by h5 to control whether form elements can be manipulated or not.
Property value is true and form elements are disabled
The attribute value is false, and you can use form elements
1 <!-- Binding submission events -->

2 <form #f="ngForm" (submit)="submitData()">

3  <p>

4   <label>User name</label>

5   <input type="text" autocomplete="off" name="username" [(ngModel)]="data.username" maxlength="10" minlength="4" required #username="ngModel">

6   <!-- Do not enter to hide, or, if legal, to hide -->

7   <!-- <span [hidden]="(f.controls.username && f.controls.username.pristine) || (f.controls.username && f.controls.username.valid)">User name 4-10 position</span> -->

8   <!-- Simple Way -->

9   <!-- <span [hidden]="username.pristine || username.valid">User name 4-10 position</span> -->

10   <!-- After input, and, unlawful -->

11   <span [icktShow]="username.dirty && username.invalid">User name 4-10 Bit any character</span>

12  </p>

13  <p>

14   <label>Password</label>

15   <input type="text" autocomplete="off" name="password" [(ngModel)]="data.password" pattern="^\w{4,8}$" required #password="ngModel">

16   <!-- Before input, or, legally -->

17   <span [hidden]="password.pristine || password.valid">The password is alphanumeric, underlined, 4-8 position</span>

18  </p>

19  <p>

20   <!-- View Form Instruction Object -->

21   <!-- <button (click)="showResult(f)">View data</button> -->

22   <!-- The form is illegal and cannot be submitted. -->

23   <button [disabled]="f.invalid">Submission</button>

24  </p>

25 </form>
1.6 Asynchronous Request Service
To get the server-side data, we send asynchronous requests.
In ng6, the core module does not contain the http request module, so we need to install the module first, and then use the module.
Installing http module services is the same as installing forms module services
Introducing httpModule through imports in app-module.ts
imports: [ HttpModule ]
Once the service is configured globally, we can use it in various components.
Using http services, like using ElementRef services, requires injection before use
To ensure that services are stored in components, we can use public, private, protected keywords to inject services
The ajax method in the http module implements the rxjs specification in ES6, which is similar to the primise specification and is also a specification for changing asynchronous writing to synchronous writing. rxjs is a publisher-subscriber model
http module provides
Get method, send get request
Post method to send a post request
The way you use it is the same as the axios module
But the asynchronous request method of http listens for data return through subscribe method
The returned data method can only be converted to js data by calling the tojson method
1 import { Component, OnInit } from '@angular/core';

2 // Introducing services

3 import { Http } from '@angular/http';

4

5 @Component({

6  selector: 'app-http',

7  templateUrl: './http.component.html',

8  styleUrls: ['./http.component.css']

9 })

10 export class HttpComponent implements OnInit {

11  msg;

12  // Injection services

13  constructor(public http: Http) { }

14

15  ngOnInit() {

16   // The request was sent.

17   this.http.get('/assets/data/msg.json')

18    // Listen for data return

19    .subscribe(res => {

20     // console.log(res.json())

21     // Update the msg based on the returned data

22     let data = res.json();

23     this.msg = data.msg;

24    })

25  }

26

27 }

28
1.7 Custom Service
Services are the encapsulation of methods that can be reused between components.
Built-in services are limited, and sometimes more services are needed. We need to customize services.
ng g service service service name
At this point, two new files were created and the global configuration file was not updated, so we need to configure them before using them.

** Focus on the public number "icketang", access to the latest front-end information, learning materials
B-Battle Search "Aichuang Classroom Professional Front-end Training" Free Watch Front-end Video and Project Practice**