In the development and testing environment, we usually build a single instance of Redis to meet the development and testing requirements. However, in the production environment, if there are high requirements for availability and reliability, we need to introduce Redis cluster scheme. Although major cloud platforms now provide caching services that can be used directly, it is always necessary to understand the implementation and principle behind them (such as interview). This article will learn about several Redis clustering schemes.
Redis supports three cluster schemes
- Master slave replication mode
- Sentinel mode
- Cluster mode
Master slave replication mode
1. Basic principles
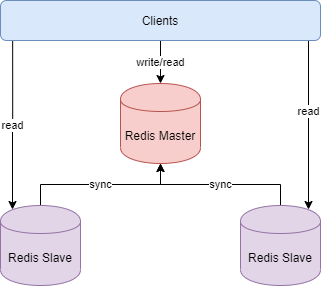
The master-slave replication mode includes one master database instance and one or more slave database instances, as shown in the following figure

The client can read and write to the master database and read from the slave database. The data written from the master database will be synchronized to the slave database automatically in real time.
The specific working mechanism is as follows:
- After the slave is started, it sends a SYNC command to the master. After receiving the SYNC command, the master saves the snapshot through bgsave (that is, RDB persistence described above), and uses the buffer to record the write commands executed during the period of saving the snapshot
- The master sends the saved snapshot file to the slave and continues to record the executed write commands
- After receiving the snapshot file, the slave loads the snapshot file and data
- After the master snapshot is sent, it starts to send buffer write commands to the slave. The slave receives and executes the commands to complete replication initialization
- After that, every time the master executes a write command, it will send it to the slave synchronously to maintain the data consistency between the master and the slave
2. Deployment example
This example is based on redis version 5.0.3.
Main configuration of redis.conf
###Network related###
# bind 127.0.0.1 # Bind the monitored network card IP. Note it out or configure it to 0.0.0.0 to make any IP accessible
protected-mode no # Turn off protected mode and access with password
port 6379  # Set the listening port. It is recommended that all production environments use custom ports
timeout 30 # How long does the client disconnect after the connection is idle, in seconds. 0 means disabled

###General configuration###
daemonize yes # Run in the background
pidfile /var/run/redis_6379.pid  # pid process file name
logfile /usr/local/redis/logs/redis.log # Location of log files

###RDB Persistent configuration###
save 900 1 # If there is at least one write operation within 900s, execute bgsave for RDB persistence
save 300 10
save 60 10000
# If RDB persistence is disabled, save "" can be added here
rdbcompression yes #Whether to compress RDB files. It is recommended to set it to no to exchange (disk) space for (CPU) time
dbfilename dump.rdb # RDB file name
dir /usr/local/redis/datas # The RDB file is saved in the path, and the AOF file is also saved here

###AOF to configure###
appendonly yes # The default value is no, which means that AOF incremental persistence is not used and RDB full persistence is used
appendfsync everysec # The optional values are always, everysec and no. It is recommended to set it to everysec

###Set password###
requirepass 123456 # Set a more complex password
To deploy the master-slave replication mode, you only need to slightly adjust the slave configuration and add it in redis.conf
replicaof 127.0.0.1 6379 # master ip, port
masterauth 123456 # master password
replica-serve-stale-data no # If the slave cannot be synchronized with the master, set the slave to be unreadable to facilitate the monitoring script to find problems
In this example, the master port 6379 is configured on a single server. The two slave ports are 70017002 respectively. Start the master and then start the two slave ports
[root@dev-server-1 master-slave]# redis-server master.conf
[root@dev-server-1 master-slave]# redis-server slave1.conf
[root@dev-server-1 master-slave]# redis-server slave2.conf
Enter the master database, write a data, and then enter a slave database to immediately access the data just written to the master database. As shown below
[root@dev-server-1 master-slave]# redis-cli
127.0.0.1:6379> auth 123456
OK
127.0.0.1:6379> set site blog.jboost.cn
OK
127.0.0.1:6379> get site
"blog.jboost.cn"
127.0.0.1:6379> info replication
# Replication
role:master
connected_slaves:2
slave0:ip=127.0.0.1,port=7001,state=online,offset=13364738,lag=1
slave1:ip=127.0.0.1,port=7002,state=online,offset=13364738,lag=0
...
127.0.0.1:6379> exit

[root@dev-server-1 master-slave]# redis-cli -p 7001
127.0.0.1:7001> auth 123456
OK
127.0.0.1:7001> get site
"blog.jboost.cn"
Execute the info replication command to view the information of other databases connected to the database. As shown above, two slave are connected to the master
3. Advantages and disadvantages of master-slave replication
advantage:
- The master can automatically synchronize the data to the slave, separate the reading and writing, and share the reading pressure of the master
- The synchronization between master and slave is non blocking. During the synchronization, the client can still submit queries or update requests
Disadvantages:
- Without the automatic fault tolerance and recovery function, the downtime of the master or slave may cause the client request to fail. You need to wait for the machine to restart or manually switch the client IP to recover
- When the master goes down, if the data is not synchronized before the shutdown, there will be data inconsistency after IP switching
- It is difficult to support online capacity expansion, and Redis's capacity is limited by single machine configuration
Sentinel mode
1. Basic principles
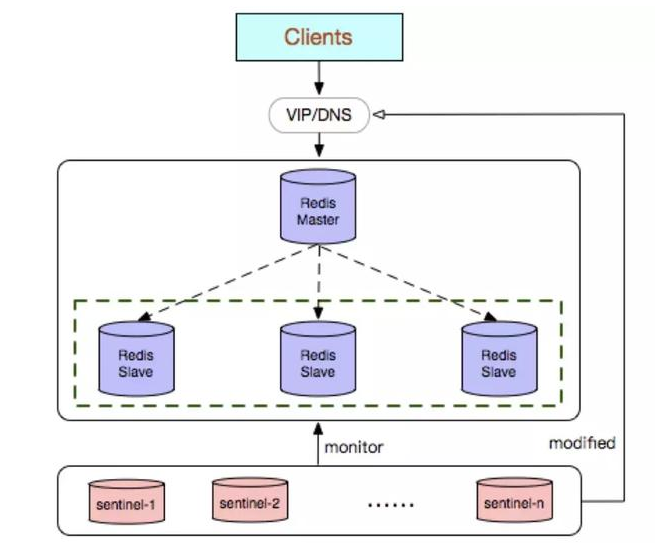
Sentinel mode is based on master-slave replication mode, but sentinel is introduced to monitor and automatically deal with faults. As shown in the figure

As the name suggests, sentinels are here to stand guard for Redis clusters. Once problems are found, they can respond accordingly. Its functions include
- Monitor whether the master and slave operate normally
- When the master fails, it can automatically convert a slave to the master (if the eldest brother hangs up, choose a younger brother)
- Multiple sentinels can monitor the same Redis, and sentinels will also automatically monitor each other
Specific working mechanism of sentinel mode:
In the configuration file sentinel monitor <master-name> <ip> <redis-port> <quorum> To locate the IP and port of the master. One sentinel can monitor multiple master databases. You only need to provide multiple configuration items. After the sentinel is started, two connections will be established with the master to be monitored:
- A connection is used to subscribe to the master_ sentinel_:hello channel and other sentinel nodes monitoring the master
- Another connection periodically sends commands such as INFO to the master to obtain the information of the master itself
After establishing a connection with the master, the Sentry will perform three operations:
- Send INFO commands to the master and slave periodically (usually once every 10s, and once every 1s when the master is marked as subjective offline)
- Regularly report to the master and slave_ sentinel_: The Hello channel sends its own information
- Send PING commands to master, slave and other sentinels regularly (1s once)
Sending the INFO command can obtain the relevant information of the current database, so as to realize the automatic discovery of new nodes. Therefore, sentinels only need to configure master database information to automatically discover their slave information. After obtaining the slave information, the sentinel will also establish two connections with the slave to perform monitoring. Through the INFO command, the Sentry can obtain the latest information of the master-slave database and carry out corresponding operations, such as role change.
Next, the sentry reports to the master-slave database_ sentinel_: The Hello channel sends information that shares its own information with sentinels who also monitor these databases. The sending content includes the Sentinel's ip port, operation id, configuration version, master name, master's ip port and master's configuration version. This information is useful for:
- Other sentinels can judge whether the sender is a newly discovered sentinel through this information. If so, a connection to the sentinel will be created to send a PING command.
- Other sentinels can judge the version of the master through this information. If the version is higher than the directly recorded version, it will be updated
- After realizing the automatic discovery of slave and other sentinel nodes, the sentinel can regularly monitor whether these databases and nodes stop service by sending PING commands regularly.
If the database or node being pinged times out (via sentinel down-after-milliseconds master-name milliseconds Configuration) does not reply, and the sentry considers it Subjectively offline (sdown, s is Subjectively). If the master is offline, the sentinel will send a command to other sentinels to ask them if they also think that the master is offline Subjectively. If a certain number of votes (i.e. quorum in the configuration file) are reached, the sentinel will think that the master has been offline Objectively (odown, o is objective - Objectively), and elect the leading sentinel node to initiate fault recovery for the master-slave system. If not enough sentinel processes agree to the master offline, the objective offline status of the master will be removed. If the master returns a valid reply to the PING command sent to the sentinel process again, the subjective offline status of the master will be removed
The sentinel thinks that after the master goes offline objectively, the fault recovery operation needs to be performed by the elected leader sentinel. The election adopts the Raft algorithm:
- The sentinel node that finds the master offline (we call it A) sends commands to each sentinel and asks the other party to select itself as the leading sentinel
- If the target sentry node has not selected anyone else, it will agree to elect A as the lead sentry
- If more than half of the Sentinels agree to elect A as the leader, A is elected
- If there are multiple sentinel nodes competing for the leader at the same time, there may be a round of voting, and no candidate wins. At this time, each participating node waits for a random time to launch the request again and conduct the next round of voting until the leader sentinel is elected
After the leader Sentry is selected, the leader starts to recover the system from failure, and selects a new master from the database of the failed master. The selection rules are as follows:
- Select the highest priority among all online slaves, and the priority can be configured through slave priority
- If there are multiple slave s with the highest priority, the one with the largest copy offset (i.e. the more complete the copy) is selected
- If the above conditions are the same, select the slave with the smallest id
After selecting the slave to be succeeded, the leading sentinel sends a command to the database to upgrade it to master, then sends a command to other slave to accept the new master, and finally updates the data. Update the old master that has been stopped to the slave database of the new master, so that it can continue to run as a slave after the service is restored.
2. Deployment demonstration
This example is based on redis version 5.0.3.
Sentinel mode is based on the master-slave replication mode described above. The sentinel configuration file is sentinel.conf, which is added to the file
sentinel monitor mymaster 127.0.0.1 6379 1 # mymaster defines the name of a master database, followed by the ip and port of the master. 1 means that at least one Sentinel process needs to agree to judge the master as invalid. If this condition is not met, automatic failover will not be performed
sentinel auth-pass mymaster 123456 # master password

sentinel down-after-milliseconds mymaster 5000 # If PING is not replied within 5s, the master will be considered offline. The default value is 30s
sentinel parallel-syncs mymaster 2  # Specifies the maximum number of slave instances that can synchronize new master instances during failover. When there are many slave instances, the smaller the number, the longer the synchronization time, and the longer the time required to complete failover
sentinel failover-timeout mymaster 300000 # If the failover operation is not completed within this time (ms), the failover is considered to have failed, and the production environment needs to set this value according to the amount of data
One sentinel can monitor multiple master databases, just add multiple sets according to the above configuration
Start three sentinel s on 2637936379 port respectively
[root@dev-server-1 sentinel]# redis-server sentinel1.conf --sentinel
[root@dev-server-1 sentinel]# redis-server sentinel2.conf --sentinel
[root@dev-server-1 sentinel]# redis-server sentinel3.conf --sentinel
Redis sentinel sentinel1.conf can also be used Command start. At this time, the cluster includes one master, two slave and three sentinel, as shown in the figure,

Let's simulate the scenario where the master hangs up and execute kill -9 3017 Kill the master process and execute it in the slave info replication view,
[root@dev-server-1 sentinel]# redis-cli -p 7001
127.0.0.1:7001> auth 123456
OK
127.0.0.1:7001> info replication
# Replication
role:slave
master_host:127.0.0.1
master_port:7002
master_link_status:up
master_last_io_seconds_ago:1
master_sync_in_progress:0
# ellipsis
127.0.0.1:7001> exit
[root@dev-server-1 sentinel]# redis-cli -p 7002
127.0.0.1:7002> auth 123456
OK
127.0.0.1:7002> info replication
# Replication
role:master
connected_slaves:1
slave0:ip=127.0.0.1,port=7001,state=online,offset=13642721,lag=1
# ellipsis
You can see that slave 7002 has been successfully promoted to master (role: Master) and receives a connection from slave 7001. At this time, check the slave2.conf configuration file and find that the replica of 127.0.0.1 6379 has been removed from the slave1.conf configuration file Changed to replicaof 127.0.0.1 7002. When you restart the master, you can also see that the configuration item replicaof 127.0.0.1 7002 is added to the master.conf configuration file. It can be seen that after the master is subordinate, you can only be a slave when you come out again, 30 years east and 30 years West.
3. Advantages and disadvantages of sentinel mode
advantage:
- Sentinel mode is based on master-slave copy mode, so master-slave copy mode has some advantages, and sentinel mode also has
- In sentinel mode, when the master hangs up, it can be switched automatically, and the system availability is higher
Disadvantages:
- It also inherits the disadvantage that the master-slave mode is difficult to expand online. Redis's capacity is limited by single machine configuration
- Additional resources are needed to start the sentinel process. The implementation is relatively complex. At the same time, the slave node does not provide services as a backup node
Cluster mode
1. Basic principles
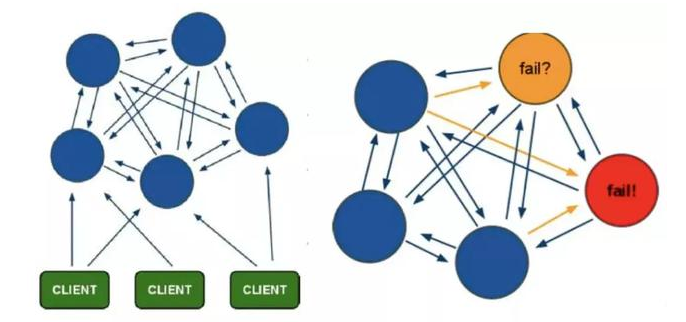
Sentinel mode solves the problem that master-slave replication cannot fail over automatically and cannot achieve high availability, but it is still difficult to expand online and Redis capacity is limited by single machine configuration. Cluster mode realizes Redis distributed storage, that is, each node stores different contents to solve the problem of online capacity expansion. As shown in the figure

Cluster adopts a centerless structure with the following characteristics:
- All redis nodes are interconnected (PING-PONG mechanism), and binary protocols are used internally to optimize transmission speed and bandwidth
- The failure of a node takes effect only when more than half of the nodes in the cluster detect failure
- The client is directly connected to the redis node and does not need an intermediate agent layer. The client does not need to connect to all nodes in the cluster, but to any available node in the cluster
Specific working mechanism of Cluster mode:
- Each node of Redis has a slot with a value range of 0-16383
- When we access the key, Redis will get a result according to the algorithm of CRC16, and then calculate the remainder of the result to 16384. In this way, each key will correspond to a hash slot numbered between 0-16383. Through this value, we can find the node corresponding to the corresponding slot, and then directly and automatically jump to the corresponding node for access
- In order to ensure high availability, the Cluster mode also introduces the master-slave replication mode. A master node corresponds to one or more slave nodes. When the master node goes down, the slave node will be enabled
- When other master nodes ping a master node a, if more than half of the master nodes communicate with a timeout, it is considered that master node a is down. If both master node A and its slave nodes are down, the cluster can no longer provide services
Cluster mode cluster nodes are configured with a minimum of 6 nodes (3 master and 3 slave, because more than half of them are required). The master node provides read-write operations, and the slave node serves as a standby node, does not provide requests, and is only used for failover.
2. Deployment demonstration
This example is based on redis version 5.0.3.
The deployment of Cluster mode is relatively simple. First, in redis.conf
port 7100 # The six node ports in this example are 71007200730075007600 respectively
daemonize yes # r background operation
pidfile /var/run/redis_7100.pid # pidfile file corresponds to 71007200730074007600
cluster-enabled yes # Turn on cluster mode
masterauth passw0rd # If the password is set, you need to specify the master password
cluster-config-file nodes_7100.conf # The cluster configuration file also corresponds to six nodes such as 71007200
cluster-node-timeout 15000 # The request timeout is 15 seconds by default and can be set by yourself
Start six instances on port 7100720073007400075007600 respectively (if it is one instance per server, the configuration can be the same)
[root@dev-server-1 cluster]# redis-server redis_7100.conf
[root@dev-server-1 cluster]# redis-server redis_7200.conf
...
Then use the command to form the six instances into a cluster of three master nodes and three slave nodes,
redis-cli --cluster create --cluster-replicas 1 127.0.0.1:7100 127.0.0.1:7200 127.0.0.1:7300 127.0.0.1:7400 127.0.0.1:7500 127.0.0.1:7600 -a passw0rd
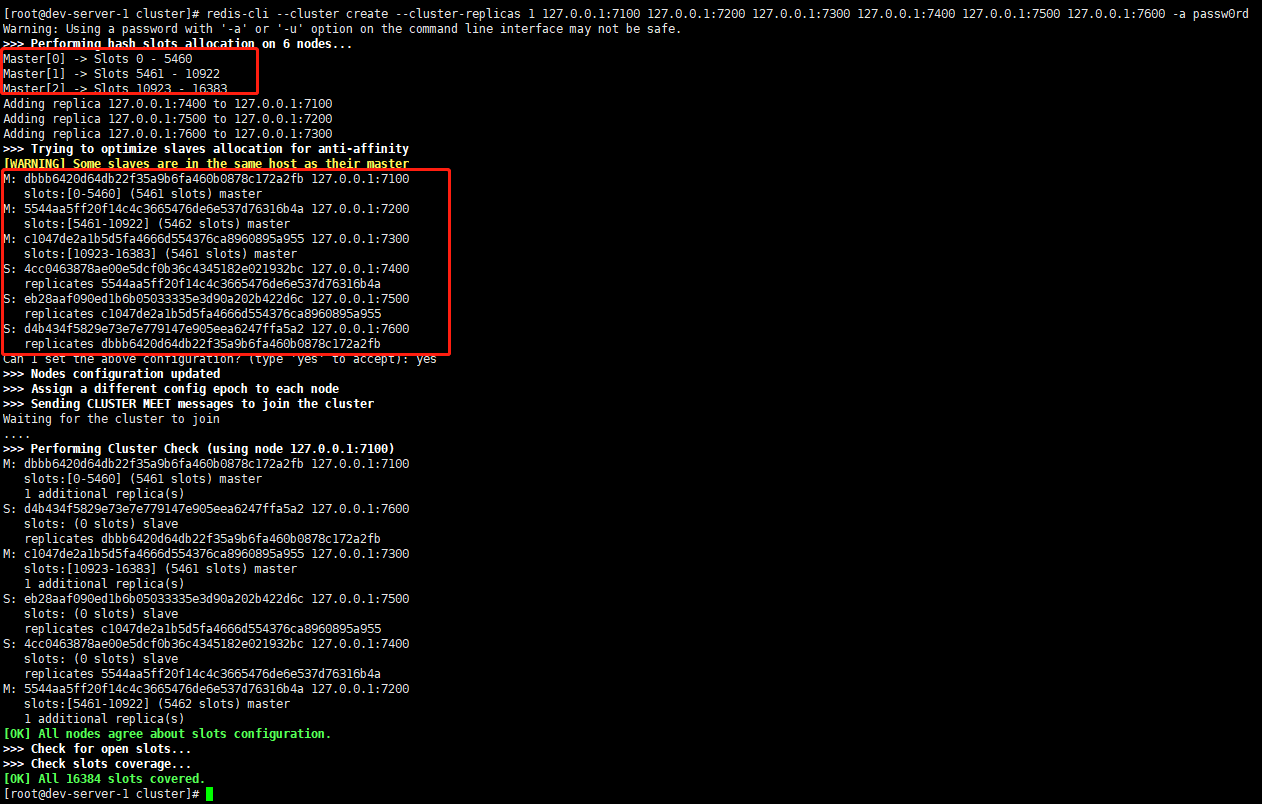
The execution results are shown in the figure below

It can be seen that 710072007300 is used as three master nodes, and the allocated slot s are 0-54605461-1092210923-163837600 as 7100, 7500 as 7300 and 7400 as 7200 respectively.
We set a value for connection 7100
[root@dev-server-1 cluster]# redis-cli -p 7100 -c -a passw0rd
Warning: Using a password with '-a' or '-u' option on the command line interface may not be safe.
127.0.0.1:7100> set site blog.jboost.cn
-> Redirected to slot [9421] located at 127.0.0.1:7200
OK
127.0.0.1:7200> get site
"blog.jboost.cn"
127.0.0.1:7200>
Note that adding the - c parameter indicates that the cluster mode is used, otherwise, an alarm will be given (error) MOVED 9421 127.0.0.1:7200 Error, specify the password with the - a parameter, otherwise (error) NOAUTH Authentication required error will be reported.
From the above command, we can see that the key is site, and the calculated slot is 9421, which falls on the 7200 node. Therefore, there is Redirected to slot [9421] located at 127.0.0.1:7200, and the cluster will jump automatically. Therefore, the client can connect to any node for data access.
You can view the node information of the cluster through cluster nodes
127.0.0.1:7200> cluster nodes
eb28aaf090ed1b6b05033335e3d90a202b422d6c 127.0.0.1:7500@17500 slave c1047de2a1b5d5fa4666d554376ca8960895a955 0 1584165266071 5 connected
4cc0463878ae00e5dcf0b36c4345182e021932bc 127.0.0.1:7400@17400 slave 5544aa5ff20f14c4c3665476de6e537d76316b4a 0 1584165267074 4 connected
dbbb6420d64db22f35a9b6fa460b0878c172a2fb 127.0.0.1:7100@17100 master - 0 1584165266000 1 connected 0-5460
d4b434f5829e73e7e779147e905eea6247ffa5a2 127.0.0.1:7600@17600 slave dbbb6420d64db22f35a9b6fa460b0878c172a2fb 0 1584165265000 6 connected
5544aa5ff20f14c4c3665476de6e537d76316b4a 127.0.0.1:7200@17200 myself,master - 0 1584165267000 2 connected 5461-10922
c1047de2a1b5d5fa4666d554376ca8960895a955 127.0.0.1:7300@17300 master - 0 1584165268076 3 connected 10923-16383
We will pass 7200 kill -9 pid kill the process to verify the high availability of the cluster. Re-enter the cluster and execute cluster nodes. You can see that 7200 fail s, but 7400 becomes the master. Restart 7200, and you can see that 7200 has become a slave.
3. Advantages and disadvantages of cluster mode
advantage:
- There is no central architecture, and the data is distributed in multiple nodes according to slot s.
- Each node in the cluster has an equal relationship, and each node saves its own data and the state of the whole cluster. Each node is connected to all other nodes, and these connections remain active, which ensures that we only need to connect to any node in the cluster to obtain the data of other nodes.
- It can be linearly extended to more than 1000 nodes, and nodes can be dynamically added or deleted
- It can realize automatic failover, exchange status information between nodes through gossip protocol, and complete the role conversion from slave to master with voting mechanism
Disadvantages:
- The implementation of the client is complex, and the driver requires to implement the Smart Client, cache the slots mapping information and update it in time, which improves the difficulty of development. At present, only JedisCluster is relatively mature, and exception handling is not perfect, such as the common "max redirect exception"
- Nodes will be judged offline due to blocking for some reasons (the blocking time is greater than the cluster node timeout). This kind of failover is not necessary
- The data is replicated asynchronously, which does not guarantee the strong consistency of the data
- The slave acts as a "cold standby" and cannot relieve the reading pressure
- Batch operation is limited. Currently, only key s with the same slot value are supported to perform batch operations. It is not friendly to mset, mget, sunion and other operations
- The key transaction operation supports wired. It only supports the transaction operation of multiple keys on the same node. The transaction function cannot be used when multiple keys are distributed on different nodes
- Multiple database spaces are not supported. Stand alone redis can support 16 db. Only one db can be used in cluster mode, that is, db 0
In Redis Cluster mode, pipeline and multi keys operations are not recommended to reduce the scenes generated by max redirect.
summary
This paper introduces three modes of Redis cluster scheme, in which the master-slave replication mode can realize read-write separation, but can not automatically fail over; Sentry mode is based on master-slave replication mode, which can achieve automatic failover and high availability. However, like master-slave replication mode, it cannot be expanded online, and the capacity is limited by the configuration of a single machine; Cluster mode realizes distributed storage through decentralized architecture, which can be linearly expanded and highly available, but it does not support batch operations and transaction operations well. The three modes have their own advantages and disadvantages, which can be selected according to the actual scene.
reference resources:
- Redis: explain three cluster strategies in detail_ BOCO blog - CSDN blog_ Three ways of redis cluster
- Three cluster modes of redis - 51life - blog Park
- Redis sentinel mode cluster configuration (version 5.0.3) - Chen Suqian - blog Park
- Analysis of advantages and disadvantages of 5 use modes of Redis Cluster - 51CTO.COM