Level function realization
In the last tutorial, we explained The main function and logic realization of brick making , in this tutorial, the author will add level function based on it (it is recommended to read the previous tutorial first).
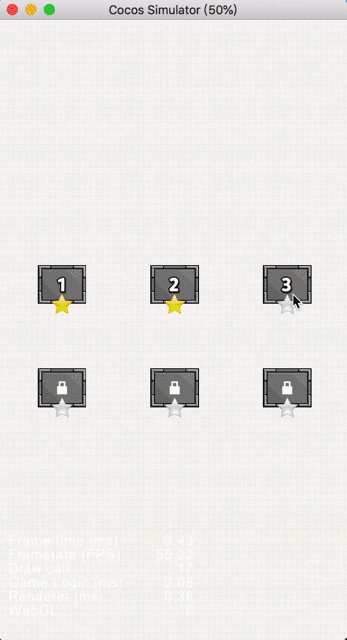
The operation effect is as follows:
Cocos Creator version: 2.2.0
The background replies "checkpoint" to obtain the complete file of the project:

Create node
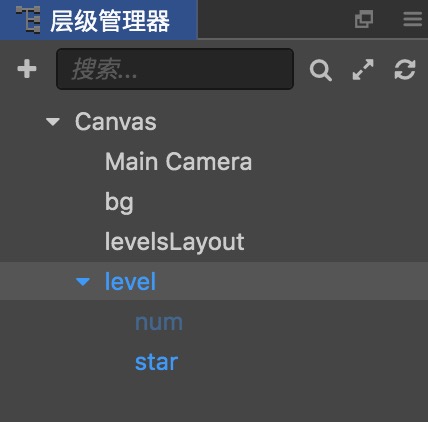
1. bg is a background image.
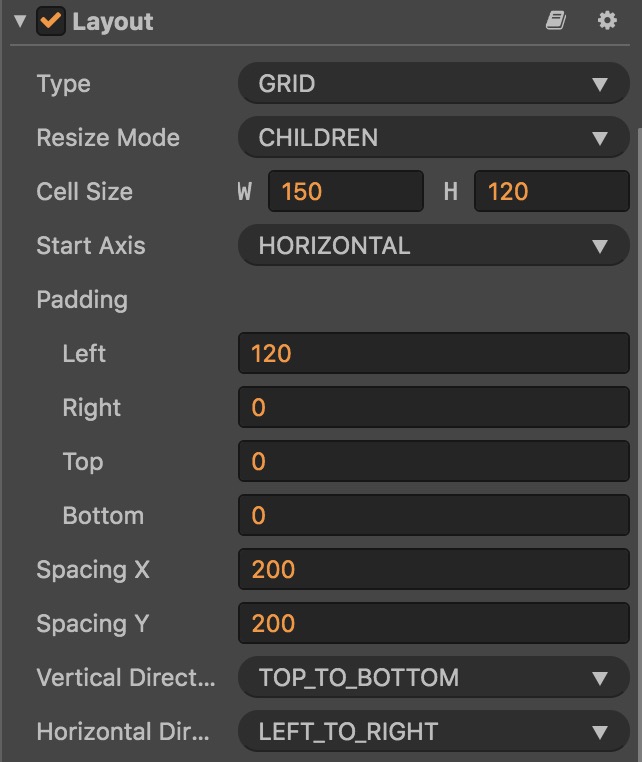
2. levelsLayout is a Layout node. The Layout component attributes on the node are set as follows (except for Type and Resize Mode, other attributes can be modified as needed):
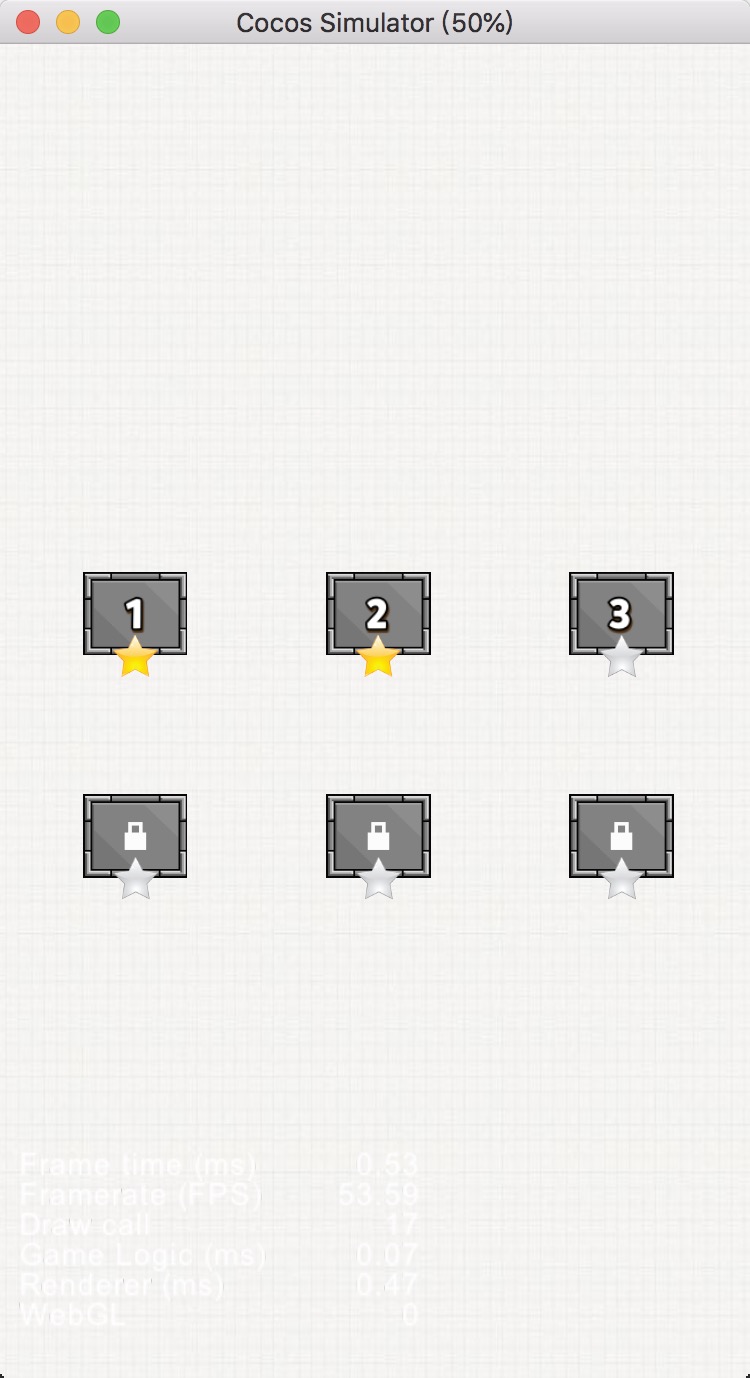
This node is used to layout each level. After completion, it looks like the following:
3. level is a prefabricated node. Its sub node num is used to prompt the current level number, and the star node is used to prompt whether the level has been cleared (it is gray when the level is not cleared, and turns yellow when the level is cleared). In addition, the initial state of the num node is not visible. Only after the player passes the current level, the number of the next level will be displayed (of course, the number of the first level will be displayed at the beginning).

Set level information
We create a new Settings.js script in the scripts folder, and write the following code:
// Settings.js
let settings = [
    {
        level: 1,                   // The first pass
        row: 3,                     // Row number
        col: 3,                     // Column number
        spaceX: 20,                 // Column spacing
        spaceY: 20,                 // Row spacing
        brickWidth: 200,            // Brick width
        brickHeight: 100,           // Brick height
        levelState: 'UNLOCKED',     // Level status
        transparentBricks: [[1,0], [2,2]]  // Transparent bricks in the beginning
    },

    {
        level: 2,                   // The second pass
        row: 6,
        col: 6,
        spaceX: 10,
        spaceY: 10,
        brickWidth: 120,
        brickHeight: 70,
        levelState: 'LOCKED',
        transparentBricks: [[3,5], [4,1], [3,4]]
    },

    {
        level: 3,                   // The third pass
        row: 9,
        col: 9,
        spaceX: 10,
        spaceY: 10,
        brickWidth: 100,
        brickHeight: 50,
        levelState: 'LOCKED',
        transparentBricks: [[7,5], [3,1], [5,7],[7,2],[6,8],[7,7]]
    },

    {
        level: 4,                   // The fourth pass
        row: 12,
        col: 15,
        spaceX: 5,
        spaceY: 5,
        brickWidth: 80,
        brickHeight: 40,
        levelState: 'LOCKED',
        transparentBricks: [[1,1], [2,2], [3,3],[4,4],[5,5],[6,6],[7,7],[8,8],[9,9]]
    },

    {
        level: 5,                   // The fifth pass
        row: 12,
        col: 15,
        spaceX: 5,
        spaceY: 5,
        brickWidth: 80,
        brickHeight: 40,
        levelState: 'LOCKED',
        transparentBricks: [[1,1], [2,2], [3,3],[4,4],[5,5],[6,6],[7,7],[8,8],[9,9]]
    },

    {
        level: 6,                   // The sixth pass
        row: 13,
        col: 13,
        spaceX: 4,
        spaceY: 4,
        brickWidth: 60,
        brickHeight: 30,
        levelState: 'LOCKED',
        transparentBricks: [[9,9], [1,1], [3,4],[5,4],[5,6],[7,6],[7,8],[8,10],[9,1]]
    },
]

export {settings};
In this script, we create a new JSON variable settings, in which each array element contains the specific configuration of the corresponding level (there are six levels in total). Here I will talk about the two keys: level state and transparent bricks:
- Level state is used to judge the status of the current level: not unlocked, unlocked or passed.
- By controlling transparent bricks, we can create brick layouts with different shapes.
Finally, output the variable with export, and we will call it in other scripts.
Implement the gate interface
Create a new Select.js script and write the following code:
// Select.js
import {settings} from './Settings.js';

cc.Class({
    extends: cc.Component,

    properties: {
        levelPrefab: cc.Prefab,
        levelsLayout: cc.Node
    },

    // LIFE-CYCLE CALLBACKS:

    onLoad () {
        this.initLevels();
    },

    initLevels () {
        if (!cc.sys.localStorage.getItem('settings')) {
            for (let i=0; i<settings.length; i++) {
                let level = cc.instantiate(this.levelPrefab);
                level.settings = settings[i];
                level.getComponent('Level').changePic(settings[i]['levelState'], (i+1).toString());
                this.levelsLayout.addChild(level);
            }
            // Store all level information locally (for the first game)
            cc.sys.localStorage.setItem('settings', JSON.stringify(settings));
        }
        else {
            // If the player has already played, obtain the level configuration information from the local storage
            let newSettings = JSON.parse(cc.sys.localStorage.getItem('settings'));
            for (let i=0; i<newSettings.length; i++) {
                let level = cc.instantiate(this.levelPrefab);
                level.settings = newSettings[i];
                level.getComponent('Level').changePic(newSettings[i]['levelState'], (i+1).toString());
                this.levelsLayout.addChild(level);
            }
        }
    }
});
The following is an explanation of the script code:
- At the beginning of the script, we imported the setting variable in Settings.js.
- Add the levelPrefab and levelsLayout properties in properties.
- The initLevels method is used to create each level prefabrication and add it to the layout.
In the initLevels method, we first determine whether there is a setting entry in the local storage.
If not, it means that the player plays for the first time, so we create a new prefabrication, save the information of each level in Settings.js to the corresponding prefabrication, and call the changePic method to set the corresponding prefabrication pictures (the method will set the corresponding pictures according to the levelState). Finally, we need to store all the level information locally. We will update the level information in the win method of Game.js later, and the game will only read the level information from the local storage later (of course, you can choose to change the local storage to server storage).
If there is, it means that the player is not playing for the first time, so we read the level information from the local, create and set the prefabrication.
Add script for prefab
Create a new Level.js script, and add the following code:
// Level.js
cc.Class({
    extends: cc.Component,

    properties: {
        unlockedPic: cc.SpriteFrame,
        lockedPic: cc.SpriteFrame,
        greyStarPic: cc.SpriteFrame,
        yellowStarPic: cc.SpriteFrame,
    },

    // LIFE-CYCLE CALLBACKS:

    onLoad () {
        // Touch monitoring
        this.node.on('touchstart', this.onTouchStart, this);
    },

    changePic (levelState, num) {
        // Change picture
        if (levelState == 'UNLOCKED') {
            // Unlock the checkpoint
            this.node.children[0].active = true;
            this.node.children[0].getComponent(cc.Label).string = num;
            this.node.getComponent(cc.Sprite).spriteFrame = this.unlockedPic;
            this.node.children[1].getComponent(cc.Sprite).spriteFrame = this.greyStarPic;
        }
        else if (levelState == 'PASSED') {
            // clearance
            this.node.children[0].active = true;
            this.node.children[0].getComponent(cc.Label).string = num;
            this.node.getComponent(cc.Sprite).spriteFrame = this.unlockedPic;
            this.node.children[1].getComponent(cc.Sprite).spriteFrame = this.yellowStarPic;

        }
        else if (levelState == 'LOCKED') {
            // Level not unlocked
            this.node.getComponent(cc.Sprite).spriteFrame = this.lockedPic;
            this.node.children[1].getComponent(cc.Sprite).spriteFrame = this.greyStarPic;
        }
    },

    onTouchStart () {
        if (this.node.settings['levelState'] == 'LOCKED')
            return;

        // Store the target level information locally and take it out in Game.js
        cc.sys.localStorage.setItem('currentLevelInfo', JSON.stringify(this.node.settings));
        cc.director.loadScene('Brick');
    }
});
The following is an explanation of the script code:
- Add four properties in properties, all of which are of SpriteFrame type. The first two pictures are for the level background, and the last two are for the stars.
- Add touch listening to the onLoad method. In the onTouchStart method, we first judge whether it has been unlocked according to the level state of the level. If it has been unlocked, we will save the current level information into the currentLevelInfo item, and then enter the brick scene.
- In the changgePic method, we also set the corresponding picture according to the levelState. I believe that you can understand the code, here I will not repeat.
Improve Game.js logic
In the Game.js script, we first obtain the currentLevelInfo item in the onLoad method, and set the relevant variables:
// Game.js
onLoad () {
    ...

    // First get the current level information
    let currentLevelInfo = JSON.parse(cc.sys.localStorage.getItem('currentLevelInfo'));
    this.level = currentLevelInfo['level'];                                           // How close?
    this.row = currentLevelInfo['row'];                                               // Row number
    this.col = currentLevelInfo['col'];                                               // Column number
    this.spaceX = currentLevelInfo['spaceX'];                                         // Column spacing
    this.spaceY = currentLevelInfo['spaceY'];                                         // Row spacing
    this.brickWidth = currentLevelInfo['brickWidth'];                                 // Brick width
    this.brickHeight = currentLevelInfo['brickHeight'];                               // Brick height
    this.transparentBricks = currentLevelInfo['transparentBricks'];                   // Transparent bricks at the beginning
    this.speed = 20;                                                                  // bar movement speed

    ...
},
Then in the initBricksLayout method, set the transparent brick according to the transparentBrick in the current level:
// Game.js
initBricksLayout () {
    ...

    // Cycle bricks
    for (let i=0; i<this.row; i++) {
        for (let j=0; j<this.col; j++) {

            ...

            // See if it's transparent brick
            for (let k=0; k<this.transparentBricks.length; k++) {
                if (this.transparentBricks[k][0]==i && this.transparentBricks[k][1]==j) {
                    brick.opacity = 0;                             // Translucent
                    brick.removeComponent(cc.RigidBody);           // Remove the rigid body component so that the brick cannot collide with the ball
                }
            }
        }
    }
},
Finally, we update the level information in win method, and only change the level state in the level:
// Game.js
win () {
    // Update level information
    let settings = JSON.parse(cc.sys.localStorage.getItem('settings'));
    settings[this.level-1]['levelState'] = 'PASSED';        // Current level status changed to pass (array subscript-1)
    settings[this.level]['levelState'] = 'UNLOCKED';        // Next level status changes to unlocked
    cc.sys.localStorage.setItem('settings', JSON.stringify(settings));

    console.log('Congratulations!');
    cc.director.loadScene('Checkpoint');
},
Well, that's all for today's tutorial. I hope you can get something~

