This paper is based on the source code analysis of version 1.12.13+hotfix.8.
catalog
1, Usage of RenderBox
1. Basic flow of using RenderBox
In flutter, we are most often exposed to a variety of widget s. However, the rendereobjects that are actually responsible for rendering are rarely exposed to each other (for the relationship between them, see this article about free fish: https://www.yuque.com/xytech/flutter/tge705 ). As a day-to-day programmer, we naturally need to learn its principles, so as to know its nature and why. This article will first look at the use of RenderBox, in order to draw on the merits, so that we can continue to explore the principle of fluent later.
Using RenderBox for painting, we need to do three things:
(1) Measurement
First, we need to determine the size of the view and assign it to the size attribute of the parent class. There are two kinds of measurement, the first is that size is determined by itself, and the second is determined by parent.
First of all, when the size is determined by itself, you need to complete the measurement in the performLayout method. You can get the value satisfying the constraint through the constraints of the parent class:
  @override
  void performLayout() {
    size = Size(
      constraints.constrainWidth(200),
      constraints.constrainHeight(200),
    );
  }
In the second case, the size is determined by the parent. In this case, the view size should be completely measured by the constraints provided by the parent without any other factors. In this case, as long as the constraint of the parent does not change, it will not be re measured.
In this case, you need to override sizedByParent and return true, and then complete the measurement in performResize.
  @override
  void performResize() {
    size = Size(
      constraints.constrainWidth(200),
      constraints.constrainHeight(200),
    );
  }

  @override
  bool get sizedByParent => true;
Seeing this, you may wonder when these two methods will be called? What is the order? The answer is in the layout method of rendereobject:
  void layout(Constraints constraints, { bool parentUsesSize = false }) {
    //Calculate relayoutBoundary
    ......
    //layout
    _constraints = constraints;
    if (sizedByParent) {
        performResize();
    }
    performLayout();
    ......
  }
}
(2) Draw
RenderBox's painting is very similar to android's native view painting. It's also a combination of paint and canvas, and the api is very close, so it's very easy to use.
  @override
  void paint(PaintingContext context, Offset offset) {
    Paint paint = Paint()
      ..color = _color
      ..style = PaintingStyle.fill;
    context.canvas.drawRect(
        Rect.fromLTRB(
          0,
          0,
          size.width,
          size.height,
        ),
        paint);
  }
Is that all right? If you draw through the above code, you will find that no matter how you set the position in the outer layer, the drawn rectangle is fixed in the upper left corner of the screen! What's going on?
Here is the biggest difference between rendering in flitter and android: the coordinate system drawn here is the global coordinate system, that is, the origin is in the upper left corner of the screen, not the upper left corner of the view.
Careful students may have found that there is also an offset parameter in the paint method, which is the offset of the current view after the parent constraint. When drawing, it should be taken into account:
  @override
  void paint(PaintingContext context, Offset offset) {
    Paint paint = Paint()
      ..color = _color
      ..style = PaintingStyle.fill;
    context.canvas.drawRect(
        Rect.fromLTRB(
          offset.dx,
          offset.dy,
          offset.dx + size.width,
          offset.dy + size.height,
        ),
        paint);
  }
(3) Update
In flitter, it is a rebuild caused by the change of Widget configuration. This is the third step we need to implement: when the view property changes, the tag is rearranged or redrawn, and when the screen is refreshed, the corresponding refresh will be done.
There are two methods involved here: markNeedsLayout and markNeedsPaint. As the name implies, the former marks the layout, and the latter marks the redraw.
What we need to do is to call appropriate marking methods when updating attributes according to the influence range of attributes, such as markNeedsPaint when the color changes, and markNeedsLayout when the width changes. In addition, when both need to be updated, just call markNeedsLayout instead of calling both methods.
  set width(double width) {
    if (width != _width) {
      _width = width;
      markNeedsLayout();
    }
  }

  set color(Color color) {
    if (color != _color) {
      _color = color;
      markNeedsPaint();
    }
  }
2,RenderObjectWidget
(1) Introduction
There are a lot of uses of RenderBox mentioned above, but how can we use it in the well-known Widget?
According to the normal process, we have to implement an Element and a Widget, then create an Element in the Widget, create and update the rendereobject in the Element, in addition, we have to manage a lot of States, which is very cumbersome. Fortunately, flutter encapsulates this set of logic for us, that is, RenderObjectWidget.
I believe that the students here are familiar with StatelessWidget and StatefulWidget, but in fact, StatelessWidget and StatefulWidget are only responsible for the management of properties, life cycle, etc. in their build method implementation, RenderObjectWidget will be created to realize the association with RenderObject.
For example, the Image we often use is a StatefulWidget. In the build method of the corresponding state, a RawImage object is actually returned. This RawImage is inherited from the LeafRenderObjectWidget, which is a subclass of RenderObjectWidget. For example, Text, the RichText created in its build method is inherited from the MultiChildRenderObjectWidget, which is also renderobj A subclass of the ectwidget.
Let's look at the comments at the top of the RenderObjectWidget to see:
RenderObjectWidgets provide the configuration for [RenderObjectElement]s,
which wrap [RenderObject]s, which provide the actual rendering of the
application.
It means that rendereobject is actually responsible for rendering applications, and the rendereobjectwidget provides the configuration of the rendereobject, which is convenient for us to use.
In addition, flutter also implements several subclasses to further encapsulate the renderoubjectwidget, which are leadrenderoubjectwidget, singlechildrenderoubjectwidget and MultiChildRenderObjectWidget. Among them, the LeafRenderObjectWidget is a leaf node without child widgets; the SingleChildRenderObjectWidget has only one child; and the MultiChildRenderObjectWidget has a list of children. These subclasses create corresponding elements according to the situation of child, so we only need to pay attention to the creation and update of rendereobject through these subclasses.
(2) Usage
Take the simplest LeafRenderObjectWidget as an example, we need to implement two methods: createrendereobject and updateRenderObject
  class CustomRenderWidget extends LeafRenderObjectWidget {
  CustomRenderWidget({
    this.width = 0,
    this.height = 0,
    this.color,
  });

  final double width;
  final double height;
  final Color color;

  @override
  RenderObject createRenderObject(BuildContext context) {
    return CustomRenderBox(width, height, color);
  }

  @override
  void updateRenderObject(BuildContext context, RenderObject renderObject) {
    CustomRenderBox renderBox = renderObject as CustomRenderBox;
    renderBox
      ..width = width
      ..height = height
      ..color = color;
  }
}
3. hitTest of non container control
Through the above content, we have been able to implement the custom control and use it in the interface development, but we are still far from a complete control: hit test. When the user uses gesture, the fluent will hand the gesture information to the control to check whether it is hit.
There are three hit test methods in RenderBox: hitTest, hitTestSelf, and hitTestChildren. The default implementation of hitTest is to call the other two methods:
  bool hitTest(BoxHitTestResult result, { @required Offset position }) {
    if (_size.contains(position)) {
      // It can also be seen from this that when children are hit, they will no longer conduct their own hit test
      if (hitTestChildren(result, position: position) || hitTestSelf(position)) {
        result.add(BoxHitTestEntry(this, position));
        return true;
      }
    }
    return false;
  }
So there are two ways to rewrite hit test method: one is to rewrite hitTest, which needs to add hit test information to BoxHitTestResult; the other is to rewrite hitTestSelf and hitTestChildren, which simply returns whether to hit.
For a control of non container type, you only need to override hitTestSelf and return true to hit. For example, in RawImage:
  @override
  bool hitTestSelf(Offset position) => true;
2, RenderBox of container type
1. Introduction
In the painting chapter, we have learned how to use RenderObjectWidget and RenderBox for basic painting. In this chapter, we will continue to learn how to manage sub objects in RenderBox. First, let's look at a comment at the top of the RenderBox:
For render objects with children, there are four possible scenarios:
* A single [RenderBox] child. In this scenario, consider inheriting from
  [RenderProxyBox] (if the render object sizes itself to match the child) or
  [RenderShiftedBox] (if the child will be smaller than the box and the box
  will align the child inside itself).
* A single child, but it isn't a [RenderBox]. Use the
  [RenderObjectWithChildMixin] mixin.
* A single list of children. Use the [ContainerRenderObjectMixin] mixin.
* A more complicated child model.
As we can see from the above, there are four situations with sub objects:
(1) There is only one sub object, and it is a subclass of RenderBox. If the current view needs to be resized according to the sub object, it inherits the RenderProxyBox; if the sub object is smaller than the current view and aligned within the current view, it inherits the RenderShiftedBox (think Align will understand better);
(2) There is only one sub object, and it is not a RenderBox sub class. In this case, RenderObjectWithChildMixin is used;
(3) ContainerRenderObjectMixin is used for multiple sub objects;
(4) A more complex situation.
The fourth situation needs to be considered when using non linked list children structure, such as map or list structure. In this case, we need to inherit rendereobject to implement a set of rendering protocol. Let's not discuss it for now.
However, the first three situations are not clearly described in the notes. In fact, there are only two situations. The first one is with a single child. The second one is with a list of children. The first two situations above can be combined into one. Why do you say that? Let's see~
2. Single child
(1)RenderProxyBox
In this case, there is no size related attribute in the current container. The size is determined by the subclass. The specific logic flutter has been implemented in RenderProxyBoxMixin. Let's take a look:
  void performLayout() {
    if (child != null) {
      child.layout(constraints, parentUsesSize: true);
      size = child.size;
    } else {
      performResize();
    }
  }
The logic is very simple. If there is a child, use the size of the child directly. If there is no child, use performeresize. If there is no performeresize, use the default implementation of RenderBox, and take the minimum constraint value:
  void performResize() {
    size = constraints.smallest;
    assert(size.isFinite);
  }
In the drawing method, the paintChild method of PaintingContext can be used to draw the child:
  @override
  void paint(PaintingContext context, Offset offset) {
    if (child != null)
      context.paintChild(child, offset);
  }
(2)RenderShiftedBox
In contrast to RenderProxyBox, the current container has size related attributes, such as padding. Next, take the very common padding as an example to see the layout method of RenderPadding:
  @override
  void performLayout() {
    // Parse the value of padding according to the language direction
    _resolve();
    assert(_resolvedPadding != null);
    if (child == null) {
      // If there is no child, calculate the size according to the vertical and horizontal padding values
      size = constraints.constrain(Size(
        _resolvedPadding.left + _resolvedPadding.right,
        _resolvedPadding.top + _resolvedPadding.bottom,
      ));
      return;
    }
    // If there is a child, the current constraint is subtracted from the padding value and then passed to the child for measurement
    final BoxConstraints innerConstraints = constraints.deflate(_resolvedPadding);
    child.layout(innerConstraints, parentUsesSize: true);

    // After the measurement is completed, the coordinate offset is calculated and provided to the child for drawing
    // parentData is an attribute of rendereobject, which is provided to the parent layout to access some information of child in the parent layout, including location, etc
    final BoxParentData childParentData = child.parentData;
    childParentData.offset = Offset(_resolvedPadding.left, _resolvedPadding.top);

    // Finally, the size is the size of padding plus child
    size = constraints.constrain(Size(
      _resolvedPadding.left + child.size.width + _resolvedPadding.right,
      _resolvedPadding.top + child.size.height + _resolvedPadding.bottom,
    ));
  }
As you can see, there are three key steps here: first, subtract the width and height required for additional occupation from the constraint according to the attribute, and then transfer it to the child for measurement; second, calculate the drawing offset required for the child after the measurement; third, get the total width and height according to the attribute and the size of the child.
In addition, the paint method logic of RenderShiftedBox is slightly different from that of RenderProxyBox, and the offset will be processed:
  @override
  void paint(PaintingContext context, Offset offset) {
    if (child != null) {
      final BoxParentData childParentData = child.parentData;
      context.paintChild(child, childParentData.offset + offset);
    }
  }
(3)RenderObjectWithChildMixin
Going back to the above question, why are RenderBox and non RenderBox single sub objects the same? In fact, RenderProxyBox and RenderShiftedBox are specially designed to encapsulate a layer of convenience for the subclasses of RenderBox. They are also with RenderObjectWithChildMixin:
class RenderProxyBox extends RenderBox with RenderObjectWithChildMixin<RenderBox>, RenderProxyBoxMixin<RenderBox> {
  ///Brief
}

abstract class RenderShiftedBox extends RenderBox with RenderObjectWithChildMixin<RenderBox> {
  ///Brief
}
After the previous analysis, we know that RenderProxyBox and RenderShiftedBox are only responsible for measurement and painting, so what does RenderObjectWithChildMixin do? With the Structure window of Android Studio, we can see:
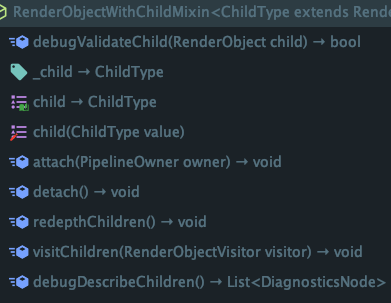
There are not many methods except debug. Take attach as an example:
  @override
  void attach(PipelineOwner owner) {
    super.attach(owner);
    if (_child != null)
      _child.attach(owner);
  }
There is very little code, that is, when the upper level attach comes over, attach its own child, and this involves the knowledge of rendering tree. This is another topic, and I haven't seen it yet. Let's analyze it later~
In a word, RenderObjectWithChildMixin implements the management of children related to rendering trees.
(4)SingleChildRenderObjectWidget
Similarly, after defining the RenderBox, it needs to be created in a Widget. In the case of a single child, we can use the singlechildrenderrobobjectwidget. The difference between the singlechildrenderrobobjectwidget and the leafrenderrobobjectwidget is that we need to pass the child in the constructor:
class CustomRenderWidget extends SingleChildRenderObjectWidget {
  CustomRenderWidget(Widget child) : super(child: child);
}
3. Multiple sub objects
(1)ContainerRenderObjectMixin
Compared with the above case of only a single child, the case of multiple sub objects is a little more complex, but it is only a little, in fact, the difference is not too big. Similarly, for sub object management related to rendering tree, flitter also provides a ContainerRenderObjectMixin. Here we will not analyze its principle any more, just pay attention to one place. When the RenderBox is created, we need to adjust addAll method to add children:
  RenderListBody({
    List<RenderBox> children,
    AxisDirection axisDirection = AxisDirection.down,
  }) : assert(axisDirection != null),
       _axisDirection = axisDirection {
    // Give children to ContainerRenderObjectMixin for management
    addAll(children);
  }
(2)ContainerParentDataMixin
In addition, ContainerDefaultsMixin specifies that the ParentData used must be a subclass of ContainerParentDataMixin. ContainerParentDataMixin is not complex. Its function is only to realize ParentData of two-way linked list structure:
mixin ContainerParentDataMixin<ChildType extends RenderObject> on ParentData {
  ChildType previousSibling;
  ChildType nextSibling;
}
After specifying the type of ParentData, you also need to check whether the data type used by the child conforms to the setupParentData in the RenderBox. If it does not conform to the data type, create and replace it again:
  @override
  void setupParentData(RenderObject child) {
    super.setupParentData(child);
    if (child.parentData is! MultiChildLayoutParentData) {
      child.parentData = MultiChildLayoutParentData();
    }
  }
(3) Case source code analysis
Let's take RenderStack as an example to see its measurement (the function is a little long, but it's easy to understand in sections):
  @override
  void performLayout() {
    // Resolve alignment according to textDirection
    _resolve();
    assert(_resolvedAlignment != null);
    _hasVisualOverflow = false;
    bool hasNonPositionedChildren = false;

    // If there are no children, the stack fills the parent layout
    if (childCount == 0) {
      size = constraints.biggest;
      assert(size.isFinite);
      return;
    }

    double width = constraints.minWidth;
    double height = constraints.minHeight;

    // Adjust constraints according to fit attribute
    BoxConstraints nonPositionedConstraints;
    assert(fit != null);
    switch (fit) {
      case StackFit.loose:
        nonPositionedConstraints = constraints.loosen();
        break;
      case StackFit.expand:
        nonPositionedConstraints = BoxConstraints.tight(constraints.biggest);
        break;
      case StackFit.passthrough:
        nonPositionedConstraints = constraints;
        break;
    }
    assert(nonPositionedConstraints != null);

    // Traverse all sub objects that do not specify the location or size through Positioned for layout
    RenderBox child = firstChild;
    while (child != null) {
      final StackParentData childParentData = child.parentData;

      if (!childParentData.isPositioned) {
        hasNonPositionedChildren = true;

        // In this case, sub objects are measured according to the constraints transformed by fit
        child.layout(nonPositionedConstraints, parentUsesSize: true);

        // Take the maximum value of comparison size after measurement
        final Size childSize = child.size;
        width = math.max(width, childSize.width);
        height = math.max(height, childSize.height);
      }

      child = childParentData.nextSibling;
    }

    if (hasNonPositionedChildren) {
      // If there are subobjects whose position or size is not specified with Positioned, the maximum size of these subobjects (measured above) is taken
      size = Size(width, height);
      assert(size.width == constraints.constrainWidth(width));
      assert(size.height == constraints.constrainHeight(height));
    } else {
      // Otherwise fill the parent layout
      size = constraints.biggest;
    }

    assert(size.isFinite);

    // Ergodic calculation constraint, offset
    child = firstChild;
    while (child != null) {
      final StackParentData childParentData = child.parentData;

      if (!childParentData.isPositioned) {

        // If no location or size is specified, the offset is calculated according to the alignment
        childParentData.offset = _resolvedAlignment.alongOffset(size - child.size);

      } else {
        BoxConstraints childConstraints = const BoxConstraints();

        if (childParentData.left != null && childParentData.right != null)
          // left and right are specified, and the width of the child is calculated according to the width of the stack
          childConstraints = childConstraints.tighten(width: size.width - childParentData.right - childParentData.left);
        else if (childParentData.width != null)
          // The width is specified directly here
          childConstraints = childConstraints.tighten(width: childParentData.width);

        // Same logic as above
        if (childParentData.top != null && childParentData.bottom != null)
          childConstraints = childConstraints.tighten(height: size.height - childParentData.bottom - childParentData.top);
        else if (childParentData.height != null)
          childConstraints = childConstraints.tighten(height: childParentData.height);

        // Measure child
        child.layout(childConstraints, parentUsesSize: true);

        // Calculate offset
        double x;
        if (childParentData.left != null) {
          x = childParentData.left;
        } else if (childParentData.right != null) {
          x = size.width - childParentData.right - child.size.width;
        } else {
          x = _resolvedAlignment.alongOffset(size - child.size).dx;
        }

        if (x < 0.0 || x + child.size.width > size.width)
          // Mark overflow, used when paint ing
          _hasVisualOverflow = true;

        double y;
        if (childParentData.top != null) {
          y = childParentData.top;
        } else if (childParentData.bottom != null) {
          y = size.height - childParentData.bottom - child.size.height;
        } else {
          y = _resolvedAlignment.alongOffset(size - child.size).dy;
        }

        if (y < 0.0 || y + child.size.height > size.height)
          _hasVisualOverflow = true;

        childParentData.offset = Offset(x, y);
      }

      assert(child.parentData == childParentData);
      child = childParentData.nextSibling;
    }
  }
It's not hard to understand after spinning. In fact, multiple sub objects and a single sub object are essentially the same. Sub object constraints are provided for it to measure, and then its size is determined according to the measurement results. Finally, the offset drawn by the sub object is calculated. That's it~
Finally, let's look at the drawing method:
  @protected
  void paintStack(PaintingContext context, Offset offset) {
    // In other cases, the default rendering method provided by RenderBoxContainerDefaultsMixin is used directly
    defaultPaint(context, offset);
  }

  @override
  void paint(PaintingContext context, Offset offset) {
    // When the processing method is clip, the overflow part is truncated_ hasVisualOverflow is marked when calculating the offset above
    if (_overflow == Overflow.clip && _hasVisualOverflow) {
      context.pushClipRect(needsCompositing, offset, Offset.zero & size, paintStack);
    } else {
      paintStack(context, offset);
    }
  }
4. The function and usage of getxxxintranicxxx and computexxxintranicxxx
Careful students may find that in the classes that implement performLayout, a series of methods beginning with compute are rewritten. In addition, some places call several "get series" methods such as getmaxininsinsinsinsinicwidth. In terms of name, these methods are used to calculate and obtain the maximum and minimum width and height respectively, but according to our previous statement, it is also possible to calculate the width and height directly through constraints in performLayout or performResize, so what are the functions of these methods? What's the difference with our previous practice? Don't worry, let's solve these doubts next.
According to the comments of getMinIntrinsicWidth method, we can get several points:
(1) Getmin intrinsic width is used to get the minimum width that can draw all content completely;
(2) This method is used for the parent layout. If the parent layout calls a child's method, when the child calls markNeedsLayout, the parent layout will also be notified to refresh;
(3) The algorithm of this method is O(N^2), so do not use it when it is not necessary;
(4) Do not override this method, override computeminininicwidth if necessary.
Combined with these instructions, the situation is basically clear. The method of compute series needs to be rewritten and calculated to return the corresponding size; the method of get series is provided to the parent layout, so that the parent layout can know the size of the child before the child is measured. The reason for this implementation is to avoid the problem of android's native measure twice. For details, see the article "idle fish": https://zhuanlan.zhihu.com/p/90195812
5. hitTest of container control
Compared with the control of non container class, the hit test of container control needs to consider the hit situation of child. Combined with the above content, we only need to implement hitTestChildren, but we need to pay attention to that the position received by this method needs to be relative to the current control (that is, the origin is in the top left corner of the current control). Before hit test of child, we need to put Po Position turns to the relative coordinate position of the origin at the top left corner of the child. Some of the methods provided by the HitTestResult class will help us complete this transformation. Let's take a look at the default implementation in RenderBoxContainerDefaultsMixin:
  bool defaultHitTestChildren(BoxHitTestResult result, { Offset position }) {
    ChildType child = lastChild;
    while (child != null) {
      final ParentDataType childParentData = child.parentData;

      // addWithPaintOffset will convert the position to the relative position of child according to the offset
      final bool isHit = result.addWithPaintOffset(
        offset: childParentData.offset,
        position: position,
        hitTest: (BoxHitTestResult result, Offset transformed) {
          // The offset here has been converted
          return child.hitTest(result, position: transformed);
        },
      );
      if (isHit)
        return true;
      child = childParentData.previousSibling;
    }
    return false;
  }
For example, a chestnut, a square container with a width of 200 and a height of 100, is installed in the lower right corner of the container
At this time, the offset in childParentData is (100100). If you click on the upper left corner of the square container, the position obtained by the hitTestChildren method of the container is (0,0). After conversion, the position obtained by the hitTest method of the small square should be (- 100, - 100).