Spring Boot starter
We know that Spring Boot greatly simplifies the initial construction and development process of the project, which are completed through the starter provided by Spring Boot. Pinda general permission system is developed based on Spring Boot, and some basic modules are starters in essence, so we need to have a comprehensive and in-depth understanding of the starter of Spring Boot, which is the necessary knowledge for us to develop Pinda general permission system.
1 starter introduction
Compared with spring, spring boot is much simpler in configuration. Its core lies in spring boot starter. When using spring boot to build a project, you only need to introduce the officially provided starter, which can be used directly without various configurations. Starter simply introduces some dependencies and initialization configurations.
Spring officially provides many starters, and third parties can also define starters. In order to distinguish, starter has the following specifications in terms of Name:
- [] the official Spring starter name is Spring boot starter XXX, for example, Spring boot starter web
- [] the name of the starter provided by the third party is XXX spring boot starter, such as mybatis spring boot starter provided by mybatis
2 starter principle
The reason why Spring Boot can help us simplify the project construction and development process is mainly based on its start dependency and automatic configuration.
2.1 start dependence
Starting dependency is actually packaging coordinates with certain functions, which can simplify the dependency import process. For example, if we import the spring boot starter web starter, the jar packages related to web development will be imported into the project together. As shown in the figure below:

2.2 automatic configuration
Automatic configuration is to automatically configure and manage bean s without manually configuring xml, which can simplify the development process. So how does Spring Boot complete automatic configuration?
Automatic configuration involves the following key steps:
- Bean configuration based on Java code
- Auto configure conditional dependencies
- Bean parameter acquisition
- Bean's discovery
- Bean loading
We can use a practical example mybatis spring boot starter to illustrate the implementation process of automatic configuration.
2.2.1 Bean configuration based on Java code
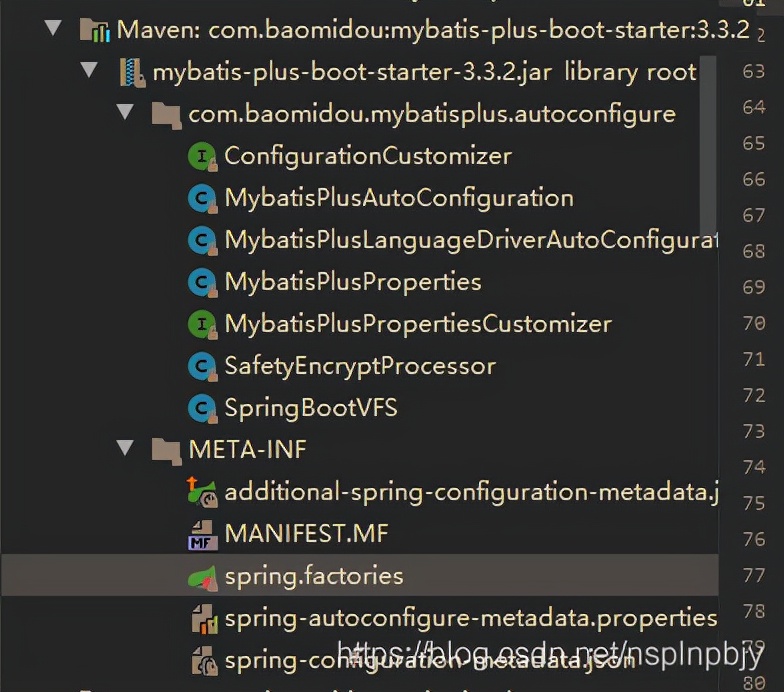
When we import the jar mybatis spring boot starter in the project, we can see that it includes many related jar packages, as shown in the following figure:

In the mybatis spring boot autoconfigure jar package, there is the following MybatisAutoConfiguration autoconfigure class:

Open this class and the key code intercepted is as follows:


@Configuration and @ Bean annotations can be used together to create a configuration class based on java code, which can be used to replace the traditional xml configuration file.
@Configuration Annotated classes can be seen as factories that can produce Bean instances managed by the Spring IoC container.
@Bean The object returned by the annotated method can be registered in the spring container.
Therefore, the above MybatisAutoConfiguration class automatically helps us generate important instances of Mybatis, such as SqlSessionFactory and SqlSessionTemplate, and submits them to the spring container for management, so as to complete the automatic registration of bean s.
2.2.2 automatic configuration condition dependency
From the annotations used in the MybatisAutoConfiguration class, we can see that there are dependent conditions to complete automatic configuration.

Therefore, to complete the automatic configuration of Mybatis, two classes SqlSessionFactory.class and SqlSessionFactoryBean.class need to exist in the classpath, and the bean DataSource needs to exist and complete the automatic registration.
These annotations are unique to spring boot. Common conditional dependency annotations are:
| annotation | Function description |
| @ConditionalOnBean | This bean will be instantiated only when there is a bean in the current context |
| @ConditionalOnClass | Only when a class is on the classpath can the Bean be instantiated |
| @ConditionalOnExpression | This Bean will be instantiated only when the expression is true |
| @ConditionalOnMissingBean | This bean is instantiated only if it does not exist in the current context |
| @ConditionalOnMissingClass | The Bean will be instantiated only when a class does not exist on the classpath |
| @ConditionalOnNotWebApplication | This Bean will be instantiated only when it is not a web application |
| @AutoConfigureAfter | Instantiate a bean after it completes automatic configuration |
| @AutoConfigureBefore | Instantiate a bean before it completes automatic configuration |
2.2.3 Bean parameter acquisition
To complete the automatic configuration of mybatis, we need to provide the configuration parameters related to the data source in the configuration file, such as database driver, connection url, database user name, password, etc. So how does spring boot read the properties of yml or properites configuration files to create data source objects?
After we import the jar package mybatis spring boot starter, a spring boot autoconfigure package will be passed. In this package, there is an automatic configuration class DataSourceAutoConfiguration, as shown below:
!
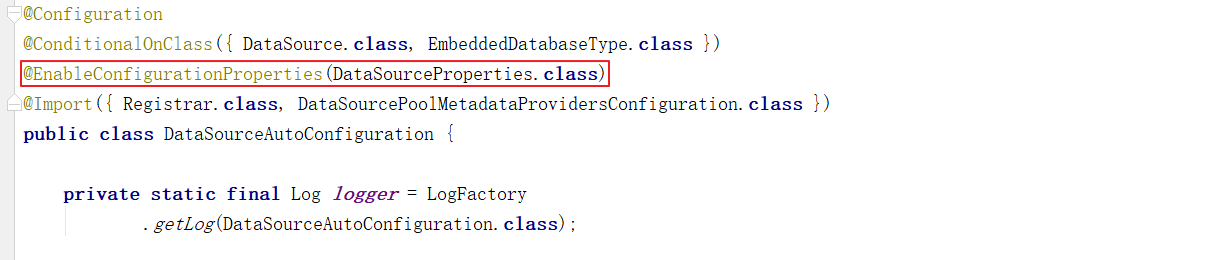
We can see that the annotation EnableConfigurationProperties is added to this class. Continue to track the source code to the DataSourceProperties class, as follows:
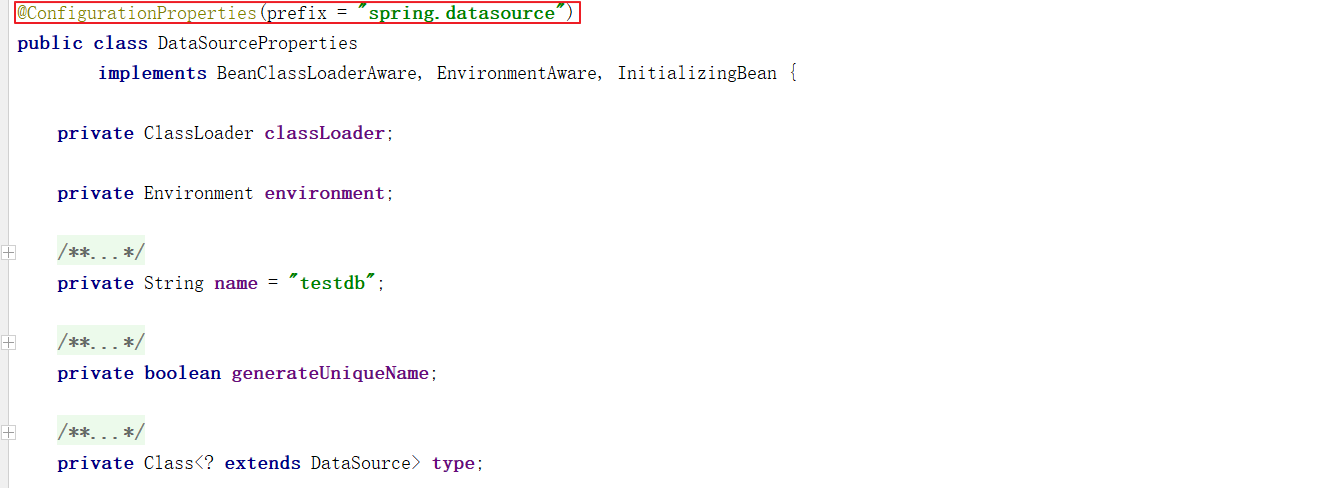
You can see that the ConfigurationProperties annotation is added to this class. The function of this annotation is to encapsulate the configuration parameter information in the yml or properties configuration file into the corresponding properties of the bean (i.e. DataSourceProperties) marked by the ConfigurationProperties annotation.
@The EnableConfigurationProperties annotation is used to validate the @ ConfigurationProperties annotation.
2.2.4 Bean discovery
spring boot scans all components of the main class and subclasses under the package where the startup class is located by default, but does not include the classes in the dependent package. How are the bean s in the dependent package found and loaded?
We need to start tracking from the startup class of the Spring Boot project. We usually add the SpringBootApplication annotation on the startup class. The source code of this annotation is as follows:
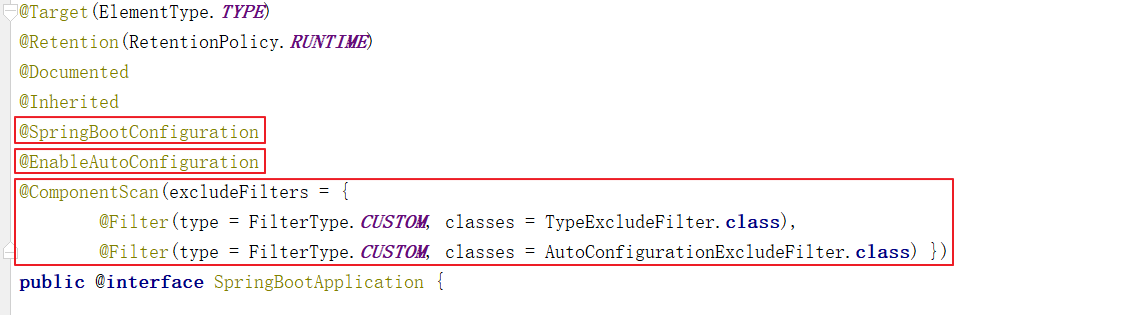
The following three notes are highlighted:
Spring boot Configuration: the function is equivalent to Configuration annotation. The annotated class will become a bean Configuration class
ComponentScan: the function is to automatically scan and load qualified components, and finally load these bean s into the spring container
EnableAutoConfiguration : This annotation is very important. With the support of @ Import, collect and register the relevant bean definitions in the dependency package
Continue to track the source code of EnableAutoConfiguration annotation:
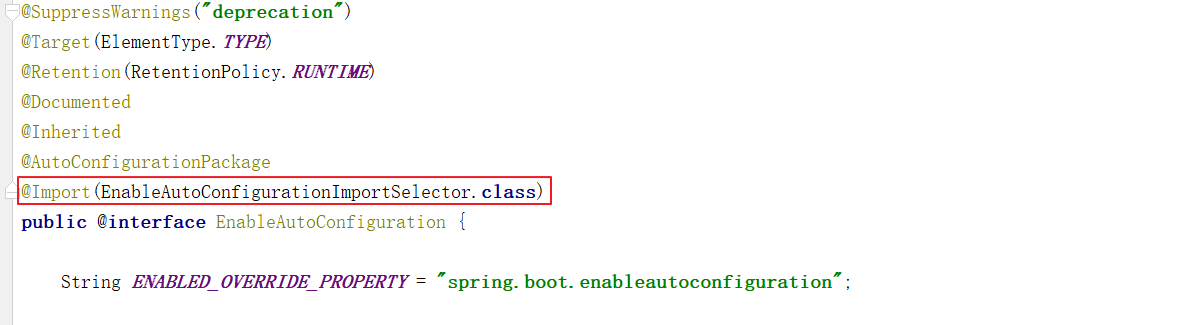
@The EnableAutoConfiguration annotation introduces the @ Import annotation.
Import: import components that need automatic configuration. Here is the class EnableAutoConfigurationImportSelector
The source code of EnableAutoConfigurationImportSelector class is as follows:
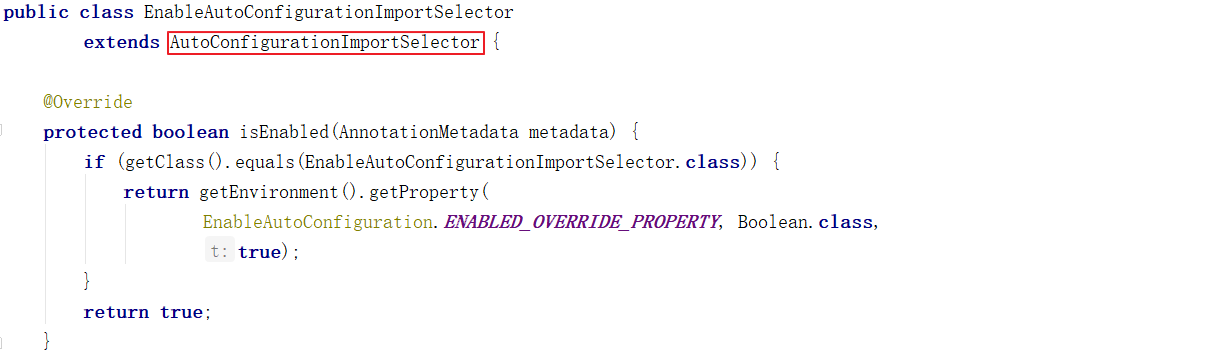
EnableAutoConfigurationImportSelector inherits the AutoConfigurationImportSelector class. Continue to track the source code of the AutoConfigurationImportSelector class:
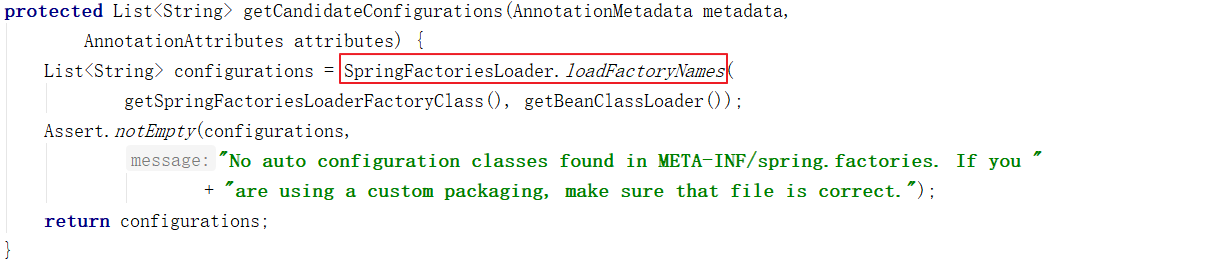
The getCandidateConfigurations method of the AutoConfigurationImportSelector class calls the loadFactoryNames method of the SpringFactoriesLoader class to continue tracking the source code:
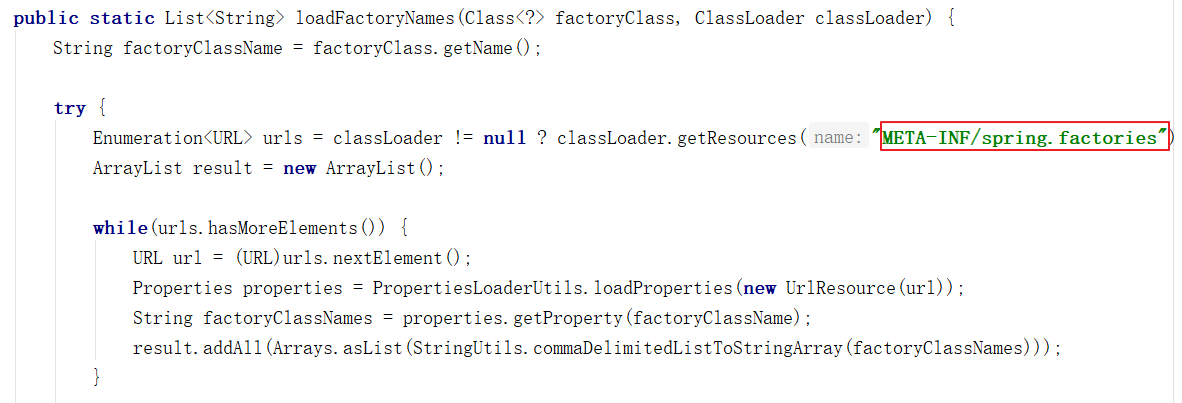
The loadFactoryNames static method of SpringFactoriesLoader can read the META-INF/spring.factories file from all jar packages, and the automatically configured classes are configured in this file:

The contents of the spring.factories file are as follows:
In this way, Spring Boot can be loaded into the configuration class MybatisAutoConfiguration.
2.2.5 Bean loading
In the Spring Boot application, there are usually the following methods to hand over a common class to the Spring container for management:
1. Use @ Configuration and @ Bean annotations
2. Annotate the class with the @ Controller @Service @Repository @Component annotation and enable @ ComponentScan automatic scanning
3. Use @ Import method
The Spring Boot implements automatic configuration by using @ Import annotation. The selectImports method of the AutoConfigurationImportSelector class returns the full class names of a group of beans read from the META-INF/spring.factories file, so that Spring Boot can load these beans and complete the creation of instances.
2.3 automatic configuration summary
We can summarize the key steps of automatic configuration and the corresponding notes as follows:
1. @ Configuration and @ bean: bean Configuration based on Java code
2. @ Conditional: set automatic configuration condition dependency
3. @ EnableConfigurationProperties and @ ConfigurationProperties: read configuration file and convert to bean
4. @ EnableAutoConfiguration and @ Import: implement bean discovery and loading
Top
3 custom starter
In this section, we customize two starters to enhance the understanding and application of starters.
3.1 case 1
3.1.1 development starter
Step 1: create the starter project Hello spring boot starter and configure the pom.xml file
<?xml version="1.0" encoding="UTF-8"?>
<project xmlns="http://maven.apache.org/POM/4.0.0"
         xmlns:xsi="http://www.w3.org/2001/XMLSchema-instance"
         xsi:schemaLocation="http://maven.apache.org/POM/4.0.0
                             http://maven.apache.org/xsd/maven-4.0.0.xsd">
    <modelVersion>4.0.0</modelVersion>
    <parent>
        <groupId>org.springframework.boot</groupId>
        <artifactId>spring-boot-starter-parent</artifactId>
        <version>2.2.2.RELEASE</version>
        <relativePath/>
    </parent>
    <groupId>cn.pf</groupId>
    <artifactId>hello-spring-boot-starter</artifactId>
    <version>1.0-SNAPSHOT</version>
    <dependencies>
        <dependency>
            <groupId>org.springframework.boot</groupId>
            <artifactId>spring-boot-starter</artifactId>
        </dependency>
        <dependency>
            <groupId>org.springframework.boot</groupId>
            <artifactId>spring-boot-autoconfigure</artifactId>
        </dependency>
    </dependencies>
</project>
Step 2: create the configuration property class HelloProperties
package cn.pf.config;

import org.springframework.boot.context.properties.ConfigurationProperties;

/*
 *Read configuration file and convert to bean
 * */
@ConfigurationProperties(prefix = "hello")
public class HelloProperties {
    private String name;
    private String address;

    public String getName() {
        return name;
    }

    public void setName(String name) {
        this.name = name;
    }

    public String getAddress() {
        return address;
    }

    public void setAddress(String address) {
        this.address = address;
    }

    @Override
    public String toString() {
        return "HelloProperties{" +
                "name='" + name + '\'' +
                ", address='" + address + '\'' +
                '}';
    }
}
Step 3: create a service class HelloService
package cn.pf.service;

public class HelloService {
    private String name;
    private String address;

    public HelloService(String name, String address) {
        this.name = name;
        this.address = address;
    }

    public String sayHello(){
        return "Hello! My name is " + name + ",I come from " + address;
    }
}
Step 4: create the auto configuration class HelloServiceAutoConfiguration
package cn.pf.config;

import cn.pf.service.HelloService;
import org.springframework.boot.autoconfigure.condition.ConditionalOnMissingBean;
import org.springframework.boot.context.properties.EnableConfigurationProperties;
import org.springframework.context.annotation.Bean;
import org.springframework.context.annotation.Configuration;

/*
* Configuration class, bean configuration based on Java code
* */

@Configuration
@EnableConfigurationProperties(HelloProperties.class)
public class HelloServiceAutoConfiguration {
    private HelloProperties helloProperties;

    //Inject the configuration property object HelloProperties through the constructor
    public HelloServiceAutoConfiguration(HelloProperties helloProperties) {
        this.helloProperties = helloProperties;
    }

    //Instantiate HelloService and load the Spring IoC container
    @Bean
    @ConditionalOnMissingBean
    public HelloService helloService(){
        return new HelloService(helloProperties.getName(),helloProperties.getAddress());
    }
}
Step 5: create META-INF/spring.factories in the resources directory
org.springframework.boot.autoconfigure.EnableAutoConfiguration=\
cn.pf.config.HelloServiceAutoConfiguration
So far, the starter has been developed. You can install the current starter into the local maven warehouse for use by other applications.
3.1.2 using starter
Step 1: create maven project myapp and configure pom.xml file
<?xml version="1.0" encoding="UTF-8"?>
<project xmlns="http://maven.apache.org/POM/4.0.0"
         xmlns:xsi="http://www.w3.org/2001/XMLSchema-instance"
         xsi:schemaLocation="http://maven.apache.org/POM/4.0.0 http://maven.apache.org/xsd/maven-4.0.0.xsd">
    <modelVersion>4.0.0</modelVersion>
    <parent>
        <groupId>org.springframework.boot</groupId>
        <artifactId>spring-boot-starter-parent</artifactId>
        <version>2.2.2.RELEASE</version>
        <relativePath/>
    </parent>
    <groupId>cn.pf</groupId>
    <artifactId>myapp</artifactId>
    <version>1.0-SNAPSHOT</version>
    <dependencies>
        <dependency>
            <groupId>org.springframework.boot</groupId>
            <artifactId>spring-boot-starter-web</artifactId>
        </dependency>
        <!--Import custom starter-->
        <dependency>
            <groupId>cn.pf</groupId>
            <artifactId>hello-spring-boot-starter</artifactId>
            <version>1.0-SNAPSHOT</version>
        </dependency>
    </dependencies>
</project>
Step 2: create the application.yml file
server:
  port: 8080
hello:
  name: xiaoming
  address: beijing
Step 3: create HelloController
package cn.pf.controller;

import cn.pf.service.HelloService;
import org.springframework.beans.factory.annotation.Autowired;
import org.springframework.web.bind.annotation.GetMapping;
import org.springframework.web.bind.annotation.RequestMapping;
import org.springframework.web.bind.annotation.RestController;

@RestController
@RequestMapping("/hello")
public class HelloController {
    //HelloService has been automatically configured in our customized starter, so it can be injected directly here
    @Autowired
    private HelloService helloService;

    @GetMapping("/say")
    public String sayHello(){
        return helloService.sayHello();
    }
}
Step 4: create the startup class HelloApplication
package cn.pf;

import org.springframework.boot.SpringApplication;
import org.springframework.boot.autoconfigure.SpringBootApplication;

@SpringBootApplication
public class HelloApplication {
    public static void main(String[] args) {
        SpringApplication.run(HelloApplication.class,args);
    }
}
Execute the main method of the startup class to access the address http://localhost:8080/hello/say

3.2 case 2
In the previous case 1, we automatically configured a HelloService instance by defining a starter. In this case, we need to create an interceptor object through automatic configuration, and realize the logging function through this interceptor object.
We can continue to develop case 2 on the basis of case 1.
3.2.1 development starter
Step 1: add the following maven coordinates to the pom.xml file of Hello spring boot starter
<dependency>
    <groupId>org.springframework.boot</groupId>
    <artifactId>spring-boot-starter-web</artifactId>
    <optional>true</optional>
</dependency>
<dependency>
    <groupId>org.springframework.boot</groupId>
    <artifactId>spring-boot-configuration-processor</artifactId>
</dependency>
Step 2: customize MyLog annotation
package cn.pf.log;

import java.lang.annotation.ElementType;
import java.lang.annotation.Retention;
import java.lang.annotation.RetentionPolicy;
import java.lang.annotation.Target;

@Target(ElementType.METHOD)
@Retention(RetentionPolicy.RUNTIME)
public @interface MyLog {
    /**
     * Method description
     */
    String desc() default "";
}
Step 3: customize the log interceptor MyLogInterceptor
package cn.pf.log;

import org.springframework.web.method.HandlerMethod;
import org.springframework.web.servlet.ModelAndView;
import org.springframework.web.servlet.handler.HandlerInterceptorAdapter;
import javax.servlet.http.HttpServletRequest;
import javax.servlet.http.HttpServletResponse;
import java.lang.reflect.Method;

/**
 * Logging Interceptor
 */
public class MyLogInterceptor extends HandlerInterceptorAdapter {
    private static final ThreadLocal<Long> startTimeThreadLocal = new ThreadLocal<>();

    public boolean preHandle(HttpServletRequest request, HttpServletResponse response,
                             Object handler) throws Exception {
        HandlerMethod handlerMethod = (HandlerMethod)handler;
        Method method = handlerMethod.getMethod();//Gets the intercepted method object
        MyLog myLog = method.getAnnotation(MyLog.class);//Get annotation on method
        if(myLog != null){
            //Method is annotated with MyLog, and logging is required
            long startTime = System.currentTimeMillis();
            startTimeThreadLocal.set(startTime);
        }
        return true;
    }

    public void postHandle(HttpServletRequest request, HttpServletResponse response,
                           Object handler, ModelAndView modelAndView) throws Exception {
        HandlerMethod handlerMethod = (HandlerMethod)handler;
        Method method = handlerMethod.getMethod();//Gets the intercepted method object
        MyLog myLog = method.getAnnotation(MyLog.class);//Get annotation on method
        if(myLog != null){
            //Method is annotated with MyLog, and logging is required
            long endTime = System.currentTimeMillis();
            Long startTime = startTimeThreadLocal.get();
            long optTime = endTime - startTime;

            String requestUri = request.getRequestURI();
            String methodName = method.getDeclaringClass().getName() + "." +
                				method.getName();
            String methodDesc = myLog.desc();

            System.out.println("request uri: " + requestUri);
            System.out.println("Request method name:" + methodName);
            System.out.println("Method description:" + methodDesc);
            System.out.println("Method execution time:" + optTime + "ms");
        }
    }
}
Step 4: create an automatic configuration class MyLogAutoConfiguration to automatically configure web components such as interceptors and parameter parsers
package cn.pf.config;

import cn.pf.log.MyLogInterceptor;
import org.springframework.context.annotation.Configuration;
import org.springframework.web.servlet.config.annotation.InterceptorRegistry;
import org.springframework.web.servlet.config.annotation.WebMvcConfigurer;

/**
 * Configuration class, which is used to automatically configure web components such as interceptors and parameter parsers
 */

@Configuration
public class MyLogAutoConfiguration implements WebMvcConfigurer{
    //Register custom log interceptor
    public void addInterceptors(InterceptorRegistry registry) {
        registry.addInterceptor(new MyLogInterceptor());
    }
}
Step 5: add MyLogAutoConfiguration configuration in spring.factories
org.springframework.boot.autoconfigure.EnableAutoConfiguration=\
cn.pf.config.HelloServiceAutoConfiguration,\
cn.pf.config.MyLogAutoConfiguration
Note: we added new content to Hello spring boot starter, which needs to be repackaged and installed in maven warehouse.
3.2.2 using starter
Add @ MyLog annotation to the Controller method of myapp project
package cn.pf.controller;

import cn.pf.log.MyLog;
import cn.pf.service.HelloService;
import org.springframework.beans.factory.annotation.Autowired;
import org.springframework.web.bind.annotation.GetMapping;
import org.springframework.web.bind.annotation.RequestMapping;
import org.springframework.web.bind.annotation.RestController;

@RestController
@RequestMapping("/hello")
public class HelloController {
    //HelloService has been automatically configured in our customized starter, so it can be injected directly here
    @Autowired
    private HelloService helloService;

    @MyLog(desc = "sayHello method") //Logging notes
    @GetMapping("/say")
    public String sayHello(){
        return helloService.sayHello();
    }
}
Access address:
http://localhost:8080/hello/say
View console output:
request uri: /hello/say
 Request method name: cn.pf.controller.HelloController.sayHello
 Method description: sayHello method
 Method execution time: 36 ms
If you think this article is helpful to you, you can forward it for attention and support