ES cluster installation
1)ELK is a log analysis platform, not a software, but a complete set of solutions. It is the acronym of three software products. ELK represents:
Elasticsearch: responsible for log retrieval and storage
Logstash: responsible for the collection, analysis and processing of logs
Kibana: responsible for the visualization of logs
2) ELK component can be used to solve centralized query of distributed log data and monitoring of management system, troubleshooting, safety information and event management, and report function in the operation and maintenance of massive log system
Deploy the elastic search distributed cluster installation, Kibana as the visualization platform, summarize the flow and data charts in real time, and Logstash is used to collect and process logs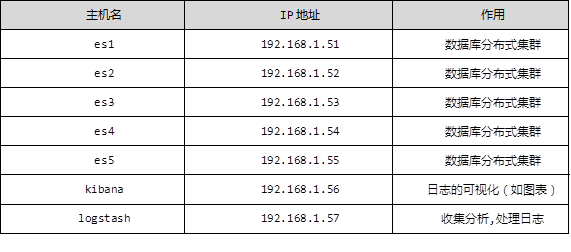 1.3 steps
To implement this case, follow the steps below.
Step 1: prepare a virtual machine first
1) Change the host name, configure IP, and build a third-party yum source
    [root@se1 ~]# echo se1 > /etc/hostname
    [root@se1 ~]# vim /etc/sysconfig/network-scripts/ifcfg-eth0
    # Generated by dracut initrd
    DEVICE="eth0"
    ONBOOT="yes"
    IPV6INIT="no"
    IPV4_FAILURE_FATAL="no"
    NM_CONTROLLED="no"
    TYPE="Ethernet"
    BOOTPROTO="static"
    IPADDR=192.168.1.51
    PREFIX=24
    GATEWAY=192.168.1.254
    [root@se1 ~]# vim /etc/yum.repos.d/local.repo
    [local_repo]
    name=CentOS-$releasever - Base
    baseurl="ftp://192.168.1.254/system"
    enabled=1
    gpgcheck=1
    [elk]
    name=elk
    baseurl="ftp://192.168.1.254/elk"
    enabled=1
    gpgcheck=0
2) Deploy the first node of elasticsearch
    [root@se1 ~]# vim /etc/hosts
    192.168.1.51 es1
    192.168.1.52 es2
    192.168.1.53 es3
    192.168.1.54 es4
    192.168.1.55 es5
    [root@es1 ~]# yum -y install java-1.8.0-openjdk.x86_64
    [root@es1 ~]# java -version
    openjdk version "1.8.0_161"
    OpenJDK Runtime Environment (build 1.8.0_161-b14)
    OpenJDK 64-Bit Server VM (build 25.161-b14, mixed mode)
    [root@es1 ~]# sestatus  //View selinux status
    SELinux status:                 disabled
    [root@es1 ~]# yum -y install elasticsearch
    [root@es1 ~]# vim /etc/elasticsearch/elasticsearch.yml
    17 cluster.name: myelk        //Configuration cluster name
    23 node.name: es1        //Current host name
    54 network.host: 0.0.0.0     // 0.0.0.0 (listen to all addresses)
    68 discovery.zen.ping.unicast.hosts: ["es1", "es2", "es3"]
    //It is not necessary to write in all the host members in the cluster
    [root@es1 ~]# systemctl restart elasticsearch
    [root@es1 ~]# systemctl enable elasticsearch
    [root@es1 ~]# ss -antup | grep 9200
    [root@es1 ~]# ss -antup | grep 9300
3) Visit port 9200 to see if the installation is successful, as shown in figure-1: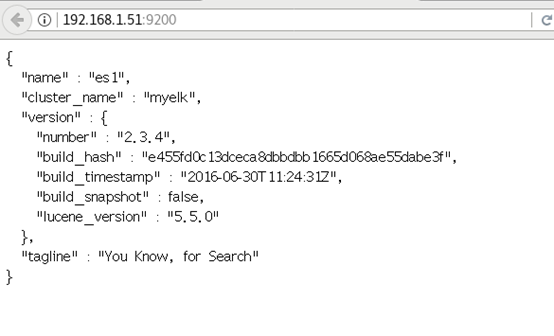
Figure -1
Case 2: ES cluster installation configuration
2.1 problem
This case requires:
Install 5 virtual machines in total
Deploy ES in all machines
Start the service to view and verify the cluster status
2.2 steps
To implement this case, follow the steps below.
Step 1: install elastic search and java-1.8.0-openjdk, and synchronize the configuration files
Note: in step 1, an elastic search has been installed. Here, you only need to prepare four more
1) Change the corresponding host name, ip address and build the yum source (take case 1 as an example)
2) The same operation for installing elastic search on four hosts (take es2 as an example)
[root@es2 ~]# yum -y install java-1.8.0-openjdk.x86_64
[root@es2 ~]# yum -y install elasticsearch
3) Configure / etc/hosts and / etc/elasticsearch/elasticsearch.yml synchronously, and modify the node.name field (take es2 as an example)
[root@es1 ~]# for i in {52..55} ; do scp /etc/hosts 192.168.1.$i:/etc/hosts; done
[root@es1 ~]# for i in {52..55} ; do scp  \
/etc/elasticsearch/elasticsearch.yml \
192.168.1.$i:/etc/elasticsearch/elasticsearch.yml; done
[root@es2 ~]# vim /etc/elasticsearch/elasticsearch.yml
node.name: es2    //The other three are changed to es3, es4 and es5
[root@es2 ~]# systemctl restart elasticsearch
[root@es2 ~]# systemctl enable elasticsearch
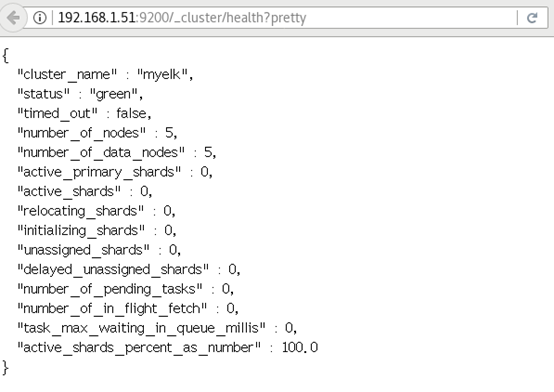
4) Access test, as shown in figure-2:
You can access any host of 61-65, and the nodes of the cluster are all five. If you start es4 or es5 first, the two will automatically become their own clusters. The solution is to start es1 or es2 or es3 in the cluster first, or restart es4 and es5, and es4 and es5 will be added automatically
ES cluster validation: return field resolution:
”Status ":" green "cluster status: green indicates normal, yellow indicates a problem but not very serious, red indicates a serious fault
”Number of nodes: 5, indicating the number of nodes in the cluster
[student@room9pc01 ~]$ firefox http://192.168.1.51:9200/_cluster/health?pretty
3 case 3: practice plug-ins
3.1 problem
This case requires:
Deploying plug-ins on one of the machines
 Using bigdesk to view cluster status
 Using head to create index
 Using kopf to view data
3.2 steps
To implement this case, follow the steps below.
Step 1: deploy plug-ins
Which machine is the plug-in installed on, and which machine can only be used (installed on es5 machine here)
1) Use remote uri path to install directly
[root@es5 ~]# cd /usr/share/elasticsearch/bin
[root@es5 bin]# ./plugin  install  \
ftp://192.168.1.254/elk/elasticsearch-head-master.zip / / install the head plug-in
[root@es5 bin]# ./plugin  install  \
ftp://192.168.1.254/elk/elasticsearch-kopf-master.zip / / install the Kopf plug-in
[root@es5 bin]# [root@se5 bin]# ./plugin install  \
 ftp://192.168.1.254/elk/bigdesk-master.zip
//Install bigdesk plug-in
[root@es5 bin]# . / plugin list / / view the installed plug-ins
Installed plugins in /usr/share/elasticsearch/plugins:
    - head
    - kopf
    - bigdesk
2) Access the head plug-in, as shown in Figure 4:
[student@room9pc01 ~]$ firefox http://192.168.1.55:9200/_plugin/head
Figure -4
3) Access the kopf plug-in, as shown in Figure 5:
[student@room9pc01 ~]$ firefox http://192.168.1.55:9200/_plugin/kopf
Figure -5
4) Access the bigdesk plug-in, as shown in Figure 6:
[student@room9pc01 ~]$ firefox http://192.168.1.55:9200/_plugin/bigdesk
Figure -6
Step 2: use head to create index
[root@es5 bin]# curl -X PUT "http://192.168.1.55:9200/index" -d '
> {
>     "settings":{
>     "index":{
>     "number_of_shards":5,        //Fragmentation number
>     "number_of_replicas":1        //Copy number
>    }
>   }
> }'
{"acknowledged":true}
Step 3: use kopf to view the data, as shown in Figure 7: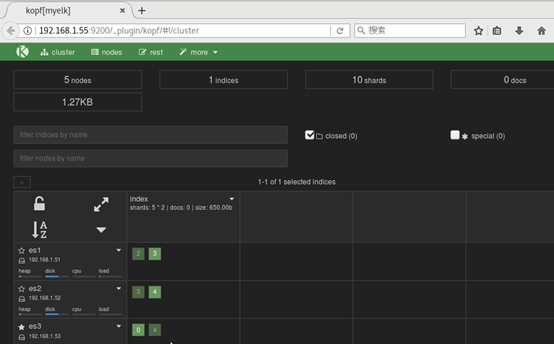
Figure -7
4 case 4: insert, add, delete query data
4.1 problem
This case requires:
Using curl command to connect and use ES database
 Use PUT method to add data
 Modifying data using POST
 Query data using GET
 DELETE data with DELETE
4.2 steps
To implement this case, follow the steps below.
Step 1: add data
[root@es5 ~]# curl -X PUT "http://192.168.1.55:9200/tedu/teacher/1" -d '{
"Occupation":"Poet",
"Name":"Li Bai",
"Title":"Poetry immortal",
"years":"Tang Dynasty"
}'
{"_index":"tedu","_type":"teacher","_id":"1","_version":1,"_shards":{"total":2,"successful":2,"failed":0},"created":true}
Step 2: modify data
[root@es5 ~]# curl -X PUT "http://192.168.1.55:9200/tedu/teacher/1" -d '{
 "doc":{
 "years": "Tang dynasty"
 }
 }'
{"_index":"tedu","_type":"teacher","_id":"1","_version":3,"_shards":{"total":2,"successful":2,"failed":0},"created":false}
Step 3: query data
[root@es5 ~]#  curl -X GET "http://192.168.1.55:9200/tedu/teacher/3?pretty"
{
  "_index" : "tedu",
  "_type" : "teacher",
  "_id" : "3",
  "found" : false
}
Step 4: delete data
[root@es5 ~]# curl -X DELETE "http://192.168.1.55:9200/tedu/teacher/3?pretty"
{
  "found" : false,
  "_index" : "tedu",
  "_type" : "teacher",
  "_id" : "3",
  "_version" : 1,
  "_shards" : {
    "total" : 2,
    "successful" : 2,
    "failed" : 0
  }
}
Step 5: delete index
[root@es5 bin]# curl -X DELETE http://192.168.1.55:9200/tedu/
//Delete index
{"acknowledged":true}
[root@es5 bin]# curl -X DELETE http://192.168.1.65:9200 / * / / delete all indexes
{"acknowledged":true}
5 case 5: import data
5.1 problem
This case requires batch import of data:
Use curl to name cluster batch import data and view
5.2 steps
To implement this case, follow the steps below.
Step 1: import data
Use POST mode to import data in batch. The data format is json. url encoding uses data binary to import json file with index configuration
[student@room9pc01 ~]$ scp  /var/ftp/elk/*.gz root@192.168.1.56:/root/
[root@kibana ~]# gzip  -d logs.jsonl.gz
[root@kibana ~]# curl -X POST "http://192.168.1.51:9200/_bulk"  \
--data-binary @logs.jsonl
2) Using GET query results
[root@kibana ~]# curl -XGET 'http://192.168.1.51:9200/_mget?pretty' -d '{
 "docs":[
     {
        "_index":"shakespeare",
        "_type:":"act",
        "_id":0
},
{
        "_index":"shakespeare",
        "_type:":"line",
        "_id":0
},
{
        "_index":"tedu",
        "_type:":"teacher",
        "_id":25
}
]
}'
{        //Results of query
  "docs" : [ {
    "_index" : "shakespeare",
    "_type" : "act",
    "_id" : "0",
    "_version" : 1,
    "found" : true,
    "_source" : {
      "line_id" : 1,
      "play_name" : "Henry IV",
      "speech_number" : "",
      "line_number" : "",
      "speaker" : "",
      "text_entry" : "ACT I"
    }
  }, {
    "_index" : "shakespeare",
    "_type" : "act",
    "_id" : "0",
    "_version" : 1,
    "found" : true,
    "_source" : {
      "line_id" : 1,
      "play_name" : "Henry IV",
      "speech_number" : "",
      "line_number" : "",
      "speaker" : "",
      "text_entry" : "ACT I"
    }
  }, {
    "_index" : "xixi",
    "_type" : "haha",
    "_id" : "25",
    "_version" : 1,
    "found" : true,
    "_source" : {
      "account_number" : 25,
      "balance" : 40540,
      "firstname" : "Virginia",
      "lastname" : "Ayala",
      "age" : 39,
      "gender" : "F",
      "address" : "171 Putnam Avenue",
      "employer" : "Filodyne",
      "email" : "virginiaayala@filodyne.com",
      "city" : "Nicholson",
      "state" : "PA"
    }
  } ]
}

