1. Create projects
1.1 New Project
First, create a new project named mysite with the following commands:
django-admin startproject mysite # Or use django-admin.py
Run successfully and generate some directories:
mysite/
    manage.py           # Command Line Tools for Managing Django Projects
    mysite/             # Packages, including projects
        __init__.py
        settings.py     # configuration file
        urls.py         # Routing file
        wsgi.py         # WSGI interface, web server entry point, providing the underlying network communication function, without concern
1.2 Start Server
python manage.py runserver          # Open by default at port 8000
python manage.py runserver 8080     # Designated port
Successfully executed, see the output of the following information:

Visit http://127.0.0.1:8000/ in the browser and see the following information to indicate the success of the opening (Django 2.x version below is different):

1.3 New Applications
Now let's create a new app called polls with the following commands:
cd mysite           # Cut it into the project
python manage.py startapp polls
After successful execution, you can see that mysite has an additional polls folder, open polls, which contains the following files:
polls/
    __init__.py
    admin.py            # Background management program provided by Django
    apps.py
    migrations/         # Database table generation record
        __init__.py
    models.py           # Model (database related)
    tests.py            # Test file
    views.py            # View (a view function represents a page)
The difference between project and Application
- A project can have one or more applications
- An application is often used to implement a function, such as blog, calendar management system, etc.
- An application can belong to multiple projects
1.4 First view
A view function represents a Web page, written in polls/views.py:
from django.shortcuts import render, HttpResponse

def index(request):
    """home page"""
    return HttpResponse('Is Ok!')
To invoke views, we need to configure urlconf to let Django find our view functions. Before that, we add app s to settings.py:
INSTALLED_APPS = [
    'django.contrib.admin',
    'django.contrib.auth',
    'django.contrib.contenttypes',
    'django.contrib.sessions',
    'django.contrib.messages',
    'django.contrib.staticfiles',

    'polls',        # It's better to leave one line blank to show the difference.
]
Configure urlconf
Write mysite/urls.py:
from django.contrib import admin
from django.urls import path, include
from polls import views         # Import View Functions

urlpatterns = [
    path('admin/', admin.site.urls),
    path('index/', views.index, name='index'),
]
Visit http://127.0.0.1:8000/index/, and if nothing happens, you will see the words Is Ok!~
Multilevel routing
We only created an app above, so the url path configuration has no impact on the project mysite/urls.py, but when there are multiple applications and views with the same name, multi-level routing is needed to avoid conflicts.
- Configure mysite/urls.py:
from django.contrib import admin
from django.urls import path, include       # Introduce include

urlpatterns = [
    path('admin/', admin.site.urls),
    path('polls/', include('polls.urls')),      # include is equivalent to multilevel routing, which removes the rules in front of the url and passes the remaining strings to the next level of routing, polls/urls.py, for judgment.
]- Create a new urls.py file under the application polls directory, and configure it as follows:
from django.urls import path
from polls import views         # Import View Functions

urlpatterns = [
    path('index/', views.index, name='index'),
    # url(r'^index/', views.index, name='index'),       # Previous versions of Django 2.x
]
Then the access address will become http://127.0.0.1:8000/polls/index/.
2. Model and Background Management
2.1 Database Configuration
In Django, the model is an exponential database. Django has built-in SQLite database, which can be used directly. However, SQLite is generally only used for testing, and rarely used in actual development. If you want to use other databases, you need to configure settings and install the corresponding drivers. Let's take MySQL as an example.
Common database configuration:
'django.db.backends.sqlite3',
'django.db.backends.postgresql',
'django.db.backends.mysql',
'django.db.backends.oracle',
- settings.py
DATABASES = {
    'default': {
        'ENGINE': 'django.db.backends.mysql',
        'NAME': 'test',     # Database name, need to be created beforehand
        'USER': 'root',     # User name
        'PASSWORD': '',     # Password
        'HOST': '',      # Leave blank defaults to localhost, database host name
        'PORT': '3306',
    }
}- Install pymysql module
pip install pymysql
- Activate MySQL and open the project mysite/_init_.py file. The configuration is as follows:
import pymysql
pymysql.install_as_MySQLdb()
Time zone and language
Django uses UTC time zone by default, as well as English. We can modify it to Dongba and Chinese:
LANGUAGE_CODE = 'zh-hans'
TIME_ZONE = 'Asia/Shanghai'
2.2 Create Model
Django uses ORM (Object Relation Mapping) object-relational mapping to operate the database in an object-oriented manner, even if it does not understand the SQL statement, it can also operate the database.
We just need to create the corresponding classes and fields in the model, and then execute the commands. Django will automatically generate the data tables for us:
- Class: corresponding data table name
- Fields: Columns corresponding to data tables
Before that, we created a polls application, and now we will create two tables: Question (to store problems and publish events), and Choice, the selection table for people.
Now let's write polls/models.py:
from django.db import models

class Question(models.Model):       # Each class must inherit models.Model
    """Data sheet: Question sheet"""
    question_text = models.CharField(max_length=2000)       # Content of question
    pub_date = models.DateTimeField('date published')       # Release date


class Choice(models.Model):
    """Data Table: Selection Table"""
    choice_text = models.CharField(max_length=200)      # Choice
    votes = models.IntegerField(default=0)      # Have you voted yet?
question = models.ForeignKey(Question, on_delete=models.CASCADE) # Foreign key Association- In some of the fields above, we specify the longest width max_length, which limits its input range, not necessarily, but preferably.
In addition, we associate the two tables by using foreign key (database content) ForeignKey, that is, the two tables are one-to-many relationships.
There are many choices for a problem. In addition, there are one-to-one and many-to-many relationships among data tables, which will be described in detail later.
Model creation and data migration
Next, create the model and execute Python management.py makemigrations polls. You will see the following tips:
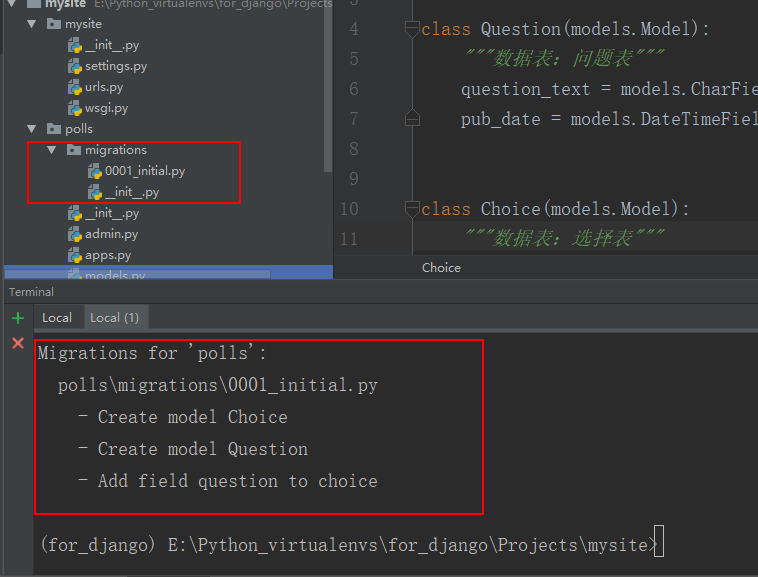
This means that the relevant model records are created in the polls migrations 0001 initial. py file. When we operate on the data table, there are corresponding records on it, which are saved on our computer disk.
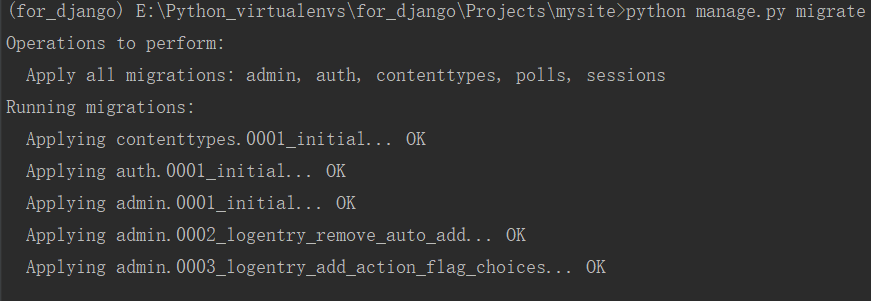
Then we migrate the data to a real database and execute Python management.py migrate:
When you open SQLite in Pycharm, you can see that many tables are created:

Tips
- When creating models, we don't need to create id s. Django will automatically create them for us.
- A foreign key field, Django adds a _id to its name to indicate that it is associated with the ID of the main table
- Django runs and modifies the model at any time. It only needs to follow the following three steps to avoid losing data.
- Modify models.py
- Execute Python management.py makemigrations app_name to create migration records for changes
- Execute Python management.py migrate to synchronize operations to the database
2.3 Operational Model
We created the model with the corresponding commands above, so how do we manipulate the contents of the datasheet? Django provides us with a series of API s that make it easy to manipulate data.
- Enter the shell interaction environment Python management.py shell provided by Django
>>> from polls.models import Question, Choice   # Import model classes
>>> Question.objects.all()      # Get all the question objects
<QuerySet []>                   # Because there is no data in it, all is empty.

>>> from django.utils import timezone   # Import Django's built-in timezone module to get time from the dependency library pytz
>>> q = Question(question_text="What's new?", pub_date=timezone.now())      # Create a question object
>>> q.save()                # Save to database
>>> q.id                    # Access the value of the field in the model by means of object attribute invocation
1
>>> q.question_text
"What's new?"
>>> q.pub_date
datetime.datetime(2019, 2, 28, 8, 10, 18, 766500, tzinfo=<UTC>)

# Modify the value of the field and save it
>>> q.question_text = "What's up?"
>>> q.save()

# all() queries all objects in the database. Here is the question object
>>> Question.objects.all()
<QuerySet [<Question: Question object (1)>]>
When we visit all the objects in Question above, we get an object object object, which is very unfriendly. So we can add a _str() method to the model to make it more readable:
from django.db import models
import datetime
from django.utils import timezone

class Question(models.Model):
    ...
    def __str__(self):
        return self.question_text       # question_text, not object, is returned

class Choice(models.Model):
    ...
    def __str__(self):
return self.choice_text- Open a shell again and see the other API s
>>> from polls.models import Question, Choice
>>> Question.objects.all()
<QuerySet [<Question: What's up?>]>

# Keyword query filter() method filter id=1
>>> Question.objects.filter(id=1)
<QuerySet [<Question: What's up?>]>

# Query question_text with question beginning with What
>>> Question.objects.filter(question_text__startswith="What")
<QuerySet [<Question: What's up?>]>

# Import timezone
# Query questions released this year
>>> from django.utils import timezone
>>> current_year = timezone.now().year      # Get this year's time: 2019
>>> Question.objects.get(pub_date__year=current_year)       #  __year=2019
<Question: What's up?>

# Query ID that does not exist, an exception occurs
>>> Question.objects.get(id=2)
Traceback (most recent call last):
  File "<console>", line 1, in <module>
  File "E:\Python_virtualenvs\for_django\lib\site-packages\django\db\models\manager.py", line 82, in manager_method
    return getattr(self.get_queryset(), name)(*args, **kwargs)
  File "E:\Python_virtualenvs\for_django\lib\site-packages\django\db\models\query.py", line 399, in get
    self.model._meta.object_name
polls.models.Question.DoesNotExist: Question matching query does not exist.

# pk is the abbreviation of primary key, which is the same as id.
>>> Question.objects.get(pk=1)
<Question: What's up?>

>>> q = Question.objects.get(pk=1)      # Create Question Objects
>>> q.choice_set.all()          # Get all the objects of the tables associated with it by the data table name _set.all()
<QuerySet []>

# Create three choices
>>> q.choice_set.create(choice_text='Not much', votes=0)
<Choice: Not much>
>>> q.choice_set.create(choice_text='The sky', votes=0)
<Choice: The sky>
>>> c = q.choice_set.create(choice_text='Just hacking again', votes=0)
>>> c.question
<Question: What's up?>

>>> q.choice_set.all()
<QuerySet [<Choice: Not much>, <Choice: The sky>, <Choice: Just hacking again>]>
>>> q.choice_set.count()
3

>>> Choice.objects.filter(question__pub_date__year=current_year)
<QuerySet [<Choice: Not much>, <Choice: The sky>, <Choice: Just hacking again>]>
>>> c = q.choice_set.filter(choice_text__startswith='Just hacking')
>>> c.delete()      # delete() delete objects
(1, {'polls.Choice': 1})
Above are some examples from official documents, and there are more API operations, which we will learn later.
summary
1,create object

q = Question.objects.all()      # QuerySet object set
q = Question.objects.filter()   # QuerySet object set
q = Question.objects.get()      # QuerySet object, one


2,insert data

q = Question(question_text="What's up?", pub_date=timezone.now())   # Method 1
q.save()

    //Access data:
        q.id
        q.pub_date

Question.objects.create(question_text="What's up?", pub_date=timezone.now())    # Method two

3,Query data

q = Question.objects.get(id=1)      # Get the table object associated with it by q. table name_set.all()
q.choice_set.all()      # <QuerySet [<Choice: Not much>, <Choice: The sky>]>


4,Delete data
q.delete()
2.4 Background Admin Management
Django provides us with a background management tool Admin, which can simply add, delete, modify and check data, which is easy to use and supports expansion.
Creating Administrator Users
python manage.py createsuperuser        # Run commands to create new usernames, mailboxes and passwords
# username: xxx
# email:xxx@qq.com
# password:xxx
Registration application
Register the classes in the model into polls/admin.py, and manage the receiving site:
from django.contrib import admin
from polls.models import Question, Choice

admin.site.register(Question)
admin.site.register(Choice)
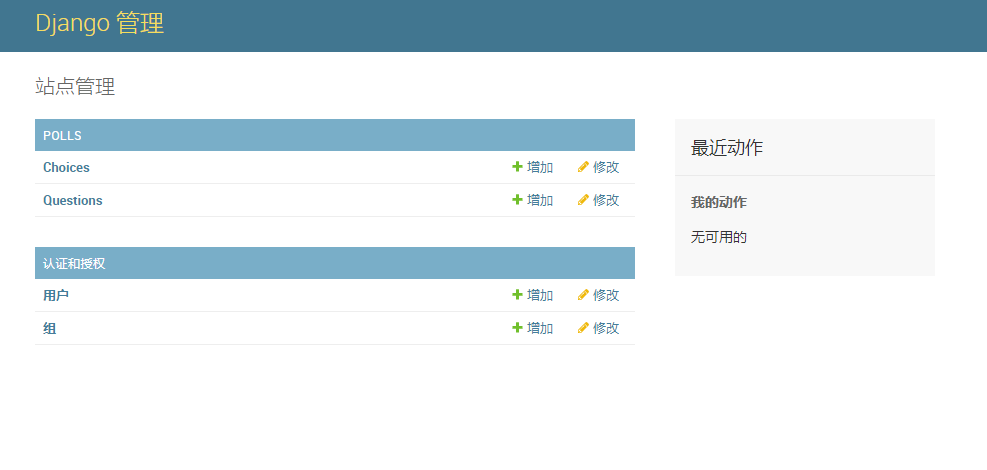
Visit Admin
Visit http://127.0.0.1:8000/admin/, and enter the user name and password you just created:
Custom style
Modify polls/admin.py:
from django.contrib import admin
from polls.models import Question, Choice

# Custom Styles, More Styles See Official Documents
class QuestionAdmin(admin.ModelAdmin):
    list_display = ('id', 'question_text', 'pub_date')      # Fields to be displayed
    list_editable = ('question_text', 'pub_date')       # Editable

admin.site.register(Question, QuestionAdmin)
admin.site.register(Choice)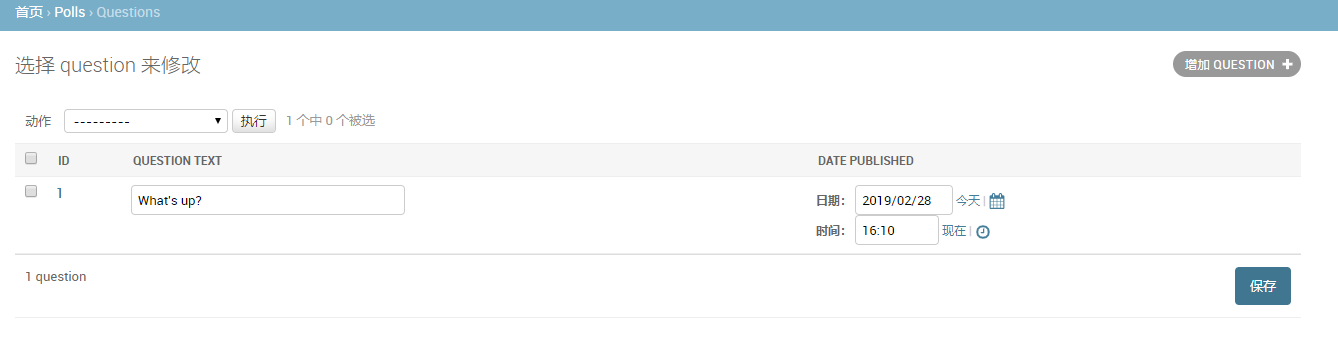
3. Templates and views
3.1 Writing View Functions
Each page in Django is processed by view function. In polls application, we will create the following four views:
| URL | View function | Template | Explain |
|---|---|---|---|
| /index/ | index() | index.html | Home page, showing the latest questions |
| /results/ | results() | results.html | Poll results |
| /detail/ | detail() | detail.html | Detailed description of the problem |
| /vote/ | vote() | vote.html | Voting action, whether to vote or not |
- First, we configure mysite/urlconf so that we can find the corresponding view function:
from django.contrib import admin
from django.urls import path, include
from polls import views

urlpatterns = [
    path('admin/', admin.site.urls),
    path('index/', views.index, name='index'),
    path('detail/', views.detail, name='detail'),
    path('results/', views.results, name='results'),
    path('vote/', views.vote, name='vote'),
]- Write view polls/views.py:
from django.shortcuts import render, HttpResponse

def index(request):
    """home page"""
    return HttpResponse('Is Ok!')

def detail(request):
    """Detailed description of the problem"""
    return HttpResponse('Detailed description of the problem')

def results(request):
    """Poll results"""
    return HttpResponse('Poll results')

def vote(request):
    """Whether to vote"""
    return HttpResponse('Have you voted yet?')
Now that the view function has been created, we can visit the corresponding view to see what http://127.0.0.1:8000/detail/returns.
3.2 Use templates
3.2.1 Create Templates
In the view function above, we use the HttpResponse object to return a string, but in the actual development, we get an HTML page. This requires our template system.
Create a template directory in the polls directory and a new polls directory in the templates directory. Then create a template file in polls (its path polls/templates/polls/), such as index.html/detail.html, etc.
Why create another polls directory
When you have another app and index.html, you can avoid Django matching errors.
Configure templates
In order for Django to find template files in templates, configure settings:
# When templates are in mysite/templates, do not add polls
TEMPLATE_DIRS = (os.path.join(BASE_DIR, 'polls', 'templates'),)

TEMPLATES = [
    {
        'BACKEND': 'django.template.backends.django.DjangoTemplates',
        'DIRS': [os.path.join(BASE_DIR, 'templates')],      # Add this line
        'APP_DIRS': True,
        'OPTIONS': {
            'context_processors': [
                'django.template.context_processors.debug',
                'django.template.context_processors.request',
                'django.contrib.auth.context_processors.auth',
                'django.contrib.messages.context_processors.messages',
            ],
        },
    },
]
3.2.2 Rendering Template
- Rendering templates, Django provides us with a render() function for rendering template files, render() grammar format:
render(request, template_name, context=None) # Three parameters, the first fixed request for the request object, the second is to render the template file, the third is an optional parameter, that is, the data to be transmitted, is a dictionary format.
Edit polls/views.py:
from django.shortcuts import render, HttpResponse
from .models import Question

def index(request):
    """home page"""
    question_list = Question.objects.all()      # Remove all questions from question

    return render(request, 'polls/index.html', {'question_list': question_list})

def detail(request, question_id):
    """Detailed description of the problem"""
    question = Question.objects.get(id=question_id)

    return render(request, 'polls/detail.html', {'question': question})
When we visit http://127.0.0.1:8000/index/the index() function handles our view. It takes all the problem objects from Question and renders them into the template.
- Create the template file polls/templates/polls/index.html:
<!--index.html-->
<!DOCTYPE html>
<html lang="en">
<head>
    <meta charset="UTF-8">
    <title>Title</title>
</head>
<body>
    {% for question in question_list %}
    <!-- Equivalent to access <a href='detail/1/'></a>-->
        <li><a href="{% url 'detail' question.id %}">{{ question.question_text }}</a> </li>
    {% endfor %}
</body>
</html>
In the template file index.html, we use the for loop to loop all the problems. When we click on the link of tag a, it will be located at http://127.0.0.1:8000/detail/1.
- Template file polls/templates/polls/detail.html:
<!DOCTYPE html>
<html lang="en">
<head>
    <meta charset="UTF-8">
    <title>Detail</title>
</head>
<body>
    <h1>{{ question.question_text }}</h1>
    <ul>
        {% for choice in question.choice_set.all %}
            <li>{{ choice.choice_text }}</li>
        {% endfor %}
    </ul>
</body>
</html>- Configure mysite/urls.py:
from django.contrib import admin
from django.urls import path, include
from polls import views

urlpatterns = [
    path('admin/', admin.site.urls),
    path('index/', views.index, name='index'),

    # We changed'detail/'to'detail/<int:question_id>' to match paths such as http://127.0.0.1:8000/detail/1.
    path('detail/<int:question_id>', views.detail, name='detail'),
]
Here we modify'detail/'to'detail/<int:question_id>' to match paths such as http://127.0.0.1:8000/detail/1. Where < int: question_id > matches to a positive integer, and don't forget to receive the corresponding question_id in the view function:
def detail(request, question_id):
    """Detailed description of the problem"""
    question = Question.objects.get(id=question_id)

    return render(request, 'polls/detail.html', {'question': question})
Here we use the template language provided by Django to display the data in the database on the page, which will be described in detail later.

3.3 Returns 404 error
When we visit a path that does not exist, we return an Http404, which we can customize to return to what we want, edit polls/views.py:
from django.http import Http404
from django.shortcuts import render
from .models import Question

def detail(request, question_id):
    try:
        question = Question.objects.get(pk=question_id)
    except Question.DoesNotExist:
        raise Http404("Question Non-existent")
    return render(request, 'polls/detail.html', {'question': question})
In addition, Django also provides us with a shortcut function get_object_or_404(), which only needs one line to replace the above multiple lines:
from django.shortcuts import get_object_or_404, render
from .models import Question

def detail(request, question_id):
    question = get_object_or_404(Question, pk=question_id)      # First parameter: model, second: arbitrary keywords
return render(request, 'polls/detail.html', {'question': question})- get_object_or_404(): Instead, get() method
- get_list_or_404(): Instead of filter() method
3.4 URL Namespaces
What is the namespace of a URL? To add an alias to each URL path has the following advantages:
- When there are multiple apps, you can better distinguish which app's path is
- Avoid hard coding. In index.html above, we use the URL namespace instead of hard coding like <a href='/detail/{question.id}'. In this way, when we modify the matching method, we do not need to make a lot of modifications.
Add namespaces
from django.contrib import admin
from django.urls import path, include
from polls import views

urlpatterns = [
    path('admin/', admin.site.urls),
    path('index/', views.index, name='index'),          # Where name='index'is the namespace of the URL
    path('detail/<int:question_id>', views.detail, name='detail'),
]
When there are multiple applications
When there are multiple applications, we just need to add an app_name to urls.py and bring it with us when we use it:
...
app_name = 'polls'      # Add this line
urlpatterns = [
    path('admin/', admin.site.urls),
    path('index/', views.index, name='index'),          # Where name='index'is the namespace of the URL
    path('detail/<int:question_id>', views.detail, name='detail'),
]
When using, be sure to bring app_name:
<li><a href="{% url 'polls:detail' question.id %}">{{ question.question_text }}</a></li>4. Forms and General Views
Before creating the form, let's analyze the overall running process of the following program:
- Visit the home page index to display all the problems
- Click on the question, jump to detail, display the detailed question, and show the voting options
- When the user votes, he jumps to the results page and asks if he wants to continue voting.
As you can see from the process, we need to provide a radio box on the question details page for users to choose. Let's create the first form below:
4.1 Form form
- Write polls/detail.html:
<!DOCTYPE html>
<html lang="en">
<head>
    <meta charset="UTF-8">
    <title>Detail</title>
</head>
<body>
<!--problem-->
<h1>{{ question.question_text }}</h1>

<!-- error message -->
{% if error_message %}
    <p>{{ error_message }}</p>
{% endif %}


<form action="{% url 'vote' question.id %}" method="post">
    {% csrf_token %}        <!--csrf Attack, form submission must take this with it-->

    <!-- adopt question.choice_set.all Get all Choice option -->
    {% for choice in question.choice_set.all %}             <!--choice1,choice2-->
        <input type="radio" name="choice" id="choice{{ forloop.counter }}" value="{{ choice.id }}">
        <label for="choice{{ forloop.counter }}">{{ choice.choice_text }}</label>
    {% endfor %}

    <!-- Submission -->
    <input type="submit" value="vote">
</form>
</body>
</html>- In the detail.html template file above, we created a form that will be submitted to the corresponding URL of action when the user clicks on submit.
- In the form, we get all the Choice options through question.choice_set.all and loop through it.
- Then a radio check box is defined. The key submitted to the server is choice, and the value is the id of the option.
- Also note that when a form sends a post request, be sure to bring {% csrf_token%} or it will be forbidden to submit.
- Configure mysite/urls.py:
# /index/
path('index/', views.index, name='index'),
# /detail/1/
path('detail/<int:question_id>', views.detail, name='detail'),
# /results/1/
path('results/<int:question_id>', views.results, name='results'),
# /vote/1/
path('vote/<int:question_id>', views.vote, name='vote'),- Write polls/views.py:
from django.shortcuts import render, HttpResponse, get_object_or_404, redirect
from .models import Question, Choice
from django.http import HttpResponseRedirect
from django.urls import reverse

def vote(request, question_id):
    """Processing voting"""
    print(question_id)
    question = get_object_or_404(Question, id=question_id)
    try:
        choice_id = request.POST.get('choice', None)
        print(choice_id)
        selected_choice = question.choice_set.get(id=choice_id)
    except (KeyError, Choice.DoesNotExist):
        # choice is not found. Return to the form page and give prompts.
        return render(request, 'polls/detail.html', {'question': question, 'error_message': 'You don't have to choose the option!'})
    else:
        selected_choice.votes += 1
        selected_choice.save()
        ret = reverse('results', args=(question.id,))       # /results/1
return HttpResponseRedirect(ret)- question_id is the ID corresponding to the problem
- In the detail.html template, we submit the id of the option to the background. Through request.POST.get('choice'), we can get the id of the option selected by the user.
- When there is no corresponding choice_id, return to the form page and give the error message
- When there is a corresponding choice_id, the corresponding vote is added 1, and finally redirected to the results page.
- Write polls/results.html
<!DOCTYPE html>
<html lang="en">
<head>
    <meta charset="UTF-8">
    <title>Result</title>
</head>
<body>
    <h1>{{ question.question_text }}</h1>
    <ul>
        {% for choice in question.choice_set.all %}
            <li>{{ choice.choice_text }} -- {{ choice.votes }} vote{{ choice.votes|pluralize }}</li>
        {% endfor %}

    </ul>
    <a href="{% url 'detail' question.id %}">Vote again?</a>
</body>
</html>
So far, a simple public voting system has been roughly completed. The following is a demonstration:
4.2 General View
In view polls/views, we have written a lot of duplicate code similar to index(), which is redundant.
Django provides us with a general view system that abstracts common patterns and deletes a lot of redundant code. To do this, we need the following three steps:
- Conversion urlconf
- Delete old, unnecessary views
- Introduce a new view based on the general view
Conversion URLconf
Edit mysite/urls.py:
urlpatterns = [
    path('admin/', admin.site.urls),
    path('index/', views.IndexView.as_view(), name='index'),
    path('detail/<int:pk>', views.DetailView.as_view(), name='detail'),
    path('results/<int:pk>', views.ResultsView.as_view(), name='results'),
    path('vote/<int:question_id>', views.vote, name='vote'),
]
Here we change question_id to pk, because the primary key PK will match the generic view from the url.
Modify view
from django.views import generic


class IndexView(generic.ListView):
    template_name = 'polls/index.html'  # Template name
    context_object_name = 'question_list'   # Variables returned to the template

    def get_queryset(self):
        return Question.objects.all()


class DetailView(generic.DetailView):
    model = Question    # Model
    template_name = 'polls/detail.html'


class ResultsView(generic.DetailView):
    model = Question
    template_name = 'polls/results.html'


def vote(request, question_id):
pass- ListView: Displays a list of objects
- DetaiView: Display a specific type of object detail page
- context_object_name: Question_list in the variable {'question_list':question_list} returned to the template
- DetaiView: Matches the pk primary key in the URL
- template_name: The template file returned in the format <app_name>/<model name>_list.html
More about generic views: https://docs.djangoproject.com/zh-hans/2.1/topics/class-based-views/
5. test
Testing is an integral part of actual development. It can:
- Check whether the procedure meets expectations
- Discover problems in time and save development time
- More conducive to teamwork, etc.
Testing is divided into manual testing and automatic testing. Manual testing is often time-consuming, laborious and inefficient. We can use some test modules, such as TestCase, to help us finish the test work automatically. Django also has an automatic test program, which is also based on TestCase module.
In model models.py, we define a was_published_recently() method for Question to return whether the problem was recently published and True when Question was released the latest day.
class Question(models.Model):
    """Data sheet: Question sheet"""
    question_text = models.CharField(max_length=2000)       # Content of question
    pub_date = models.DateTimeField('date published')       # Release date

    def __str__(self):
        return self.question_text

    def was_published_recently(self):
        # The current time minus the previous day, compared with the issue release time
        return self.pub_date >= timezone.now() - datetime.timedelta(days=1)
5.1 Verification bug
Enter the Django shell environment:
>>> import datetime
>>> from django.utils import timezone
>>> from polls.models import Question

# Create a problem object 30 days after the release date
>>> future_question = Question(pub_date=timezone.now() + datetime.timedelta(days=30))

# Test the return value and find that it is also True
>>> future_question.was_published_recently()
True
We created a problem 30 days after the release date, and the test found it or returned to True, that is to say, it was allowed to release the problem in the future time. This is a bug.
5.2 Testing bug s
Write polls/tests.py:
from django.test import TestCase
import datetime
from django.utils import timezone
from .models import Question

class QuestionModelTests(TestCase):

    def test_was_published_recently_with_future_question(self):
    # Create a pub_date as a Question example in the next 30 days, and then check the return value of was_published_recently(), which should be False
        time = timezone.now() + datetime.timedelta(days=30)
        future_question = Question(pub_date=time)
        self.assertIs(future_question.was_published_recently(), False)
Execute Python management.py test polls and you will see the results:
Creating test database for alias 'default'...
System check identified no issues (0 silenced).
F
======================================================================
FAIL: test_was_published_recently_with_future_question (polls.tests.QuestionModelTests)
----------------------------------------------------------------------
Traceback (most recent call last):
  File "E:\Python_virtualenvs\for_django\Projects\mysite\polls\tests.py", line 11, in test_was_published_recently_with_future_qu
estion
    self.assertIs(future_question.was_published_recently(), False)
AssertionError: True is not False

----------------------------------------------------------------------
Ran 1 test in 0.016s

FAILED (failures=1)
Destroying test database for alias 'default'...
We created a Question instance with a pub_dae value of 30 days, used assertls() method to determine whether to return False, and found that it returned True.
5.3 Modifying bug s
We want pub_date to be the next day, Question.was_published_recently() to return to False and modify polls/models.py:
def was_published_recently(self):
    now = timezone.now()
    return now - datetime.timedelta(days=1) <= self.pub_date <= now
Then we test and find that the test passes. Testing is very important and often used in project development. Here we just do a general understanding and discuss it in detail later.
6. Static files
Static files are necessary files for Web applications, such as pictures, JS scripts, CSS styles, etc. A complete Web application should have its own independent static files, template files, that is to say, it needs to be distinguished from the project itself.
Create a static directory under the application polls, create a new folder under the name of the application, and then classify and store various static files. The directory structure is as follows:

Configure static files
Like template templates, you need to configure static files before you use them, so that Django can find them. Edit settings.py:
STATIC_URL = '/static/'
STATICFILES_DIRS = (
    os.path.join(BASE_DIR, 'polls', 'static'),
)       # Don't forget the last comma.
Using static files
Create an image directory under polls/static/polls / to store images, and a CSS directory to store CSS files. Then create a new style.css file.
Let's add background images to index.html and write the following code:
li a{
    color: red;
}

body {
    background: white url("images/2.png") no-repeat;
}
Then load the style.css file in index.html:
{% load static %}       <!--Introduce static-->
<!DOCTYPE html>
<html lang="en">
<head>
    <meta charset="UTF-8">
    <title>Title</title>
    <!--Again style.css Load in -->
    <link rel="stylesheet" href="{% static 'polls/css/style.css' %}">
</head>
<body>
    {% for question in question_list %}
        <li><a href="{% url 'detail' question.id %}">{{ question.question_text }}</a> </li>
    {% endfor %}
</body>
</html>
We refreshed it again and found that the background picture had been added to the home page. In addition, we can use static files directly in template files, such as jQuery in template:
# Similarly, static should be introduced first.
{% load static %}
<script src="{% static 'polls/js/jquery-3.1.1.js' %}"></script>