I. Introduction
Let's not say much. Let's look at these two little candles.
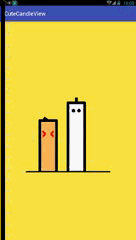
Small candles hold their breath and ignite the flame. They are blown out 0 ^ 0 by the buddies next to them. They still seem to be full of vigor. Looking at the picture, you should be able to think about how to achieve it, custom View! Yes, but how to do this process well? Follow your steps and have a look. There's a little bit more code, so watch it patiently.
II. Process Realization
Drawing and animation of candles
-
In the light of object-oriented thinking, it is obvious that there are two candles here. Since this is the case, we define a candle class as having the basic properties of candles.

public abstract class ICandle {

    //Left lower coordinates at the bottom of the candle
    protected int mCurX;
    protected int mCurY;
    //Candle width
    protected int mCandleWidth;
    protected int mCandleHeight;
    //Left eye coordinates of candles
    protected Point mEyeLPoint;
    //Right eye coordinates of candles
    protected Point mEyeRPoint;
    //Candle Eye Radius
    protected int mEyeRadius;
    //Eye spacing
    protected int mEyeDevide;
    //Body color
    protected int mCandleColor;
    //Stop animation or not
    protected boolean mIsAnimStoping = false;
    //Candle wick coordinates
    protected Point mCandlewickPoint;
    public void initAnim(){
    }
    public void stopAnim(){
    }
    public void drawSelf(Canvas canvas){
    }
}
There's code for the candle, so it's clear at a glance. Perhaps what needs to be explained is the following methods: public
void initAnim(), stopAnim() initializes the data needed to start and end the animation. A small candle will implement this method, drawSelf(Canvas).
canvas) Pass in the canvas and the candle draws itself.
Now it's time for us to take a look at the internal structure of the candle body, hiahiahiahia!
No, there's a flame that goes with the candle's life and death. Let's look at the flame first. Wait till the candle burns itself.
-
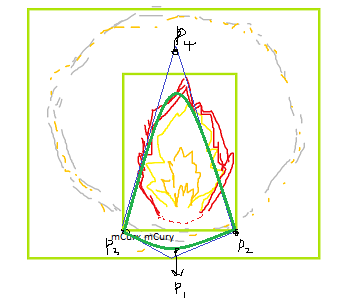
Let's first see what Fulham looks like.


There seems to be nothing wrong with it. First of all, the inner area is Flame. Outside, Mr. Flame burns his human light and ashes (wiping tears manually).
Let's take a look at the implementation of Flame. We analyze step by step.
    private static float CHANGE_FACTOR = 20;
    private Paint mPaint;
    private Path mPath;
    //Left lower coordinates
    private int mCurX;
    private int mCurY;
    //Flame width
    private int mWidth;
    //Flame height
    private int mHeight;
    //Record initial height
    private int mPreHeight;
    //Record initial width
    private int mPreWidth;
    //Variation parameters of control points of Bessel curve on top of flame
    private int mTopXFactor;
    private int mTopYFactor;
    //Used to achieve flame jitter
    private Random mRandom;
    //Aureole radius
    private int mHaloRadius;
    //Burning
    private boolean mIsFiring;
    //Whether to Start Stop Animation
    private boolean mIsStopAnim = false;
    private boolean mFlagStop = false;
    private LinearGradient mLinearGradient;
    private RadialGradient mRadialGradient;

    private ValueAnimator mFlameAnimator;
    private ValueAnimator mHaloAnimator;
These are the parameters, mainly our animation implementation process, that is, our attribute animation Value Animator here are two rendering classes do not know whether you have used, Linear Gradient and Radial Gradient do not understand the students can directly link. My csdn Read about it on my blog. Linear Gradient draws the flame, Radial Gradient draws in addition to the diffuse light.
I won't write the initialization process. Let's see the code. The main thing is how to draw the small flame.
    mPaint.setStyle(Paint.Style.FILL);
    mPaint.setShader(mLinearGradient);
    mPath.reset();
    mPath.moveTo(mCurX, mCurY);
    mPath.quadTo(mCurX + mWidth / 2,
            mCurY + mHeight / 3,
            mCurX + mWidth, mCurY);
    mPath.quadTo(mCurX + mWidth / 2 + ((1 - mRandom.nextFloat()) * CHANGE_FACTOR) + mTopXFactor,
            mCurY - 2 * mHeight + mTopYFactor,
            mCurX, mCurY);
    canvas.drawPath(mPath, mPaint);
This is the drawing of flame flame. You can see that the drawing of quadratic Bessel curve is used here. Students who are not very clear about the Bessel curve can also point to this. Wave Loading Animation (Bessel Curve) There is a brief introduction, which was used in the view of a water wave. The drawing here refers to the rectangle in the previous one. Let's take a look at this one again (of course, the enhanced version of hiahia).
So why does the x coordinate above add mRandom. nextFloat ()?*
What about CHANGE_FACTOR? You think, the flame will not sway left and right, using a random control to sway left and right.
    mFlameAnimator = ValueAnimator.ofFloat(0, 4).setDuration(4000);
    mFlameAnimator.setRepeatCount(ValueAnimator.INFINITE);
    mFlameAnimator.addUpdateListener(
                   new ValueAnimator.AnimatorUpdateListener() {
        @Override
        public void onAnimationUpdate(ValueAnimator animation) {
            float zeroToOne = (float) animation.getAnimatedValue();
            if (zeroToOne >= 1.0f && zeroToOne <= 1.2f) {
                //Flame ignite
                zeroToOne = 1.0f - 5 * (zeroToOne - 1.0f);//1-0
                mHeight = (int) (mPreHeight * (1 - zeroToOne));
                mIsFiring = true;
            } else if (zeroToOne >= 3.5f) {
                if (mFlagStop) {
                    mFlameAnimator.cancel();
                    return;
                }
                //The flame was blown out
                zeroToOne = 2 * (zeroToOne - 3.5f);//0-2
                mTopXFactor = (int) (-20 * zeroToOne);
                mTopYFactor = (int) (160 * zeroToOne);
//                    mWidth = (int) (mPreWidth * (1 -zeroToOne));
                mIsFiring = false;
            }
        }
    });
In 4 seconds, the flame has a series of activities. From below, as the wick moves up, the position of the flame is constantly changed. It is divided into two parts: flame ignition and flame extinction. As can be seen from the code, mHeight becomes larger slowly when the flame is ignited, and then the process of rising is hot. The other is when the flame is blown out, because the flame is blown out. The height must be kept at the previous value, so there is no need to change it. Instead, two factors, mTopXFactor and mTopYFactor, are used to control the position of the flame. Well, now that the flame is there, the wax torch turns to ash and tears begin to dry. It's time for the light of life to come out.
Diaphragm drawing and animation are relatively simple
            mPaint.setStyle(Paint.Style.STROKE);
            mPaint.setStrokeWidth(5);
            mPaint.setShader(mRadialGradient);
            canvas.drawCircle(mCurX + mWidth / 2,
                         mCurY - mHeight / 2, mHaloRadius, mPaint);
            canvas.drawCircle(mCurX + mWidth / 2,
                         mCurY - mHeight / 2, mHaloRadius + 5, mPaint);
            canvas.drawCircle(mCurX + mWidth / 2,
                         mCurY - mHeight / 2, mHaloRadius - 5, mPaint);
mHaloAnimator = ValueAnimator.ofFloat(0, 1).setDuration(500);
mHaloAnimator.setRepeatCount(ValueAnimator.INFINITE);
mHaloAnimator.addUpdateListener(
new ValueAnimator.AnimatorUpdateListener() {
@Override
public void onAnimationUpdate(ValueAnimator animation) {
float zeroToOne = (float) animation.getAnimatedValue();
if (mIsFiring) {
mHaloRadius = (int) (70 + zeroToOne % 1.0f * 20);
}
}
});
There is only one parameter changed here, mHaloRadius, which is the radius of the aperture. But don't forget that other parameters are changing at the same time, just in mFlame Animator.
Okay, that's all for Flame.
-
FireCandle
It's a strange name, Candle. It's awesome for Brother Word. I've already introduced ICandle. Now let's look at his implementation class, FireCandle, the two brothers of Candles.
Initialization routine will not say, look at the variables that should be there.
Naming is still quite standard. We should know what it is at first glance.private Paint mPaint; //Centrox coordinates private int mCenterX; //Record Initial Width private int mPreWidth; //Record initial height private int mPreHeight; //Rotation angle of candle wick private int mCandlewickDegrees = 0; private Flame mFlame; private boolean mIsFire = false; private boolean mIsStateOnStart = false; private boolean mIsStateOnEnd = false; private boolean mFlagStop = false; private ValueAnimator mCandlesAnimator;
We're still going to focus on the combination of rendering and attribute animation, so we don't see the rendering (face-beating at the speed of light). Look at the animation.
This process is a little more, but in fact it is not complicated at all. First, we look at the small candle in the animation. At the beginning, he came to a squat with a fat red face. So mCandleWidth is bigger and mCandleHeight is smaller. The latter one rotates at a large angle with the squat. You can see how the wick rotates, change the coordinate system, and then you can see it. All right. Used.mCandlesAnimator = ValueAnimator.ofFloat(0, 4).setDuration(4000); mCandlesAnimator.addUpdateListener( new ValueAnimator.AnimatorUpdateListener() { @Override public void onAnimationUpdate(ValueAnimator animation) { float zeroToOne = (float) animation.getAnimatedValue(); if (zeroToOne <= 1.0f) { //Candle wick pulls down mIsFire = true; mCandleWidth = mPreWidth + (int) (zeroToOne * 40); mCandleHeight = mPreHeight - (int) (zeroToOne * 30); mCandlewickDegrees = (int) (-60 + (180 + 60) * zeroToOne); refreshEyePosition(); } else if (zeroToOne <= 2.0f) { zeroToOne = zeroToOne - 1.0f; //Candle wick pendulum if (zeroToOne <= 0.2f) { zeroToOne = 1.0f - 5 * zeroToOne; mIsFire = false; mCandleWidth = mPreWidth + (int) (zeroToOne * 40); mCandleHeight = mPreHeight - (int) (zeroToOne * 30); mCandlewickDegrees = (int) (180 * zeroToOne); } else { if (mFlameStateListener != null && !mIsStateOnStart) { mFlameStateListener.flameStart(); mIsStateOnStart = true; } mCandleWidth = mPreWidth; mCandleHeight = mPreHeight; mCandlewickDegrees = 0; if (mFlagStop) { mCandlesAnimator.cancel(); } } refreshEyePosition(); } else if (zeroToOne >= 3.5f) { //The candle wick was blown askew zeroToOne = 2 * (zeroToOne - 3.5f);//0-1 mCandlewickDegrees = (int) (-60 * zeroToOne); if (mFlameStateListener != null && !mIsStateOnEnd) { mFlameStateListener.flameEnd(); mIsStateOnEnd = true; } } } });
canvas.rotate(mCandlewickDegrees, mCenterX, MCurY - mCandleHeight; this method. The same is true of the pendulum process, let alone say. refreshEyePosition(); This method changes the position of the eyes, both of which are used, so it's slightly independent. Notice the mIsFire variable. When there is no fire, do other drawings, such as red eyes and so on. Okay, here we go, the little candle part is over. -
SecCandle
Big candles, handsome candletown buildings, the actual drawing and small candles are almost the same, here is no explanation.

Drawing View and Controller Together
-
AnimControler
The function of this class is very simple. Drawing the floor part and assigning the height and width of the calculation to two candles, then controlling the two candles to start animation separately.
At the end of the day, it's our View.mFirCandle = new FirCandle(mRelativeX + mWidth / 6, mRelativeY + mHeight); mFirCandle.initCandle(mFirCandleWidth, mFirCandleHeight); mFirCandle.initAnim(); mSecCandle = new SecCandle(mRelativeX + mWidth / 2, mRelativeY + mHeight); mSecCandle.initCandle(mSecCandleWidth, mSecCandleHeight - 80); mSecCandle.initAnim(); -
CandlesAnimView
      //16ms refresh Canvas
      mInvalidateAnimator = ValueAnimator.ofInt(0, 1).setDuration(16);
      mInvalidateAnimator.setRepeatCount(ValueAnimator.INFINITE);
      mInvalidateAnimator.addListener(new AnimatorListenerAdapter() {
          @Override
          public void onAnimationRepeat(Animator animation) {
              invalidate();
          }
      });
      mInvalidateAnimator.start();
The task of this attribute animation is to refresh the interface quickly, so that Candle's animation can be displayed in time.
  @Override
  protected void onMeasure(int widthMeasureSpec, int heightMeasureSpec) {
      super.onMeasure(widthMeasureSpec, heightMeasureSpec);
      int width = measureDimension(WIDTH_DEFAULT * mDensity,
                                 widthMeasureSpec);
      int height = measureDimension(HEIGHT_DEFAULT *mDensity,
                                 heightMeasureSpec);
      setMeasuredDimension(width, height);
  }

  public int measureDimension(int defaultSize, int measureSpec) {
      int result;
      int specMode = MeasureSpec.getMode(measureSpec);
      int specSize = MeasureSpec.getSize(measureSpec);

      if (specMode == MeasureSpec.EXACTLY) {
          result = specSize;
      } else {
          result = defaultSize;
          if (specMode == MeasureSpec.AT_MOST) {
              result = Math.min(result, specSize);
          }
      }
      return result;
  }

  @Override
  protected void onDraw(Canvas canvas) {
      if (!mIsInit) {
          initConfig();
          mIsInit = true;
      }
      mAnimControler.drawMyView(canvas);
  }
You can see that we finally called our controller in view and passed cavas over.
Last tip: Have you found that the duration of each animation is the same?
Three, last
Well, so far, I've said so much about a simple view customization.
I hope to encourage you on the road of technology and go farther and farther. Thank you