Building a virtual host
1. Introduction to virtual host
There are three types of virtual hosts commonly used in Enterprises:
(1) based on domain name
(2) port based
(3) IP based
Virtual web host
Running multiple web sites in the same physical server, each of which does not occupy a real computer independently
Types of virtual hosts supported by httpd
(1) domain name based virtual host
(2) virtual host based on IP address
(3) port based virtual master
Apache connection hold
Apache connection retention parameters
(1)KeepAlive
Open connection hold, OFF off, ON
(2)KeepAlive Timeout
The maximum interval time between multiple coarse requests in one connection, and the connection is disconnected when the two requests exceed this time
(3)MaxKeepAliveRequests
The maximum number of requests that a connection can transmit
Apache access control
(1) function
Control access to site resources
Add access to a specific site directory
(2) common access control methods
Client address restrictions
user limit
Access control based on client address
Use the Require configuration item to implement access control and restrict in order
It can be used in < location >, < Directory >, < files >, < limit > configuration segments.
Common syntax for Require configuration items
Require all granted
Require all denied
Require local
Require [not ] host <Host name or domain name list>
Require [not ] ip <IP Address or segment list>
When not is used to prohibit access, it should be placed in the < requireall > < requireall > container and the corresponding restriction policy should be specified in the container.
Command mode of Require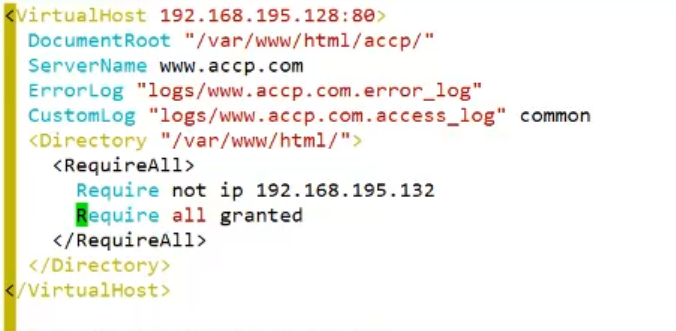
2. Building a virtual host -- Based on domain name
2.1 configuration environment
Install DNS and httpd services
[root@localhost ~]# yum install bind httpd -y
Modify DNS master profile
[root@localhost ~]# vim /etc/named.conf
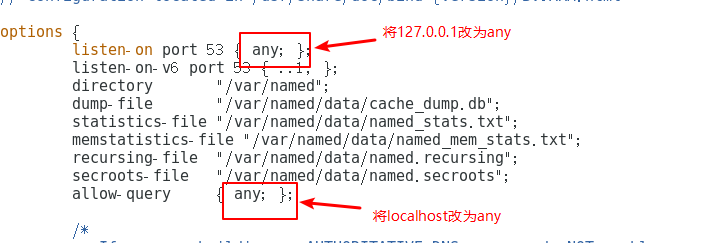
Configure DNS zone profile
[root@localhost ~]# vim /etc/named.rfc1912.zones
#Add the following to the zone profile
zone "kgc.com" IN {
        type master;
        file "kgc.com.zone";
        allow-update { none; };
};

zone "accp.com" IN {
        type master;
        file "accp.com.zone";
        allow-update { none; };
};
Configure DNS zone data profile
[root@localhost ~]# cd /var/named/
[root@localhost named]# ls / / view
data  dynamic  named.ca  named.empty  named.localhost  named.loopback  slaves
[root@localhost named]# cp -p named.localhost kgc.com.zone
[root@localhost named]# vim kgc.com.zon
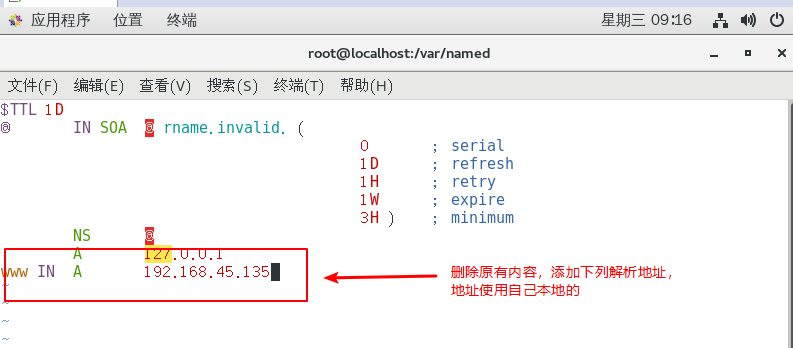
Copy the area data configuration file of kgc to accp without modification.
[root@localhost named]# cp -p kgc.com.zone accp.com.zone
Turn on DNS service, turn off firewall and security functions
[root@localhost named]# systemctl start named
[root@localhost named]# systemctl stop firewalld.service
[root@localhost named]# setenforce 0
2.2 configure the static DNS resolution address on the tested windows 10

Open cmd on Windows 10 to test whether it can resolve to domain name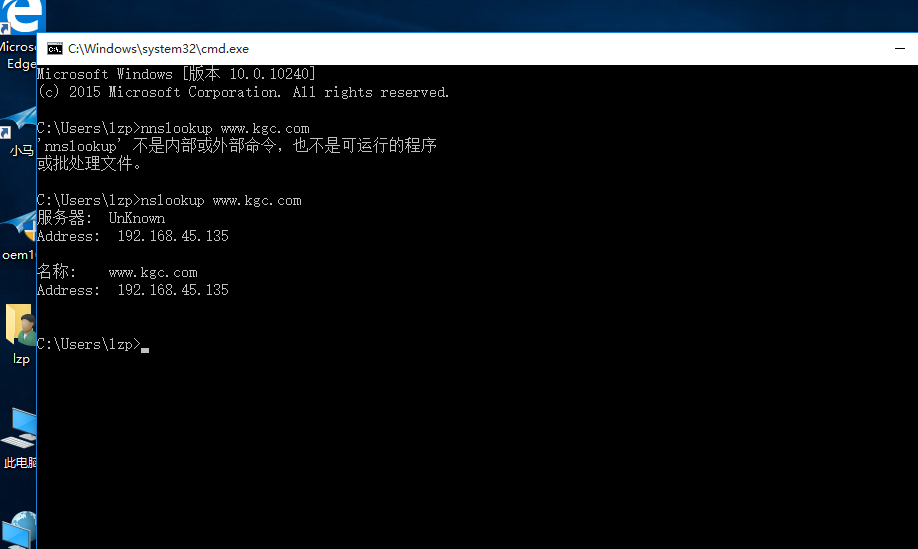
2.3 configure virtual host
[root@localhost named]# cd /etc/httpd/
[root@localhost httpd]# ls
conf  conf.d  conf.modules.d  logs  modules  run
[root@localhost httpd]# cd conf/
[root@localhost conf]# ls
httpd.conf  magic
[root@localhost conf]# mkdir extra
[root@localhost conf]# cd extra/
[root@localhost extra]# vim vhost.conf / / create extension file
 <VirtualHost  *:80>                     //Title, fixed format
     DocumentRoot "/var/www/html/kgc"                //site
     ServerName www.kgc.com                               //domain name
    ErrorLog "logs/www.kgc.com.error_log"              //Error log file
    CustomLog "logs/www.kgc.com.access_log" common                 //Access log files
   <Directory "/var/www/html/">
         Require all granted                                    //Access right
              </Directory>
 </VirtualHost>

 <VirtualHost  *:80>
     DocumentRoot "/var/www/html/accp"
     ServerName www.accp.com
     ErrorLog "logs/www.accp.com.error_log"
     CustomLog "logs/www.accp.com.access_log" common
     <Directory "/var/www/html/">
          Require all granted
      </Directory>
   </VirtualHost>
Configure web page display content
[root@localhost httpd]# cd /var/www/html/
[root@localhost html]# ls
[root@localhost html]# mkdir kgc accp
[root@localhost html]# ls
accp  kgc
[root@localhost html]# cd kgc/
[root@localhost kgc]# vim index.html
<h1>this is kgc web</h1>
[root@localhost kgc]# cd ../accp/
[root@localhost accp]# vim index.html
<h1>this is accp web</h1>
Configure the absolute path of a web page
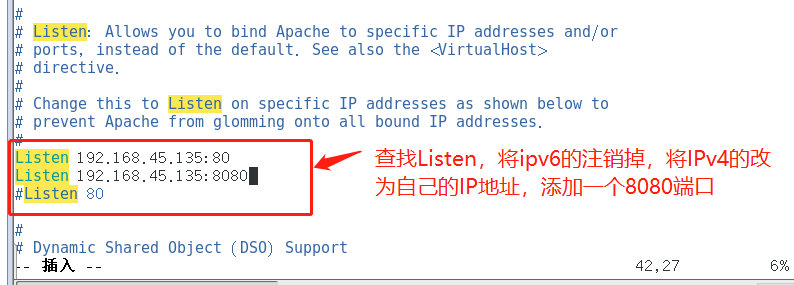
[root@localhost accp]# cd /etc/httpd/
[root@localhost httpd]# ls
conf  conf.d  conf.modules.d  logs  modules  run
[root@localhost httpd]# cd conf/
[root@localhost conf]# vim httpd.conf
Include conf/extra/vhost.conf
Start http service
[root@localhost conf]# systemctl start httpd
2.4 test your own web page on Windows 10


3. Build virtual host based on port
3.1 modification based on domain name
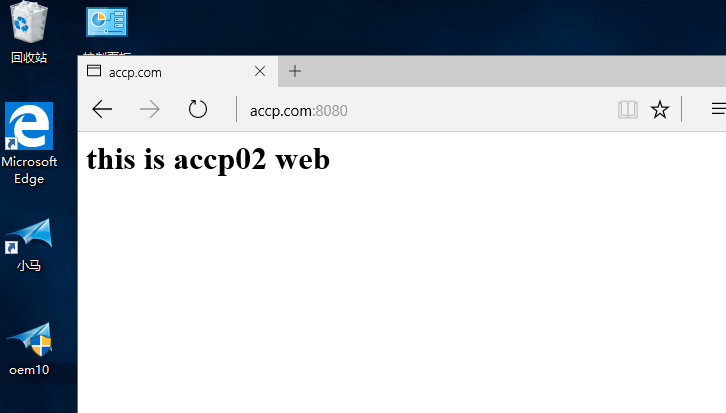
Enter the extension file, configure and add a port
[root@localhost conf]# cd extra/
[root@localhost extra]# vim vhost.conf
 <VirtualHost  *:8080>
 22     DocumentRoot "/var/www/html/accp02"
 23     ServerName www.accp.com
 24     ErrorLog "logs/www.accp02.com.error_log"
 25     CustomLog "logs/www.accp02.com.access_log" common
 26     <Directory "/var/www/html/">
 27          Require all granted
 28      </Directory>
 29 </VirtualHost>

[root@localhost extra]# cd /var/www/html / / / create accp02 Zhan
[root@localhost html]# ls
accp  kgc
[root@localhost html]# mkdir accp02
[root@localhost html]# cd accp02/
[root@localhost accp02]# vim index.html
<h1>this is accp02 web</h1>
Enter absolute path, modify
[root@localhost accp02]# vim /etc/httpd/conf/httpd.conf
Restart Web Services
[root@localhost accp02]# systemctl restart httpd
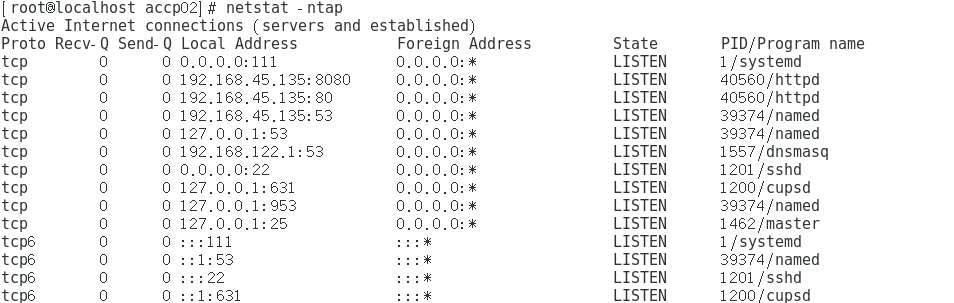
View port
[root@localhost accp02]# netstat -ntap
3.2 enter windows 10 test
4. Build virtual host - based on IP
4.1 configuration environment
Based on different IP addresses, we first add a network card to the virtual machine, and then let it get the IP address automatically.
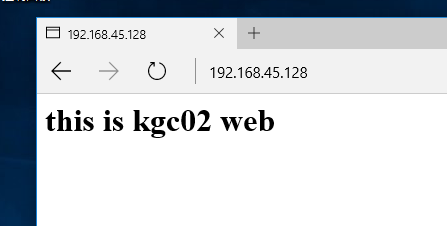
The second network card was added successfully. Its IP address is 192.168.45.128.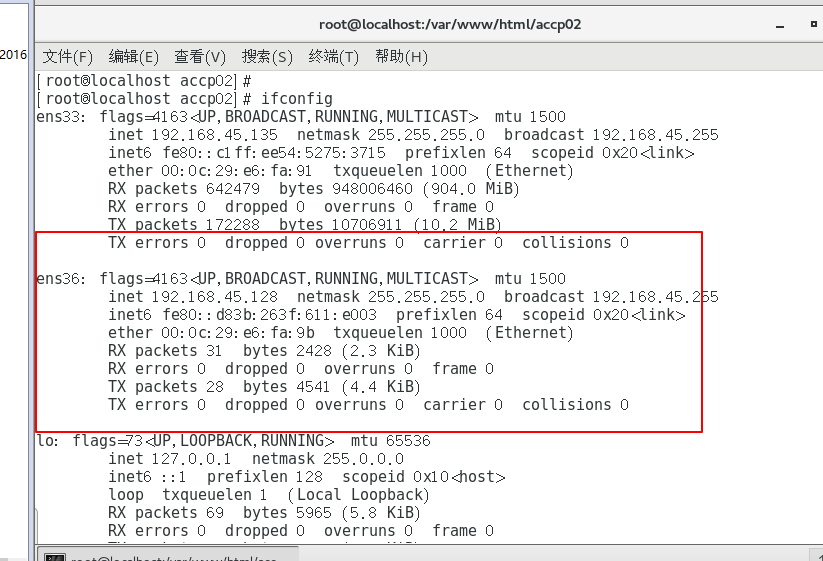
Enter vhost.conf to modify and set the configuration of the base IP
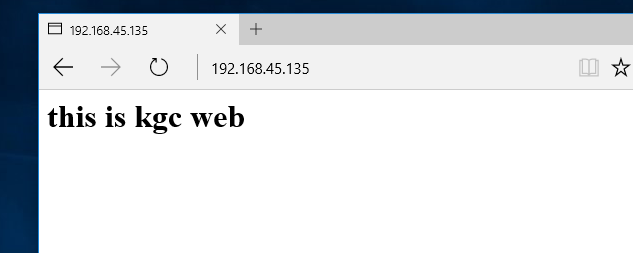
[root@localhost accp02]# cd /etc/httpd/conf/extra/
[root@localhost extra]# vim vhost.conf
 1 <VirtualHost  192.168.45.135:80>
  2     DocumentRoot "/var/www/html/kgc"
  3     ErrorLog "logs/www.kgc.com.error_log"
  4     CustomLog "logs/www.kgc.com.access_log" common
  5     <Directory "/var/www/html/">
  6          Require all granted
  7      </Directory>
  8 </VirtualHost>
  9
 10 <VirtualHost  192.168.45.128:80>
 11     DocumentRoot "/var/www/html/kgc02"
 12     ErrorLog "logs/www.kgc02.com.error_log"
 13     CustomLog "logs/www.kgc02.com.access_log" common
 14     <Directory "/var/www/html/">
 15          Require all granted
 16      </Directory>
 17 </VirtualHost>
Create a web page file and add Web page display content
[root@localhost extra]# cd /var/www/html/
[root@localhost html]# mkdir kgc02
[root@localhost html]# cd kgc02/
[root@localhost kgc02]# vim index.html
<h1>this is kgc02 web</h1>
Enter http profile
[root@localhost kgc02]# vim /etc/httpd/conf/httpd.conf

Restart Web Services
[root@localhost kgc02]# systemctl restart httpd
4.2 return to windows 10 test web page