Business background
Send an entry welcome email to an employee when they are added
Preparation
Take QQ email as an example
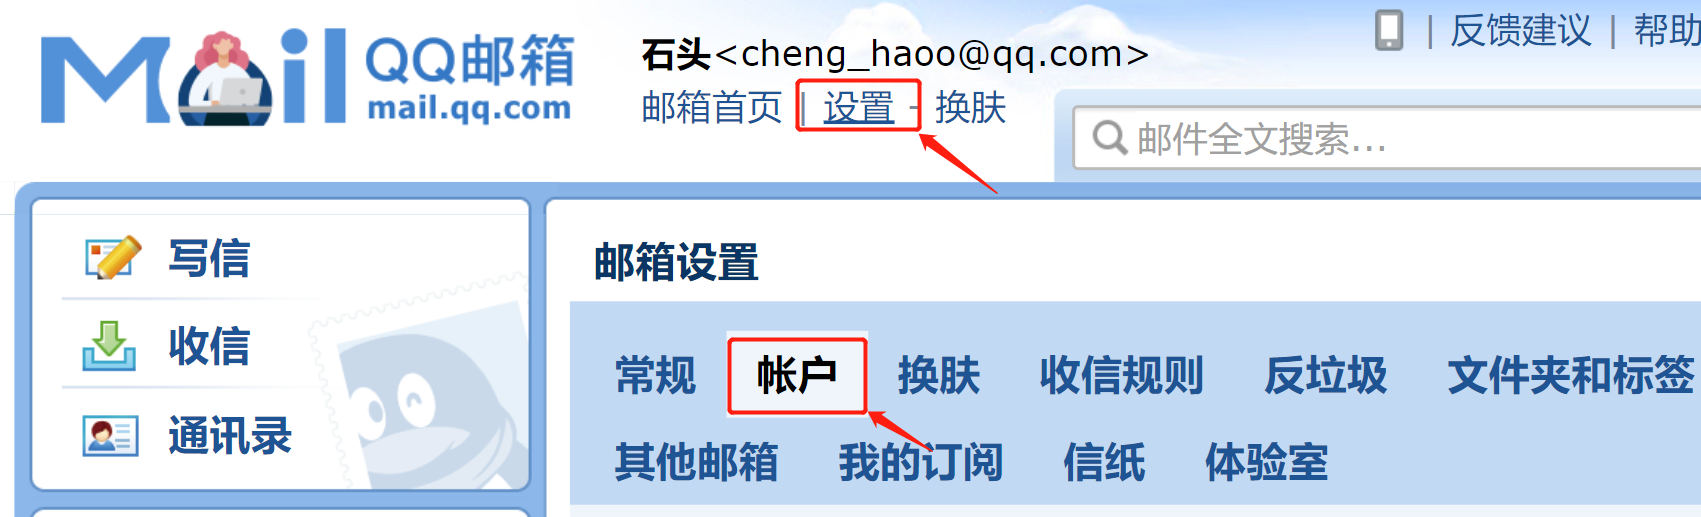
- Log in QQ email and select settings and accounts
- Find the POP3/SMTP service in the account settings
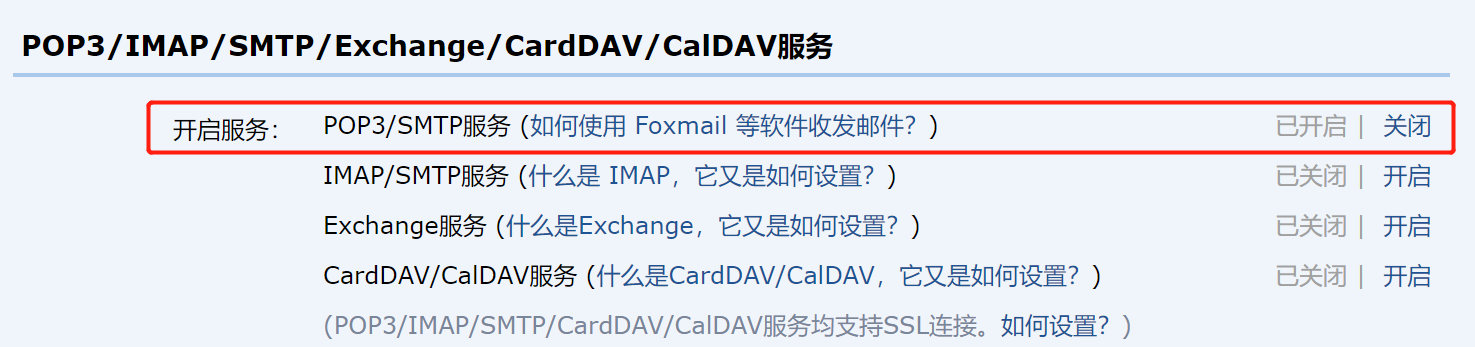
- Click the "open" button, send SMS according to the guidance steps, get an authorization code, and save the authorization code for later use
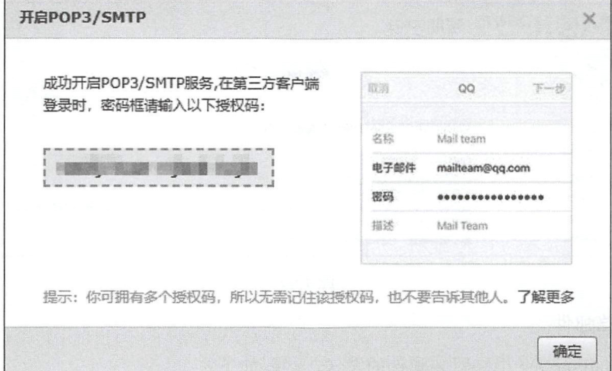
When you get the authorization code, you're done
Spring boot builds mail service
Because message queuing is used in this project, rabbitmq needs to be installed first. You can remove the relevant code if you don't need to.
The project structure is as follows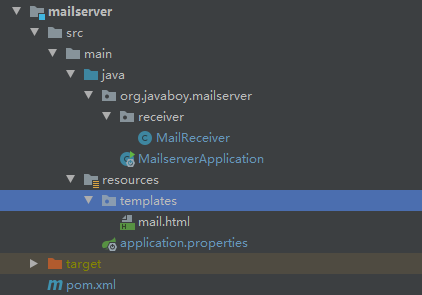
- Introducing dependency
        <!--rabbitMq rely on-->
        <dependency>
            <groupId>org.springframework.boot</groupId>
            <artifactId>spring-boot-starter-amqp</artifactId>
        </dependency>
        <!--Mail service dependency-->
        <dependency>
            <groupId>org.springframework.boot</groupId>
            <artifactId>spring-boot-starter-mail</artifactId>
        </dependency>
        <!--Thymeleaf rely on-->
        <dependency>
            <groupId>org.springframework.boot</groupId>
            <artifactId>spring-boot-starter-thymeleaf</artifactId>
        </dependency>
- Basic information about configuring mailbox and rabbitmq
spring.mail.host=smtp.qq.com
spring.mail.protocol=smtp
spring.mail.default-encoding=UTF-8
spring.mail.username=xxx@qq.com
spring.mail.password=Authorization code previously applied for
spring.mail.port=587  //Or 465
spring.mail.properties.mail.stmp.socketFactory.class=javax.net.ssl.SSLSocketFactory
spring.mail.properties.mail.debug=true

spring.rabbitmq.username=guest
spring.rabbitmq.password=guest
spring.rabbitmq.host=127.0.0.1
spring.rabbitmq.port=5672
- Using the Thymeleaf component mail template
The default location of the Thymeleaf mail template is in the resource/templates directory, and then create the mail template mail.html. The code is as follows:
<!DOCTYPE html>
<html lang="en" xmlns:th="http://www.thymeleaf.org">
<head>
    <meta charset="UTF-8">
    <title>Entry welcome email</title>
</head>
<body>
Welcome <span th:text="${name}"></span> join Java For the family of Dharma hall, your employment information is as follows:
<table border="1">
    <tr>
        <td>Full name</td>
        <td th:text="${name}"></td>
    </tr>
    <tr>
        <td>position</td>
        <td th:text="${posName}"></td>
    </tr>
    <tr>
        <td>Title</td>
        <td th:text="${joblevelName}"></td>
    </tr>
    <tr>
        <td>department</td>
        <td th:text="${departmentName}"></td>
    </tr>
</table>

<p>Hope in the future, hand in hand!</p>
</body>
</html>
- Create mail sending service
@Component
public class MailReceiver {

    public static final Logger logger = LoggerFactory.getLogger(MailReceiver.class);

    @Autowired
    JavaMailSender javaMailSender;
    @Autowired
    MailProperties mailProperties;
    @Autowired
    TemplateEngine templateEngine;

    @RabbitListener(queues = "javaboy.mail.welcome") //Monitor
    public void handler(Employee employee) {
        logger.info(employee.toString());
        //Message received, email sent
        MimeMessage msg = javaMailSender.createMimeMessage();
        MimeMessageHelper helper = new MimeMessageHelper(msg);
        try {
            helper.setTo(employee.getEmail());
            helper.setFrom(mailProperties.getUsername());
            helper.setSubject("Entry welcome");
            helper.setSentDate(new Date());
            Context context = new Context();
            context.setVariable("name", employee.getName());
            context.setVariable("posName", employee.getPosition().getName());
            context.setVariable("joblevelName", employee.getJobLevel().getName());
            context.setVariable("departmentName", employee.getDepartment().getName());
            String mail = templateEngine.process("mail", context);
            helper.setText(mail, true);
            javaMailSender.send(msg);
        } catch (MessagingException e) {
            e.printStackTrace();
            logger.error("Failed to send message:"+e.getMessage());
        }
    }
}
Because you need to listen to mq messages, the @ RabbitListener annotation is added to listen to message queues.
In addition, the message queue needs to be injected. I put it directly into the startup class, as follows
@SpringBootApplication
public class  MailserverApplication {

    public static void main(String[] args) {
        SpringApplication.run(MailserverApplication.class, args);
    }

    @Bean
    Queue queue() {
        return new Queue("javaboy.mail.welcome");
    }
}
Here, a simple mail server is set up.
Finally, to implement the business, you need to send mq messages in the business logic of adding employees, as follows
 /**
     * Add employee information
     * @param employee
     * @return
     */
   public int addEmp(Employee employee) {
        Date beginContract = employee.getBeginContract();
        Date endContract = employee.getEndContract();
        double month = (Double.parseDouble(yearFormat.format(endContract)) - Double.parseDouble(yearFormat.format(beginContract))) * 12 + (Double.parseDouble(monthFormat.format(endContract)) - Double.parseDouble(monthFormat.format(beginContract)));
        employee.setContractTerm(Double.parseDouble(decimalFormat.format(month / 12)));
        int result = employeeMapper.insertSelective(employee);
        //Send mq message if the addition is successful
        if (result==1) {
            Employee emp = employeeMapper.getEmployeeById(employee.getId());
            log.info(emp.toString());
            rabbitTemplate.convertAndSend("javaboy.mail.welcome",emp);
        }
        return result;
    }
Now let's test it
Click the OK button to send the welcome email to the filled email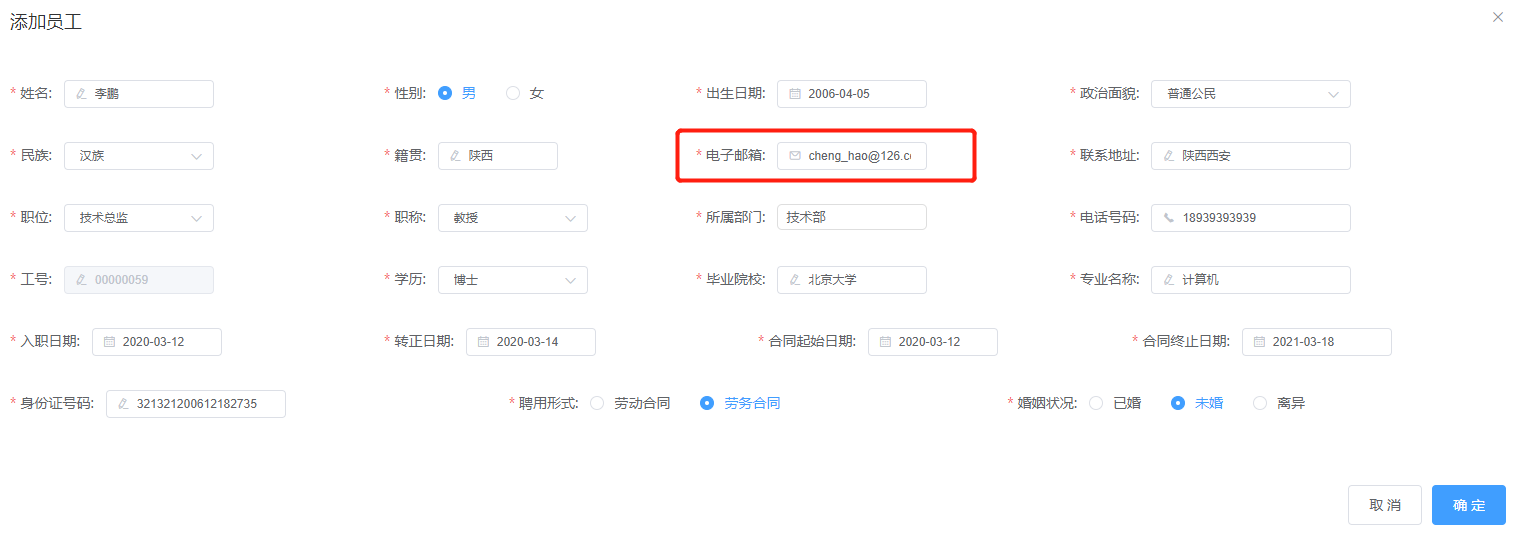
The message received is as follows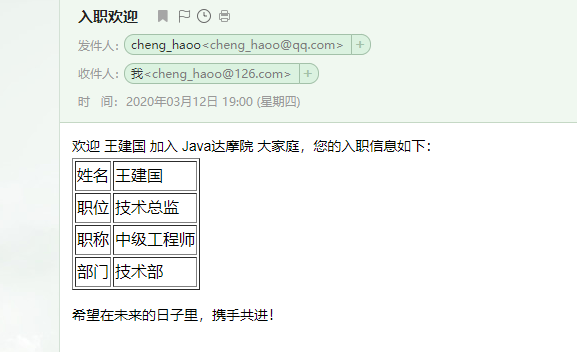
Attach source address: github address

