1. Fluent architecture
The architecture of FLUENT is mainly divided into three layers: Framework, Engine and Embedder.
1. The framework is implemented using dart, including Material Design style Widgets, Cupertino (for iOS) style Widgets, text / picture / button and other basic Widgets, rendering, animation, gestures, etc. The core code of this part is: the shuttle package under the shuttle warehouse and sky_ Packages such as IO, async, UI (DART: the UI library provides the interface between the fluent framework and the engine) under the engine warehouse.
2.Engine is implemented in C + +, mainly including Skia,Dart and Text. Skia is an open-source two-dimensional graphics library, which provides a general API suitable for a variety of software and hardware platforms.
3.Embedder is an embedded layer, that is, it embeds fluent into various platforms. The main work done here includes rendering Surface settings, thread settings, plug-ins and so on. It can be seen from here that the platform related layer of Flutter is very low, the platform (such as iOS) only provides a canvas, and all the remaining rendering related logic is inside Flutter, which makes it have good cross-end consistency.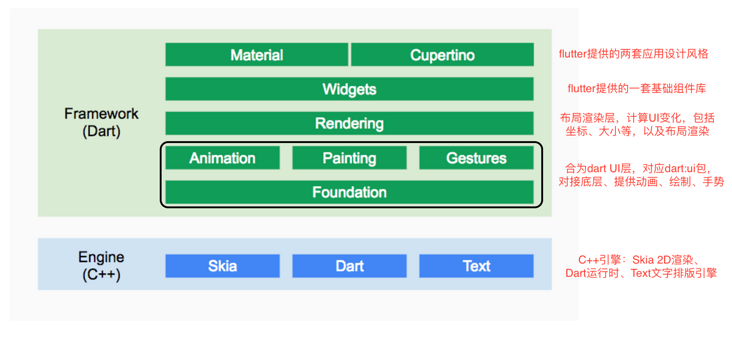
2. Drawing of fluent view
For developers, the most commonly used is the framework. I'll start with the entry function of fluent and go down step by step to analyze the principle of drawing the view of fluent.
In the Flutter application, the simplest implementation of the main() function is as follows
// The parameter app is a widget, which is the first widget to be displayed after the fluent application is started.
void runApp(Widget app) {
  WidgetsFlutterBinding.ensureInitialized()
    ..scheduleAttachRootWidget(app)
    ..scheduleWarmUpFrame();
}
1.WidgetsFlutterBinding
WidgetsFlutterBinding inherits from BindingBase and mixes many bindings. Viewing the source code of these bindings, we can find that these bindings basically listen to and process some events of Window objects (including some information of the current device and system and some callbacks of the Flutter Engine), and then wrap, abstract and distribute these events according to the model of the Framework.
WidgetsFlutterBinding is the "glue" between the Flutter engine and the upper Framework.
- GestureBinding: provides a window.onPointerDataPacket callback, binds the Framework gesture subsystem, and is the binding entry between the Framework event model and the underlying events.
- ServicesBinding: provides a window.onPlatformMessage callback, which is used to bind the platform message channel. It mainly handles native and fluent communication.
- SchedulerBinding: provides window.onBeginFrame and window.onDrawFrame callbacks, listens to refresh events, and binds the Framework drawing and scheduling subsystem.
- PaintingBinding: binding the drawing library, which is mainly used to handle picture caching.
- SemanticsBinding: the bridge between semantic layer and fluent engine, mainly the bottom support of auxiliary functions.
- RendererBinding: provides callbacks such as window.onMetricsChanged and window.onTextScaleFactorChanged. It is the bridge between rendering tree and fluent engine.
- WidgetsBinding: provides callbacks such as window.onLocaleChanged and onBuildScheduled. It is the bridge between the fluent widget layer and engine.
WidgetsFlutterBinding.ensureInitialized() is responsible for initializing a global singleton of WidgetsBinding. The code is as follows
class WidgetsFlutterBinding extends BindingBase with GestureBinding, ServicesBinding, SchedulerBinding, PaintingBinding, SemanticsBinding, RendererBinding, WidgetsBinding {
  static WidgetsBinding ensureInitialized() {
    if (WidgetsBinding.instance == null)
      WidgetsFlutterBinding();
    return WidgetsBinding.instance;
  }
}
Seeing that this WidgetsFlutterBinding is mixed with many bindings, let's first look at the parent BindingBase:
abstract class BindingBase {
   ...
  ui.SingletonFlutterWindow get window => ui.window;//Get window instance
  @protected
  @mustCallSuper
  void initInstances() {
    assert(!_debugInitialized);
    assert(() {
      _debugInitialized = true;
      return true;
    }());
  }
}
See the code window get window = > ui.window, the interface linking the host operating system, that is, the interface linking the host operating system with the fluent framework. There is a window instance in the system, which can be obtained from the window attribute. See the source code:
// The type of window is a FlutterView, which has a PlatformDispatcher attribute
ui.SingletonFlutterWindow get window => ui.window;
// During initialization, transfer PlatformDispatcher.instance to complete initialization
ui.window = SingletonFlutterWindow._(0, PlatformDispatcher.instance);
// Class structure of SingletonFlutterWindow
class SingletonFlutterWindow extends FlutterWindow {
  ...
  // In fact, it assigns a value to platformDispatcher.onBeginFrame
  FrameCallback? get onBeginFrame => platformDispatcher.onBeginFrame;
  set onBeginFrame(FrameCallback? callback) {
    platformDispatcher.onBeginFrame = callback;
  }

  VoidCallback? get onDrawFrame => platformDispatcher.onDrawFrame;
  set onDrawFrame(VoidCallback? callback) {
    platformDispatcher.onDrawFrame = callback;
  }

  // window.scheduleFrame actually calls platformDispatcher.scheduleFrame()
  void scheduleFrame() => platformDispatcher.scheduleFrame();
  ...
}
class FlutterWindow extends FlutterView {
  FlutterWindow._(this._windowId, this.platformDispatcher);
  final Object _windowId;
  // PD
  @override
  final PlatformDispatcher platformDispatcher;
  @override
  ViewConfiguration get viewConfiguration {
    return platformDispatcher._viewConfigurations[_windowId]!;
  }
}
2.scheduleAttachRootWidget
scheduleAttachRootWidget will then call the attachRootWidget method of WidgetsBinding, which is responsible for adding the root Widget to RenderView. The code is as follows:
 void attachRootWidget(Widget rootWidget) {
    final bool isBootstrapFrame = renderViewElement == null;
    _readyToProduceFrames = true;
    _renderViewElement = RenderObjectToWidgetAdapter<RenderBox>(
      container: renderView,
      debugShortDescription: '[root]',
      child: rootWidget,
    ).attachToRenderTree(buildOwner!, renderViewElement as RenderObjectToWidgetElement<RenderBox>?);
    if (isBootstrapFrame) {
      SchedulerBinding.instance!.ensureVisualUpdate();
    }
  }
The renderView variable is a RenderObject, which is the root of the rendering tree. The renderviveelement variable is the Element object corresponding to renderView. It can be seen that this method mainly completes the whole association process from root widget to root RenderObject and then to root Element.
RenderView get renderView => _pipelineOwner.rootNode! as RenderView;
renderView is the PipelineOwner.rootNode in RendererBinding. PipelineOwner plays an important role in Rendering Pipeline:
Continuously collect "Dirty Render Objects" as the UI changes, and then drive the Rendering Pipeline to refresh the UI.
In short, PipelineOwner is the bridge between RenderObject Tree and RendererBinding.
Finally, the attachRootWidget is called, and the attachToRenderTree method of RenderObjectToWidgetAdapter will be called. This method is responsible for creating the root element, RenderObjectToWidgetElement, and associating the element with the widget, that is, creating the element tree corresponding to the widget tree. If the element has been created, set the associated widget in the root element as new. From this, we can see that the element will be created only once and reused later. BuildOwner is the management class of the widget framework, which tracks which widgets need to be rebuilt. The code is as follows
RenderObjectToWidgetElement<T> attachToRenderTree(BuildOwner owner, [RenderObjectToWidgetElement<T> element]) {
  if (element == null) {
    owner.lockState(() {
      element = createElement();
      assert(element != null);
      element.assignOwner(owner);
    });
    owner.buildScope(element, () {
      element.mount(null, null);
    });
  } else {
    element._newWidget = this;
    element.markNeedsBuild();
  }
  return element;
}
3.scheduleWarmUpFrame
In the implementation of runApp, when the attachRootWidget is called, the last line will call the scheduleWarmUpFrame() method of the WidgetsFlutterBinding instance. This method is implemented in SchedulerBinding. After it is called, it will draw immediately (instead of waiting for the "vsync" signal). Before the drawing is completed, this method will lock the event distribution, That is to say, before the end of this drawing, fluent will not respond to various events, which can ensure that new redrawing will not be triggered during the drawing process.
The following is a partial implementation of the scheduleWarmUpFrame() method (irrelevant code is omitted):
void scheduleWarmUpFrame() {
...
Timer.run(() {
handleBeginFrame(null);
});
Timer.run(() {
handleDrawFrame();
resetEpoch();
});
//Lock event
lockEvents(() async {
await endOfFrame;
Timeline.finishSync();
});
...
}
This method mainly calls handleBeginFrame() and handleDrawFrame()
Looking at the source code of handleBeginFrame() and handleDrawFrame(), we can find that the former mainly executes the transientCallbacks queue, while the latter executes the persistentCallbacks and postFrameCallbacks queues.
1. transientCallbacks: It is used to store some temporary callbacks, usually animation callbacks.

Can pass SchedulerBinding.instance.scheduleFrameCallback Add callback.

2. persistentCallbacks: It is used to store some persistent callbacks. New drawing frames cannot be requested in such callbacks. Once the persistent callbacks are registered, they cannot be removed.

SchedulerBinding.instance.addPersitentFrameCallback(),This callback handles the layout and drawing work.

3. postFrameCallbacks: stay Frame It will only be called once at the end. After calling, it will be removed by the system and can be used by the system SchedulerBinding.instance.addPostFrameCallback() Registration.

Be careful not to trigger new callbacks in such callbacks Frame,This can cause loops
The real rendering and rendering logic is implemented in RendererBinding. Check its source code and find the following code in its initInstances() method:
void initInstances() {
  ... // Omit irrelevant code
  addPersistentFrameCallback(_handlePersistentFrameCallback);
}
void _handlePersistentFrameCallback(Duration timeStamp) {
  drawFrame();
}
void drawFrame() {
  assert(renderView != null);
  pipelineOwner.flushLayout(); // layout
  pipelineOwner.flushCompositingBits(); //The preprocessing operation before redrawing. Check whether RenderObject needs redrawing
  pipelineOwner.flushPaint(); // Repaint
  renderView.compositeFrame(); // Send the bit data to be drawn to the GPU
  pipelineOwner.flushSemantics(); // this also sends the semantics to the OS.
}
It should be noted that: since RendererBinding is only a mixin, and with it is WidgetsBinding, you need to check whether this method is rewritten in WidgetsBinding and check the source code of drawFrame() method of WidgetsBinding:
@override
void drawFrame() {
 ...//Omit irrelevant code
  try {
    if (renderViewElement != null)
      buildOwner.buildScope(renderViewElement);
    super.drawFrame(); //Call the drawFrame() method of RendererBinding
    buildOwner.finalizeTree();
  }
}
Before calling the RendererBinding.drawFrame() method, buildOwner.buildScope() will be called (not drawing for the first time), which will rebuild the element marked "dirty")
Let's look at WidgetsBinding again, create the BuildOwner object in the initInstances() method, and then execute BuildOwner onBuildScheduled = _ handleBuildScheduled;, Here will_ Handlebuildscheduled is assigned to the onbuildscheduled property of BuildOwner.
The BuildOwner object, which tracks which widgets need to be rebuilt and handles other tasks applied to the widgets tree, internally maintains a_ dirtyElements list to save elements marked "dirty".
When each element is created, its buildouwner is determined. A page has only one buildowner object, which is responsible for managing all elements of the page.
// WidgetsBinding
void initInstances() {
  ...
  buildOwner!.onBuildScheduled = _handleBuildScheduled;
  ...
  }());
}

When called buildOwner.onBuildScheduled()The following process will be followed.

// WidgetsBinding class
void _handleBuildScheduled() {
  ensureVisualUpdate();
}
// SchedulerBinding class
void ensureVisualUpdate() {
    switch (schedulerPhase) {
      case SchedulerPhase.idle:
      case SchedulerPhase.postFrameCallbacks:
        scheduleFrame();
        return;
      case SchedulerPhase.transientCallbacks:
      case SchedulerPhase.midFrameMicrotasks:
      case SchedulerPhase.persistentCallbacks:
        return;
    }
  }

When schedulerPhase be in idle Status, will call scheduleFrame,Then pass window.scheduleFrame()Medium performDispatcher.scheduleFrame()Go and register one VSync monitor

 void scheduleFrame() {
    ...

    window.scheduleFrame();
    ...
  }
4. Summary
From start-up to image display on the screen, the main process of FLUENT is as follows: first, listen and process the events of window objects, package these event processing as Framework model for distribution, create element tree through widget, then render through scheduleWarmUpFrame, then layout and draw through Rendererbinding, and finally call ui.window.render(scene)Scene information is sent to Flutter engine, Flutter engine finally calls rendering API to paint the picture on the screen.
I have roughly sorted out the timing diagram drawn by the fluent view, as follows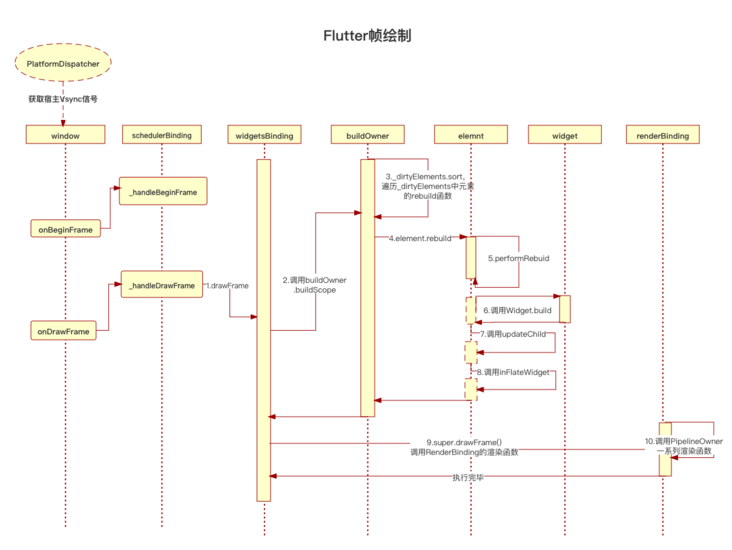
3.Flutter performance monitoring
After having a certain understanding of view rendering, think about how to control and optimize performance in the process of view rendering. Let's take a look at the two performance monitoring tools officially provided by fluent
1.Dart VM Service
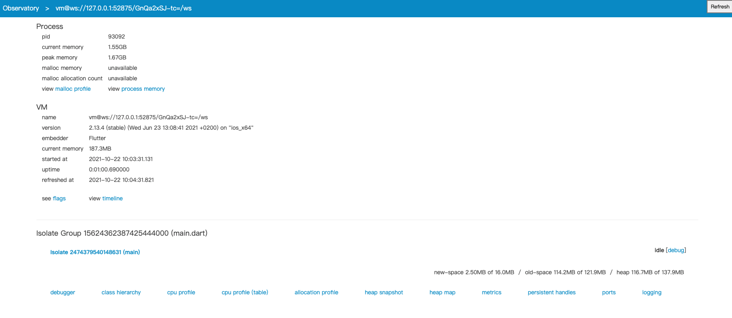
1.observatory
Observer: its specific implementation can be found in engine / shell / tests / observer. It opens a ServiceClient to obtain the running status of dartvm. When the fluent app is started, it will generate an address of the current observer server
flutter: socket connected in service Dart VM Service Protocol v3.44 listening on http://127.0.0.1:59378/8x9XRQIBhkU=/
For example, after selecting timeline, you can perform performance analysis, as shown in the figure below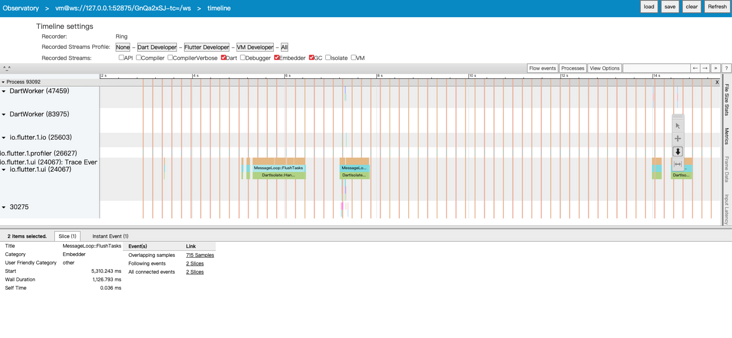
2.devTools
devTools also provides some basic detection. The specific details are not as perfect as those provided by observation. It has strong visibility
You can install it with the following command
flutter pub global activate devtools
After installation, open it with the devtools command and enter the DartVM address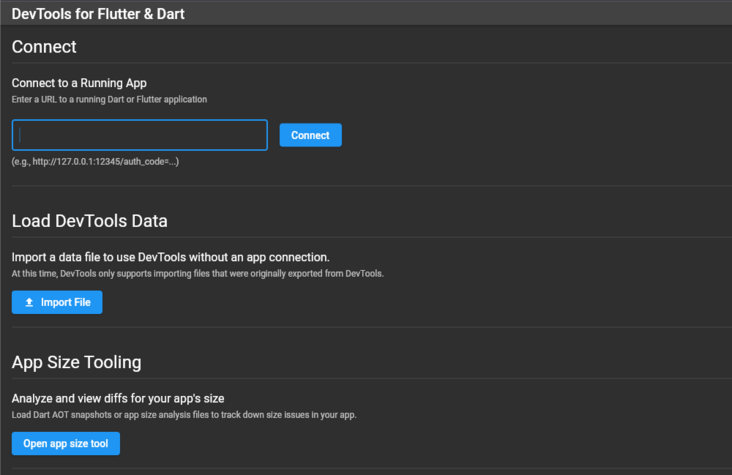
Open page
The timeline in devtools is performance. After we select it, the page is as follows. The operation experience is much better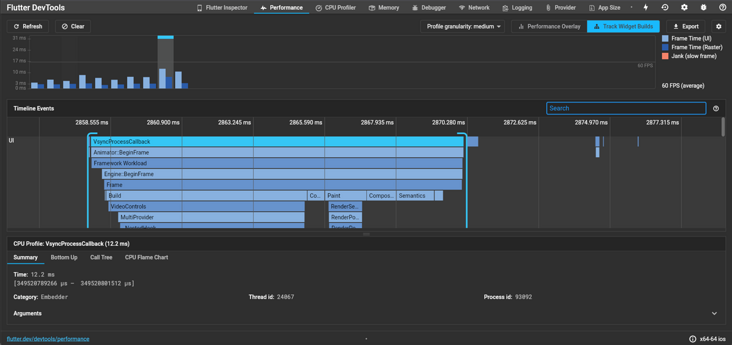
Both observatory and devtools are implemented through VM_ Service implementation. There are many online user guides, so I won't repeat them here. I'll mainly introduce the Dart VM Service (hereinafter referred to as vm_service)
It is a set of Web services provided inside Dart virtual machine, and the data transmission protocol is JSON-RPC 2.0.
However, we don't need to implement data request parsing by ourselves. The official has written an available Dart SDK for us: vm_service. vm_ When the service is started, a WebSocket service will be started locally. The service URI can be obtained from the corresponding platform:
1) Android is in FlutterJNI.getObservatoryUri();
2) iOS is in FlutterEngine.observatoryUrl.
With URI s, we can use vm_service. There is an official SDK written for us: vm_service
Future<void> connect() async {
ServiceProtocolInfo info = await Service.getInfo();
if (info.serverUri == null) {
print("service protocol url is null,start vm service fail");
return;
}
service = await getService(info);
print('socket connected in service $info');
vm = await service?.getVM();
List<IsolateRef>? isolates = vm?.isolates;
main = isolates?.firstWhere((ref) => ref.name?.contains('main') == true);
main ??= isolates?.first;
connected = true;
}
Future<VmService> getService(info) async {
Uri uri = convertToWebSocketUrl(serviceProtocolUrl: info.serverUri);
return await vmServiceConnectUri(uri.toString(), log: StdoutLog());
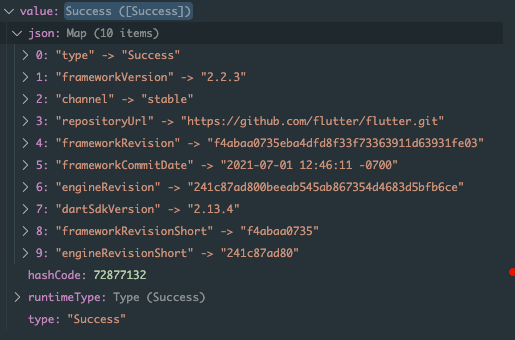
}Get the frameworkVersion, call the callExtensionService of a VmService instance, and pass in 'fluent version' to get the current fluent framework and engine information
 Future<Response?> callExtensionService(String method) async {
    if (_extensionService == null && service != null && main != null) {
      _extensionService = ExtensionService(service!, main!);
      await _extensionService?.loadExtensionService();
    }
    return _extensionService!.callMethod(method);
  }
Get the memory information and call getMemoryUsage of a VmService instance to get the current memory information
  Future<MemoryUsage> getMemoryUsage(String isolateId) =>
      _call('getMemoryUsage', {'isolateId': isolateId});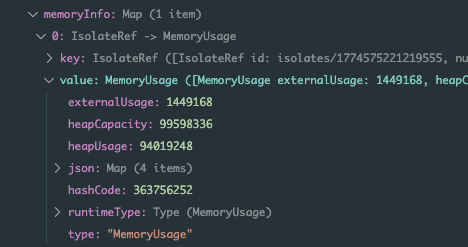
To obtain the FPS of the flutter app, the official has provided several methods to enable us to view FPS and other performance data during the development of the flutter app, such as devtools. For details, see the documents Debugging Flutter apps, Flutter performance profiling, etc.
// Register when monitoring fps
void start() {
  SchedulerBinding.instance.addTimingsCallback(_onReportTimings);
}
// Remove when listening is not required
void stop() {
  SchedulerBinding.instance.removeTimingsCallback(_onReportTimings);
}
void _onReportTimings(List<FrameTiming> timings) {
  // TODO
}
2. Crash log capture and reporting
The crash log collection of fluent mainly includes two aspects:
1) Exception of shuttle dart code (including app and framework code, which generally will not cause flash back. Guess why)
2) Crash log of fluent engine (usually flashback)
Dart has a concept of zone, which is a bit similar to sandbox. Different zone code contexts are different and do not affect each other. Zone can also create new sub zones. Zone can redefine its own print, timers, microtasks, and the most critical how uncaught errors are handled
runZoned(() {
    Future.error("asynchronous error");
}, onError: (dynamic e, StackTrace stack) {
    reportError(e, stack);
});
1. Exception capture of fluent framework
Register the flutterror.onerror callback to collect exceptions thrown out of the Flutter framework.
FlutterError.onError = (FlutterErrorDetails details) {
    reportError(details.exception, details.stack);
};
2.Flutter engine exception capture
The exception in the fluent engine part, taking Android as an example, is mainly the error in libfuter.so.
This part can be directly handled by the native crash collection sdk, such as firebase crash analytics, bugly, xCrash, and so on
We need to pass the dart exception and stack to the bugly sdk through the MethodChannel.
After the exception is collected, you need to look up the symbols table to restore the stack.
First, you need to confirm the version number of the fluent engine and execute it on the command line:
flutter --version
The output is as follows:
Flutter 2.2.3 • channel stable • https://github.com/flutter/flutter.git
Framework • revision f4abaa0735 (4 months ago) • 2021-07-01 12:46:11 -0700
Engine • revision 241c87ad80
Tools • Dart 2.13.4
You can see that the revision of the Engine is 241c87ad80.
Secondly, find the symbols.zip of the corresponding cpu abi on the shuttle infra and download it. After decompression, you can get the debug so file with symbol information libshuttle.so, and then upload and restore the stack according to the platform document. For example, the bugly platform provides an upload tool
java -jar buglySymbolAndroid.jar -i xxx
4.Flutter performance optimization
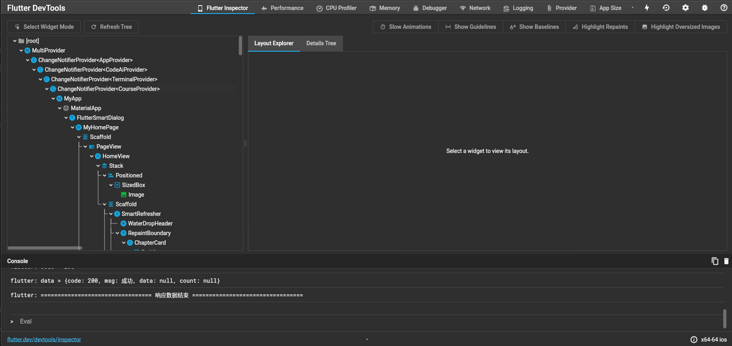
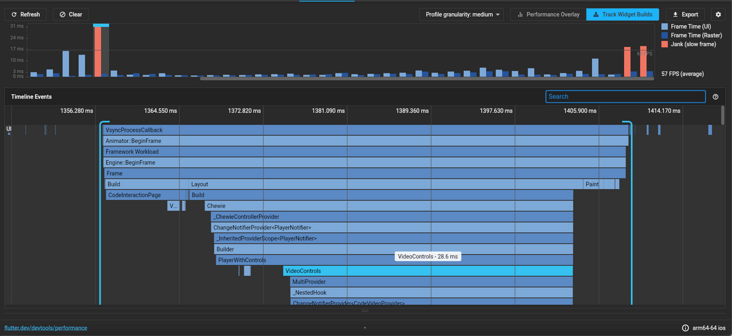
In business development, we should learn to use devtools to detect engineering performance, which will help us achieve more robust applications. During the troubleshooting process, I found that the rendering of the video details page is time-consuming, as shown in the figure
1.build time-consuming optimization
The build time of VideoControls control is 28.6ms, as shown in the figure
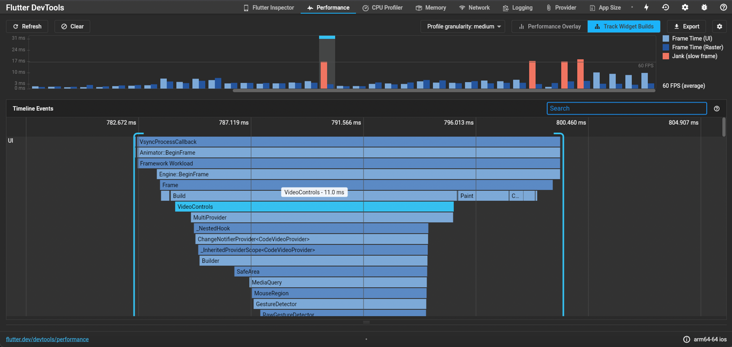
Therefore, our optimization scheme here is to improve the build efficiency and reduce the starting point of Widget tree traversal, and distribute the setState refresh data to the underlying nodes as much as possible. Therefore, the sub components triggering refresh in VideoControl are extracted into independent widgets, and the setState is distributed to the extracted widgets
After optimization, it is 11.0ms, and the overall average frame rate also reaches 60fps, as shown in the figure
2.paint time-consuming optimization
Next, analyze whether the paint process can be optimized. Open debugProfilePaintsEnabled variable analysis to see the paint level displayed by Timeline, as shown in the figure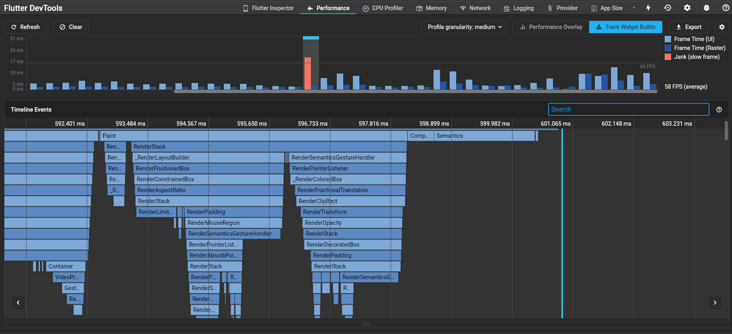
We found frequent updates_ buildPositionTitle and other widgets are in the same layer. The optimization point we think of here is to improve the paint efficiency by using RepaintBoundary. It provides a new isolation layer for the content with frequent display changes, and the new layer paint will not affect other layers
See the optimized effect, as shown in the figure
3. Summary
During the development of Flutter, when we use devtools to troubleshoot the rendering of positioning pages, there are two main points:
1. Improve the build efficiency, refresh the data in setState and distribute it to the underlying node as much as possible.
2. Improve the paint efficiency, and create a separate layer in the repaintboundary to reduce the redrawing area.
Of course, there are far more than this case for Flutter neutral tuning. Each process of build / layout / paint actually has many details that can be optimized.
5. Summary
1. Review
In this article, we mainly introduce the technology of fluent from three dimensions, which are to explain the rendering principle. We review ed the source code and found that the whole rendering process is a closed loop. The Framework, Engine and Embedder perform their respective duties. In short, Embedder keeps getting back the Vsync signal, and the Framework gives the dart code to the Engine to translate it into cross platform code, Then call back to the host platform through Embedder; Performance monitoring is to constantly insert our sentinels into this cycle, observe the whole ecology, obtain abnormal data and report; Performance optimization through a project practice, learn how to use tools to improve our efficiency in locating problems.
2. Advantages and disadvantages
advantage:
We can see that Flutter forms a closed loop in the view rendering process, and the two ends basically maintain consistency, so our development efficiency has been greatly improved, and performance monitoring and performance optimization are more convenient.
Disadvantages:
1) Declarative development of dynamic operation view nodes is not very friendly. It can not be programmed as a native command, or as easy as getting dom nodes from the front end
2) At present, there is no good open source technology to learn from to realize the dynamic mechanism