I wonder if you have ever thought about this. When Wechat's personal public number is becoming more and more popular and the media is becoming more and more popular, have you ever thought about applying for a Wechat public number of your own? In the circle of friends, more and more small partners are forwarding articles in their Wechat Public Number. What would you like me to do to make a Wechat Public Number? Writing articles is too insidious. You have no material to do the content. Okay, so this article will teach you how to correctly toss Wechat's personal public number.
Dead work
First, you have to have a personal blog with a back-end dynamic language
Secondly, there must be a Wechat Personal Public Number.
Finally, you have to be able to program (php, javascript, etc.)
Configuration of Wechat Public Number
Log on to the Wechat public platform, enter the development - > basic configuration page, and enable the server configuration function, as follows:
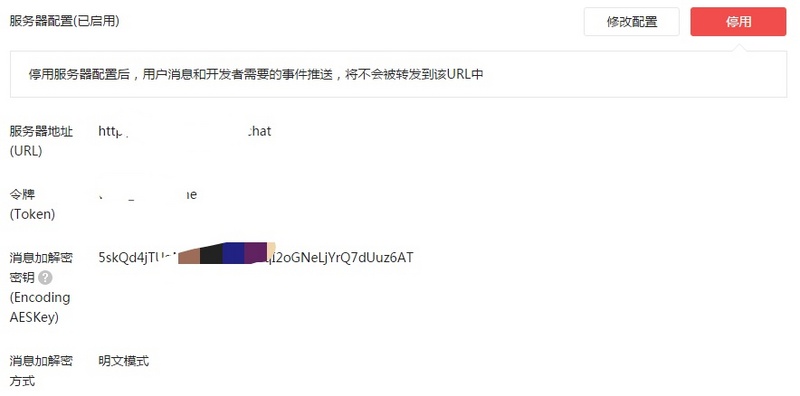
Refer to the Public Number Development Document for specific access and validation of your server address. After this step, we can start writing the server code (take php as an example).
The server is mainly used to accept the data from Weichat post and parse it. The following is the code fragment of the public number message receiving server:
// Wechat Message Receiving Entry
function onHttpPostRequest($mock){
    $wxMsgBody = $mock;
    if(empty($wxMsgBody)){
        $wxMsgBody = file_get_contents("php://input");
    }

    $this->wxMsgBody = simplexml_load_string($wxMsgBody, 'SimpleXMLElement', LIBXML_NOCDATA);
    $this->wxMsgType = strtoupper($this->wxMsgBody->MsgType);

    $this->comet();
}

// Serialize the received message and write it to a file to trigger the comet on the front end
public function comet() {
    $cometfile = WWW_PATH . 'wechat.comet';
    if(!file_exists($cometfile)) {
        file_put_contents($cometfile, '');
    }
    $filemtime = filemtime($cometfile);
    $timing = time() - $filemtime;
    $wxMsgBody = (array)$this->wxMsgBody;
    if($timing > 1) {
        file_put_contents($cometfile, serialize($wxMsgBody));
    } else {
        file_put_contents($cometfile, serialize($wxMsgBody) . PHP_EOL, FILE_APPEND);
    }
}
Above complete code address: indexAction.class.php
comet?
comet The technology is a "server push" technology based on long HTTP connection, which was developed N years ago. It is mainly used to display bullet screen messages on blog pages in real time. Its core code is divided into server and client as follows:
<?php
// Server-side code
ini_set("display_errors", "On");
error_reporting(E_ALL | E_STRICT);

$cometfile  = 'wechat.comet';

set_time_limit(0);
$lastmtime = isset($_GET['timestamp']) ? $_GET['timestamp'] : 0;
$msgid = isset($_GET['msgid']) ? $_GET['msgid'] : 0;
$callback = isset($_GET['callback']) ? $_GET['callback'] : 0;

//Get the last modification time of the file
$filemtime = filemtime($cometfile);
while ($filemtime <= $lastmtime)  {
//Release CPU occupancy
    usleep(10000);
    //Clear File Cache Information
    clearstatcache();
    $filemtime = filemtime($cometfile);
}
$files = array_reverse(file($cometfile));
$result = array();
foreach ($files  as $key => $value) {
    $msg = unserialize($value);
    if($msg['MsgId'] == $msgid) {
        break;
    }
    array_push($result, $msg);
}
$response = array();
$response['data']      = $result;
$response['timestamp'] = $filemtime;
echo $callback . '(' . json_encode($response) . ')';
ob_flush();
flush();
The following code mainly establishes a long http connection between client and server
// Client Code (javascript)
function Comet(url,cbk){
    var url          = url;
    var cbk          = cbk;
    var timestamp    = 0;
    var msgid = 0;
    var noerror      = true

    var main         = function(){
        $.ajax({
            type:'GET',
            url: url,
            dataType : 'jsonp',
            timeout: 5000,
            data: {
                timestamp: timestamp,
                msgid: msgid
            }
        }).success(function(res){
            var isFrist = timestamp;
            timestamp = res.timestamp;
            if(res.data[0]) {
                   msgid = res.data[0]['MsgId'];
            }

            noerror = true;
            if(isFrist == 0)return false;
            if(cbk)cbk(res);
        }).complete(function() {
            if (!noerror){
                setTimeout(main, 10);
            }else{
                setTimeout(main, 10);
            }
            noerror = false;
        });
    };

    return main();
}

Comet('http://dev.sobird.me/_wechat.php', function(res) {
    var data = res.data;
    var danm={
       info: '', //Written words
       href: '', //link
       close: false, //Display Close Button
       speed: 6, //Delay, unit second, default 6
       color: randRgb(), //Color, default white
       old_ie_color: randRgb(), //ie low version compatible color, can not be the same as the background of the page, default black
     }
    if(data.length > 0) {
        $.each(data, function(index, item) {
        var msgType = item.MsgType

        switch (msgType) {
            case 'text' :
            var text = item.Content;
            danm.info = text;

                $('body').barrager(danm);
            break;
            case 'image' :
            var img = 'http://dev.sobird.me/wechat/pic?src=' + item.PicUrl;
            danm.img = img;

            disImage(img, function() {
                    $('body').barrager(danm);
            });
            break;
            default:
        }
    });
    }
});
Complete code: Jaring.js The bottom of the file
Barrage?
It's relatively simple to implement the barrage effect on the blog. There are many open source libraries (based on jQuery) on Github. I use this library: jquery.barrager.js By introducing this library into your blog, you can use it as follows
// Move over the official examples~~
var item={
    img:'static/heisenberg.png', //picture
    info:'Bullet caption information', //Written words
    href:'http://www.yaseng.org', //link
    close:true, //Display Close Button
    speed:8, //Delay, unit second, default 8
    bottom:70, //Distance from bottom height, unit px, default random
    color:'#fff', // color, default white
    old_ie_color:'#000000', //ie low-level compatible color, cannot be the same as the background of the page, default black
}
$('body').barrager(item);
Based on jQuery's bullet screen effect, the code is short and the appropriate CSS style is adjusted.
Experience effect
Now scan the following two-dimensional code, pay attention to my public number, send a little text or pictures, and then go to my Personal Blog Have a look