1, Background
As the project becomes larger and larger, the compilation time is silently increasing. Whether in the development stage or production integration, compilation time has become a pain point that can not be underestimated.
After nearly five years of continuous development iterations, our project has also recently migrated from the original wechat native applet development mode to taro. Taro is a set of multi terminal development solutions using React syntax. Using Taro, we can only write a set of code, and then compile the source code separately through the Taro compiler tool, which can run at different ends (WeChat / Baidu / Alipay / byte beat /QQ/ Jingdong applet, fast application, H5, React-Native, etc.). Therefore, many small programs of Ctrip also use taro for development.
However, due to more business, the compiled code of the project is close to 12M. When executing the build command in the daily development stage, it takes nearly 1 minute to compile and package new development related files. Execute the build command in the production environment and compile all files in the packaged project for up to 10 minutes. In addition, with the increasing functions of infrastructure and a single complex page, the amount of code is also increasing, which will lead to the size of the main package or some subcontracts exceeding 2M, which will make the QR code preview function of wechat developer tools unusable and the development experience is very bad.
To solve the above problems, we try to optimize taro compilation and packaging. In order to optimize the compilation and packaging of taro, we need to understand the configuration of Taro's built-in Webpack, and then use the method provided by Webpack chain to modify the configuration chain. Next, we also need to solve the problem that the subcontracting is too large to preview the QR code.
2, Taro's built-in Webpack configuration
We know that the compilation and packaging of Taro is completed by webpack. Since we want to optimize the packaging speed, we should first know how Taro calls webpack for packaging and what its built-in webpack configuration is.
After reading the Taro source code, you can see that Taro is in the @tarojs/mini-runner/dist/index.js file, called webpack to package, you can view the relevant code by yourself.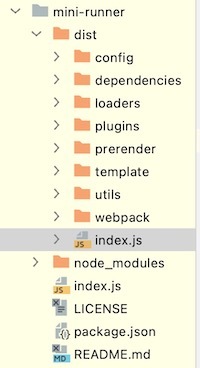
We focus on the build function in this file. The code is as follows.
function build(appPath, config) {
    return __awaiter(this, void 0, void 0, function* () {
        const mode = config.mode;
        /** process config.sass options */
        const newConfig = yield chain_1.makeConfig(config);
        /** initialized chain */
        const webpackChain = build_conf_1.default(appPath, mode, newConfig);
        /** customized chain */
        yield customizeChain(webpackChain, newConfig.modifyWebpackChain, newConfig.webpackChain);
        if (typeof newConfig.onWebpackChainReady === 'function') {
            newConfig.onWebpackChainReady(webpackChain);
        }
        /** webpack config */
        const webpackConfig = webpackChain.toConfig();
        return new Promise((resolve, reject) => {
            const compiler = webpack(webpackConfig);
            const onBuildFinish = newConfig.onBuildFinish;
            let prerender;
            const onFinish = function (error, stats) {
                if (typeof onBuildFinish !== 'function')
                    return;
                onBuildFinish({
                    error,
                    stats,
                    isWatch: newConfig.isWatch
                });
            };
            const callback = (err, stats) => __awaiter(this, void 0, void 0, function* () {
                if (err || stats.hasErrors()) {
                    const error = err !== null && err !== void 0 ? err : stats.toJson().errors;
                    logHelper_1.printBuildError(error);
                    onFinish(error, null);
                    return reject(error);
                }
                if (!lodash_1.isEmpty(newConfig.prerender)) {
                    prerender = prerender !== null && prerender !== void 0 ? prerender : new prerender_1.Prerender(newConfig, webpackConfig, stats, config.template.Adapter);
                    yield prerender.render();
                }
                onFinish(null, stats);
                resolve(stats);
            });
            if (newConfig.isWatch) {
                logHelper_1.bindDevLogger(compiler);
                compiler.watch({
                    aggregateTimeout: 300,
                    poll: undefined
                }, callback);
            }
            else {
                logHelper_1.bindProdLogger(compiler);
                compiler.run(callback);
            }
        });
    });
}
You can see that the function accepts two parameters, appPath and config. appPath is the directory of the current project, and the parameter config is the Taro configuration we wrote. Before invoking the webpack, Taro will process the webpackConfig, including configuring the built-in webpack configuration of Taro and configuring the user's webackchain in the Taro configuration file.
After locating the webpack location, let's take a look at the relevant code of the webpack configuration finally generated by Taro.
const webpack = (options, callback) => {
    const webpackOptionsValidationErrors = validateSchema(
        webpackOptionsSchema,
        options
    );
    if (webpackOptionsValidationErrors.length) {
        throw new WebpackOptionsValidationError(webpackOptionsValidationErrors);
    }
    let compiler;
    if (Array.isArray(options)) {
        compiler = new MultiCompiler(
            Array.from(options).map(options => webpack(options))
        );
    } else if (typeof options === "object") {
        options = new WebpackOptionsDefaulter().process(options);

        compiler = new Compiler(options.context);
        compiler.options = options;
        new NodeEnvironmentPlugin({
            infrastructureLogging: options.infrastructureLogging
        }).apply(compiler);
        if (options.plugins && Array.isArray(options.plugins)) {
            for (const plugin of options.plugins) {
                if (typeof plugin === "function") {
                    plugin.call(compiler, compiler);
                } else {
                    plugin.apply(compiler);
                }
            }
        }
        compiler.hooks.environment.call();
        compiler.hooks.afterEnvironment.call();
        compiler.options = new WebpackOptionsApply().process(options, compiler);
    } else {
        throw new Error("Invalid argument: options");
    }
    if (callback) {
        if (typeof callback !== "function") {
            throw new Error("Invalid argument: callback");
        }
        if (
            options.watch === true ||
            (Array.isArray(options) && options.some(o => o.watch))
        ) {
            const watchOptions = Array.isArray(options)
                ? options.map(o => o.watchOptions || {})
                : options.watchOptions || {};
            return compiler.watch(watchOptions, callback);
        }
        compiler.run(callback);
    }
    return compiler;
};
It should be noted that the built-in webpack configuration is different in the development and production environments. For example, in the production environment, terser webpack plugin will be called for file compression. We use the vscode code code editor. Before calling the webpack location, the debugger breaks the point and uses the console command to output the variable webpackConfig, that is, the final generated webpack configuration. In the command line tool DEBUG CONSOLE of vscode, you can easily click to expand object properties and view the webpack configuration generated by taro. Here we show Taro's built-in webpack configuration in the development environment, as shown in the following figure.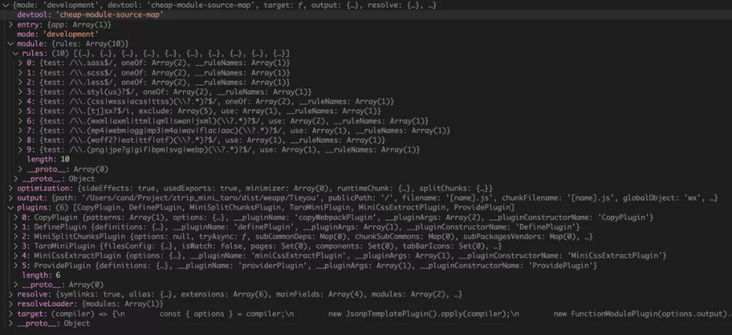
These are common webpack configurations. We mainly focus on two parts: one is the rules configured in the module, which configures various loader s to process matching corresponding files, such as common scss files and jsx files. The second is the taromiplugin plug-in configured in plugins. The plug-in is built in Taro and is mainly responsible for compiling and packaging the code into applet code.
Now that we understand the webpack configuration in Taro and their working process, we should consider how to modify and optimize the configuration to help us optimize the speed of compilation and packaging. It should be noted that Taro packaging uses the webpack chain mechanism. The essence of webpack configuration is an object, which is troublesome to create and modify. Webpack chain provides a chained API to create and modify webpack configuration. The Key part of the API can be referenced by the name specified by the user, which helps to standardize the configuration method of cross project modification.
Webpack chain itself provides many examples, which can be referred to: https://github.com/Yatoo2018/webpack-chain/tree/zh-cmn-Hans
3, Optimize Webpack packaging configuration
After the previous introduction, we have learned about the webpack configuration generated by Taro and the methods to modify these configurations. The next step is to consider how to modify the webpack configuration to optimize the compilation and packaging speed. To this end, we have introduced the speed measure webpack plugin, which can count the time-consuming of plugin and loader during compilation and packaging, and help us clarify the optimization direction.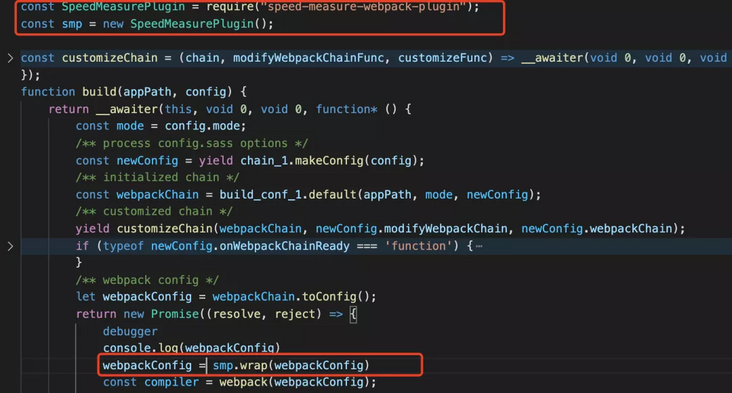
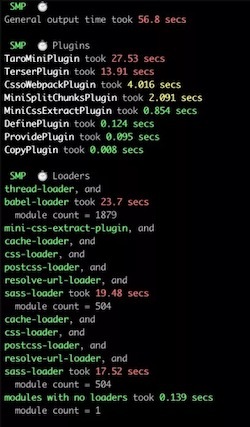
After configuring the speed measure webpack plugin, execute the build command again, and the output results are shown in the following figure.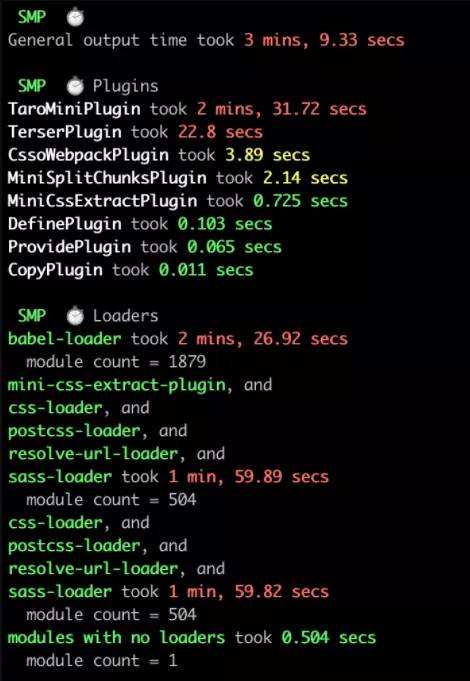
It can be seen that taro miniplugin takes more than 2 minutes of the total compilation time of 3 minutes, which is still very time-consuming. Taro miniplugin is Taro's built-in webpack plug-in. Most of Taro's compilation and packaging work is configured here, such as obtaining the configuration content, processing subcontracting and tabbar, reading the page of applet configuration, adding it to the dependencies array for subsequent processing, generating applet related files, etc. The second most time-consuming is TerserPlugin, which mainly compresses files.
In the time-consuming statistics of loaders, Babel loader takes two and a half minutes and sass loader takes two minutes, which are the most serious. These two are also the main reasons why taro miniplugin takes so much time. Because the plug-in will add applet pages, components and other files to the entry file through the compilation.addEntry of webpack, and then execute a complete compliance phase in webpack. In this process, the configured loader will be called for processing. Of course, Babel loader and scss loader will also be called to process js files or scss files, which seriously slows down the speed of taromiplugin, resulting in serious time-consuming statistics of the plug-in.
Therefore, optimizing the packaging of Webpack is mainly in these two loader s, which is equivalent to optimizing taro miniplugin. In the optimization scheme, we choose two common optimization strategies: multi-core and cache.
3.1 multi core
For multi-core, we use the thread loader officially recommended by webpack, which can transfer very resource consuming loaders to the worker pool. According to the above time-consuming statistics, we can know that Babel loader is the most time-consuming loader. Therefore, put thread loader in front of Babel loader, so that Babel loader will run in a separate worker pool, so as to improve the compilation efficiency.
After knowing the optimization method, the next thing to consider is how to configure it into webpack. Here, we use the modifyWebpackChain hook provided by Taro plug-in mechanism to chain modify the webpack configuration by using the method provided by webpack chain.
Specifically, first find a way to delete the built-in Babel loader in Taro. We can go back and check the built-in webpack configuration in Taro. We find that the naming rule dealing with Babel loader is' script ', as shown in the figure below, and then use the webpack chain syntax rule to delete the naming rule.
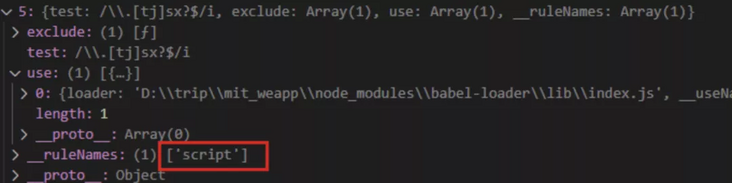
Finally, through the merge method provided by webpack chain, reconfigure the Babel loader for processing js files, and introduce thread loader before Babel loader, as shown below.
ctx.modifyWebpackChain(args => {
  const chain = args.chain
  chain.module.rules.delete('script') // Delete the Babel loader configured in Taro
  chain.merge({ // Reconfigure the Babel loader
    module: {
      rule: {
        script: {
          test: /\.[tj]sx?$/i,
          use: {
            threadLoader: {
              loader: 'thread-loader', // Multicore construction
            },
            babelLoader: {
              loader: 'babel-loader',
              options: {
                cacheDirectory: true, // Enable Babel loader cache
              },
            },
          },
        },
      },
    }
  })
})
Of course, we only introduce thread loader here to deal with Babel loader. You can also use it to deal with other time-consuming loaders such as CSS loader.
3.2 caching
In addition to enabling multithreading, the cache needs to be optimized in order to optimize the packaging speed. The cache optimization strategy is also aimed at these two parts. One is to use cache loader to cache the loaders used to process scss files, and the other is Babel loader. Set the parameter cacheDirectory to true and turn on Babel loader cache.
When using the cache loader cache, it should be noted that the cache loader should be placed before the CSS loader and after the mini CSS extract plugin. In practice, it is found that the generated files cannot be effectively cached before Mini CSS extract plugin / loader.
Similar to the previous approach, we first need to look at the cache strategy of Taro's built-in webpack configuration, then use webpack-chain syntax to locate the corresponding location, and finally invocate the before method before inserting it into css-loader.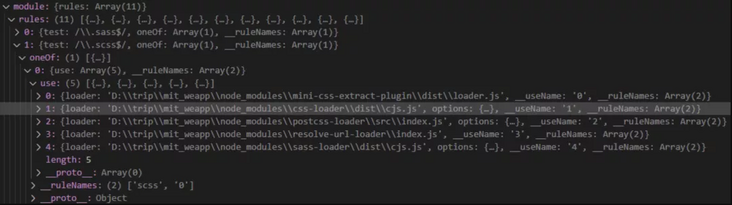
Through the webpack chain method, place the cache loader before the CSS loader and after the mini CSS extract plugin. The code is as follows:
chain.module.rule('scss').oneOf('0').use('cacheLoader').loader('cache-loader').before('1')
chain.module.rule('scss').oneOf('1').use('cacheLoader').loader('cache-loader').before('1')
Note: the cache is saved in node by default_ Modules /. Cache, as shown below. Therefore, when using the compile and package command, you should pay attention to whether the current packaging environment can retain the cache, otherwise the cache configuration cannot bring speed optimization effect.

It is worth mentioning that from the above figure, we can find that the terser webpack plugin also enables caching. Let's look back. The following figure shows the parameters configured in Taro. We can find that both cache and parallel are true, indicating that they have enabled cache and parallel compilation respectively.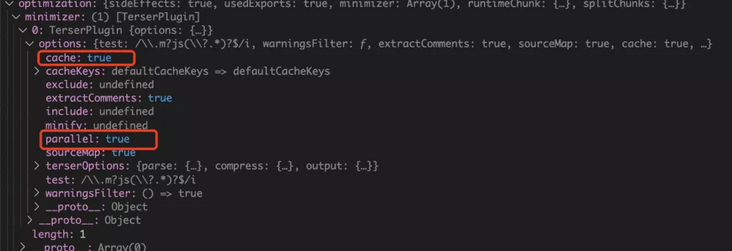
3.3 taro plugin compiler optimization plug-in
With the above optimization scheme, we started to write the optimization plug-in. In general, this plug-in uses the modifyWebpackChain hook exposed by the taro plug-in mechanism, and uses the webpack chain method to chain modify the webpack configuration. Configure the multi-core and cache optimization strategy into Taro's webpack to improve the compilation and packaging speed.
The plug-in installation address is as follows:
GitHub:
Npm: https://www.npmjs.com/package/taro-plugin-compiler-optimization
First, install the plug-in in the project:
npm install --save-dev thread-loader cache-loader taro-plugin-compiler-optimization
Then, add the following script in config.js of taro:
// Configure it into plugins in taro config.js
// Root directory / config/index.js
plugins: ['taro-plugin-compiler-optimization']
Finally, when we perform the packaging task, we find that the total time has been reduced to 56.9s, the time of taromiplugin, Babel loader and CSS loader has been significantly reduced, and the time of TerserPlugin configured with cache has also been reduced from 22.8s to 13.9s. The optimization effect is still very significant.
4, Compressed resource file
In wechat developer tools, if you want to debug small programs on the real machine, you usually need to preview the QR code. Due to wechat restrictions, the packaged files, main package and subcontract files cannot exceed 2M, otherwise the QR code preview cannot be successful. However, with the increasing size of the project, it is impossible for the main package file to exceed 2M. In particular, the file processed through Babel loader will contain a lot of comments, too long variable names, etc., resulting in too large a file. The most fundamental solution in the industry is subcontracting, because wechat applet has adjusted the total package size to 10M. However, this article does not discuss how to subcontract, but mainly discusses how to adjust the package size.
When we execute the build command, we enable the terser webpack plugin compressed file to reduce the main package file to less than 2M. However, the problem is also obvious, that is, it takes a lot of time to build packaging every time, and the efficiency is too low. Moreover, in this case, it will not listen to file changes and perform module hot replacement, which is very inefficient.
Therefore, our strategy is to configure webpack in the development environment and call terser webpack plugin for compression. At the same time, configure the plug-in parameters to compress the specified files instead of all. Open the wechat developer tool and click code dependency analysis, as shown in the following figure.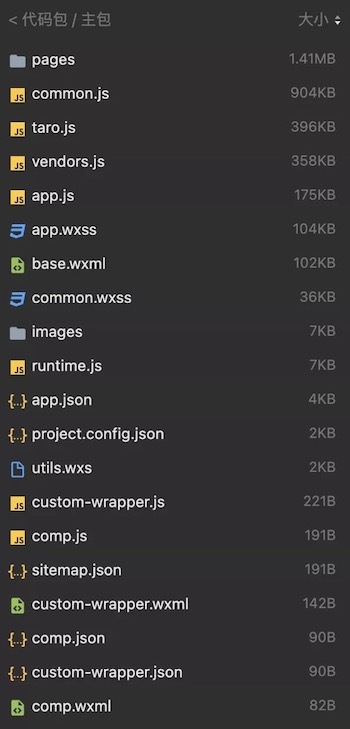
As can be seen from the figure, the main package file has exceeded 2M. Among them, common.js, taro.js, vendors.js and app.js are obviously large, and these four files must be generated after each Taro project is compiled and packaged. The pages folder is also up to 1.41M, which is the tabBar page we configured, so the size of the folder is directly affected by the complexity of the tabBar page. In addition, other files are relatively small and can not be considered for processing for the time being.
First, execute the following command to install the terser webpack plugin.
npm install -D terser-webpack-plugin@3.0.5
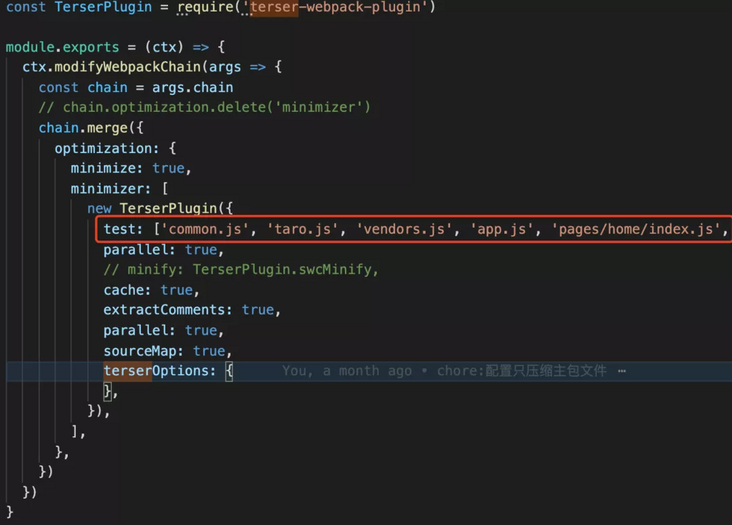
It should be noted that the latest version of terser webpack plugin is v5. This version is optimized according to webpack5, but does not support webpack4. Therefore, you need to specify an additional version before using it. Here I choose 3.0.5, which is the same version as the terser webpack plugin used in Taro. The parameter configuration passed in is the same as Taro. What we need to do is to add the file path to be compressed to the test array. The common.js, taro.js, vendors.js, app.js and pages / home / index.js files have been configured by default.
Similarly, we need to introduce the Taro plug-in in the Taro configuration file plugins. It is recommended to introduce it in the config/dev.js configuration file, which will only be used in the development environment.
// config/dev.js
plugins: [
    path.resolve(__dirname, 'plugins/minifyMainPackage.js'),
]
Finally, let's take a look at the size of the compressed main package. It can be found that it has been reduced to 1.42M. Compared with the previous 3.45M, it has been compressed by about 50%, which can solve most scenes where QR code preview and packaging cannot be performed.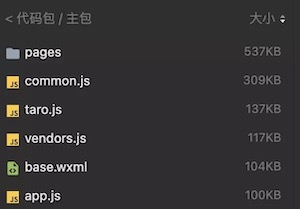
However, at present, wechat applets already support subcontracting Lee, but the main package can not exceed 2M. The above method is aimed at the solution that the main package is too large. This paper mainly solves two problems: one is to optimize the compilation and packaging speed of Taro, and the other is to provide a solution to the problem that the subcontracting is too large to use wechat developer tools for QR code preview.