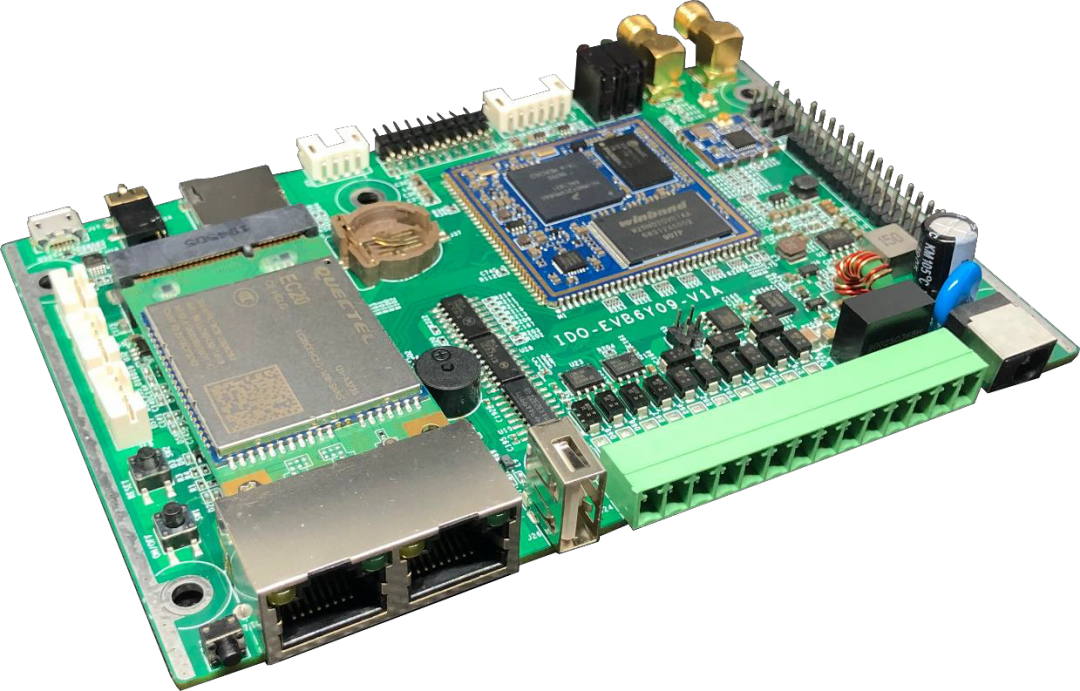
IDO-EVB6Y09 is a multi interface internet of things gateway device equipped with NXP imx6uliec processor, with a maximum dominant frequency of 800MHz. It has three functions: 4G industrial router, 4GDTU and industrial HMI. It supports the wireless communication mode of WIFI Bluetooth module and 4G all Netcom module, and provides multiple functional interfaces such as Dual Ethernet interface, CAN, RS-485, RS-232, USB OTG, TF card, SIM card, LVDS, RGB, TP and audio. It CAN be widely used in various industrial Internet of things gateways and industrial control equipment to provide all-round software and hardware support for data acquisition and data analysis.
Let's introduce how to use 6Y09 to make Debian10 base file system on i.MX 6ULL platform. This method is also applicable to all platforms and motherboards.
The detailed manufacturing steps are as follows:
1. Host software installation
The system used by the PC host is Ubuntu 18.04 AMD64. Before making debian10 system, you need to install some tools and software required for making the system.
sudo apt-get install qemu-user-static qemu-system-arm debootstrap
-
QEMU system arm is used to simulate the equipment of arm architecture and demonstrate the operation of debian system on this platform.
-
debootstrap is a tool for building debian basic file subsystem.
-
QEMU user static on the ubuntu system with non arm architecture on the PC side, you need to simulate the arm environment with the help of QEMU arm static tool before you can install the software required under the arm architecture.
2. Get the debin10 root file system
-
Create a directory to store file system files
mkdir fs_debian_buster
-
Use the debootstrap tool to download the debian file system
$sudo debootstrap --arch=armhf --foreign buster fs_debian_buster/ http://mirrors.ustc.edu.cn/debian
-
--arch: Specifies the system architecture
-
--foreign: Specifies the system code to download (debian-10 is buster)
-
fs_debian_buster: Specifies the directory where the downloaded content is stored
-
http://mirrors.ustc.edu.cn/debian : Download path (the source of China University of science and technology is used here). The printing information of the download process is as follows:
fu@fu-VirtualBox:/home/industio_work/rootfs/debian-10$ sudo debootstrap --arch=armhf --foreign buster fs_debian_buster/ http://mirrors.ustc.edu.cn/debian
W: Cannot check Release signature; keyring file not available /usr/share/keyrings/debian-archive-keyring.gpg
I: Retrieving InRelease
I: Validating Packages
I: Resolving dependencies of required packages...
I: Resolving dependencies of base packages...
···
3. Simulate the arm environment and download the software under the arm architecture
Because the host is Ubuntu 18.04 AMD64, you need to use QEMU arm static to simulate the arm environment and download and install the required software.
1. Copy QEMU arm static to debian file system / usr/bin /
sudo cp /usr/bin/qemu-arm-static fs_debian_buster/usr/bin/
-
Perform the second phase of the download
sudo DEBIAN_FRONTEND=noninteractive DEBCONF_NONINTERACTIVE_SEEN=true LC_ALL=C LANGUAGE=C LANG=C chroot fs_debian_buster/ debootstrap/debootstrap --second-stage
Set the environment variable, then switch to the file system storage directory, and use the debootstrap/debootstrap command under the directory to execute the second stage of download. After waiting for a few minutes, the command execution is completed, and the terminal outputs "I: Base system installed successfully." that is, the system download is completed.
4. Set the system environment and install the required software
After executing the second and third chapters, you can have a basic Debian 10 root file system; Continue to install and customize the software based on the file system according to the system requirements.
1. Switch the root directory of the host to debian10
Switch root directory: switch the root directory to fs_debian_buster
sudo chroot fs_debian_buster
Exit root directory: returns the root directory of the host
exit
2. Set root password
passwd root
3. System disk mount configuration
when the system starts up, it will actively read the contents of the / etc/fstab file and mount the disk according to the configuration in the file
sudo vim fs_debian_buster/etc/fstab
#Add the following
# UNCONFIGURED FSTAB FOR BASE SYSTEM
proc    /proc   proc    defaults        0       0
sysfs   /sys    sysfs   defaults        0       0
4. Modify network configuration
sudo vim etc/network/interfaces
#Add content
auto lo
iface lo inet loopback

#Example: set network port eth1 as a dynamic ip address
auto eth0
allow-hotplug eth0
iface eth0 inet dhcp

#Example: set eth1 as a static ip address
auto eth1
allow-hotplug eth1
iface eth1 inet static
address 192.168.0.23
netmask 255.255.255.0
gateway 192.168.0.1
5. Software installation
apt update

apt install sudo
apt install language-pack-en-base
apt install ssh
apt install net-tools   #net tool
apt install wireless-tools #Contains iwconfig iwlist
apt install ethtool
apt install ifupdown
apt install iputils-ping
apt install rsyslog
apt install htop
apt install vi
apt install samba samba-common
apt install wpasupplicant
5. File system packaging
Switch to the file system directory and use the tar command to package the file system directory of the installed software into a rootfs.tar file.
cd fs_debian_buster
sudo tar -cf rootfs.tar ./*
6. Problems encountered in real machine running file system
1. The line number available for debugging terminal becomes less
by default, after the terminal is connected, the number of lines of the terminal that can be used is consistent with the window size of the actual terminal, but after opening the file with vim, only half of the functions used by the terminal are left. At this time, it is necessary to reset the number of lines and columns of the terminal stty.
#Set effective terminal behavior 48
stty rows 48
#Set the terminal valid column to 170
stty cols 175
#View the window size of the terminal
stty size
2. Wireless network card name modification
by default, wlan0 will be renamed by udev according to the naming rules. For example, wlan0 will be renamed to wl+mac address. To keep the naming of wlan0, you need to modify the "/ lib/udev/rules.d/73-usb-net-by-mac.rules" file and annotate the modified contents in the file.
3,wpa_ The supplicant command line cannot obtain the ip address when connecting to wifi
Need to install: apt install wpasupplicant
-
Modify profile settings ssid and psk
Configuration file: / etc/wpa_supplicant/wpa_supplicant.conf
ctrl_interface=/var/run/wpa_supplicant
ap_scan=1

network={
  ssid="wireless-tag-2G-RD"
  psk="wt2grd12345"
  #ssid="fu"
  #psk="39184967"
}-
Connect wifi and use wpa_supplicant
wpa_supplicant -D nl80211 -i wlan0 -c /etc/wpa_supplicant/wpa_supplicant.conf -B &
-
Get ip address automatically
dhclient -d wlan0
4. Configure EC20 4G module to access the Internet
after PPP dials successfully, you cannot ping the Internet. Check the routes without ppp0 in the routing table, so you need to add ppp0 to the routing table.
route del default
route add default dev ppp0