Related knowledge
Through the previous article, we implemented the use of JWT for interface authentication. When requesting an interface, we need to pass Token in the Header header, so that the backend can identify the requester and judge whether the interface can be requested.
At the same time, we also use Swagger2 to automatically generate interface documents, and directly unit test the HTML page provided by Swagger2.
In the actual project, authentication and documentation are both necessary, so this paper aims to solve the problem of how to pass Token when using Swagger2 for unit test.
target
The integrated spring security implementation uses the Swagger2 document to test the background interface and pass it in the Token.
Operation steps
Add dependency
Introducing Spring Boot Starter parent project
<parent>
    <groupId>org.springframework.boot</groupId>
    <artifactId>spring-boot-starter-parent</artifactId>
    <version>2.0.5.RELEASE</version>
</parent>
Add the dependency of springSecurity, swagger2 and JWT. The overall dependency after adding is as follows
<dependencies>
    <dependency>
        <groupId>org.springframework.boot</groupId>
        <artifactId>spring-boot-starter-web</artifactId>
    </dependency>

    <dependency>
        <groupId>org.springframework.boot</groupId>
        <artifactId>spring-boot-starter-test</artifactId>
        <scope>test</scope>
    </dependency>

    <dependency>
        <groupId>org.projectlombok</groupId>
        <artifactId>lombok</artifactId>
        <scope>provided</scope>
    </dependency>

    <dependency>
        <groupId>org.springframework.boot</groupId>
        <artifactId>spring-boot-starter-security</artifactId>
    </dependency>

    <dependency>
        <groupId>io.jsonwebtoken</groupId>
        <artifactId>jjwt</artifactId>
        <version>0.9.1</version>
    </dependency>

    <dependency>
        <groupId>io.springfox</groupId>
        <artifactId>springfox-swagger2</artifactId>
        <version>2.9.2</version>
    </dependency>

    <dependency>
        <groupId>io.springfox</groupId>
        <artifactId>springfox-swagger-ui</artifactId>
        <version>2.9.2</version>
    </dependency>
</dependencies>
Code
Register Swagger2 and add Header parameters
Add parameters to the interface through the globalOperationParameters method
@Configuration
@EnableSwagger2
public class SwaggerConfig {

    @Bean
    public Docket createRestApi() {
        ParameterBuilder builder = new ParameterBuilder();
        builder.name("Authorization").description("Authentication token")
                .modelRef(new ModelRef("string"))
                .parameterType("header")
                .required(false)
                .build();

        return new Docket(DocumentationType.SWAGGER_2)
                .apiInfo(apiInfo())
                .select()
                .apis(RequestHandlerSelectors.any())
                .paths(PathSelectors.any())
                .build()
                .globalOperationParameters(Collections.singletonList(builder.build()));
    }

    /**
     * Create the basic information of the API (these basic information will be displayed in the document page)
     * Access address: http: / / project actual address / swagger-ui.html
     */
    private ApiInfo apiInfo() {
        return new ApiInfoBuilder()
                .title("Interface document")
                .version("1.0.0-SNAPSHOT")
                .contact(new Contact("Bruce.Gong", "", ""))
                .build();
    }

}
Configure spring security
Spring security intercepts the web pages of swagger UI by default, so to access the interface documents of swagger 2, you need to remove the interception.
@Configuration
@EnableGlobalMethodSecurity(prePostEnabled = true)
public class SecurityConfig extends WebSecurityConfigurerAdapter {

    @Override
    public void configure(WebSecurity web) throws Exception {
        web.ignoring().antMatchers(
                "/v2/api-docs",
                "/swagger-resources/configuration/ui",
                "/swagger-resources",
                "/swagger-resources/configuration/security",
                "/swagger-ui.html");
    }

}
Writing interface
@RestController
@Api("Test group")
public class TestController {

    @ApiOperation(value = "test", notes = "test")
    @GetMapping("/testGet")
    public String testGet() {
        return "Test success";
    }

}
Verification
Access the Swagger2 interface document through the address http://localhost:8080/swagger-ui.html, select the test interface written in the previous step, and click Try it out, as shown in the figure below, you can see that Authorization has become an input item.
We input nothing and click Execute to receive the request. The result is as follows. The request is blocked by AuthenticationEntryPoint, indicating that the current user is not logged in.
{
  "message": "Full authentication is required to access this resource"
}
Use postman to visit http://localhost:8080/login to log in. After the login is successful, the token will be returned. Fill the value of token in the Authorization entry, and take over again. The result shows that the test is successful and the request is released.
Upgrading plan
According to the above method, there is no problem in testing an interface, but if you want to test many interfaces, you need to manually fill in the token value in each test, which is very troublesome. Is there any way to fill in once, and all interfaces can be shared?
Modify Swagger2 registration
@Configuration
@EnableSwagger2
public class SwaggerConfig {

    /**
     * Create API Application
     * apiInfo() Add API related information
     * An API selecterbuilder instance is returned through the select() function to control which interfaces are exposed to Swagger for presentation,
     * This example uses the package path of the specified scan to define the directory where the API is to be established.
     */
    @Bean
    public Docket createRestApi() {
        return new Docket(DocumentationType.SWAGGER_2).
                useDefaultResponseMessages(false)
                .select()
                .apis(RequestHandlerSelectors.any())
                .build()
                .securitySchemes(Collections.singletonList(securityScheme()))
                .securityContexts(Collections.singletonList(securityContext()));
    }

    private SecurityScheme securityScheme() {
        return new ApiKey("Authorization", "Authorization", "header");
    }

    private SecurityContext securityContext() {
        return SecurityContext.builder()
                        .securityReferences(defaultAuth())
                        .forPaths(PathSelectors.regex("^(?!auth).*$"))
                        .build();
    }

    private List<SecurityReference> defaultAuth() {
        AuthorizationScope authorizationScope = new AuthorizationScope("global", "accessEverything");
        AuthorizationScope[] authorizationScopes = new AuthorizationScope[1];
        authorizationScopes[0] = authorizationScope;
        return Collections.singletonList(
                new SecurityReference("Authorization", authorizationScopes));
    }

    /**
     * Create the basic information of the API (these basic information will be displayed in the document page)
     * Access address: http: / / project actual address / swagger-ui.html
     */
    private ApiInfo apiInfo() {
        return new ApiInfoBuilder()
                .title("Interface document")
                .version("1.0.0-SNAPSHOT")
                .contact(new Contact("Bruce.Gong", "", ""))
                .build();
    }

}
Verification
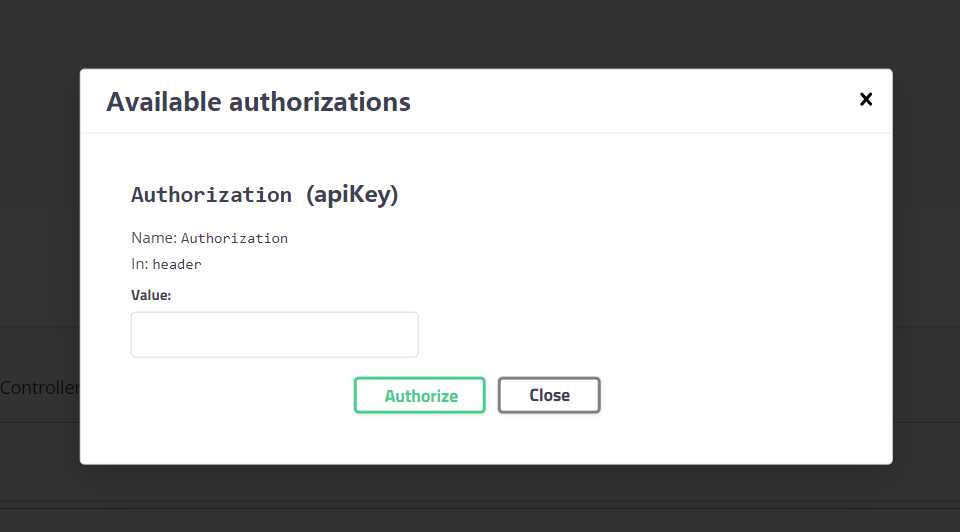
Access the Swagger2 interface document through the address http://localhost:8080/swagger-ui.html, as shown in the figure below, the original Authorization input box disappears, and the Authorize button in the upper right corner appears
Click the button and a pop-up window will appear. In the pop-up window, you can enter Authorization
Source address
Source code of this chapter: https://gitee.com/gongm_24/spring-boot-tutorial.git

