The iSCSI gateway integrates Ceph storage and iSCSI standards to provide a high availability (HA) iSCSI target that exports RADOS block device (RBD) images to SCSI disks. The iSCSI protocol allows clients to send SCSI commands to SCSI storage devices (targets) over TCP/IP networks. This allows heterogeneous clients to access the Ceph storage cluster.
Each iSCSI gateway runs the Linux IO target kernel subsystem (LIO) to provide iSCSI protocol support. LIO uses user space to interact with CPH's librbd library via TCMU and exposes RBD images to iSCSI clients. Using Ceph's iSCSI gateway can effectively run a fully integrated block storage infrastructure, which has all the characteristics and advantages of traditional storage area network (SAN).
Is RBD supported as a VMware ESXI data store?
(1) At present, RBD does not support the form of datastore.
(2) iSCSI is a way to support data store, which can be used as a storage function for VMware Esxi virtual machine. It has a very good cost-effective choice.
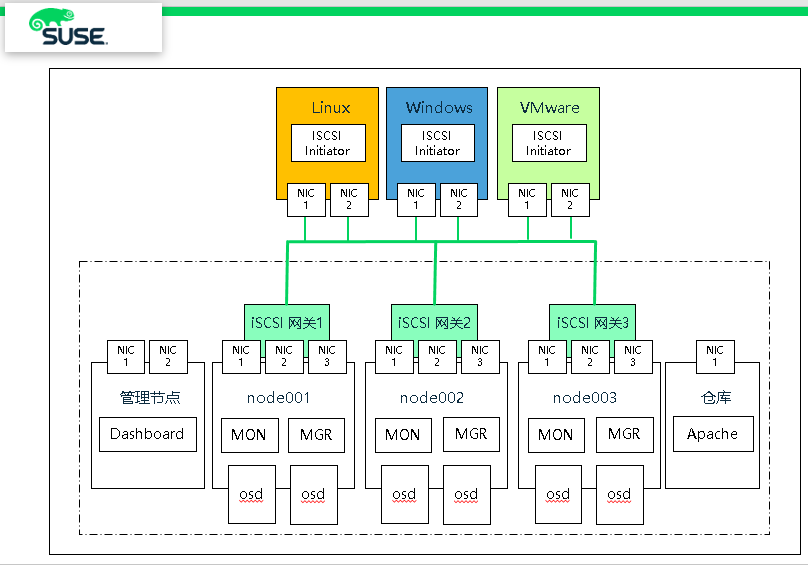
1. Create pools and mirrors
(1) Creating pools
# ceph osd pool create iscsi-images 128 128 replicated
# ceph osd pool application enable iscsi-images rbd
(2) Create images
# rbd --pool iscsi-images create --size=2048 'iscsi-gateway-image001'
# rbd --pool iscsi-images create --size=4096 'iscsi-gateway-image002'
# rbd --pool iscsi-images create --size=2048 'iscsi-gateway-image003'
# rbd --pool iscsi-images create --size=4096 'iscsi-gateway-image004'
(3) Display images
# rbd ls -p iscsi-images
iscsi-gateway-image001
iscsi-gateway-image002
iscsi-gateway-image003
iscsi-gateway-image004
2. Depsea Installation of iSCSI Gateway
(1) Install on node00 1 and node002 nodes, edit policy.cfg file
vim /srv/pillar/ceph/proposals/policy.cfg
  ......
# IGW
role-igw/cluster/node00[1-2]*.sls
  ......
(2) Running stage 2 and stage 4
# salt-run state.orch ceph.stage.2
# salt 'node001*' pillar.items
    public_network:
        192.168.2.0/24
    roles:
        - mon
        - mgr
        - storage
        - igw
    time_server:
        admin.example.com
# salt-run state.orch ceph.stage.4
3. Manual Installation of iSCSI Gateway
(1) Node 003 node installs iscsi software package
# zypper -n in -t pattern ceph_iscsi
# zypper -n in tcmu-runner  tcmu-runner-handler-rbd \
  ceph-iscsi patterns-ses-ceph_iscsi python3-Flask python3-click python3-configshell-fb \
  python3-itsdangerous python3-netifaces python3-rtslib-fb \
  python3-targetcli-fb python3-urwid targetcli-fb-common
(2) admin node creates key and copies it to node003
# ceph auth add client.igw.node003 mon 'allow *' osd 'allow *' mgr 'allow r'
# ceph auth get client.igw.node003
client.igw.node003
        key: AQC0eotdAAAAABAASZrZH9KEo0V0WtFTCW9AHQ==
        caps: [mgr] allow r
        caps: [mon] allow *
        caps: [osd] allow *
# ceph auth get client.igw.node003 >> /etc/ceph/ceph.client.igw.node003.keyring
# scp /etc/ceph/ceph.client.igw.node003.keyring node003:/etc/ceph
(3) Node 003 Node Start Service
# systemctl start tcmu-runner.service
# systemctl enable tcmu-runner.service
(4) Node 003 Node Create Configuration File
# vim /etc/ceph/iscsi-gateway.cfg
[config]
cluster_client_name = client.igw.node003
pool = iscsi-images
trusted_ip_list = 192.168.2.42,192.168.2.40,192.168.2.41
minimum_gateways = 1
fqdn_enabled=true

# Additional API configuration options are as follows, defaults shown.
api_port = 5000
api_user = admin
api_password = admin
api_secure = false

# Log level
logger_level = WARNING
(5) Start the RBD target service
# systemctl start rbd-target-api.service
# systemctl enable rbd-target-api.service
(6) Display configuration information
# gwcli info
HTTP mode          : http
Rest API port      : 5000
Local endpoint     : http://localhost:5000/api
Local Ceph Cluster : ceph
2ndary API IP's    : 192.168.2.42,192.168.2.40,192.168.2.41
# gwcli ls
o- / ...................................................................... [...]
  o- cluster ...................................................... [Clusters: 1]
  | o- ceph ......................................................... [HEALTH_OK]
  |   o- pools ....................................................... [Pools: 1]
  |   | o- iscsi-images ........ [(x3), Commit: 0.00Y/15718656K (0%), Used: 192K]
  |   o- topology ............................................. [OSDs: 6,MONs: 3]
  o- disks .................................................... [0.00Y, Disks: 0]
  o- iscsi-targets ............................ [DiscoveryAuth: None, Targets: 0]
4. Dashboard adds iscsi gateway
(1) On the Admin node, view the dashboard iSCSI gateway
admin:~ # ceph dashboard iscsi-gateway-list
{"gateways": {"node002.example.com": {"service_url": "http://admin:admin@192.168.2.41:5000"},
 "node001.example.com": {"service_url": "http://admin:admin@192.168.2.40:5000"}}}
(2) Adding iSCSI Gateway
# ceph dashboard iscsi-gateway-add http://admin:admin@192.168.2.42:5000
# ceph dashboard iscsi-gateway-list
{"gateways": {"node002.example.com": {"service_url": "http://admin:admin@192.168.2.41:5000"},
 "node001.example.com": {"service_url": "http://admin:admin@192.168.2.40:5000"},
 "node003.example.com": {"service_url": "http://admin:admin@192.168.2.42:5000"}}}
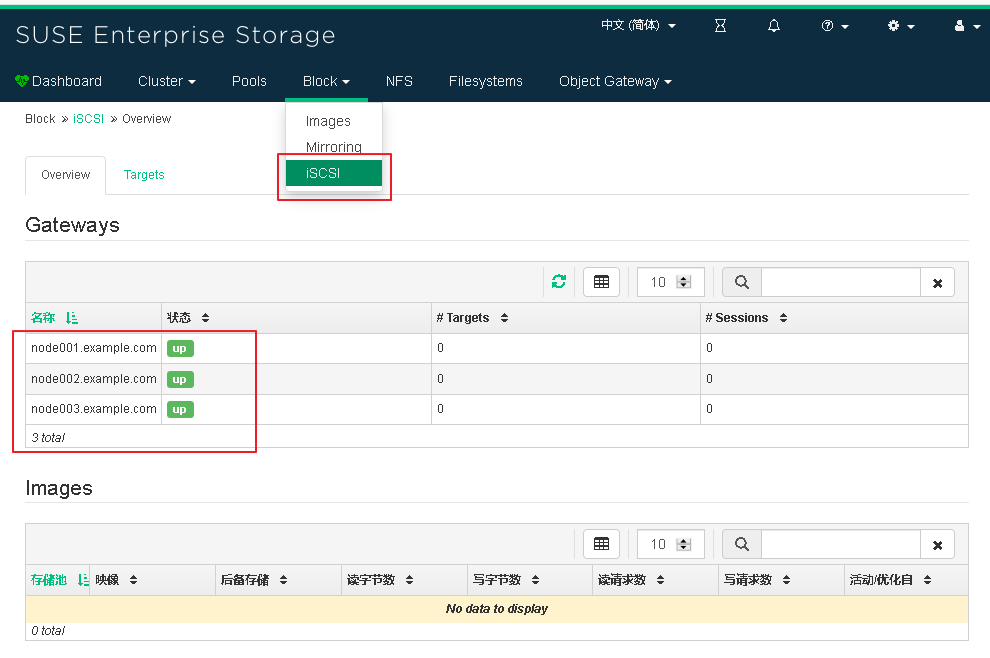
(3) log in to Dashboard to view the iSCSI gateway
5,Export RBD Images via iSCSI
(1) Create iSCSI target name
# gwcli
gwcli > /> cd /iscsi-targets
gwcli > /iscsi-targets> create iqn.2019-10.com.suse-iscsi.iscsi01.x86:iscsi-gateway01
(2) Adding iSCSI Gateway
gwcli > /iscsi-targets> cd iqn.2019-10.com.suse-iscsi.iscsi01.x86:iscsi-gateway01/gateways
/iscsi-target...tvol/gateways> create node001.example.com 172.200.50.40
/iscsi-target...tvol/gateways> create node002.example.com 172.200.50.41
/iscsi-target...tvol/gateways> create node003.example.com 172.200.50.42


/iscsi-target...ay01/gateways> ls
o- gateways ......................................................... [Up: 3/3, Portals: 3]
  o- node001.example.com ............................................. [172.200.50.40 (UP)]
  o- node002.example.com ............................................. [172.200.50.41 (UP)]
  o- node003.example.com ............................................. [172.200.50.42 (UP)]
Note: Install hostname to define
/iscsi-target...tvol/gateways> create node002 172.200.50.41
The first gateway defined must be the local machine
(3) Adding RBD Mirror
/iscsi-target...tvol/gateways> cd /disks
/disks> attach iscsi-images/iscsi-gateway-image001
/disks> attach iscsi-images/iscsi-gateway-image002
(4) mapping relationship between target and RBD image
/disks> cd /iscsi-targets/iqn.2019-10.com.suse-iscsi.iscsi01.x86:iscsi-gateway01/disks
/iscsi-target...teway01/disks> add iscsi-images/iscsi-gateway-image001
/iscsi-target...teway01/disks> add iscsi-images/iscsi-gateway-image002
(5) Settings not validated
gwcli > /> cd /iscsi-targets/iqn.2019-10.com.suse-iscsi.iscsi01.x86:iscsi-gateway01/hosts
/iscsi-target...teway01/hosts> auth disable_acl
/iscsi-target...teway01/hosts> exit
(6) View configuration information
node001:~ # gwcli ls
o- / ............................................................................... [...]
  o- cluster ............................................................... [Clusters: 1]
  | o- ceph .................................................................. [HEALTH_OK]
  |   o- pools ................................................................ [Pools: 1]
  |   | o- iscsi-images .................. [(x3), Commit: 6G/15717248K (40%), Used: 1152K]
  |   o- topology ...................................................... [OSDs: 6,MONs: 3]
  o- disks ................................................................ [6G, Disks: 2]
  | o- iscsi-images .................................................. [iscsi-images (6G)]
  |   o- iscsi-gateway-image001 ............... [iscsi-images/iscsi-gateway-image001 (2G)]
  |   o- iscsi-gateway-image002 ............... [iscsi-images/iscsi-gateway-image002 (4G)]
  o- iscsi-targets ..................................... [DiscoveryAuth: None, Targets: 1]
    o- iqn.2019-10.com.suse-iscsi.iscsi01.x86:iscsi-gateway01 .............. [Gateways: 3]
      o- disks ................................................................ [Disks: 2]
      | o- iscsi-images/iscsi-gateway-image001 .............. [Owner: node001.example.com]
      | o- iscsi-images/iscsi-gateway-image002 .............. [Owner: node002.example.com]
      o- gateways .................................................. [Up: 3/3, Portals: 3]
      | o- node001.example.com ...................................... [172.200.50.40 (UP)]
      | o- node002.example.com ...................................... [172.200.50.41 (UP)]
      | o- node003.example.com ...................................... [172.200.50.42 (UP)]
      o- host-groups ........................................................ [Groups : 0]
      o- hosts .................................................... [Hosts: 0: Auth: None]
6. Use the Dashboard interface to output RBD Images
(1) Add iSCSI target

(2) Write target IQN and add mirror Portals and images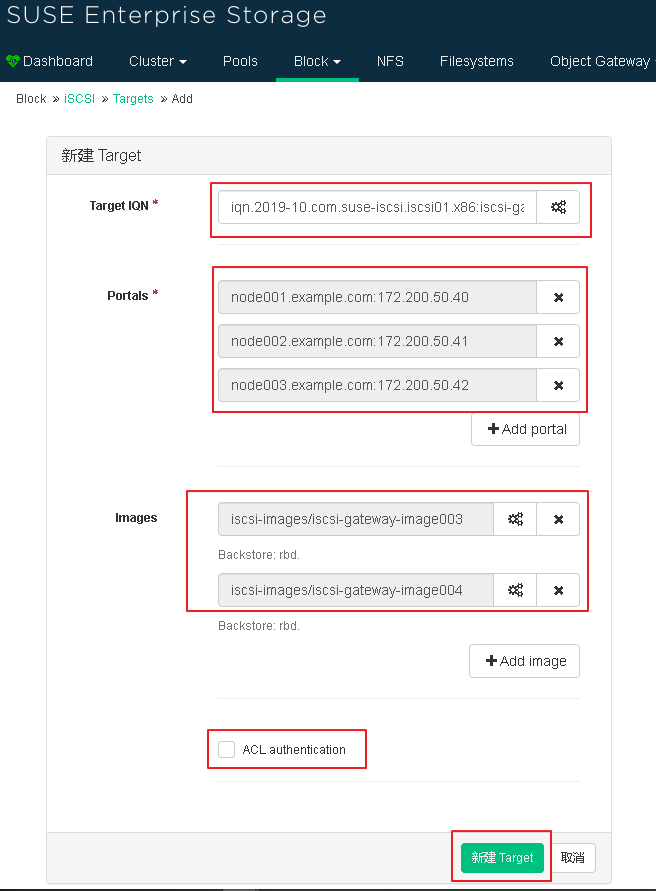
(3) View the newly added iSCSI target information
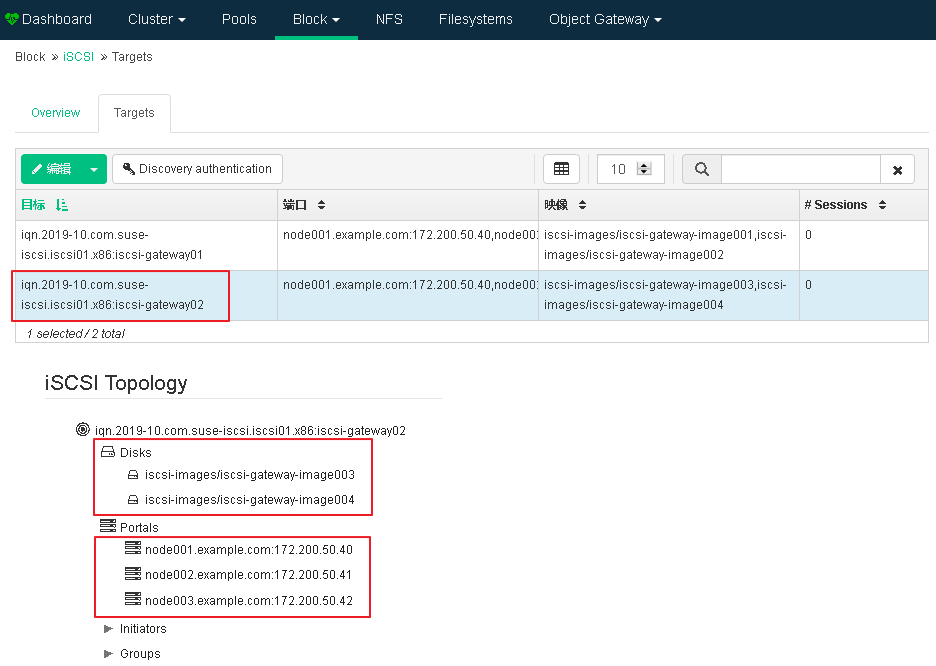
7. Linux Client Access
(1) Start iscsid service
- SLES or RHEL
# systemctl start iscsid.service
# systemctl enable iscsid.service
- Debian or Ubuntu
# systemctl start open-iscsi
(2) Discovering and Connecting targets
# iscsiadm -m discovery -t st -p 172.200.50.40
172.200.50.40:3260,1 iqn.2019-10.com.suse-iscsi.iscsi01.x86:iscsi-gateway01
172.200.50.41:3260,2 iqn.2019-10.com.suse-iscsi.iscsi01.x86:iscsi-gateway01
172.200.50.42:3260,3 iqn.2019-10.com.suse-iscsi.iscsi01.x86:iscsi-gateway01
172.200.50.40:3260,1 iqn.2019-10.com.suse-iscsi.iscsi01.x86:iscsi-gateway02
172.200.50.41:3260,2 iqn.2019-10.com.suse-iscsi.iscsi01.x86:iscsi-gateway02
172.200.50.42:3260,3 iqn.2019-10.com.suse-iscsi.iscsi01.x86:iscsi-gateway02
(3) Log on to target
# iscsiadm -m node -p 172.200.50.40 --login
# iscsiadm -m node -p 172.200.50.41 --login
# iscsiadm -m node -p 172.200.50.42 --login
# lsblk
NAME            MAJ:MIN RM   SIZE RO TYPE MOUNTPOINT
sda               8:0    0    25G  0 disk
├─sda1            8:1    0   509M  0 part /boot
└─sda2            8:2    0  24.5G  0 part
  ├─vg00-lvswap 254:0    0     2G  0 lvm  [SWAP]
  └─vg00-lvroot 254:1    0 122.5G  0 lvm  /
sdb               8:16   0   100G  0 disk
└─vg00-lvroot   254:1    0 122.5G  0 lvm  /
sdc               8:32   0     2G  0 disk
sdd               8:48   0     2G  0 disk
sde               8:64   0     4G  0 disk
sdf               8:80   0     4G  0 disk
sdg               8:96   0     2G  0 disk
sdh               8:112  0     4G  0 disk
sdi               8:128  0     2G  0 disk
sdj               8:144  0     4G  0 disk
sdk               8:160  0     2G  0 disk
sdl               8:176  0     2G  0 disk
sdm               8:192  0     4G  0 disk
sdn               8:208  0     4G  0 disk
(4) If the lsscsi utility is installed on the system, you can use it to enumerate the SCSI devices available on the system:
# lsscsi
[1:0:0:0]    cd/dvd  NECVMWar VMware SATA CD01 1.00  /dev/sr0
[30:0:0:0]   disk    VMware,  VMware Virtual S 1.0   /dev/sda
[30:0:1:0]   disk    VMware,  VMware Virtual S 1.0   /dev/sdb
[33:0:0:0]   disk    SUSE     RBD              4.0   /dev/sdc
[33:0:0:1]   disk    SUSE     RBD              4.0   /dev/sde
[34:0:0:2]   disk    SUSE     RBD              4.0   /dev/sdd
[34:0:0:3]   disk    SUSE     RBD              4.0   /dev/sdf
[35:0:0:0]   disk    SUSE     RBD              4.0   /dev/sdg
[35:0:0:1]   disk    SUSE     RBD              4.0   /dev/sdh
[36:0:0:2]   disk    SUSE     RBD              4.0   /dev/sdi
[36:0:0:3]   disk    SUSE     RBD              4.0   /dev/sdj
[37:0:0:0]   disk    SUSE     RBD              4.0   /dev/sdk
[37:0:0:1]   disk    SUSE     RBD              4.0   /dev/sdm
[38:0:0:2]   disk    SUSE     RBD              4.0   /dev/sdl
[38:0:0:3]   disk    SUSE     RBD              4.0   /dev/sdn
(5) Multipath settings
# zypper in multipath-tools
# modprobe dm-multipath path
# systemctl start multipathd.service
# systemctl enable multipathd.service
# multipath -ll
36001405863b0b3975c54c5f8d1ce0e01 dm-3 SUSE,RBD
size=4.0G features='2 queue_if_no_path retain_attached_hw_handler' hwhandler='1 alua' wp=rw
|-+- policy='service-time 0' prio=50 status=active
| `- 35:0:0:1 sdh 8:112 active ready running  <=== Single link active
`-+- policy='service-time 0' prio=10 status=enabled
  |- 33:0:0:1 sde 8:64  active ready running
  `- 37:0:0:1 sdm 8:192 active ready running
3600140529260bf41c294075beede0c21 dm-2 SUSE,RBD
size=2.0G features='2 queue_if_no_path retain_attached_hw_handler' hwhandler='1 alua' wp=rw
|-+- policy='service-time 0' prio=50 status=active
| `- 33:0:0:0 sdc 8:32  active ready running
`-+- policy='service-time 0' prio=10 status=enabled
  |- 35:0:0:0 sdg 8:96  active ready running
  `- 37:0:0:0 sdk 8:160 active ready running
360014055d00387c82104d338e81589cb dm-4 SUSE,RBD
size=2.0G features='2 queue_if_no_path retain_attached_hw_handler' hwhandler='1 alua' wp=rw
|-+- policy='service-time 0' prio=50 status=active
| `- 38:0:0:2 sdl 8:176 active ready running
`-+- policy='service-time 0' prio=10 status=enabled
  |- 34:0:0:2 sdd 8:48  active ready running
  `- 36:0:0:2 sdi 8:128 active ready running
3600140522ec3f9612b64b45aa3e72d9c dm-5 SUSE,RBD
size=4.0G features='2 queue_if_no_path retain_attached_hw_handler' hwhandler='1 alua' wp=rw
|-+- policy='service-time 0' prio=50 status=active
| `- 34:0:0:3 sdf 8:80  active ready running
`-+- policy='service-time 0' prio=10 status=enabled
  |- 36:0:0:3 sdj 8:144 active ready running
  `- 38:0:0:3 sdn 8:208 active ready running
(5) Editing multipath configuration files
# vim /etc/multipath.conf
defaults {
    user_friendly_names yes
}

devices {
    device {
        vendor "(LIO-ORG|SUSE)"
        product "RBD"
        path_grouping_policy "multibus" # All effective paths in a priority group
        path_checker "tur"              # Execute the TEST UNIT READY command in the device.
        features "0"
        hardware_handler "1 alua"       # Grouping or processing in switching paths I/O A module used to perform specific hardware actions when an error occurs.
        prio "alua"
        failback "immediate"
        rr_weight "uniform"             # All paths have the same weights
        no_path_retry 12                # After path failure, retry 12 times, 5 seconds each time
        rr_min_io 100                   # Specifies the next path to be routed to the current path group before switching to the next path I/O Number of requests.
    }
}
# systemctl stop multipathd.service
# systemctl start multipathd.service
(6) View multipath status
# multipath -ll
mpathd (3600140522ec3f9612b64b45aa3e72d9c) dm-5 SUSE,RBD
size=4.0G features='2 queue_if_no_path retain_attached_hw_handler' hwhandler='1 alua' wp=rw
`-+- policy='service-time 0' prio=23 status=active
  |- 34:0:0:3 sdf 8:80  active ready running  <=== Multiple links active
  |- 36:0:0:3 sdj 8:144 active ready running
  `- 38:0:0:3 sdn 8:208 active ready running
mpathc (360014055d00387c82104d338e81589cb) dm-4 SUSE,RBD
size=2.0G features='2 queue_if_no_path retain_attached_hw_handler' hwhandler='1 alua' wp=rw
`-+- policy='service-time 0' prio=23 status=active
  |- 34:0:0:2 sdd 8:48  active ready running
  |- 36:0:0:2 sdi 8:128 active ready running
  `- 38:0:0:2 sdl 8:176 active ready running
mpathb (36001405863b0b3975c54c5f8d1ce0e01) dm-3 SUSE,RBD
size=4.0G features='2 queue_if_no_path retain_attached_hw_handler' hwhandler='1 alua' wp=rw
`-+- policy='service-time 0' prio=23 status=active
  |- 33:0:0:1 sde 8:64  active ready running
  |- 35:0:0:1 sdh 8:112 active ready running
  `- 37:0:0:1 sdm 8:192 active ready running
mpatha (3600140529260bf41c294075beede0c21) dm-2 SUSE,RBD
size=2.0G features='2 queue_if_no_path retain_attached_hw_handler' hwhandler='1 alua' wp=rw
`-+- policy='service-time 0' prio=23 status=active
  |- 33:0:0:0 sdc 8:32  active ready running
  |- 35:0:0:0 sdg 8:96  active ready running
  `- 37:0:0:0 sdk 8:160 active ready running
(7) Display the current device mapper information
# dmsetup ls --tree
mpathd (254:5)
 ├─ (8:208)
 ├─ (8:144)
 └─ (8:80)
mpathc (254:4)
 ├─ (8:176)
 ├─ (8:128)
 └─ (8:48)
mpathb (254:3)
 ├─ (8:192)
 ├─ (8:112)
 └─ (8:64)
mpatha (254:2)
 ├─ (8:160)
 ├─ (8:96)
 └─ (8:32)
vg00-lvswap (254:0)
 └─ (8:2)
vg00-lvroot (254:1)
 ├─ (8:16)
 └─ (8:2)
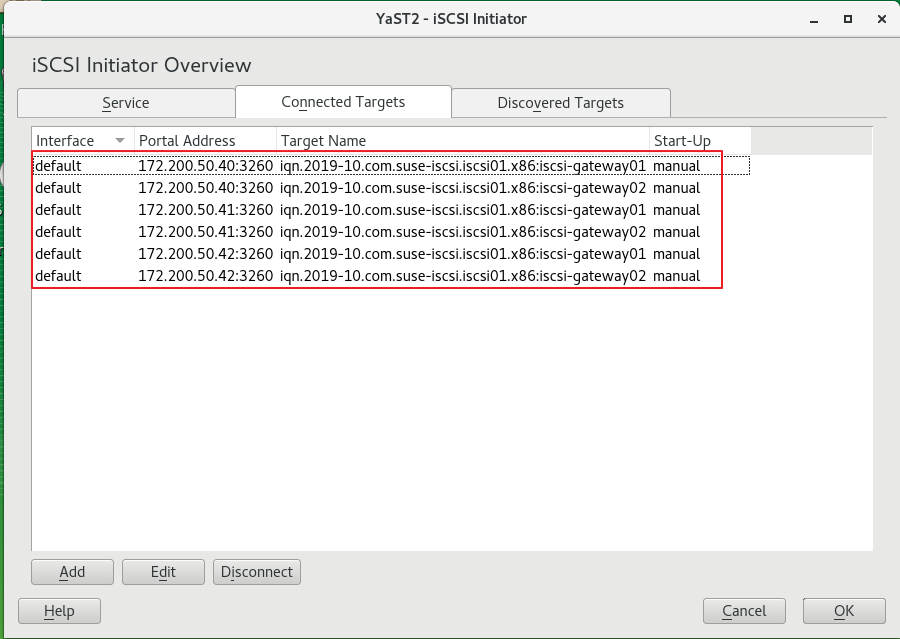
(8) Client yast iscsi-client tool View
Other common operations of iSCSI (client)
(1) List all target s
# iscsiadm -m node
(2) Connect all target s
# iscsiadm -m node -L all
(3) Connect the specified target
# iscsiadm -m node -T iqn.... -p 172.29.88.62 --login
(4) Use the following commands to view configuration information
# iscsiadm -m node -o show -T iqn.2000-01.com.synology:rackstation.exservice-bak
(5) View the current iSCSI target connection status
# iscsiadm -m session
# iscsiadm: No active sessions.
(There is currently no connected iSCSI target)
(6) Disconnect all target s
# iscsiadm -m node -U all
(7) Disconnect the specified target
# iscsiadm -m node -T iqn... -p 172.29.88.62 --logout
(8) Delete all node information
# iscsiadm -m node --op delete
(9) Delete the specified node (/ var/lib/iscsi/nodes directory, disconnect session first)
# iscsiadm -m node -o delete -name iqn.2012-01.cn.nayun:test-01
(10) Delete a target (/ var/lib/iscsi/send_targets directory)
# iscsiadm --mode discovery -o delete -p 172.29.88.62:3260
