How idea packages and publishes springboot
1.1. Environmental preparation
window system, jdk8 environment, springboot project, maven3.5.4 environment
1.2. Package and publish
Open the idea editor and open a written demo project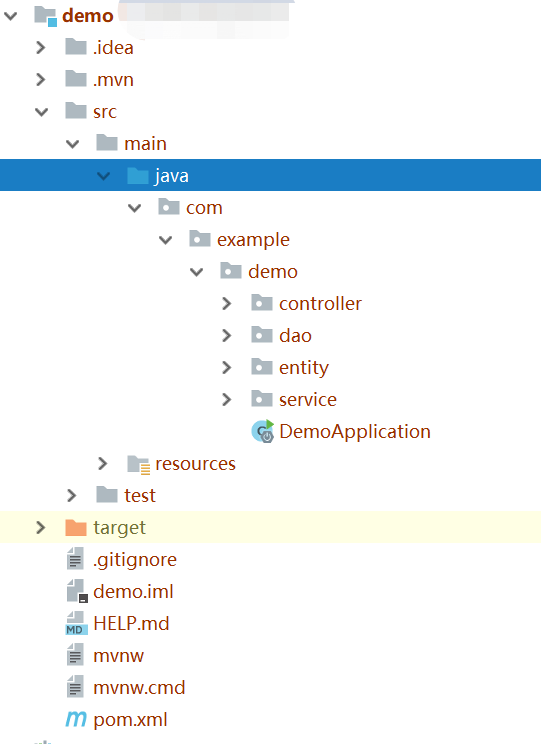
Then open the terminal window under the idea editor, and when you open this window, it's at the root of the directory
Enter the command mvn clean install -Dmaven.test.skip, which is typed as a jar package with maven, then the Enter key.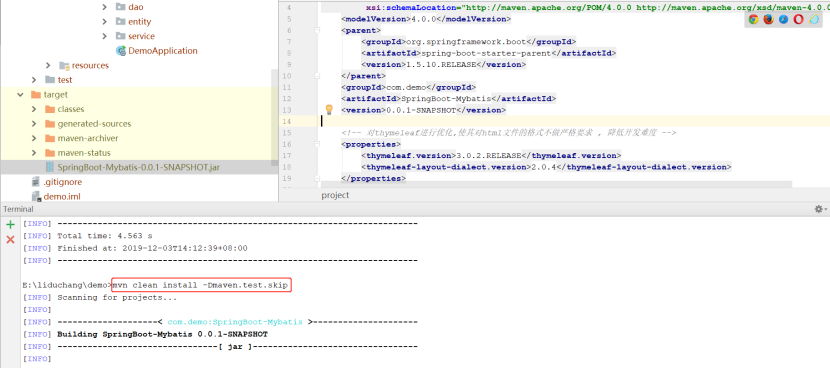
When you see BUILD SUCCESS, the package is successful and a jar package appears in the project's target directory. The default jar package name is artifactId+version
Now go to the target directory and type the java-jar SpringBoot-Mybatis-0.0.1-SNAPSHOT.jar command to run the jar package.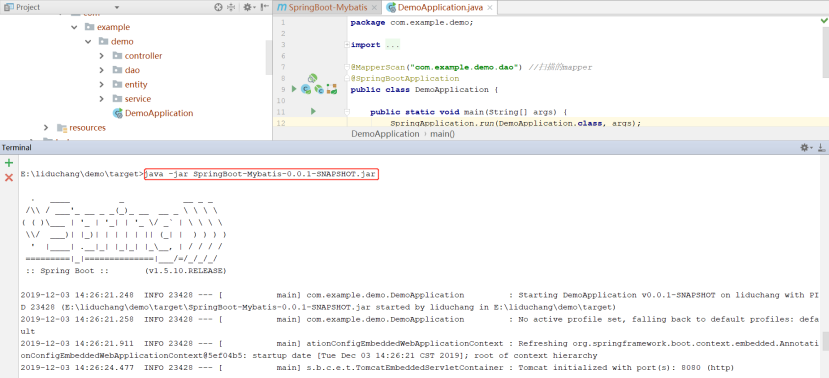
When you see Started DemoApplication in... The launch is successful and you can access it locally
Conclusion: This is the SpringBoot project published in the Windows environment, as is the linux environment, which also installs the jdk and maven environments.This is also the magic of springboot, which does not need to be published under Tomcat because it has web servers embedded, including Tomcat
Introduction to Features
Because of the cumbersome configuration files of traditional ssm, ssh, and other frameworks, springboot appears to simplify the configuration files
The embedded Web server includes Tomcat, so you only need to type a jar package to run the project
SpringBoot is based on full annotation development
SpringBoot Integration Servlet
3.1. Mode 1
Steps:
- Write a class MyFirstServlet that inherits HttpServlet and override the doGet method
- Identify the Servlet above the class with @WebServlet and specify name and urlPatterns
- Add on the main class identified with @SpringBootApplication
@ServletComponentScan
FirstServlet.java
package com.example.servlet.myservlet;

import javax.servlet.http.HttpServlet;
import java.io.IOException;
import javax.servlet.ServletException;
import javax.servlet.annotation.WebServlet;
import javax.servlet.http.HttpServletRequest;
import javax.servlet.http.HttpServletResponse;

/**
 *SpringBoot Integrated Servlet Approach One
 *@WebServlet(name="MyFirstServlet",urlPatterns="/myFirst")Equivalent to the following:
 *
 *<servlet>
 * <servlet-name>MyFirstServlet</servlet-name>
 * <servlet-class>ah.szxy.servlet.FirstServlet</servlet-class>
 *</servlet>
 *<servlet-mapping>
 * <servlet-name>MyFirstServlet</servlet-name>
 * <url-pattern>/first</url-pattern>
 *</servlet-mapping>
 *
 */

@WebServlet(name="MyFirstServlet",urlPatterns="/myFirst")
public class FirstServlet extends HttpServlet {

    @Override
    protected void doGet(HttpServletRequest req, HttpServletResponse resp) throws ServletException, IOException {
        System.out.println("MyFirstServlet init............");
    }
}
ServletApplication.java
package com.example.servlet;

import org.springframework.boot.SpringApplication;
import org.springframework.boot.autoconfigure.SpringBootApplication;
import org.springframework.boot.web.servlet.ServletComponentScan;

@SpringBootApplication
@ServletComponentScan //When springBoot starts, it scans the @WebServlet and instantiates the class
public class ServletApplication {

   public static void main(String[] args) {
      SpringApplication.run(ServletApplication.class, args);
   }

}
Then start the project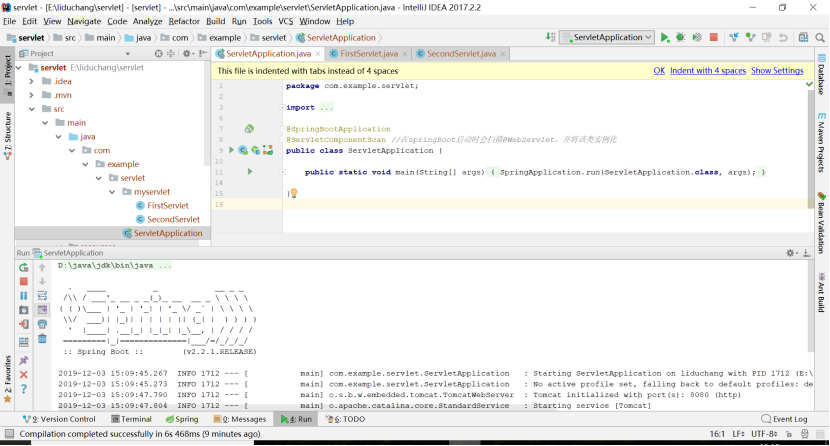
Finally, type localhost:8080/myFirstServlet in the browser, the page appears blank, and the console prints MyFirstServlet init......
package com.example.servlet.myservlet;

import javax.servlet.ServletException;
import javax.servlet.http.HttpServlet;
import javax.servlet.http.HttpServletRequest;
import javax.servlet.http.HttpServletResponse;
import java.io.IOException;

/**
 * Second way to integrate Servlet s
 */
public class SecondServlet extends HttpServlet {

    @Override
    protected void doGet(HttpServletRequest req, HttpServletResponse resp) throws ServletException, IOException {
        System.out.println("MySecondServlet init..........");
    }
}
ServletApplication.java
package com.example.servlet;

import com.example.servlet.myservlet.SecondServlet;
import org.springframework.boot.SpringApplication;
import org.springframework.boot.autoconfigure.SpringBootApplication;
import org.springframework.boot.web.servlet.ServletComponentScan;
import org.springframework.boot.web.servlet.ServletRegistrationBean;
import org.springframework.context.annotation.Bean;

@SpringBootApplication
//@ServletComponentScan //Scan@WebServlet when springBoot starts and instantiate the class
public class ServletApplication {

   public static void main(String[] args) {
      SpringApplication.run(ServletApplication.class, args);
   }

  /**
 * The second way to integrate Servlets is to create a ServletRegistrationBean and add a path
 * @return
 */
@Bean
public ServletRegistrationBean getServletRegistrationBean(){
   ServletRegistrationBean bean = new ServletRegistrationBean(new SecondServlet());
   bean.addUrlMappings("/mySecond");
   return bean;
}
Then start the project, access the localhost:8080/mySecondServlet in the browser, the page is blank, and the console will print MySecondServlet init.......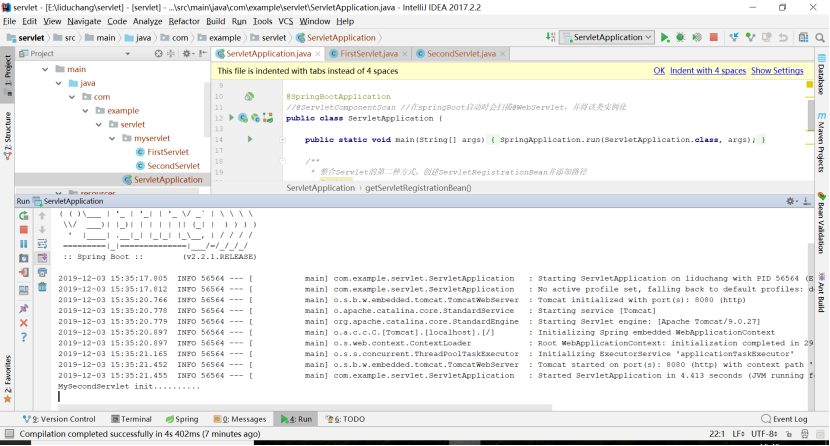
Project, structured as shown in the diagram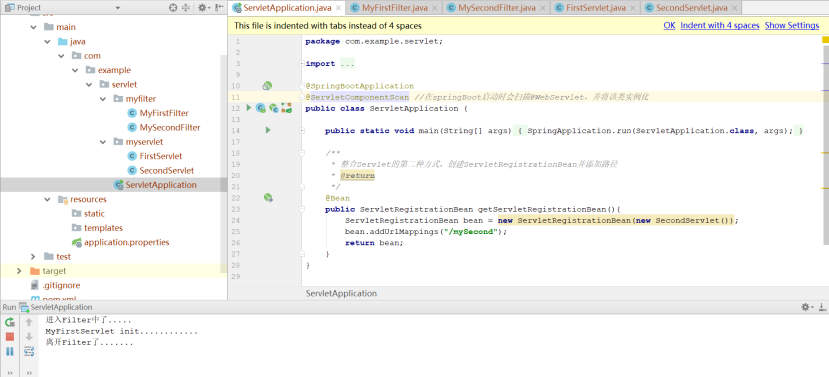
Conclusion:
The above two approaches recommend the first annotation-based integration
Although there are few servlets available now, learning SpringBoot integrated servlets can help you gain a deeper understanding and better understanding of the framework
4.SpringBoot Integration Filter Br/>4.1.Mode 1
Steps:
_Create a MyFirstFilter class to implement the Filter interface and label @WebFilter on it
Add the @ServletComponentScan annotation to the main class of @SpringBootApplication
MyFirstFilter.java
package com.example.servlet.myfilter;

import javax.servlet.*;
import javax.servlet.annotation.WebFilter;
import java.io.IOException;

/**
 * Integrated Filter Method One Based on @WebFilter Annotation
 */
@WebFilter(filterName = "MyFirstFilter",urlPatterns = "/myFirst")
public class MyFirstFilter implements Filter {
    @Override
    public void init(FilterConfig filterConfig) throws ServletException {

    }

    @Override
    public void doFilter(ServletRequest arg0, ServletResponse arg1, FilterChain arg2) throws IOException, ServletException {
        System.out.println("Get into Filter Medium.....");
        arg2.doFilter(arg0,arg1);
        System.out.println("leave Filter Yes.......");
    }

    @Override
    public void destroy() {

    }
}
ServletApplication.java
package com.example.servlet;

import com.example.servlet.myservlet.SecondServlet;
import org.springframework.boot.SpringApplication;
import org.springframework.boot.autoconfigure.SpringBootApplication;
import org.springframework.boot.web.servlet.ServletComponentScan;
import org.springframework.boot.web.servlet.ServletRegistrationBean;
import org.springframework.context.annotation.Bean;

@SpringBootApplication
@ServletComponentScan //When springBoot starts, it scans the @WebServlet and instantiates the class
public class ServletApplication {

   public static void main(String[] args) {
      SpringApplication.run(ServletApplication.class, args);
   }

   /**
    * The second way to integrate Servlets is to create a ServletRegistrationBean and add a path
    * @return
    */
   @Bean
   public ServletRegistrationBean getServletRegistrationBean(){
      ServletRegistrationBean bean = new ServletRegistrationBean(new SecondServlet());
      bean.addUrlMappings("/mySecond");
      return bean;
   }
}
4.2. Mode 2
Steps:
_Create a class MySecondFilter to implement the Filter interface, override the method.
Add a method of @Bean to the main class identified by @SpringBootApplication to inject the MySecondFilter object into the container.
MySecondFilter.java
package com.example.servlet.myfilter;

import javax.servlet.*;
import java.io.IOException;

/**
 * Second way to integrate Filter
 */
public class MySecondFilter implements Filter {
    @Override
    public void init(FilterConfig filterConfig) throws ServletException {

    }

    @Override
    public void doFilter(ServletRequest arg0, ServletResponse arg1, FilterChain arg2) throws IOException, ServletException {
        System.out.println("Get into MySecondFilter Yes......");
        arg2.doFilter(arg0, arg1);
        System.out.println("leave MySecondFilter Yes......");
    }

    @Override
    public void destroy() {

    }
}
ServletApplication.java
package com.example.servlet;

import com.example.servlet.myfilter.MySecondFilter;
import com.example.servlet.myservlet.SecondServlet;
import org.springframework.boot.SpringApplication;
import org.springframework.boot.autoconfigure.SpringBootApplication;
import org.springframework.boot.web.servlet.FilterRegistrationBean;
import org.springframework.boot.web.servlet.ServletComponentScan;
import org.springframework.boot.web.servlet.ServletRegistrationBean;
import org.springframework.context.annotation.Bean;

@SpringBootApplication
//@ServletComponentScan //Scan@WebServlet when springBoot starts and instantiate the class
public class ServletApplication {

   public static void main(String[] args) {
      SpringApplication.run(ServletApplication.class, args);
   }

   /**
    * Second way to integrate Filter
    * Register Filter
    */
   @Bean
   public FilterRegistrationBean getFilterRegistrationBean() {
      FilterRegistrationBean bean = new FilterRegistrationBean(new MySecondFilter());
      // Bean.addUrlPatterns (new String[]{'*.do', *.jsp'}); //intercept multiple times
      bean.addUrlPatterns("/mySecond");
      return bean;
   }
}
Then when you visit localhost:8080/mySecond in your browser, you can see that the console prints as follows
5.SpringBoot Integration Listener
5.1. Mode 1
Steps:
_Create a class MyFirstListener to implement the ServletContextListener interface, override the method
Add the @WebListener annotation to this class
package com.example.servlet.mylistener;

import javax.servlet.ServletContextEvent;
import javax.servlet.ServletContextListener;
import javax.servlet.annotation.WebListener;

/**
 * springBoot The first way to integrate Listener s
 * Create a listener for the Servlet context
 * @WebListener Automatic registration, equivalent to adding the following code to web.xml
 *
 *<listener>
 * <listener-class>ah.szxy.listener.FirstListener</listener-class>
 *</listener>
 */
@WebListener
public class MyFirstListener implements ServletContextListener {

    @Override
    public void contextDestroyed(ServletContextEvent arg0) {
        // TODO Auto-generated method stub
        System.out.println("MyFirstListener Execution was destroyed.");
    }

    @Override
    public void contextInitialized(ServletContextEvent arg0) {
        // TODO Auto-generated method stub
        System.out.println("MyFirstListener Execution is initialized.");
    }
}
Executing the project will print as follows, because the @ServletComponentScan annotation is used, the package will be scanned for servlets at project startup and initialized if any.Since the FirstServlet is annotation-based, it executes an initialization servlet at project startup and is listened on by Listener
5.1. Mode 2
Steps:
Create a class MySecondListener to implement the ServletContextListener interface, override the method
Add a method of @Bean to the main class identified by @SpringBootApplication to inject the MySecondListener object into the container.
package com.example.servlet.mylistener;

import javax.servlet.ServletContextEvent;
import javax.servlet.ServletContextListener;

/**
 * The second way to integrate Listener s
 */
public class MySecondListener implements ServletContextListener {

    @Override
    public void contextDestroyed(ServletContextEvent arg0) {
        // TODO Auto-generated method stub
        System.out.println("MySecondListener Execution was destroyed.");
    }

    @Override
    public void contextInitialized(ServletContextEvent arg0) {
        // TODO Auto-generated method stub
        System.out.println("MySecondListener Execution is initialized.");
    }

}
package com.example.servlet;
import com.example.servlet.myfilter.MySecondFilter;
import com.example.servlet.mylistener.MySecondListener;
import com.example.servlet.myservlet.SecondServlet;
import org.springframework.boot.SpringApplication;
import org.springframework.boot.autoconfigure.SpringBootApplication;
import org.springframework.boot.web.servlet.FilterRegistrationBean;
import org.springframework.boot.web.servlet.ServletComponentScan;
import org.springframework.boot.web.servlet.ServletListenerRegistrationBean;
import org.springframework.boot.web.servlet.ServletRegistrationBean;
import org.springframework.context.annotation.Bean;
@SpringBootApplication
@ServletComponentScan //When springBoot starts, it scans the @WebServlet and instantiates the class
public class ServletApplication {
public static void main(String[] args) {
SpringApplication.run(ServletApplication.class, args);
}
/**
* Register listener
*/
@Bean
public ServletListenerRegistrationBean<MySecondListener> getServletListenerRegistrationBean() {
ServletListenerRegistrationBean<MySecondListener> bean = new ServletListenerRegistrationBean<MySecondListener>(
new MySecondListener());
return bean;
}
}Execute the project, and in the console you can see that the output is as follows, both Servlet listeners executed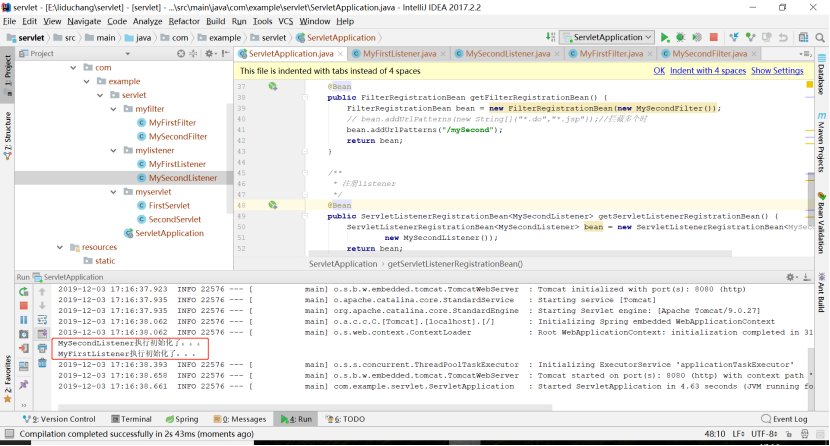
The overall project catalog package structure is as follows: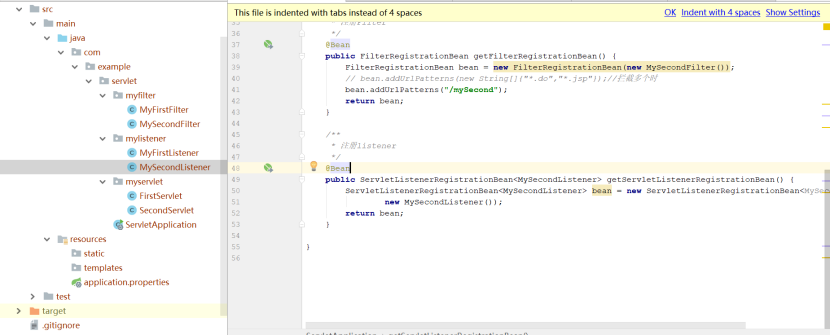
6.SpringBoot Integrates Static Resources
6.1. Under the resource/static path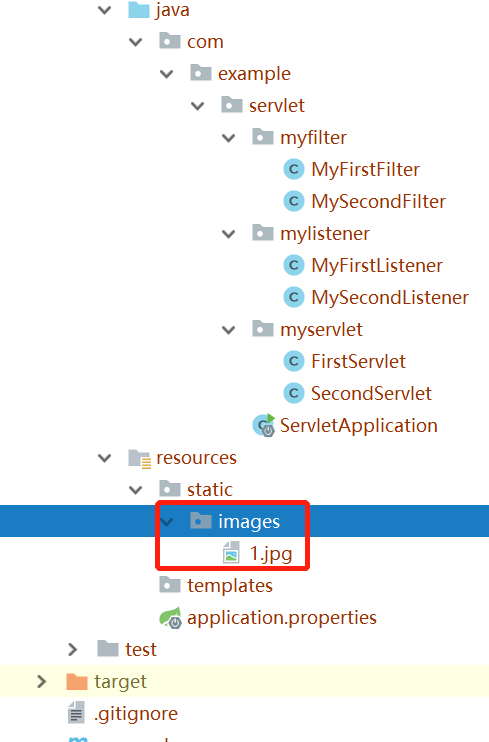
Then start the project and access localhost:8080/images/1.jpg in the browser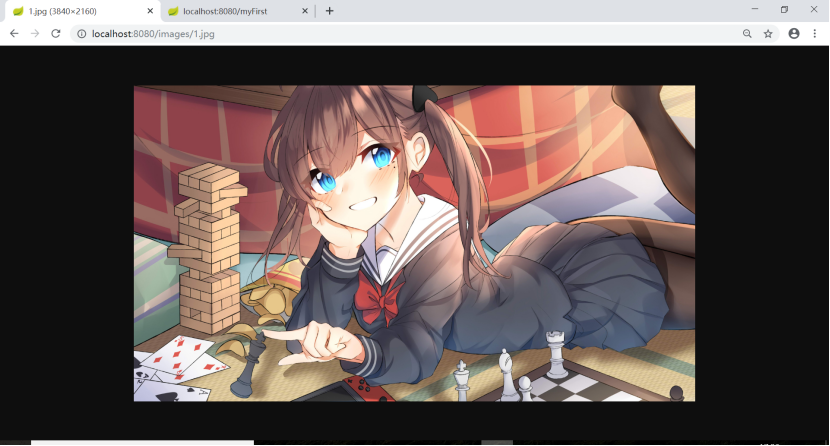
6.2. Under the webapp directory path
Add web to SpringBoot project in 6.2.1.idea
Since SpringBoot was initialized without a webapp directory, it needs to be added manually in the idea, but not created directly, but configured. Below is the SpringBoot project configuration webapp tutorial
6.2.2. Select the item and then ctrl+alt+shift+s, and the following page will pop up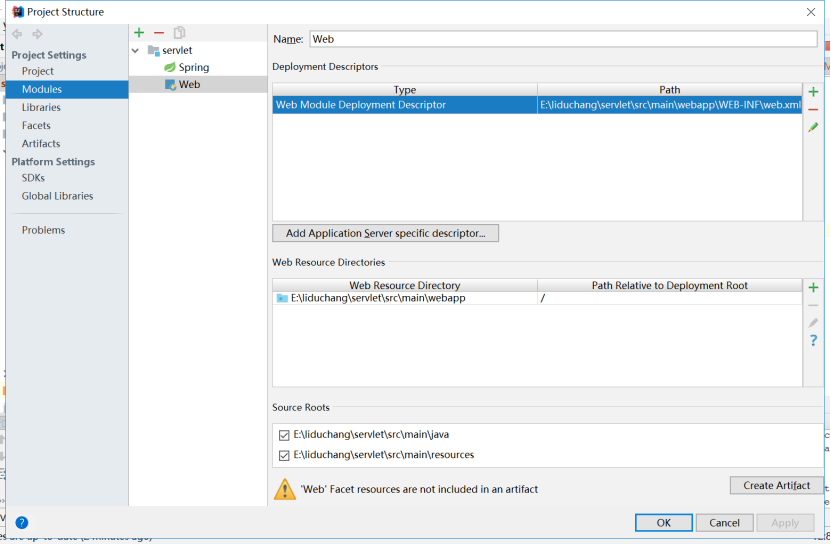
6.2.3. Select Modules and click on the + sign as follows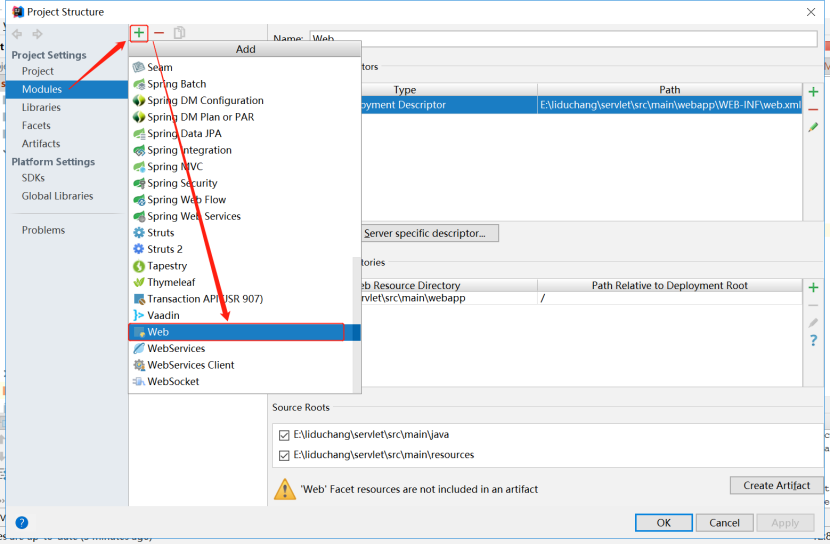
The paths to the configured directories are:
E:\liduchang\servlet\src\main\webapp\WEB-INF\web.xml
E:\liduchang\servlet\src\main\webapp
6.2.4 The following interface appears, click the pencil to edit the path to web.xml, then double-click the second place to edit the path of the webapp similarly
The last configured directory structure for 6.2.5 is shown below
6.2.6 Then webapp creates a new image folder, copies a picture to the images folder named 2.jpg, and creates a new index.html under webapp as follows
<!DOCTYPE html>
<html lang="en">
<head>
    <meta charset="UTF-8">
    <title>Title</title>
</head>
<body>
<h1>Static Resource Access Method One</h1><hr>
<img alt="" src="images/2.jpg">
</body>
</html>
6.2.7 Start the project, then browser access to localhost:8080, which appears as shown in the diagram and is configured successfully
7.SpringBoot file upload
7.1. File upload
Project Structure Diagram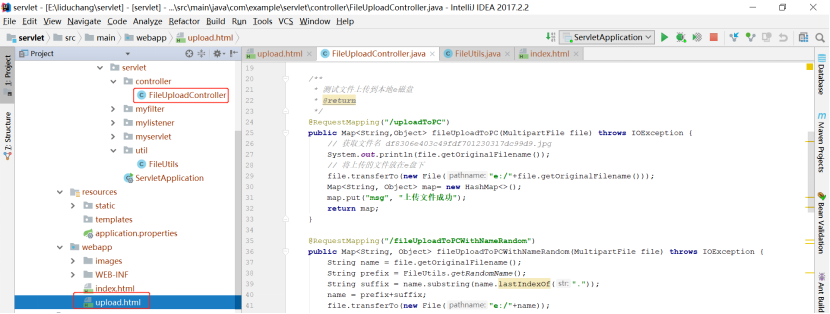
- Upload to local disk with original file name
- Upload to local disk with random name
- Upload to the images folder under the project webapp folder
upload.html (file upload home page)
<!DOCTYPE html>
<html lang="en">
<head>
    <meta charset="UTF-8">
    <title>Title</title>
</head>
<body>
<!--
    The form is submitted in   :  post
    enctype The value of : multipart/form-data
    file Type of input box name Attributes to and MultipartFile Same parameter as ,This allows file upload
-->
<h1>Files uploaded locally e disc</h1><hr>
<form action="/uploadToPC" method="post" enctype="multipart/form-data">
    <input type="file" name="file" ><br>
    <input type="submit" value="Click Upload">
</form>

<h1>File upload to e Disk Name Random</h1><hr>
<form action="/fileUploadToPCWithNameRandom" method="post" enctype="multipart/form-data">
    <input type="file" name="file" ><br>
    <input type="submit" value="Click Upload">
</form>

<h1>Files uploaded to this project</h1><hr>
<form action="/uploadToProject" method="post" enctype="multipart/form-data">
    <input type="file" name="file" ><br>
    <input type="submit" value="Click Upload">
</form>

</body>

</html>
FileUpload Controller.java (File Upload Controller)
package com.example.servlet.controller;

import com.example.servlet.util.FileUtils;
import org.springframework.web.bind.annotation.RequestMapping;
import org.springframework.web.bind.annotation.RestController;
import org.springframework.web.multipart.MultipartFile;

import javax.servlet.http.HttpSession;
import java.io.File;
import java.io.IOException;
import java.util.HashMap;
import java.util.Map;

/**
 * File Upload Controller
 */
@RestController
public class FileUploadController {

    /**
     * Test file uploaded to local e-disk
     * @return
     */
    @RequestMapping("/uploadToPC")
    public Map<String,Object> fileUploadToPC(MultipartFile file) throws IOException {
        // Get the file name df8306e403c49fdf701230317dc99d9.jpg
        System.out.println(file.getOriginalFilename());
        // Place the uploaded files under drive e
        file.transferTo(new File("e:/"+file.getOriginalFilename()));
        Map<String, Object> map= new HashMap<>();
        map.put("msg", "Successfully uploaded file");
        return map;
    }

    @RequestMapping("/fileUploadToPCWithNameRandom")
    public Map<String, Object> fileUploadToPCWithNameRandom(MultipartFile file) throws IOException {
        String name = file.getOriginalFilename();
        String prefix = FileUtils.getRandomName();
        String suffix = name.substring(name.lastIndexOf("."));
        name = prefix+suffix;
        file.transferTo(new File("e:/"+name));
        Map<String, Object> map = new HashMap<String, Object>();
        map.put("msg", "ok");
        return map;
    }

    /**
     * Upload files to the images folder under the project's webapp
     * However, normal files are not uploaded to the project, but to this file
     * On other disks of the server, or upload to a dedicated server
     * Up, so this is a good way to do it
     * @param file
     * @return
     */
    @RequestMapping("/uploadToProject")
    public String uploadToProject(MultipartFile file, HttpSession session){
        // Get absolute path through session, add/WEB-INF/images inside the method,
        // Indicates that under the project's images directory, the folder needs to be created and static resources released
        String path= session.getServletContext().getRealPath("/images");
        System.err.println(path);
        String fileName= file.getOriginalFilename();
        File f= new File(path, fileName);
        try {
            file.transferTo(f);
        } catch (IOException e) {
            e.printStackTrace();
        }
        return "ok";
    }
}
FileUtils.java (File Random Naming Tool Class)
package com.example.servlet.util;

import java.util.Random;
import java.util.UUID;

/**
 * Filename Random Generation Tool Class
 * @version 1.0
 */
public class FileUtils {

    /**
     * Picture Name Generation
     */
    public static String getRandomName() {
        //Number of long reshaping milliseconds for current time
        long millis = System.currentTimeMillis();
        Random random = new Random();
        //Get a 0-1000 integer that does not contain 1000,
        int end3 = random.nextInt(1000);
        //If less than three leading 0
        String str = millis + String.format("%03d", end3);
        return str;
    }

    /**
     * Commodity id generation
     */
    public static long getRandomId() {
        //Include milliseconds for a long shaping value of the current time
        long millis = System.currentTimeMillis();
        Random random = new Random();
        //Randomly get shaping between 0-99 and 99
        int end2 = random.nextInt(99);
        //If less than two leading 0
        String str = millis + String.format("%02d", end2);
        long id = new Long(str);
        return id;
    }

}
Configuration information uploaded in Profile Profile
application.properties
#Set single file upload size
spring.http.multipart.maxFileSize=200MB
#Set the total capacity of a request to upload a file
spring.http.multipart.maxRequestSize=200MB
More tutorials please pay attention to: non-class classes