1, Introduce React and tell us what features they have
1.1 INTRODUCTION
React is a JavaScript library for building user interfaces and a UI level solution. React follows the component design pattern, declarative programming paradigm and functional programming concepts to make front-end application development more efficient. At the same time, react uses virtual DOM to effectively operate DOM, following the one-way data flow from high-order components to low-order components. At the same time, react can help us split the interface into independent blocks. Each block is a component. These components can be combined and nested to form a whole page.
Syntactically, the React class component uses a method named render() or a function component return to receive the input data and return the content to be displayed, such as:
class HelloMessage extends React.Component {
  render() {
    return (
      <div>
        Hello {this.props.name}
      </div>
    );
  }
}

ReactDOM.render(
  <HelloMessage name="Taylor" />,
  document.getElementById('hello-example')
);
The above XML like form is JSX, which will eventually be compiled by babel into legal JS statement calls. The incoming data can be accessed in the component through this.props in render().
1.2 characteristics
React has many features. Here are a few:
- JSX syntax
- One way data binding
- Virtual DOM
- Declarative programming
- Component
1.2.1 declarative programming
Declarative programming is a programming paradigm that focuses on what you want to do, not how to do it. It expresses logic without explicitly defining steps. This means that we need to declare the components to be displayed according to logical calculation, such as implementing a marked map: creating a map by command, creating a mark, and adding a mark on the map are as follows.
// Create map
const map = new Map.map(document.getElementById('map'), {
    zoom: 4,
    center: {lat,lng}
});

// Create tag
const marker = new Map.marker({
    position: {lat, lng},
    title: 'Hello Marker'
});

// Add markers to the map
marker.setMap(map);
The above functions are realized by React as follows:
<Map zoom={4} center={lat, lng}>
    <Marker position={lat, lng} title={'Hello Marker'}/>
</Map>
Declarative programming makes React components easy to use, and the final code is simpler and easier to maintain.
1.2.2 Component
In React, everything is a component. The entire logic of an application is usually broken down into small individual parts. We call each individual part a component. The component can be a function or a class. It accepts data input, processes it and returns the React element presented in the UI. The functional components are as follows:
const Header = () => {
    return(
        <Jumbotron style={{backgroundColor:'orange'}}>
            <h1>TODO App</h1>
        </Jumbotron>
    )
}
For state changes, stateful components are defined as follows:
class Dashboard extends React.Component {
    constructor(props){
        super(props);

        this.state = {

        }
    }
    render() {
        return (
            <div className="dashboard">
                <ToDoForm />
                <ToDolist />
            </div>
        );
    }
}
It can be seen that the components of React have the following features:
- Composable: one component is easy to use with other components, or nested inside another component.
- Reusable: each component has independent functions and can be used in multiple UI scenarios.
- Maintainability: each small component only contains its own logic, which is easier to understand and maintain.
2, Difference between Real DOM and Virtual DOM
2.1 Real DOM
Real DOM is relative to Virtual DOM. Real DOM refers to the document object model, which is an abstraction of structured text. Each node rendered on the page is a real DOM structure. We can use the DevTool of the browser to view it, as follows.
Virtual Dom is essentially a description of DOM in the form of JavaScript objects. The purpose of creating a Virtual Dom is to better render the virtual nodes into the page view. The nodes of the Virtual Dom object take care of the properties of the real DOM one by one. In React, JSX is one of its major features, which allows you to directly declare the DOM structure of the interface by using XML in JS.
const vDom = <h1>Hello World</h1> // When creating h1 tag, do not put quotation marks on the right
const root = document.getElementById('root') // Locate the < div id = "root" > < / div > node
ReactDOM.render(vDom, root) // Render the created h1 label to the root node
In the above code, ReactDOM.render() is used to insert the created virtual DOM node into a real node and render it to the page. In fact, JSX is a syntax sugar, which will be compiled and converted into JS code by babel during use. The above VDOM is converted into the following.
const vDom = React.createElement(
  'h1',
  { className: 'hClass', id: 'hId' },
  'hello world'
)
As you can see, JSX is to simplify calling the React.createElement() method directly:
- The first parameter is the tag name, such as h1, span, table.
- The second parameter is an object, which contains some attributes of the tag, such as id, class, etc.
- The third parameter is the text in the node.
Through console.log(VDOM), you can get the relevant information of virtual DOM.
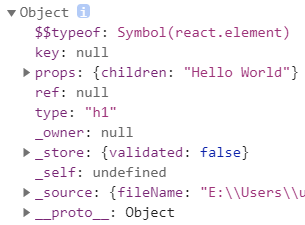
Therefore, as can be seen from the above example, JSX is transformed into React.createElement through babel, and the return value is an object, that is, virtual DOM
2.2 differences
The differences between Real DOM and Virtual DOM are as follows:
- Virtual DOM will not perform typesetting and redrawing operations, while real DOM will frequently rearrange and redraw.
- The total loss of virtual DOM is "virtual DOM addition, deletion and modification + real DOM difference addition, deletion and modification + typesetting and redrawing", and the total loss of real DOM is "real DOM complete addition, deletion and modification + typesetting and redrawing".
2.3 advantages and disadvantages
Advantages of real DOM:
- Easy to use
Disadvantages:
- Low efficiency, slow parsing speed and high memory consumption.
- Poor performance: frequent operation of real DOM can easily lead to redrawing and reflow.
The advantages of using virtual DOM are as follows:
- Simple and convenient: if you manually operate the real DOM to complete the page, it is cumbersome and error prone, and it is also difficult to maintain in large-scale applications.
- Good performance: using Virtual DOM can effectively avoid frequent updates of real DOM, reduce redrawing and reflow caused by multiple times, and improve performance.
-Cross platform: with the help of virtual DOM, React brings cross platform capability, and a set of code runs at multiple ends.
The disadvantages are as follows:
- In some applications with extremely high performance requirements, virtual DOM cannot be optimized.
- When rendering a large number of DOM for the first time, due to the calculation of an additional layer of virtual DOM, the speed is slightly slower than normal.
3, What's the difference between super() and super(props)
3.1 ES6
In ES6, class inheritance is realized through the extends keyword, as follows:
class sup {
    constructor(name) {
        this.name = name
    }

    printName() {
        console.log(this.name)
    }
}


class sub extends sup{
    constructor(name,age) {
        super(name) // super represents the constructor of the parent class
        this.age = age
    }

    printAge() {
        console.log(this.age)
    }
}

let jack = new sub('jack',20)
jack.printName()          //Output: jack
jack.printAge()           //Output: 20
In the above example, you can see that the super keyword is used to call the parent class. Super replaces the constructor function of the parent class. Using super(name) is equivalent to calling sup.prototype.constructor.call(this,name). If the super keyword is not used in the subclass, an error will be generated, as follows:
The reason for the error is that the subclass does not have its own this object. It can only inherit the this object of the parent class and process it. super() inherits the this object from the parent class to the subclass. Without super() subclass, you can't get the this object. If you call this first and then initialize super(), it is also prohibited.
class sub extends sup{
    constructor(name,age) {
        this.age = age
        super(name) // super represents the constructor of the parent class
    }
}
Therefore, in the subclass constructor, you must substitute super to reference this.
Class 3.2 components
In React, the class component is implemented based on the es6 specification and inherits React.Component. Therefore, if the constructor is used, it must write super() to initialize this. At this time, when calling super(), we generally need to pass props as a parameter. If it is not passed in, React will also define it in the component instance.
// React internal
const instance = new YourComponent(props);
instance.props = props;
Therefore, this.props can be used in render whether there is a constructor or not. It is automatically attached to React and can not be written.
class HelloMessage extends React.Component{
    render (){
        return (
            <div>nice to meet you! {this.props.name}</div>
        );
    }
}
However, it is not recommended to use super() instead of super(props). Because this.props will be assigned after the class component constructor generates an instance in React, calling this.props will return undefined without passing props super, as shown below.
class Button extends React.Component {
  constructor(props) {
    super();                             // No props passed in
    console.log(props);          // {}
    console.log(this.props);  // undefined
   // ...
}
The incoming props can be accessed normally, which ensures that this.props has been assigned before the constructor is executed, which is more logical.
class Button extends React.Component {
  constructor(props) {
    super(props); // No props passed in
    console.log(props);      //  {}
    console.log(this.props); //  {}
  // ...
}
From the above example, we can conclude that:
- In React, class components are based on ES6, so super must be used in constructor.
- When calling the super procedure, whether props is passed in or not, React will assign porps to the porps attribute of the component instance.
- If only super() is called, this.props is still undefined between super() and the end of the constructor.
4, On the execution mechanism of setState
4.1 what is the setState mechanism
In React, the display form of a component can be determined by the data state and external parameters, and the data state is state. When the state of the value inside needs to be modified, it needs to be changed by calling setState, so as to update the internal data of the component.
For example, the following example:
import React, { Component } from 'react'

export default class App extends Component {
    constructor(props) {
        super(props);

        this.state = {
            message: "Hello World"
        }
    }

    render() {
        return (
            <div>
                <h2>{this.state.message}</h2>
                <button onClick={e => this.changeText()}>Interviewer series</button>
            </div>
        )
    }

    changeText() {
        this.setState({
            message: "JS One question per day"
        })
    }
}
Click the button to trigger the onclick event, execute this.setState method to update the state, and then re execute the render function, resulting in the view update of the page. If you want to directly modify the state of state, you only need to call setState.
changeText() {
    this.state.message = "Hello, world";
}
We will find that the page will not react, but the state of the state has changed. This is because React is not like vue2 calling Object.defineProperty data response or Vue3 calling Proxy monitoring data changes, it must be informed by setState method react component state has changed.
The definition of state method is inherited from React.Component. The source code of the definition is as follows:
Component.prototype.setState = function(partialState, callback) {
  invariant(
    typeof partialState === 'object' ||
      typeof partialState === 'function' ||
      partialState == null,
    'setState(...): takes an object of state variables to update or a ' +
      'function which returns an object of state variables.',
  );
  this.updater.enqueueSetState(this, partialState, callback, 'setState');
};
4.2 update method
When using setState to update data, the update types of setState are divided into asynchronous update and synchronous update.
4.2.1 asynchronous update
For example, there is the following code.
changeText() {
  this.setState({
    message: "How do you do"
  })
  console.log(this.state.message);         // Hello World
}
The final print result of the above code is Hello world. You can't get the latest state result immediately after executing setState. If you want to get the updated value immediately, it will be executed after updating in the callback of the second parameter.
changeText() {
  this.setState({
    message: "How do you do"
  }, () => {
    console.log(this.state.message);   // How do you do
  });
}
4.2.2 synchronous update
The following is an example of using setTimeout to synchronize updates.
changeText() {
  setTimeout(() => {
    this.setState({
      message: "How do you do
    });
    console.log(this.state.message); // How do you do
  }, 0);
}
4.2.3 batch update
Sometimes, we need to deal with batch updates. Give an example first:
handleClick = () => {
    this.setState({
        count: this.state.count + 1,
    })
    console.log(this.state.count) // 1

    this.setState({
        count: this.state.count + 1,
    })
    console.log(this.state.count) // 1

    this.setState({
        count: this.state.count + 1,
    })
    console.log(this.state.count) // 1
}
When we click the button to trigger the event, 1 is printed, and the value of count displayed on the page is 2. Multiple setstates are performed on the same value. The batch update strategy of setState will overwrite it and take the last execution result. Therefore, the above code is equivalent to the following code:
Object.assign( previousState, {index: state.count+ 1}, {index: state.count+ 1}, ...)Since the later data will overwrite the previous changes, it is only added once in the end. If the next state depends on the previous state, it is recommended to give a parameter to setState and pass in a function, as follows:
onClick = () => { this.setState((prevState, props) => { return {count: prevState.count + 1}; }); this.setState((prevState, props) => { return {count: prevState.count + 1}; });}In setTimeout or native dom events, because they are synchronous operations, they will not be overwritten.
5, React event binding
5.1 event binding
When we need to handle the click event, we need to add some binding operations to the event, that is, the so-called event binding. The following is one of the most common event bindings:
class ShowAlert extends React.Component {
  showAlert() {
    console.log("Hi");
  }

  render() {
    return <button onClick={this.showAlert}>show</button>;
  }
}
You can see that the method of event binding needs to be wrapped with {}. The above code seems to be OK, but when you change the output code of the processing function to console.log(this), click the button, and you will find that the console outputs undefined.
5.2 common binding methods
Common event binding methods of React are as follows:
- Use bind in render method
- Use arrow function in render method
- bind in constructor
- The definition phase uses arrow function binding
5.2.1 using bind in render method
If a class component is used and an onClick attribute is given to a component / element, it will now bind its this to the current component. The way to solve this problem is to bind this to the current component with. bind(this) after the event function.
class App extends React.Component {
  handleClick() {
    console.log('this > ', this);
  }
  render() {
    return (
      <div onClick={this.handleClick.bind(this)}>test</div>
    )
  }
}
In this way, the bind operation will be repeated every time the component render s, which will affect the performance.
5.2.2 use of arrow function in render method
Bind the point of this to the current component through the context of ES6. Similarly, each render will generate a new method, which will affect the performance.
class App extends React.Component {
  handleClick() {
    console.log('this > ', this);
  }
  render() {
    return (
      <div onClick={e => this.handleClick(e)}>test</div>
    )
  }
}
5.2.3 bind in constructor
bind the current component in the constructor in advance to avoid repeated binding in the render operation.
class App extends React.Component {
  constructor(props) {
    super(props);
    this.handleClick = this.handleClick.bind(this);
  }
  handleClick() {
    console.log('this > ', this);
  }
  render() {
    return (
      <div onClick={this.handleClick}>test</div>
    )
  }
}
5.2.4 use arrow function binding in the definition phase
Like the above method 3, it can avoid repeated binding in render operation, and the implementation is also very simple.
class App extends React.Component {
  constructor(props) {
    super(props);
  }
  handleClick = () => {
    console.log('this > ', this);
  }
  render() {
    return (
      <div onClick={this.handleClick}>test</div>
    )
  }
}
5.3 differences
The main differences between the above four methods are as follows:
- Writing: mode 1 and mode 2 are simple, and mode 3 is too complicated
- In terms of performance: mode 1 and mode 2 will generate new method instances every time the component render, which is lack of performance problems. If this function is passed as an attribute value to a child component, it will cause additional rendering. Mode 3 and mode 4 will only generate one method instance.
Based on the above, mode 4 is the best event binding mode.
6, Component communication in React
6.1 component communication
Component is the core basic idea of Vue and React front-end framework, and it is also one of the most obvious features that distinguish other js frameworks. Usually, a completed complex business page is composed of many basic components. When messages need to be passed between components, communication will be involved. Communication means that the sender transmits information to the receiver in a certain format through a certain media to achieve a certain purpose. In a broad sense, any traffic of information is communication.
6.2 several modes of communication
There are many ways of component delivery, which can be divided into the following types according to the sender and receiver:
- Pass from parent component to child component
- Child component passes to parent component
- Communication between sibling components
- Pass from parent component to descendant component
- Non relational component delivery
6.2.1 message transmission from parent component to child component
Because the data flow of React is one-way, it is the most common way for parent components to pass to child components. When the parent component calls the child component, it only needs to pass the parameters in the child component label, and the child component can receive the parameters passed by the parent component through the props attribute.
function EmailInput(props) {
  return (
    <label>
      Email: <input value={props.email} />
    </label>
  );
}

const element = <EmailInput email="123124132@163.com" />;
6.2.2 message passing from child component to parent component
The basic idea of communication between child components and parent components is that the parent component passes a function to the child component, and then gets the value passed by the child component through the callback of this function. The corresponding codes of parent components are as follows:
class Parents extends Component {
  constructor() {
    super();
    this.state = {
      price: 0
    };
  }

  getItemPrice(e) {
    this.setState({
      price: e
    });
  }

  render() {
    return (
      <div>
        <div>price: {this.state.price}</div>
        {/* Pass a function into the subcomponent  */}
        <Child getPrice={this.getItemPrice.bind(this)} />
      </div>
    );
  }
}
The corresponding codes of sub components are as follows:
class Child extends Component {
  clickGoods(e) {
    // Pass in a value in this function
    this.props.getPrice(e);
  }

  render() {
    return (
      <div>
        <button onClick={this.clickGoods.bind(this, 100)}>goods1</button>
        <button onClick={this.clickGoods.bind(this, 1000)}>goods2</button>
      </div>
    );
  }
}
6.2.3 communication between sibling components
In case of transmission between sibling components, the parent component acts as an intermediate layer to realize data interworking through the use of the parent component.
class Parent extends React.Component {
  constructor(props) {
    super(props)
    this.state = {count: 0}
  }
  setCount = () => {
    this.setState({count: this.state.count + 1})
  }
  render() {
    return (
      <div>
        <SiblingA
          count={this.state.count}
        />
        <SiblingB
          onClick={this.setCount}
        />
      </div>
    );
  }
}
6.2.4 messages delivered by the next generation group
It is the most common thing for a parent component to transfer data to a descendant component, just like global data. Using context provides a way of communication between components, which can share data, and other data can read the corresponding data. Create a context by using React.createContext.
const PriceContext = React.createContext('price')After the context is created successfully, the Provider component is used to create the data source and the Consumer component is used to receive the data. The use examples are as follows: the Provider component is used to pass data to the descendant components through the value attribute.
<PriceContext.Provider value={100}>
</PriceContext.Provider>
If you want to get the data passed by the Provider, you can receive it through the Consumer component or by using the contextType attribute. The corresponding are as follows:
class MyClass extends React.Component {
  static contextType = PriceContext;
  render() {
    let price = this.context;
    /* Render based on this value */
  }
}
The code of the Consumer component is as follows:
<PriceContext.Consumer>
    { /*Here is a function*/ }
    {
        price => <div>price: {price}</div>
    }
</PriceContext.Consumer>
6.2.5 message delivery by non relational components
If the relationship types between components are complex, it is recommended to conduct a global resource management for data to realize communication, such as redux, mobx, etc.
7, React Hooks
7.1 Hook
Hook is a new feature of React 16.8. It allows you to use state and other React features without writing class. As for why hook is introduced, the official motivation is to solve the problems often encountered in the process of using and maintaining React for a long time, such as:
- It is difficult to reuse and share state related logic in components
- Components with complex logic are difficult to develop and maintain. When our components need to deal with multiple unrelated local state s, each life cycle function may contain various unrelated logic
- this in class components increases the learning cost, and there are some problems in the optimization of class components based on existing tools
- Due to business changes, function components have to be changed to class components, etc
Function components, also known as stateless components, are only responsible for rendering at the beginning. Therefore, using Hook technology, the current functional components can also be stateful components. They can also maintain their own state and do some logical processing internally.
7.2 Hooks function
Hooks enables our functional components to have the characteristics of class components, such as the state and life cycle in the component. In order to realize state management, Hook provides many useful hooks functions, including:
- useState
- useEffect
- other
useState
First, an example is given as follows:
import React, { useState } from 'react';

function Example() {
  // Declare a state variable called "count"
  const [count, setCount] = useState(0);

  return (
    <div>
      <p>You clicked {count} times</p >
      <button onClick={() => setCount(count + 1)}>
        Click me
      </button>
    </div>
  );
}
In the function component, use useState to maintain the state inside the function. The parameter is the default value of state. The return value is an array. The first value is the current state and the second value is the function that updates the state. If the function component is implemented by class component, the code is as follows:
class Example extends React.Component {
  constructor(props) {
    super(props);
    this.state = {
      count: 0
    };
  }

  render() {
    return (
      <div>
        <p>You clicked {this.state.count} times</p >
        <button onClick={() => this.setState({ count: this.state.count + 1 })}>
          Click me
        </button>
      </div>
    );
  }
}
From the analysis of the above two codes, we can see the difference between them:
- state declaration method: directly obtained through useState in function components, and set in constructor for class components
- State reading method: variables are directly used in function components, and class components are obtained through this.state.count
- state update method: update through setCount in function components and this.setState() in class components
In general, useState is more concise to use and reduces the ambiguity of this point.
useEffect
useEffect allows us to perform some operations with side effects in function components. For example, the following is an example of a timer:
class Example extends React.Component {
  constructor(props) {
    super(props);
    this.state = {
      count: 0
    };
  }

  componentDidMount() {
    document.title = `You clicked ${this.state.count} times`;
  }
  componentDidUpdate() {
    document.title = `You clicked ${this.state.count} times`;
  }

  render() {
    return (
      <div>
        <p>You clicked {this.state.count} times</p >
        <button onClick={() => this.setState({ count: this.state.count + 1 })}>
          Click me
        </button>
      </div>
    );
  }
}
As you can see from the above, the component performs the same operation during the load and update phases. If useEffect is used, the same logic can be extracted, which is a method that such components do not have.
import React, { useState, useEffect } from 'react';
function Example() {
  const [count, setCount] = useState(0);

  useEffect(() => {    document.title = `You clicked ${count} times`;  });
  return (
    <div>
      <p>You clicked {count} times</p >
      <button onClick={() => setCount(count + 1)}>
        Click me
      </button>
    </div>
  );
}
The first parameter of useEffect accepts a callback function. By default, useEffect will be executed after the first rendering and update, which is equivalent to callback in the two life cycle functions of componentDidMount and componentDidUpdate.
If some specific values do not change between two re renderings, you can skip the call to effect. At this time, you only need to pass in the second parameter, as follows:
useEffect(() => {
  document.title = `You clicked ${count} times`;
}, [count]);      // Update only when count changes
After passing in the second parameter above, if the count value is 5 and the count is still equal to 5 when our component is re rendered, React will compare [5] of the previous rendering with [5] of the next rendering. If it is equal, skip the effects execution.
A cleanup function can be returned in the callback function. This is an optional cleanup mechanism for effect, which is equivalent to the componentwillUnmount life cycle function in class components. It can do some operations to clear side effects, as follows:
useEffect(() => {
    function handleStatusChange(status) {
        setIsOnline(status.isOnline);
    }

    ChatAPI.subscribeToFriendStatus(props.friend.id, handleStatusChange);
    return () => {
        ChatAPI.unsubscribeFromFriendStatus(props.friend.id, handleStatusChange);
    };
});
It can be found that useEffect is equivalent to the combination of three life cycle functions: componentDidMount, componentDidUpdate and componentWillUnmount.
Other hooks
In addition to the above two common ones, React also has many additional hooks.
- useReducer
- useCallback
- useMemo
- useRef
7.3 summary
Through the above preliminary understanding, we can see that hooks can more easily solve the problem of state related reuse:
- Each call to useHook generates a separate state
- By customizing the hook, we can better encapsulate our functions
Write hooks as functional programming. Each function is wrapped in functions. The overall style is more refreshing and elegant.
8, Talk about your understanding of Redux
8.1 concept
React is used to build the user interface and help us solve the process of rendering DOM. In the whole application, there are many components. The state of each component is managed by itself, including defining its own state, communicating between components through props, and using Context to realize data sharing.
Theoretically, if each component stores its own related state, it will not affect the operation of the application, but we will spend a lot of energy to query the state change process in the development and subsequent maintenance stages. In this case, if all States are managed centrally, when the state needs to be updated, only the management needs to be processed centrally, without paying attention to how the state is distributed to each component.
Redux realizes the centralized management of status, and three basic principles need to be followed when using it:
- Single data source
- state is read-only
- Use pure functions to perform modifications
It should be noted that Redux is not only applied in React, but also used with other interface libraries, such as Vue.
8.2 working principle
redux state management is mainly divided into three parts: action creator, store and Reducer. Where store is the public storage space for data. When a component changes the data content in the store, other components can perceive the change of the store and retrieve the data, thus indirectly realizing the function of data transmission.
The schematic diagram of work flow is shown in the figure below.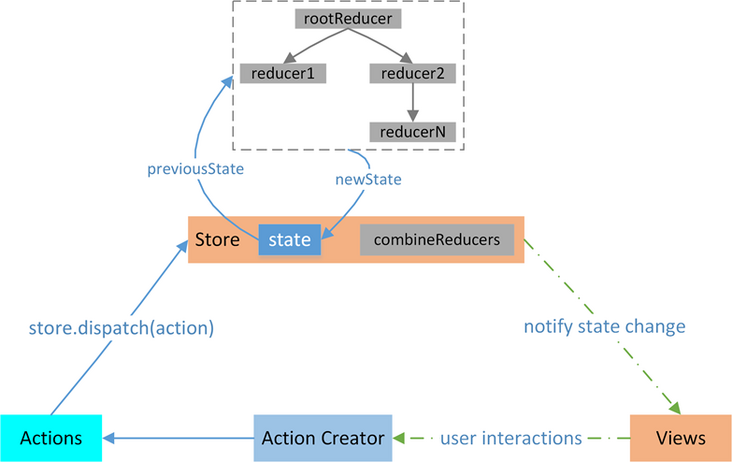
For detailed introduction, you can view: Three core concepts of Redux
8.3 use
First, you need to create a public data area of the store.
import { createStore } from 'redux' // Introducing a third-party approach
const store = createStore() // Create a public storage area for data (administrator)
Then, create a logbook to assist in managing data, that is, reduecer, which is essentially a function that receives two parameters, state and action, and returns state.
// Set defaults
const initialState = {
  counter: 0
}

const reducer = (state = initialState, action) => {
}
Next, use the createStore function to establish a connection between state and action, as follows.
const store = createStore(reducer)
If you want to get the data in the store, you can get the current state through store.getState(), as shown below.
console.log(store.getState());
Let's see how to change the data in the store. Dispatch is used to dispatch an action. Usually, the action will have a type attribute and can also carry other data.
store.dispatch({
  type: "INCREMENT"
})

store.dispath({
  type: "DECREMENT"
})

store.dispatch({
  type: "ADD_NUMBER",
  number: 5
})
Next, let's look at modifying the processing logic in reducer.
const reducer = (state = initialState, action) => {
  switch (action.type) {
    case "INCREMENT":
      return {...state, counter: state.counter + 1};
    case "DECREMENT":
      return {...state, counter: state.counter - 1};
    case "ADD_NUMBER":
      return {...state, counter: state.counter + action.number}
    default:
      return state;
  }
}
Note that reducer is a pure function and does not need to modify state directly. Then, after the action is distributed, you can monitor the changes of the store through store.subscribe.
store.subscribe(() => {
  console.log(store.getState());
})
In the React project, it will be used in conjunction with React redux.
const redux = require('redux');

const initialState = {
  counter: 0
}

// Create reducer
const reducer = (state = initialState, action) => {
  switch (action.type) {
    case "INCREMENT":
      return {...state, counter: state.counter + 1};
    case "DECREMENT":
      return {...state, counter: state.counter - 1};
    case "ADD_NUMBER":
      return {...state, counter: state.counter + action.number}
    default:
      return state;
  }
}

// Create a store based on reducer
const store = redux.createStore(reducer);

store.subscribe(() => {
  console.log(store.getState());
})

// Modify the state in the store
store.dispatch({
  type: "INCREMENT"
})
// console.log(store.getState());

store.dispatch({
  type: "DECREMENT"
})
// console.log(store.getState());

store.dispatch({
  type: "ADD_NUMBER",
  number: 5
})
// console.log(store.getState());- createStore can help create a store.
- store.dispatch helps dispatch actions, which are passed to the store.
- store.getState this method can help get all the data contents in the store.
- The store.subscrible method subscribes to the change of the store. As long as the store changes, the callback function received by the store.subscrible function will be executed.
9, Redux Middleware
9.1 what is middleware
Middleware is a kind of software between application system and system software. It uses the basic services (functions) provided by system software to connect various parts or different applications of application system on the network, and can achieve the purpose of resource sharing and function sharing.
Earlier, we learned about the whole workflow of Redux. After the action is issued, reducer immediately calculates the state. The whole process is a synchronous operation. If you need to support asynchronous operations, error handling and log monitoring, you can use middleware in this process.
In Redux, the middleware is placed in the dispatch process and intercepts the distribution action s, as shown in the following figure:
In essence, it is a function that transforms the store.dispatch method and adds other functions between issuing Action and executing Reducer.
9.2 common middleware
There are many excellent redux middleware, such as:
- Redux thunk: used for asynchronous operations
- Redux logger: used for logging
The above middleware needs to be registered through applymeddlewares. The function is to form an array of all middleware, execute them in turn, and pass them into createStore as the second parameter.
const store = createStore(
  reducer,
  applyMiddleware(thunk, logger)
);
9.2.1 redux-thunk
Redux thunk is an asynchronous processing middleware recommended by the official website. The default is dispatch(action), which needs to be a JavaScript object.
The Redux thunk middleware will judge the data type you have passed in. If it is a function, it will pass in parameter values (dispatch, getState) to the function.
- The dispatch function is used to dispatch the action again later.
- The getState function considers that some of our subsequent operations need to rely on the original state, so that we can obtain some previous states.
Therefore, dispatch can be written in the form of the following functions.
const getHomeMultidataAction = () => {
  return (dispatch) => {
    axios.get("http://xxx.xx.xx.xx/test").then(res => {
      const data = res.data.data;
      dispatch(changeBannersAction(data.banner.list));
      dispatch(changeRecommendsAction(data.recommend.list));
    })
  }
}
9.2.2 redux-logger
If you want to implement a logging function, you can use the ready-made Redux logger, as follows.
import { applyMiddleware, createStore } from 'redux';
import createLogger from 'redux-logger';
const logger = createLogger();

const store = createStore(
  reducer,
  applyMiddleware(logger)
);
9.3 Redux source code analysis
First, let's take a look at the source code of applymeddlewares:
export default function applyMiddleware(...middlewares) {
  return (createStore) => (reducer, preloadedState, enhancer) => {
    var store = createStore(reducer, preloadedState, enhancer);
    var dispatch = store.dispatch;
    var chain = [];

    var middlewareAPI = {
      getState: store.getState,
      dispatch: (action) => dispatch(action)
    };
    chain = middlewares.map(middleware => middleware(middlewareAPI));
    dispatch = compose(...chain)(store.dispatch);

    return {...store, dispatch}
  }
}
It can be seen that all middleware are put into an array chain, and then nested for execution. Finally, store.dispatch is executed, and the two methods getState and dispatch can be obtained within the middleware (middlewareAPI)
Through the above analysis, we understand the basic use of Redux thunk. At the same time, the internal will make a judgment on the dispatch, and then perform the corresponding operation. The principle is as follows:
function patchThunk(store) {
    let next = store.dispatch;

    function dispatchAndThunk(action) {
        if (typeof action === "function") {
            action(store.dispatch, store.getState);
        } else {
            next(action);
        }
    }

    store.dispatch = dispatchAndThunk;
}
Next, we implement a log output interception.
let next = store.dispatch;

function dispatchAndLog(action) {
  console.log("dispatching:", addAction(10));
  next(addAction(5));
  console.log("new state:", store.getState());
}

store.dispatch = dispatchAndLog;
10, How to improve the rendering efficiency of components
We know that, based on the perfect combination of virtual Dom and efficient Diff algorithm, React updates the minimum granularity of DOM. In most cases, the rendering efficiency of React on DOM is enough for our daily business. However, for complex business scenarios, performance problems will still haunt us. At this time, some measures need to be taken to improve the operation performance. Avoiding unnecessary rendering is one of the common optimization methods in business.
10.1 implementation scheme
We have learned that the trigger time of render is simply that a class component will cause render by calling the setState method. Once the parent component renders, the child component will also execute render. The parent component rendering leads to the sub component rendering, and the sub component has not changed. At this time, unnecessary rendering can be avoided. The specific implementation methods are as follows:
- shouldComponentUpdate
- PureComponent
- React.memo
10.2 involving life cycle functions
102.1 shouldComponentUpdate
Compare the state and props through the shouldComponentUpdate lifecycle function to determine whether to re render. By default, returning true means re rendering. If you do not want the component to re render, return false.
10.2.2 PureComponent
It is basically consistent with the principle of shouldComponentUpdate. shouldComponentUpdate is realized through the shallow comparison results of props and state. The source code is roughly as follows:
if (this._compositeType === CompositeTypes.PureClass) {
    shouldUpdate = !shallowEqual(prevProps, nextProps) || ! shallowEqual(inst.state, nextState);
}
The source code of the corresponding method of shallowEqual is as follows:
const hasOwnProperty = Object.prototype.hasOwnProperty;

/**
 * is Method to determine whether the two values are equal, and why writing so can move the MDN document
 * https://developer.mozilla.org/zh-CN/docs/Web/JavaScript/Reference/Global_Objects/Object/is
 */
function is(x: mixed, y: mixed): boolean {
  if (x === y) {
    return x !== 0 || y !== 0 || 1 / x === 1 / y;
  } else {
    return x !== x && y !== y;
  }
}

function shallowEqual(objA: mixed, objB: mixed): boolean {
  // First, compare the basic types
  if (is(objA, objB)) {
    return true;
  }

  if (typeof objA !== 'object' || objA === null ||
      typeof objB !== 'object' || objB === null) {
    return false;
  }

  const keysA = Object.keys(objA);
  const keysB = Object.keys(objB);

  // If the length is not equal, return false directly
  if (keysA.length !== keysB.length) {
    return false;
  }

  // When the key s are equal, cycle the comparison
  for (let i = 0; i < keysA.length; i++) {
    if (
      !hasOwnProperty.call(objB, keysA[i]) ||
      !is(objA[keysA[i]], objB[keysA[i]])
    ) {
      return false;
    }
  }

  return true;
}
10.2.3 React.memo
React.memo is used to cache the rendering of components to avoid unnecessary updates. In fact, it is also a high-level component, which is very similar to PureComponent. But the difference is that react.memo can only be used for function components.
import { memo } from 'react';

function Button(props) {
  // Component code
}

export default memo(Button);
If you need deep comparison, you can pass the comparison function to the second parameter of memo.
function arePropsEqual(prevProps, nextProps) {
  // your code
  return prevProps === nextProps;
}

export default memo(Button, arePropsEqual);
10.3 summary
In the actual development process, the front-end performance problem must be considered. With the complexity of the business, the probability of encountering performance problems is also increasing.
In addition, it is recommended to granulate the page smaller. If one is too large, when the state is modified, it will lead to the rendering of the whole large component. After splitting the component, the granularity becomes smaller, which can also reduce the unnecessary rendering of sub components.
11, Understanding of Fiber architecture
11.1 background
JavaScript engine and page rendering engine are mutually exclusive. When one thread executes, the other thread can only hang and wait. If the JavaScript thread occupies the main thread for a long time, the update of the rendering level will have to wait for a long time. If the interface is not updated for a long time, the page responsiveness will become worse, and users may feel stuck.
This is also the problem faced by the Stack Reconciler of React 15. When React renders components, the whole process from the beginning to the completion of rendering is done at one go and cannot be interrupted. If the component is large, the js thread will execute all the time, and then it will not be handed over to the rendering thread until the calculation of the whole VDOM tree is completed. This will lead to some user interaction, animation and other tasks that cannot be processed immediately, resulting in the situation of Caton.
11.2 React Fiber
eact Fiber is a major change and optimization made by Facebook to React in more than two years. It is a re implementation of the core algorithm of React. It was confirmed from Facebook at the React Conf 2017 conference that React Fiber was released in React 16.
In React, the following operations are mainly performed:
- Priority is added to each task. Tasks with high priority can interrupt tasks with low priority. Then re execute the task with lower priority.
- An asynchronous task is added to call the requestIdleCallback api, which can be executed when the browser is idle.
- The dom diff tree becomes a linked list. A dom corresponds to two fiber s (a linked list) and two queues. This is to find the interrupted task and re execute it.
From the perspective of architecture, Fiber is a rewriting of React core algorithm (i.e. reconciliation process). From the coding point of view, Fiber is a data structure defined within React. It is the node unit of Fiber tree structure, that is, the virtual DOM under the new architecture of React 16.
A fiber is a JavaScript object, which contains the information of the element, the update operation queue and type of the element. Its data structure is as follows:
type Fiber = {
  // The WorkTag type used to tag the fiber mainly represents the component type represented by the current fiber, such as FunctionComponent, ClassComponent, etc
  tag: WorkTag,
  // key in ReactElement
  key: null | string,
  // ReactElement.type, call the first parameter of 'createElement'
  elementType: any,
  // The resolved function/class/ associated with this fiber.
  // Represents the node type currently represented
  type: any,
  // Represents the element component instance corresponding to the current FiberNode
  stateNode: any,

  // Point to its' parent 'in the Fiber node tree, which is used to return upward after processing this node
  return: Fiber | null,
  // Point to your first child node
  child: Fiber | null,
  // Points to its own sibling structure, and the return of the sibling node points to the same parent node
  sibling: Fiber | null,
  index: number,

  ref: null | (((handle: mixed) => void) & { _stringRef: ?string }) | RefObject,

  // Component props object in current process
  pendingProps: any,
  // props after last rendering
  memoizedProps: any,

  // The Update generated by the component corresponding to the Fiber will be stored in this queue
  updateQueue: UpdateQueue<any> | null,

  // state of the last rendering
  memoizedState: any,

  // A list to store the context that the Fiber depends on
  firstContextDependency: ContextDependency<mixed> | null,

  mode: TypeOfMode,

  // Effect
  // Used to record Side Effect
  effectTag: SideEffectTag,

  // The single linked list is used to quickly find the next side effect
  nextEffect: Fiber | null,

  // First side effect in subtree
  firstEffect: Fiber | null,
  // The last side effect in the subtree
  lastEffect: Fiber | null,

  // It represents the time point at which the task should be completed in the future. Later, the version will be renamed lanes
  expirationTime: ExpirationTime,

  // Quickly determine whether there are changes in the subtree that are not waiting
  childExpirationTime: ExpirationTime,

  // The version pool of fiber records the fiber update process for easy recovery
  alternate: Fiber | null,
}
11.3 solutions
Fiber divides the rendering update process into several sub tasks, and only does a small part each time. After completion, see if there is still time left. If so, continue to the next task; If not, suspend the current task, give time control to the main thread, and continue execution when the main thread is not busy.
That is, it can be interrupted and restored. After restoration, it can also reuse the previous intermediate state, and give different priorities to different tasks. Each task update unit is the Fiber node corresponding to the React Element.
The above method is implemented by the requestIdleCallback method. The window.requestIdleCallback() method queues the functions called during the idle period of the browser. This enables developers to perform background and low priority work on the main event loop without delaying key events, such as animation and input response.
Firstly, in React, tasks are cut into multiple steps and completed in batches. After completing some tasks, return control to the browser to give the browser time to render the page. When the browser is busy and there is time left, it is a cooperative scheduling to continue the unfinished tasks of React.
The implementation process is based on the Fiber node. As a static data structure, each Fiber node corresponds to a React element, which stores the type of the component (function component / class component / native component, etc.) and the corresponding DOM node. As a dynamic work unit, each Fiber node saves the changed state of the component and the work to be performed in this update.
Each Fiber node has a corresponding React element. Multiple Fiber nodes build a tree according to the following three attributes.
// Points to the parent Fiber node
this.return = null
// Point to child Fiber node
this.child = null
// Point to the first brother Fiber node on the right
this.sibling = null
12, What are the means to optimize React performance
12.1 render rendering
React has efficient performance with virtual DOM and diff algorithm, but in some cases, the performance can be further improved. We know that class components will cause render by calling the setState method. Once the parent component renders, the child component will also perform render. When we want to update a sub component, such as the content of the updated green part: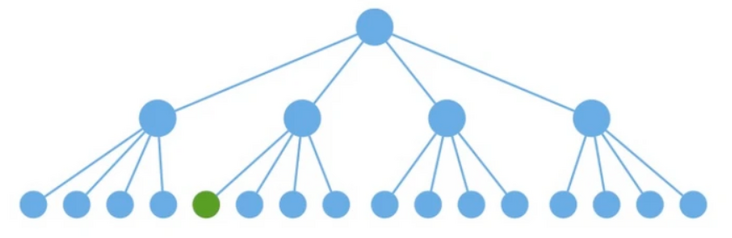
Ideally, we can only call the component render under this path to render the corresponding component.
However, the default method of React is to call render of all components, and then compare the generated virtual DOM.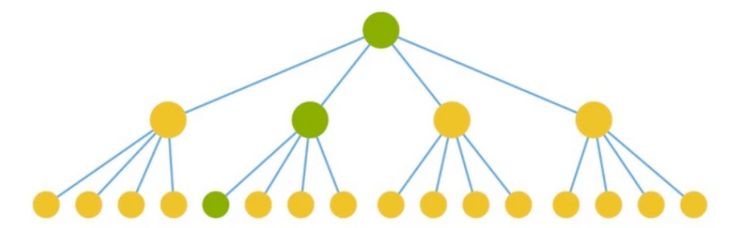
Therefore, the default approach is a waste of performance.
12.2 optimization scheme
To avoid unnecessary render ing, we introduced earlier that it can be optimized through shouldComponentUpdate, PureComponent and React.memo. In addition, some common problems of performance optimization are as follows:
- Avoid inline functions
- Use React Fragments to avoid extra tags
- Using Immutable
- Lazy load component
- Event binding method
- Server side rendering
12.2.1 avoid using inline functions
If we use an inline function, a new function instance will be created each time we call the render function, such as:
import React from "react";

export default class InlineFunctionComponent extends React.Component {
  render() {
    return (
      <div>
        <h1>Welcome Guest</h1>
        <input type="button" onClick={(e) => { this.setState({inputValue: e.target.value}) }} value="Click For Inline Function" />
      </div>
    )
  }
}
The correct approach is to create a function inside the component and bind the event to the function itself. In this way, a separate function instance will not be created each time render is called.
import React from "react";

export default class InlineFunctionComponent extends React.Component {

  setNewStateData = (event) => {
    this.setState({
      inputValue: e.target.value
    })
  }

  render() {
    return (
      <div>
        <h1>Welcome Guest</h1>
        <input type="button" onClick={this.setNewStateData} value="Click For Inline Function" />
      </div>
    )
  }
}
12.2.2 use React Fragments to avoid additional marking
When a user creates a new component, each component should have a single parent label. The parent cannot have two labels, so there should be a public label at the top, so we often add an additional label div at the top of the component.
This extra tag has no other function except to act as a parent tag. In this case, you can use a fragment. It does not introduce any additional tags to the component, but it can act as a parent tag.
export default class NestedRoutingComponent extends React.Component {
    render() {
        return (
            <>
                <h1>This is the Header Component</h1>
                <h2>Welcome To Demo Page</h2>
            </>
        )
    }
}
12.2.3 lazy loading assembly
In terms of engineering, webpack has the ability of code splitting. It can create multiple packages for applications and load them dynamically at runtime, reducing the size of the initial package. In react, suspend and lazy components are used to realize the code splitting function. The basic usage is as follows:
const johanComponent = React.lazy(() => import(/* webpackChunkName: "johanComponent" */ './myAwesome.component'));

export const johanAsyncComponent = props => (
  <React.Suspense fallback={<Spinner />}>
    <johanComponent {...props} />
  </React.Suspense>
);
12.2.4 server rendering
The server-side rendering method can enable users to see the rendered page faster. A node service is required for rendering on the server side. You can use express, koa, etc. to call the renderToString method of react, render the root component into a string, and then output it to the response:
import { renderToString } from "react-dom/server";
import MyPage from "./MyPage";
app.get("/", (req, res) => {
  res.write("<!DOCTYPE html><html><head><title>My Page</title></head><body>");
  res.write("<div id='content'>");
  res.write(renderToString(<MyPage/>));
  res.write("</div></body></html>");
  res.end();
});
Then, the client uses the render method to generate HTML.
import ReactDOM from 'react-dom';
import MyPage from "./MyPage";
ReactDOM.render(<MyPage />, document.getElementById('app'));
13, React server rendering
13.1 what is server-side rendering
Server rendering refers to the process that the service side completes the page processing technology of splicing the HTML structure of the page, sends it to the browser, and then binds the status and events for it to become a fully interactive page. It mainly solves two problems:
- SEO, because the search engine crawler can directly view the fully rendered page
- Accelerate the loading of the first screen and solve the white screen problem of the first screen
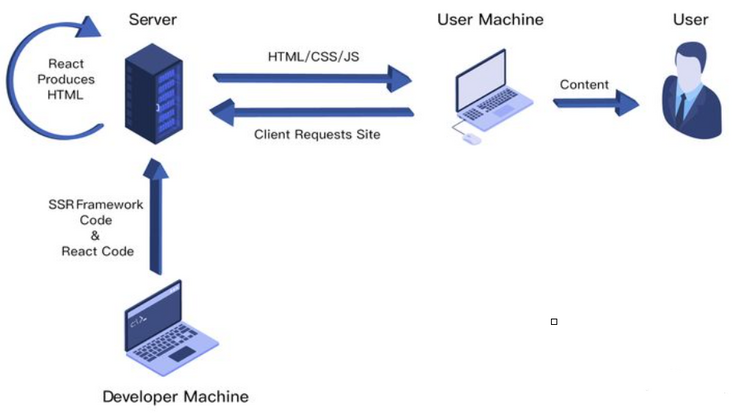
13.2 how
In React, there are two main forms to implement SSR:
- Manually build an SSR framework
- Use a mature SSR framework, such as Next.JS
The following describes how to implement SSR by manually building an SSR framework. First, start an app.js file through express to listen for requests from port 3000. When requesting the root directory, return HTML as follows:
const express = require('express')
const app = express()
app.get('/', (req,res) => res.send(`
<html>
   <head>
       <title>ssr demo</title>
   </head>
   <body>
       Hello world
   </body>
</html>
`))

app.listen(3000, () => console.log('Exampleapp listening on port 3000!'))
Then, write React code in the server and reference it in app.js:
import React from 'react'

const Home = () =>{

    return <div>home</div>

}

export default Home
In order for the server to recognize JSX, you need to use webpakc to package and transform the project, create a configuration file webpack.server.js and configure it, as shown below.
const path = require('path')    //path module of node
const nodeExternals = require('webpack-node-externals')

module.exports = {
    target:'node',
    mode:'development',           //Development mode
    entry:'./app.js',             //entrance
    output: {                     //Packing exit
        filename:'bundle.js',     //Packaged file name
        path:path.resolve(__dirname,'build')    //Save to the build folder in the root directory
    },
    externals: [nodeExternals()],  //Maintain the reference mode of require in node
    module: {
        rules: [{                  //Packaging rules
           test:   /\.js?$/,       //Package all js files
           loader:'babel-loader',  //Packaging with Babel loader
           exclude: /node_modules/,//Do not package node_ js file in modules
           options: {
               presets: ['react','stage-0',['env', {
                                  //Additional packaging rules during loader to convert react,JSX and ES6
                    targets: {
                        browsers: ['last 2versions']   //Compatible with the latest two versions of mainstream browsers
                    }
               }]]
           }
       }]
    }
}
Then, with the help of React DOM, the renderToString method for server rendering is provided, which is responsible for parsing the React component into Html.
import express from 'express'
import React from 'react'//Introduce React to support JSX syntax
import { renderToString } from 'react-dom/server'//Introducing renderToString method
import Home from'./src/containers/Home'

const app= express()
const content = renderToString(<Home/>)
app.get('/',(req,res) => res.send(`
<html>
   <head>
       <title>ssr demo</title>
   </head>
   <body>
        ${content}
   </body>
</html>
`))

app.listen(3001, () => console.log('Exampleapp listening on port 3001!'))
In the above process, the component has been successfully rendered to the page. However, some event handling methods cannot be completed on the server, so the component code needs to be executed again in the browser. This way that the server and the client share a set of code is called isomorphism. Generally speaking, refactoring is a set of React code that runs once on the server and again on the browser:
- The server renders the page structure
- Browser side rendering completion event binding
The way the browser implements event binding is to let the browser pull JS files for execution and let JS code control them. Therefore, script tags need to be introduced. The react code executed by the client is introduced into the page through the script tag, and the route is configured for the JS file through the static middleware of express. The modification is as follows:
import express from 'express'
import React from 'react'//Introduce React to support JSX syntax
import { renderToString } from'react-dom/server'//Introducing renderToString method
import Home from './src/containers/Home'

const app = express()
app.use(express.static('public'));
//Using the static middleware provided by express, the middleware will route all static files to the public folder
 const content = renderToString(<Home/>)

app.get('/',(req,res)=>res.send(`
<html>
   <head>
       <title>ssr demo</title>
   </head>
   <body>
        ${content}
   <script src="/index.js"></script>
   </body>
</html>
`))

 app.listen(3001, () =>console.log('Example app listening on port 3001!'))
Then, execute the following react code on the client, and create a new webpack.client.js as the webpack configuration file of the client react code, as follows:
const path = require('path')                    //path module of node

module.exports = {
    mode:'development',                         //Development mode
    entry:'./src/client/index.js',              //entrance
    output: {                                   //Packing exit
        filename:'index.js',                    //Packaged file name
        path:path.resolve(__dirname,'public')   //Save to the build folder in the root directory
    },
    module: {
        rules: [{                               //Packaging rules
           test:   /\.js?$/,                    //Package all js files
           loader:'babel-loader',               //Packaging with Babel loader
           exclude: /node_modules/,             //Do not package node_ js file in modules
           options: {
               presets: ['react','stage-0',['env', {
                    //loader is an additional packaging rule. Here, react and JSX are converted
                    targets: {
                        browsers: ['last 2versions']   //Compatible with the latest two versions of mainstream browsers
                    }
               }]]
           }
       }]
    }
}
This method can simply realize the React server rendering of the home page, as shown in the following figure.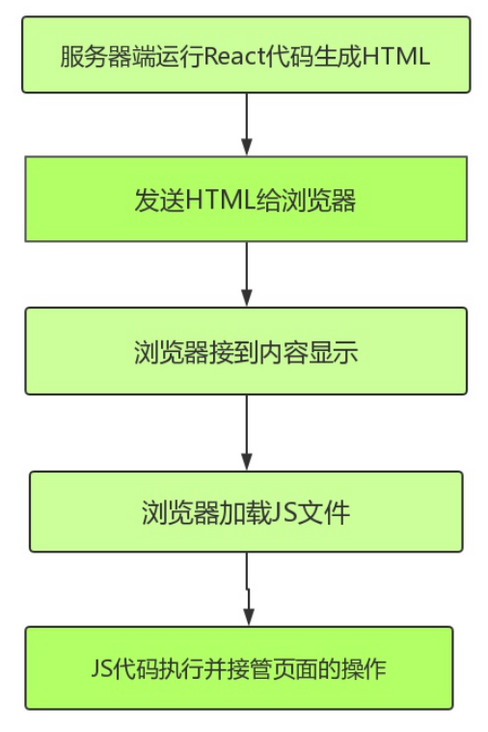
Generally, an application will have routing. The configuration information is as follows:
import React from 'react'                   //Introduce React to support JSX
import { Route } from 'react-router-dom'    //Introduction routing
import Home from './containers/Home'        //Introducing Home components

export default (
    <div>
        <Route path="/" exact component={Home}></Route>
    </div>
)
Then, you can reference the routing information through index.js, as follows:
import React from 'react'
import ReactDom from 'react-dom'
import { BrowserRouter } from'react-router-dom'
import Router from'../Routers'

const App= () => {
    return (
        <BrowserRouter>
           {Router}
        </BrowserRouter>
    )
}

ReactDom.hydrate(<App/>, document.getElementById('root'))
At this time, there will be an error message on the console because each Route component is wrapped with a div, but the div is not in the code returned by the server. The solution only needs to execute the routing information on the server, use StaticRouter instead of BrowserRouter, and pass parameters through context.
import express from 'express'
import React from 'react'//Introduce React to support JSX syntax
import { renderToString } from 'react-dom/server'//Introducing renderToString method
import { StaticRouter } from 'react-router-dom'
import Router from '../Routers'

const app = express()
app.use(express.static('public'));
//Using the static middleware provided by express, the middleware will route all static files to the public folder

app.get('/',(req,res)=>{
    const content  = renderToString((
        //Pass in current path
        //context is a required parameter, which is used to pass rendering parameters on the server
        <StaticRouter location={req.path} context={{}}>
           {Router}
        </StaticRouter>
    ))
    res.send(`
   <html>
       <head>
           <title>ssr demo</title>
       </head>
       <body>
       <div id="root">${content}</div>
       <script src="/index.js"></script>
       </body>
   </html>
    `)
})


app.listen(3001, () => console.log('Exampleapp listening on port 3001!'))
13.3 summary
The rendering principle of the overall React server is not complex, as follows:
The Node server receives the client request, obtains the current request url path, then looks up the corresponding component in the existing routing table, obtains the data to be requested, and transmits the data to the component as props, context or store.
Then, based on the server-side rendering method renderToString() built in React, the component is rendered as html string. Before outputting the final html, the data needs to be injected into the browser
The browser starts rendering and node comparison, and then completes event binding and some interactions in the component. The browser reuses the html nodes output by the server, and the whole process ends.