Articles Catalogue
Modular
QtCore: Contains core non-GUI functions. This module is used to process time, files and directories, various data types, streams, URL s, MIME types, threads or processes.
QtGui includes class window system integration, event processing, two-dimensional graphics, basic imaging, fonts and text.
The qtwidgets module contains classes that create a classic desktop-style user interface and provide a set of UI elements.
QtMultimedia contains classes to handle multimedia content and API s to access the functions of cameras and radios.
The Qtbluetooth module contains scanners and connections for classes and interacts with them. Description module includes classes of network programming. These classes facilitate the coding of TCP and IP and UDP clients and servers, making network programming easier and more portable.
Qtpositioning includes classes that use various possible sources to locate, including satellites, Wi-Fi, or a text file.
The Enginio module implements the runtime of applications hosted by client libraries accessing Qt cloud services.
The Qtwebsockets module contains the implementation of WebSocket protocol class.
QtWebKit contains a Webkit2-based library Web browser implementation class.
Qtwebkit widgets include the basic WebKit 1 of classes for the implementation of qtwidgets application Web browser.
QtXml contains classes with XML files. This module provides implementations for SAX and DOM API s.
The QtSvg module provides classes for displaying the contents of SVG files. Scalable Vector Graphics (SVG) is a language for describing two-dimensional graphics and graphics applications.
QtSql module provides classes to operate database.
QtTest includes functions that enable unit testing of pyqt5 applications
QWidget control is the parent class of all user interfaces in PyQt5. QWidget object is created as a top-level window of an application. The default constructor without parameters is used here. It does not have a parent class. We call a control without a parent class a window.
The classes and functions of the QT can be found on the following pages
http://www.kuqin.com/qtdocument/classes.html
layout
Layout is how to manage elements and windows in an application. There are two ways to do this: absolute positioning and layout classes of PyQt5
Absolute positioning
Each program distinguishes the location of elements in pixels and measures the size of elements. So we can use absolute positioning to locate every element and window.
Limitations:
- Elements do not change as we change the location and size of the window.
- Can not be applied to different platforms and different resolution displays
- Changing the font size of the application can destroy the layout
- If we decide to reconstruct the application, we need to calculate the location and size of each element.
example
import sys
from PyQt5.QtWidgets import QWidget, QLabel, QApplication

class Example(QWidget):
    def __init__(self):
        super().__init__()
        self.initUI()
    def initUI():
    	label1=QLabel('hello',self)
    	label1.move(10,10)

#Each element is located by move() method, using x and y coordinates. The origin of x and y coordinates is the upper left corner of the program.

    	label2=QLabel('world',self)
    	label2.move(25,25)
    	self.setGeometry(300, 300, 250, 150)
    	self.show()
if __name__ == '__main__':
    app = QApplication(sys.argv)
    ex = Example()
    sys.exit(app.exec_())
Design sketch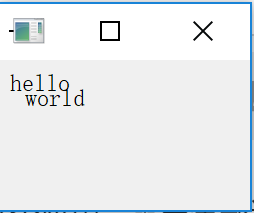
grid layout
QGridLayout module
Example: Create a calculator
import sys
from PyQt5.QtWidgets import (QWidget, QGridLayout,
   QPushButton, QApplication)

class Example(QWidget):
   def __init__(self):
       super().__init__()
       self.initUI()
   def initUI(self):
      #Grid building
       grid = QGridLayout()
       self.setLayout(grid)
      #Button name
       names = ['Cls', 'Bck', '', 'Close',
                '7', '8', '9', '/',
               '4', '5', '6', '*',
                '1', '2', '3', '-',
               '0', '.', '=', '+']
       #position
       positions = [(i,j) for i in range(5) for j in range(4)]
       #Generate Button
       for position, name in zip(positions, names):
           if name == '':
               continue
           button = QPushButton(name)
           grid.addWidget(button, *position)
       self.move(300, 150)
       self.setWindowTitle('Calculator')
       self.show()
if __name__ == '__main__':
   app = QApplication(sys.argv)
   ex = Example()
   sys.exit(app.exec_())
Submit feedback
QLineEdit line editing
def findtriggered(self):#lookup
        findDlg = QDialog(self)
        findDlg.setWindowTitle('lookup...')

        self.find_textLineEdit = QLineEdit(findDlg)#Line Editor
        find_next_button = QPushButton('Find the next', findDlg)
        find_last_button = QPushButton('Find the last one', findDlg)

        v_layout = QVBoxLayout(self)#Vertical layout
        v_layout.addWidget(find_last_button)#add button
        v_layout.addWidget(find_next_button)

        h_layout = QHBoxLayout(findDlg)#Horizontal layout
        h_layout.addWidget(self.find_textLineEdit)Join Line Editor
        h_layout.addLayout(v_layout)

        find_last_button.clicked.connect(self.findLast)#Corresponding time
        find_next_button.clicked.connect(self.findNext)


        findDlg.show()
Event
In the event model, there are three roles:
- Event source: The object whose state has changed.
- Event: The content of this object state change.
- Event Goal: The goal of the event.
Action mechanism: Event source binds event handlers and then acts on the event target
PyQt5 has a signal and slot mechanism for event handling. Signals and slots are used for communication between objects. When the event triggers, a signal occurs, slot is used to be called by Python.
Example:
import sys
from PyQt5.QtCore import Qt
from PyQt5.QtWidgets import (QWidget, QLCDNumber, QSlider,
    QVBoxLayout, QApplication)


class Example(QWidget):

    def __init__(self):
        super().__init__()

        self.initUI()
    def initUI(self):

        lcd = QLCDNumber(self)
        sld = QSlider(Qt.Horizontal, self)

        vbox = QVBoxLayout()
        vbox.addWidget(lcd)
        vbox.addWidget(sld)

        self.setLayout(vbox)
        sld.valueChanged.connect(lcd.display)
        #In the above formula, the intermediate parameter is variable, and the corresponding value of the connection in parentheses (which can be defined as a function by itself). That is, when the sld changes, the value of lcd changes accordingly.
        #switch.triggered.connect(self.switchtriggered) In this code, the intermediate parameter changes because the corresponding type of the previous switch is QAction.
        #Reb. clicked. connect (self. setColor) Redb corresponds to QPushButton

        self.setGeometry(300, 300, 250, 150)
        self.setWindowTitle('Signal and slot')
        self.show()


if __name__ == '__main__':

    app = QApplication(sys.argv)
    ex = Example()
    sys.exit(app.exec_())
Menu bar and toolbar status bar
Modular
QtWidget
QtGui
menuBar() Returns the QMenuBar object of the main window
addMenu() Add a new QMenu object to the menu bar
addAction() adds an action button to the QMenu widget containing text or icons
setEnabled() sets the action button to enable/disable
addSeperator() Add a partition line to the menu
clear() Delete the contents of the menu bar
setShortcut() associates shortcuts to action buttons
setText() Sets the text of menu items
setTitle() Sets the title of the QMenu widget
text() Returns the text associated with the QACtion object
Complete examples
menu bar
Tree menu
import sys
from PyQt5.QtWidgets import QApplication, QMainWindow,QAction,qApp,QMune
class Example(QMainWindow):
    def __init__(self,parent=None):
        super().__init__()
        self.initUI()
    def initUI(self):
        #Instantiate the QMenuBar object of the main window
        bar=self.menuBar()
        #Add a new QMenu object, parent menu, to the menu bar
        file=bar.addMenu('File')
        #Add buttons, submenus to the QMenu widget
        new=file.addAction(QIcon('New'))
        #Add Sun Menu
        form=bar.addMenu('format(O)')
        newitch.addAction('open')
Check menu
        #Create check menu
        close=QAction('Close',self,checkable=True)
        close.setChecked(True)#Default state
        close.triggered.connect(self.close)#Response events
        bar.addAction(close)
Right-click menu
	#Create a right-click menu
    def contextMenuEvent(self, event):
           cmenu = QMenu(self)
           newAct = cmenu.addAction("New")
           opnAct = cmenu.addAction("Open")
           quitAct = cmenu.addAction("Quit")
           action = cmenu.exec_(self.mapToGlobal(event.pos()))

           if action == quitAct:
               qApp.quit()
The QT menu icon is not displayed
self.setWindowIcon(QIcon('c://users/53877/desktop/7.png'))
#Address is'/'instead of'/', otherwise it is easy to have'unicode escape' codec can't decode bytes in position'error. Just make sure that'/ u' does not appear. Replicated address is'', and icons may not be displayed.
Verify that the image file is a legitimate icon.
There is a big difference between images and icons.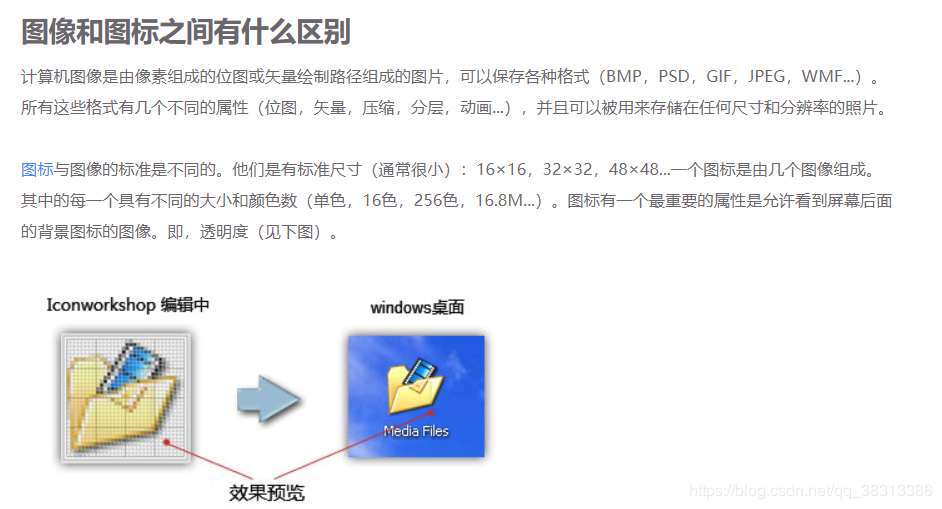
toolbar
        #Add Tool Bar
		toolbar=self.addToolBal('save')
		toolbar.addAction(save)
example
import sys
from PyQt5.QtWidgets import QApplication, QMainWindow,QAction,qApp,QMune
from PyQt5.QtGui import QIcon
class Example(QMainWindow):
    def __init__(self,parent=None):
        super().__init__()
        self.initUI()
    def initUI(self):
        #Instantiate the QMenuBar object of the main window
        bar=self.menuBar()
        #Add a new QMenu object, parent menu, to the menu bar
        file=bar.addMenu('File')
        #Add buttons, submenus to the QMenu widget
        new=file.addAction(QIcon('New'))
        #Add Sun Menu
        form=bar.addMenu('format(O)')
        newitch.addAction('open')

        #Create check menu
        close=QAction('Close',self,checkable=True)
        close.setChecked(True)#Default state
        close.triggered.connect(self.close)#Response events
        bar.addAction(close)

        #Define the response widget button and set the shortcut key to associate it with the action button to add it to the parent menu
        savesw=QAction('Save',self)
        save.setShortcut('Ctrl+S')
        file.addAction(save)
        #Add Tool Bar
		toolbar=self.addToolBal('save')
		toolbar.addAction(save)

        #Add parent menu (including parent menu icon)
        quit=QAction(QIcon('quit.jpg'),'Quit',self)
       #Additional state
        quit.setStatusTip('Sign out')
        file.addAction(quit)
		#toolbar
		quitbar=self.addToolBar('save')
		quirbar.addAction(quit)

        #Clicking on any Qmenu object emits signals and binds slot functions
        file.triggered[QAction].connect(self.processtrigger)

        #Setting layout and title
        self.setLayout(layout)
        self.setWindowTitle('menu Example')
	#Create a right-click menu
    def contextMenuEvent(self, event):
           cmenu = QMenu(self)
           newAct = cmenu.addAction("New")
           opnAct = cmenu.addAction("Open")
           quitAct = cmenu.addAction("Quit")
           action = cmenu.exec_(self.mapToGlobal(event.pos()))

           if action == quitAct:
               qApp.quit()

    def processtrigger(self,q):
        #Output that Qmenu object is clicked
        print(q.text()+'is triggeres')

if __name__ == '__main__':
    app=QApplication(sys.argv)
    ex=example()
    sys.exit(app.exec_())
Create edited text
import sys
from PyQt5.QtWidgets import QMainWindow, QTextEdit, QAction, QApplication
from PyQt5.QtGui import QIcon


class Example(QMainWindow):

    def __init__(self):
        super().__init__()

        self.initUI()


    def initUI(self):
		#Create a text editing area and place it in the middle of QMainWindow. This component may fill all the remaining areas.
        textEdit = QTextEdit()
        self.setCentralWidget(textEdit)
        self.setGeometry(300, 300, 350, 250)
        self.setWindowTitle('Main window')
        self.show()


if __name__ == '__main__':

    app = QApplication(sys.argv)
    ex = Example()
    sys.exit(app.exec_())
Open the file
QFileDialog in Qwidget
    def opentriggered(self):#Open the file
        fname = QFileDialog.getOpenFileName(self, 'Open file', '')
        if fname[0]:
            with open(fname[0],'r',encoding='gb18030',errors='ignore') as f:
                data = f.read()
                self.textEdit.setText(data)
                #Simplified Chinese Character Coding in gb18030
Time and date of color fonts
Colour fonts
Call class QFontDialog QColorDialog, etc.
from PyQt5.QtWidgets import (QWidget, QPushButton, QFrame,
    QColorDialog, QApplication,QFontDialog,QFont)
from PyQt5.QtGui import QColor
import sys
class Example(QWidget):
    def __init__(self):
        super().__init__()
        self.initUI()
    def initUI(self):
    	#Setting Buttons and Associating Functions
        self.bt1 = QPushButton('Select fonts',self)
        self.bt1.move(350,70)
        self.bt2 = QPushButton('Choose color',self)
        self.bt2.move(350,120)
        self.bt1.clicked.connect(self.choicefont)
        self.bt2.clicked.connect(self.choicecolor)
    def choicefont(self):       #Application of FontDialog Function
        font, ok = QFontDialog.getFont()
        if ok:
            self.tx.setCurrentFont(font)
    def choicecolor(self):
        col = QColorDialog.getColor()
        if col.isValid():
            self.tx.setTextColor(col)
if __name__ == '__main__':
    app = QApplication(sys.argv)
    ex = Example()
    sys.exit(app.exec_())
Time and date
QDate QTime QDateTime
This QDate is a class that uses calendar dates in the Gregorian calendar. It has methods of determining, comparing, or manipulating dates. The QTime course works in clock time. It provides methods for comparing time, determining time and various other time manipulation methods. This QDateTime is a class that combines two object QDate and QTime objects into one object.
from PyQt5.QtWidgets import QMianWindow,QDate,QTime,QDateTime
class Example(QMainWindow):
    fileName='./newFile.txt'
    def __init__(self):
        super().__init__()

        self.initUI()
    def initUI(self):
        self.textEdit = QTextEdit()
        self.setCentralWidget(self.textEdit)
        self.setGeometry(300, 300, 1500, 1200)
        now=QDateTime.currentDateTime()
        self.textEdit.append(now.toString())
        date=QDate.currentDate()
        self.textEdit.apped(date.toString())
        time=QTime.currentTime()
        self.textEdit.append(time.toString())
    if __name__ == '__main__':
    app = QApplication(sys.argv)
    ex = Example()
    sys.exit(app.exec_())
control
check box
QCheckBox check box control, which has two states: open and close, is a control with a text label (Label). Checkboxes are often used to indicate functions that can be enabled or disabled in programs.
    def initUI(self):

        cb = QCheckBox('Show title', self)#Setup button
        cb.move(20, 20)#layout
        cb.toggle()
        cb.stateChanged.connect(self.changeTitle)#response function
    def changeTitle(self, state):

    if state == Qt.Checked:
        self.setWindowTitle('QCheckBox')
    else:
        self.setWindowTitle(' ')
Drop-down box
The QComboBox component allows users to select one of several options.
    def initUI(self):

        self.lbl = QLabel("Ubuntu", self)

        combo = QComboBox(self)#Generate checkboxes
        combo.addItem("Ubuntu")#Add Options
        combo.addItem("Mandriva")
        combo.addItem("Fedora")
        combo.addItem("Arch")
        combo.addItem("Gentoo")

        combo.move(50, 50)
        self.lbl.move(50, 150)

        combo.activated[str].connect(self.onActivated)
Switch button
A special mode of QPushButton (multiple buttons). It has only two states: press and not press. When we click again, we switch between two states, which is used in many scenarios.
    def initUI(self):

        self.col = QColor(0, 0, 0)
#Generate three buttons and switch between them
        redb = QPushButton('Red', self)
        redb.setCheckable(True)
        redb.move(10, 10)

        redb.clicked[bool].connect(self.setColor)

        greenb = QPushButton('Green', self)
        greenb.setCheckable(True)
        greenb.move(10, 60)

        greenb.clicked[bool].connect(self.setColor)

        blueb = QPushButton('Blue', self)
        blueb.setCheckable(True)
        blueb.move(10, 110)

        blueb.clicked[bool].connect(self.setColor)
slider
QSlider is a component with a small slider that can drag forward and backward. It is often used to modify values with a range, much more convenient than text boxes or spin box es that increase or decrease by clicking. Volume labels can also be used.
    def initUI(self):

        sld = QSlider(Qt.Horizontal, self)#Generating slider
        sld.setFocusPolicy(Qt.NoFocus)#Setting the focus mode of the slider
        sld.setGeometry(30, 40, 100, 30)
        sld.valueChanged.connect(self.changeValue)
    def changeValue(self, value):

        if value == 0:
            #Self-adding action
        elif value > 0 and value <= 30:

        elif value > 30 and value < 80:

        else:
Photo Editing
QPixmap is a component for processing pictures.
class Example(QWidget):

    def __init__(self):
        super().__init__()

        self.initUI()


    def initUI(self):

        hbox = QHBoxLayout(self)
        pixmap = QPixmap("redrock.png")#Create a QPixmap object and accept it with pixmap

        lbl = QLabel(self)#create label
        lbl.setPixmap(pixmap)#Put pictures in labels

        hbox.addWidget(lbl)#create a window
        self.setLayout(hbox)

        self.move(300, 200)
        self.setWindowTitle('Red Rock')
        self.show()

if __name__ == '__main__':

    app = QApplication(sys.argv)
    ex = Example()
    sys.exit(app.exec_())
Line Editor
QLineEdit
qle = QLineEdit(self)
qle.textChanged.connect(self.onChanged)
Text Editing
QTextEdit
        self.textEdit = QTextEdit()
        self.setCentralWidget(self.textEdit)