preface
vue is simple and easy to use, which is reflected in many places. For example, it has a built-in 32 + modifier, which can be very convenient for us to prevent bubbles, prevent default events, mouse event processing, system keyboard events, etc., so that we can quickly handle business. It's not too convenient!!!
After 15 minutes, you can gain:
- 32 + meaning and use of modifiers (including event modifiers, mouse modifiers, form modifiers, system modifiers, etc.)
- How to use webpack to dynamically register vue routing and never write routing configuration!
The examples in the article are github source code On, you can also click Look directly at the example
How to dynamically register routes?
Each modifier example in this article is carried by a page. Smart, you certainly don't want to manually introduce dozens of. vue files and configure routing
Is there any way to help us automatically complete routing registration?
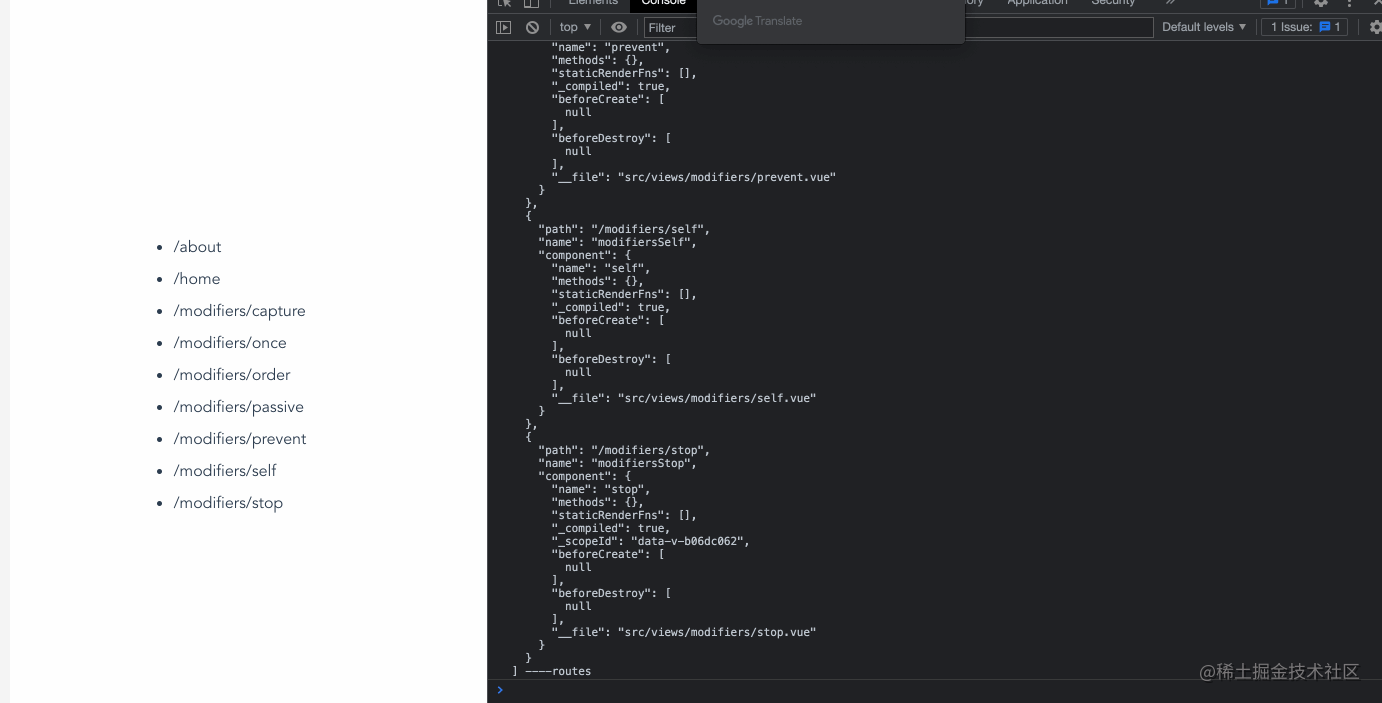
1. File directory structure
The directory structure (other file directories have been removed) is roughly as follows
├── package.json
└── src
    ├── App.vue
    ├── main.js
    ├── router.js
    └── views
        ├── About.vue
        ├── Home.vue
        └── modifiers
            ├── capture.vue
            ├── once.vue
            ├── order.vue
            ├── passive.vue
            ├── prevent.vue
            ├── self.vue
            └── stop.vue
            └── ...
2. Desired routing configuration
Finally, the configuration of Vue router is about as long as below. The most important parts of each configuration are path, name and component
[
  {
    "path": "/home",
    "name": "home",
    "component": {
      "name": "Home",
      "methods": {},
      "staticRenderFns": [],
      "_compiled": true,
      "_scopeId": "data-v-fae5bece",
      "beforeCreate": [
        null
      ],
      "beforeDestroy": [
        null
      ],
      "__file": "src/views/Home.vue"
    }
  },
  {
    "path": "/modifiers/capture",
    "name": "modifiersCapture",
    "component": {
      "name": "capture",
      "methods": {},
      "staticRenderFns": [],
      "_compiled": true,
      "_scopeId": "data-v-63b4eeee",
      "beforeCreate": [
        null
      ],
      "beforeDestroy": [
        null
      ],
      "__file": "src/views/modifiers/capture.vue"
    }
  },
  ... // Other routing configurations
]
3. require.context realizes dynamic registration routing
With the help of webpack require.context It is very convenient to realize the mapping from the above directory to the routing configuration. The source code is as follows
const registerRoutes = () => {
  const contextInfo = require.context('./views', true, /.vue$/)
  const routes = contextInfo.keys().map((filePath) => {
    // filePath is in the form of. / Home.vue,. / modifiers/capture.vue
    // path we want to be / home, / modifiers/capture
    // Therefore, you need to replace the beginning. / and. vue with empty
    const path = filePath.toLowerCase().replace(/^\.|\.vue/g, '')
    // name, then turn / home, / modifiers/capture into a small hump
    // Replace the beginning / first, and then capitalize the first / last word
    const name = path.replace(/^\//, '').replace(/\/(\w)/, ($0, $1) => $1.toUpperCase())
    // Read the contents of the. vue file through require
    const component = require(`./views${filePath.replace(/^\./, '')}`).default

    return {
      path,
      name,
      component
    }
  })

  return routes
}
effect
After the above simple processing, the dynamic registration routing is completed! You can also click vue-demos View effect
Event modifier
1. Two ways to prevent bubbling
<template>
  <div class="parent" @click="onClickParent">
    I'm daddy
    <div class="child" @click="onClickChild">
      I'm a son
    </div>
  </div>
</template>

export default {
  name: 'stop',
  methods: {
    onClickParent () {
      console.log('I'm daddy')
    },
    onClickChild () {
      console.log('I'm a son')
    }
  }
}
When clicking a child node, it will print not only that I am a son but also that I am a father because of the bubble of the event. Is there any way to prevent the event bubbling of child nodes?
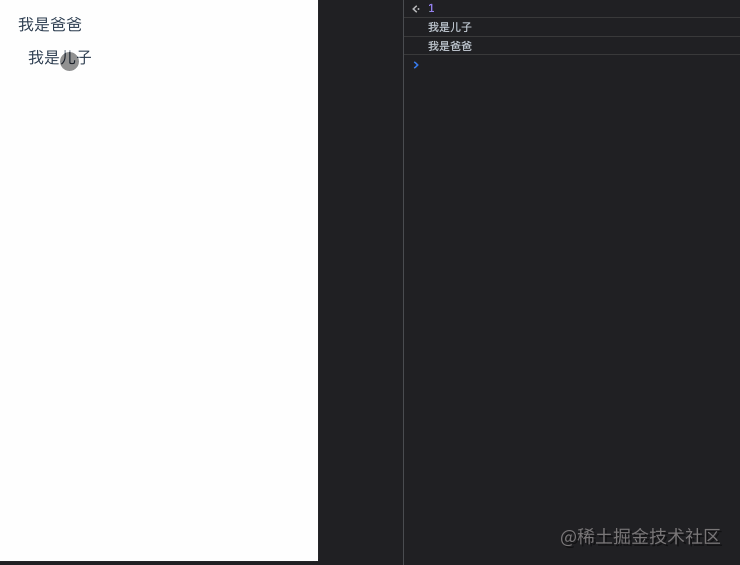
1 .stop
Just add the. stop modifier. It's a simple way to prevent the event from bubbling, isn't it.
When the. stop modifier is added, it will only appear that I am a son
<template>
  <div class="parent" @click="onClickParent">
    I'm daddy
    <div class="child" @click.stop="onClickChild">
      I'm a son
    </div>
  </div>
</template>

2. event.stopPropagation
Of course, we can also stop bubbling by calling event.stopPropagation. However, more modifiers are recommended, so that your function will focus more on logical processing without paying attention to the details of DOM events
export default {
  name: 'stop',
  methods: {
    onClickChild (event) {
      console.log('I'm a son')
      event.stopPropagation()
    }
  }
}
2. Two ways to block default events
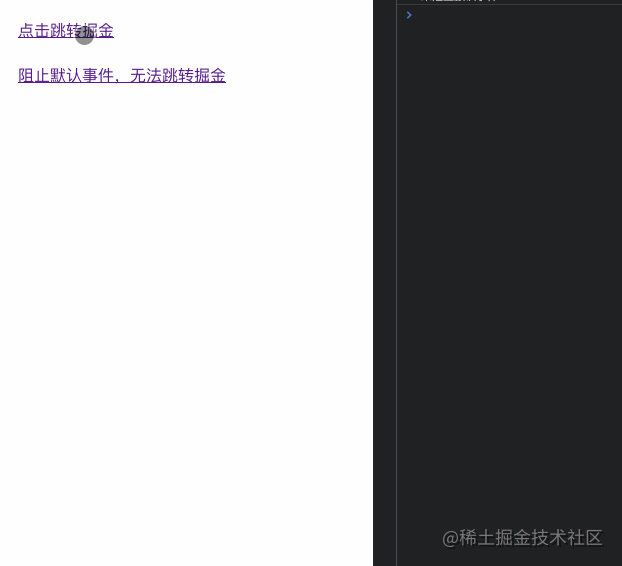
There are two ways to prevent bubbling in vue. What about blocking default events?
1 .prevent
<template>
  <div class="prevent">
    <a href="https://Juejin. CN / "@ Click =" onnoprevent "> Click to jump to Nuggets</a>
    <br />
    <br />
    <a href="https://Juejin. CN / "@click.prevent =" onprevent "> Default events are blocked and nuggets cannot be jumped</a>
  </div>
</template>

export default {
  name: 'prevent',
  methods: {
    onNoPrevent () {
      console.log('Default events are not blocked')
    },
    onPrevent () {
      console.log('Block default events')
    }
  }
}
Simply add. prevent to easily block default events
2.event.preventDefault()
Just like preventing bubbling, we can also block the default event by calling the preventDefault method of the event object
export default {
  name: 'prevent',
  methods: {
    onPrevent (event) {
      console.log('Block default events')
      event.preventDefault()
    }
  }
}
3 .capture
By default, the event flow is transmitted in the form of bubbling (from the inside out). What should I do if I want to capture (from the outside in)?
<template>
  <div class="capture parent" @click.capture="onClickParent">
    Parent node
    <div class="child" @click.capture="onClickChild">Self node</div>
  </div>
</template>

export default {
  name: 'capture',
  methods: {
    onClickParent () {
      console.log('I am the parent node')
    },
    onClickChild () {
      console.log('I am a child node')
    }
  }
}
Without the catch modifier, clicking a child node will successively print that I am the parent node and I am the child node. After adding it, it will be the reverse
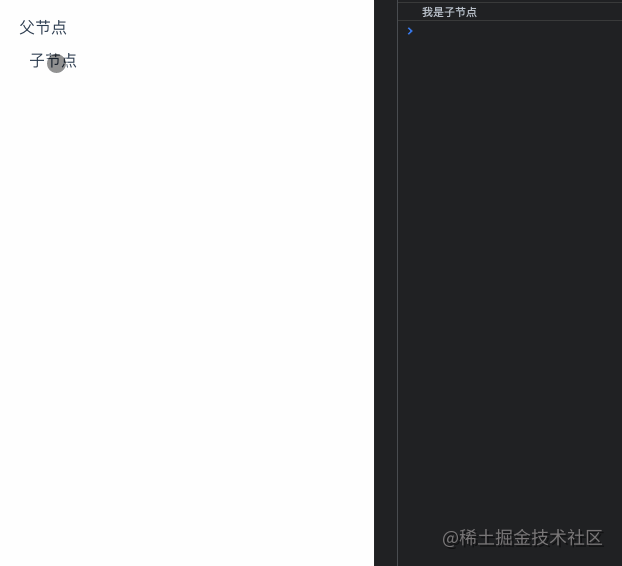
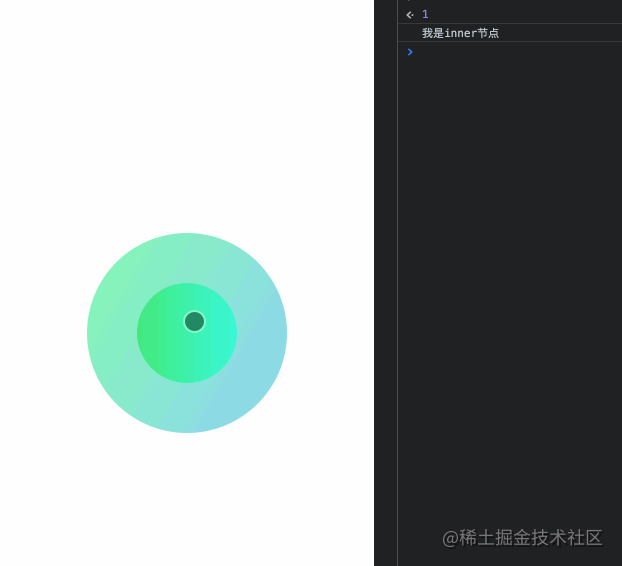
4 .self
The event callback function is triggered only when event.target is the current element itself
<template>
  <div class="self" @click.self="onClickSelf">
    <div class="inner" @click="onClickInner"></div>
  </div>
</template>

export default {
  name: 'self',
  methods: {
    onClickSelf () {
      console.log('I am self node')
    },
    onClickInner () {
      console.log('I am inner node')
    }
  }
}
If the self modifier is not added, clicking the inner node will also trigger the self event. After adding it, I will be printed as the self node only if the element triggering the event itself is self
Pause: how do you understand the order of modifiers?
The four modifiers have been reviewed. They are easy to understand when used alone, but note that there is such a sentence on the official website

How to understand? Let's look at two chestnuts
<template>
  <div class="order">
    <div class="order-0">
      <a href="https://juejin.cn/" class="order-parent" @click.self.prevent="onClickParent">
        I am the parent node and will jump to nuggets
        <br />
        <span class="order-child" @click="onClickChild">
          I am a child node
        </span>
      </a>
      <hr />
    </div>
    <div class="order-2">
      <a href="https://juejin.cn/" class="order-parent" @click.prevent.self="onClickParent">
        I am the parent node and cannot jump to nuggets
        <br />
        <span class="order-child" @click="onClickChild">
          I am a child node
        </span>
      </a>
    </div>
  </div>
</template>

export default {
  name: 'order',
  methods: {
    onClickParent () {
      console.log('I am the parent node')
    },
    onClickChild () {
      console.log('I am a child node')
    }
  }
}
You can guess what will happen in the above code. The following three points can be made clear?
- First of all, clicking on the child nodes above and below will not trigger the click event of the parent node
- Clicking the parent node below will print out that I am the parent node, but will not jump to nuggets
- Clicking the parent node above will print out that I am the parent node and will not jump to nuggets
But if you click the child node above, will the parent node jump to nuggets? The answer is yes
Why?
a@click.self.prevent="onClickParent" means that when the clicked element is the a element itself, the default event will be blocked (it can be explained 3, no jump will occur), and the onClickParent callback will be executed.
When clicking the span element, the click event will be passed to a due to bubbles, but at this time, a will judge that the event is not triggered by itself, so it will not prevent the default event (jump will occur at this time), and of course, it will not trigger the onClickParent callback
Similarly, let's analyze it a@click.prevent.self="onClickParent"
Whether it is a child node or its own click, the default event is blocked first. The onClickParent callback function will be executed only when the trigger click event is the a element itself.
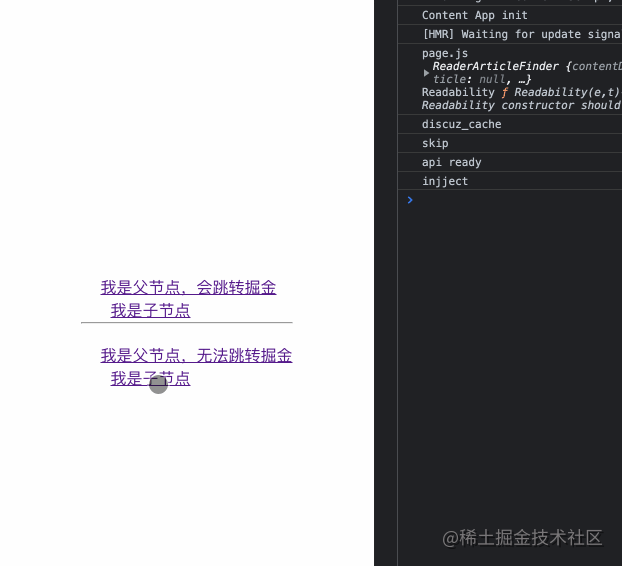
Looking back, do you understand the sequential meaning of events?
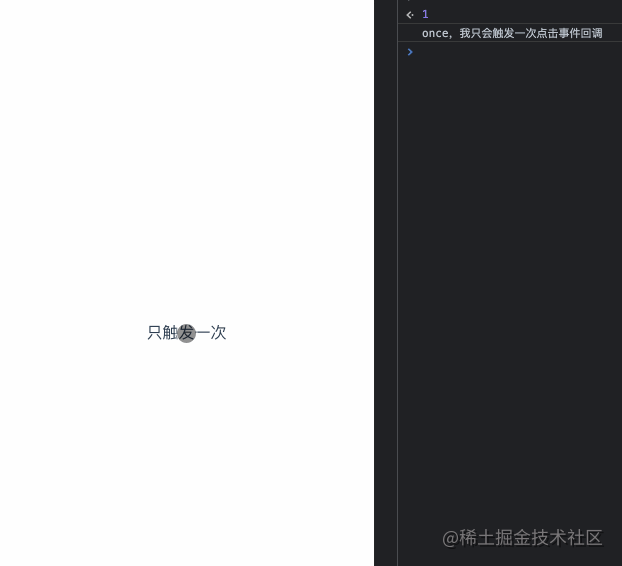
5. once
As the name suggests, an event is triggered only once
<template>
  <div class="once" @click.once="onClickOnce">
    Trigger only once
  </div>
</template>

export default {
  name: 'once',
  methods: {
    onClickOnce () {
      console.log('once,I only trigger a click event callback')
    }
  }
}
After triggering a click, no matter how much I click, the callback will not be triggered.
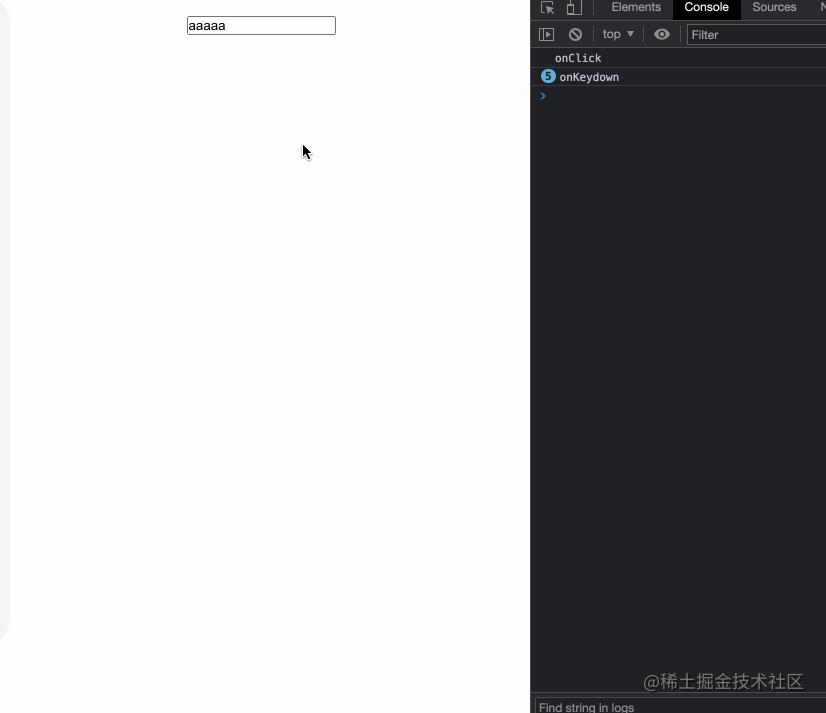
6 .native
We know that on custom components, we can only listen to custom events. Some native events (such as click) cannot be triggered directly, but using the. Native modifier can help us do this
native.vue
<template>
  <div class="native-custom">
    <input type="text" @keydown="onKeydown">
  </div>
</template>

export default {
  name: 'nativeCustom',
  methods: {
    onKeydown () {
      this.$emit('onKeydown')
    }
  }
}
custom.vue
<template>
  <div class="native">
    <!-- add.native After that, the native event can be monitored successfully -->
    <NativeCustom @onKeydown="onKeydown" @click.native="onClick" />
  </div>
</template>

import NativeCustom from '../../components/native.vue'

export default {
  name: 'native',
  components: {
    NativeCustom
  },
  methods: {
    onKeydown () {
      console.log('onKeydown')
    },
    onClick () {
      console.log('onClick')
    }
  }
}
7 .passive
vue correspondence addEventListener Medium passive option Provided . passive Modifier
<!-- Default behavior for scrolling events (Rolling behavior) Will be triggered immediately -->
<!-- Without waiting `onScroll` complete -->
<!-- This includes `event.preventDefault()` Situation -->

<div v-on:scroll.passive="onScroll">...</div>
This modifier has not found a suitable example for the improvement of rolling performance. Kneel down and beg the majority of digging friends to have examples
This modifier has not found a suitable example for the improvement of rolling performance. Kneel down and beg the majority of digging friends to have examples
This modifier has not found a suitable example for the improvement of rolling performance. Kneel down and beg the majority of digging friends to have examples
v-bind modifier
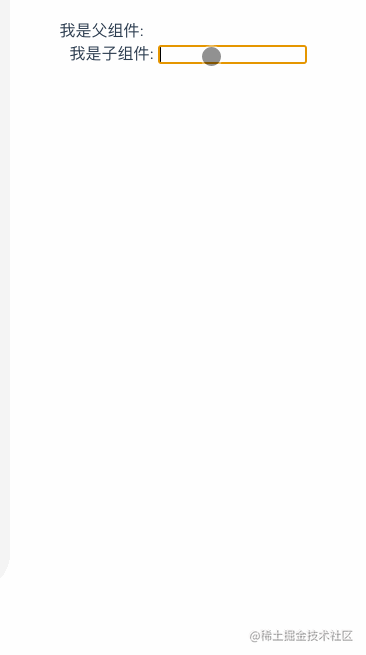
8 .sync
What is the convenient way to bind a property value between parent and child components? Yes, just the. sync modifier
Parent component
<template>
  <div class="sync-parent">
    I am the parent component: {{ text }}
    <Child :text.sync="text" />
  </div>
</template>

import Child from './child.vue'

export default {
  name: 'SyncParent',
  data () {
    return {
      text: 'parent'
    }
  },
  components: {
    Child,
  }
}
Subcomponents
<template>
  <div class="child">
    I am a subcomponent:
    <input type="text" v-model="value" @input="onInput">
  </div>
</template>

export default {
  name: 'child',
  props: {
    text: {
      type: String
    }
  },
  data () {
    return {
      value: this.text
    }
  },
  methods: {
    onInput () {
      // Note here that it must be in the form of update:xxx, that is, the attribute prop
      this.$emit('update:text', this.value)
    }
  }
}
9 .camel
.camel Modifier allows you to set the v-bind Property name humping, such as SVG viewBox property:
<svg :view-box.camel="viewBox"></svg>
10 .prop
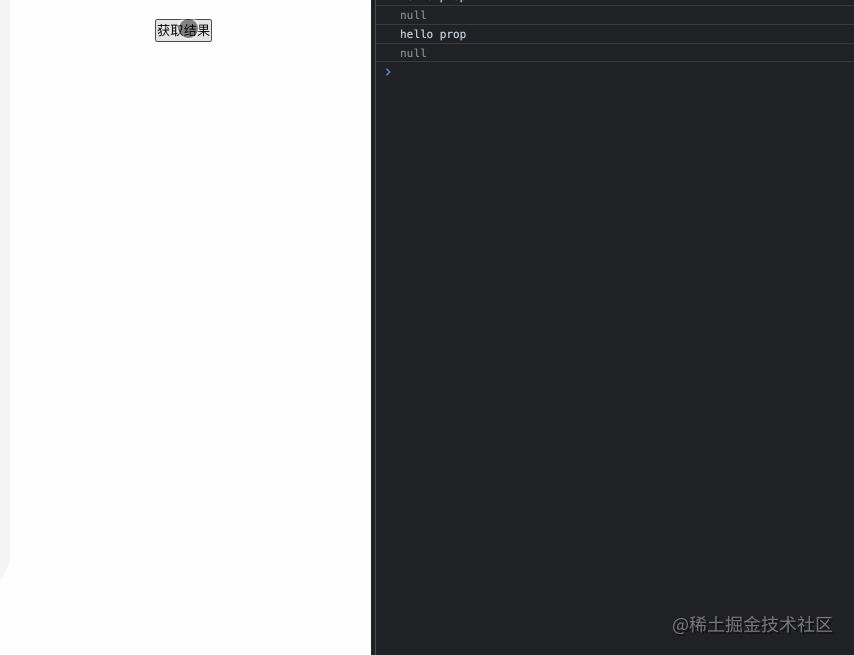
This is the only sentence about the. prop modifier on the official website. prop Bind as a DOM property, not as an attribute.
What does it do?
- Store variables through custom attributes to avoid exposing data
- Prevent contamination of HTML structure
For example, there are the following codes
<template>
  <div class="prop">
    <div class="prop-item" :my-name="prop"></div>
    // Finally, it becomes < div my name = "Hello prop" class = "prop item" > < / div >
    <div class="prop-item" :my-name.prop="prop2"></div>
    // Finally, it becomes < div class = "prop item" > < / div >
    <button @click="onGetResult">Get results</button>
  </div>
</template>

export default {
  name: 'prop',
  data () {
    return {
      prop: 'hello prop',
      prop2: 'hello prop2'
    }
  },
  methods: {
    onGetResult () {
      const $refProp = this.$refs.prop
      const $refProp2 = this.$refs.prop2

      console.log($refProp.getAttribute('my-name')) // hello prop
      console.log($refProp2.getAttribute('my-name')) // null
    }
  }
}
As can be seen from the example, the my name attribute without the. prop modifier will be bound to the attribute of the dom node, resulting in exposure.
Mouse modifier
When we want to listen to users click the left, right or middle button, there are also modifiers that can be used quickly. They are. Left,. Right and middle. Let's take an example
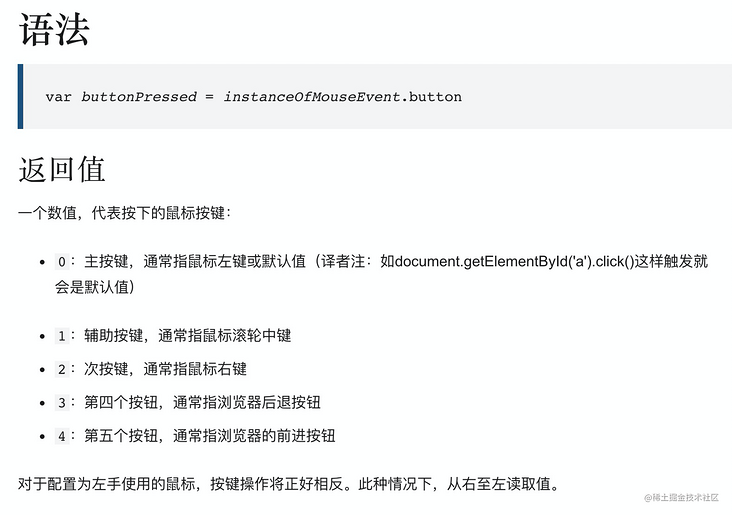
according to MDN MouseEvent.button , introduction.
Monitor the mousedown event in the outermost div.mouse to see which mouse button the user clicks. The three buttons use three modifier shortcuts to monitor the left, middle and right buttons, and print out left, middle and right
<template>
  <div class="mouse" @mousedown="onMousedown">
    <button @click.left="onClickBtn('left')">left</button>
    <button @click.middle="onClickBtn('middle')">middle</button>
    <button @click.right="onClickBtn('right')">right</button>
  </div>
</template>

export default {
  name: 'mouse',
  mounted () {

  },
  methods: {
    onClickBtn (msg) {
      console.log(msg)
    },
    onMousedown (event) {
      const mosueMsgMap = {
        0: 'Left mouse button',
        1: 'Middle mouse button',
        2: 'Right mouse button'
      }
      console.log('Click', mosueMsgMap[event.button])
    }
  }
}
I didn't bring the mouse back. Middle click can't demonstrate temporarily. I'll make it up later
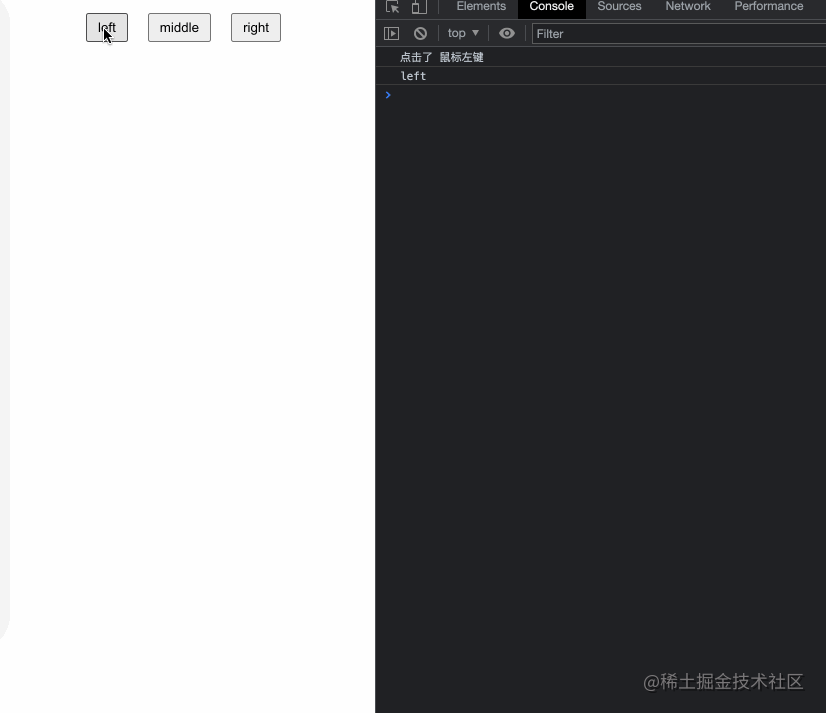
11 .left
As in the example above, monitor the left click of the mouse
12 .right
As in the example above, right click to listen
13 .middle
The same as the above example, monitor the middle click of the mouse
Form related modifiers
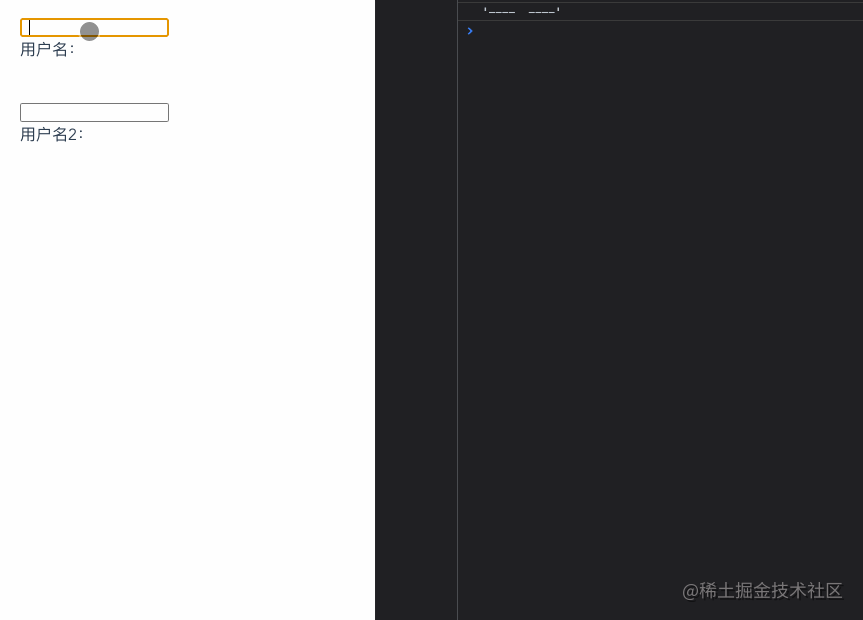
14 .trim
For the input content, if you want to filter the leading and trailing spaces, what should you do?
<template>
  <div class="trim">
    <div class="trim-item">
      <input type="text" v-model="name">
      <p>user name:<span>{{ name }}</span></p>
    </div>
    <div class="trim-item">
      <input type="text" v-model.trim="name2">
      <p>Username 2:<span>{{ name2 }}</span></p>
    </div>
  </div>
</template>

export default {
  name: 'trim',
  data () {
    return {
      name: '',
      name2: '',
    }
  },
  watch: {
    name (newVal) {
      console.log(`'----${newVal}----'`)
    },
    name2 (newVal) {
      console.log(`'----${newVal}----'`)
    },
  }
}
The. trim modifier is easy to do
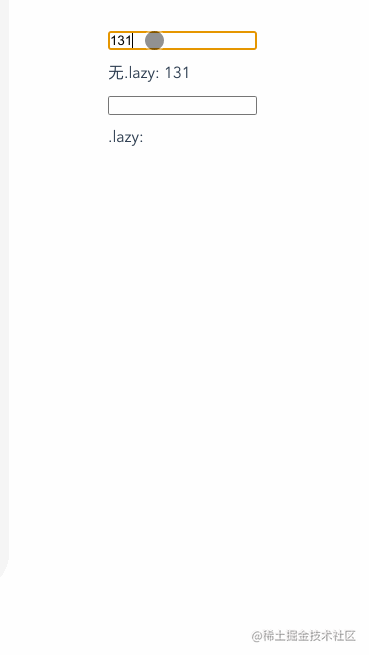
15 .lazy
v-model is familiar to everyone. By default, the value of the input box will be synchronized with its bound data in real time every time the input event is triggered. But how to update the data when the cursor leaves?
Idea 1: bind the change event and manually obtain the value of target in the event callback
Idea 2: use the. lazy modifier directly to achieve the effect
<template>
  <div class="lazy">
    <div class="lazy-item">
      <input type="text" v-model="text">
      <p>nothing.lazy: {{ text }}</p>
    </div>

    <div class="lazy-item">
      <input type="text" v-model.lazy="text2">
      <p>.lazy: {{ text2 }}</p>
    </div>
  </div>
</template>

export default {
  name: 'lazy',
  data () {
    return {
      text: '',
      text2: ''
    }
  }
}
You can see that after adding the. lazy modifier, the value entered in the second input box will not be reflected below in real time, but the data of text2 will be updated when the cursor leaves the real
16 .number
We know that even if the type of the input input box is number, the type of the value obtained is string. If we want to get the data of number directly, what should we do if we don't want to bother with manual conversion?
<template>
  <div class="number">
    <div class="number-item">
      <p>nothing.number </p>
      <input type="number" v-model="number">
    </div>
    <div class="number-item">
      <p>type:text .number </p>
      <input type="text" v-model.number="number1">
    </div>
    <div class="number-item">
      <p>type:number .number </p>
      <input type="number" v-model.number="number2">
    </div>
  </div>
</template>

export default {
  name: 'lazy',
  data () {
    return {
      number: 0,
      number1: '',
      number2: '',
    }
  },
  watch: {
    number (newVal) {
      console.log(typeof newVal, newVal)
    },
    number1 (newVal) {
      console.log(typeof newVal, newVal)
    },
    number2 (newVal) {
      console.log(typeof newVal, newVal)
    },
  }
}- The type of the first input box is number, but the resulting value is string
- The type of the second input box is text, but the number modifier is added to get the value of number (if this value cannot be modified) parseFloat() If resolved, the original value is returned.)
- The type of the third input box is number, and the final value is also number

System modifier
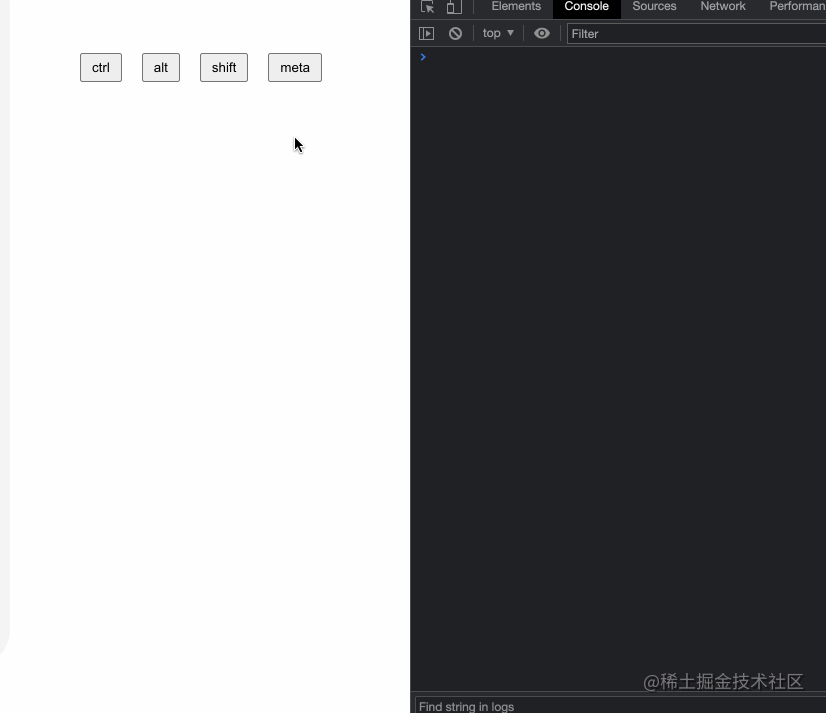
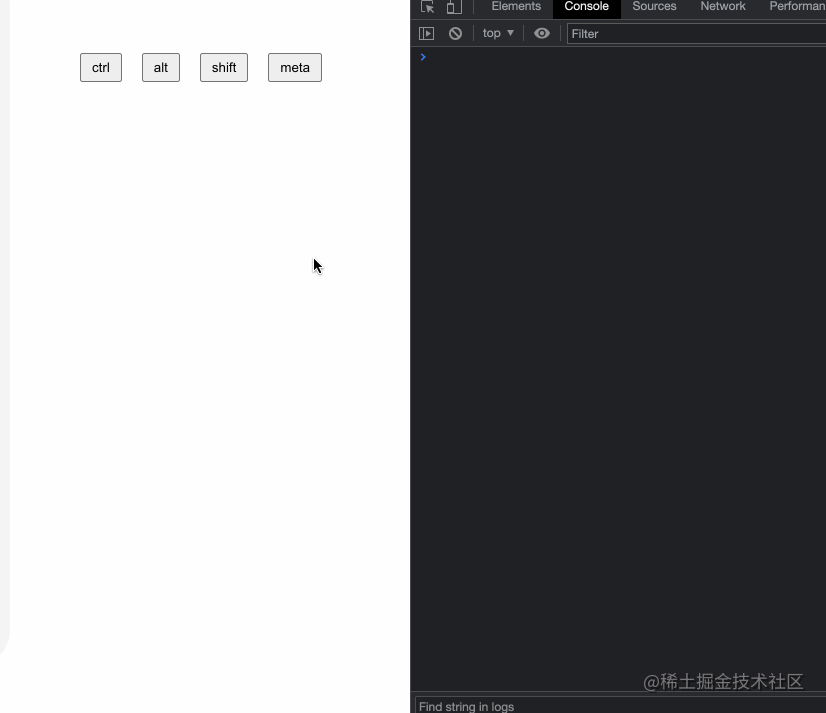
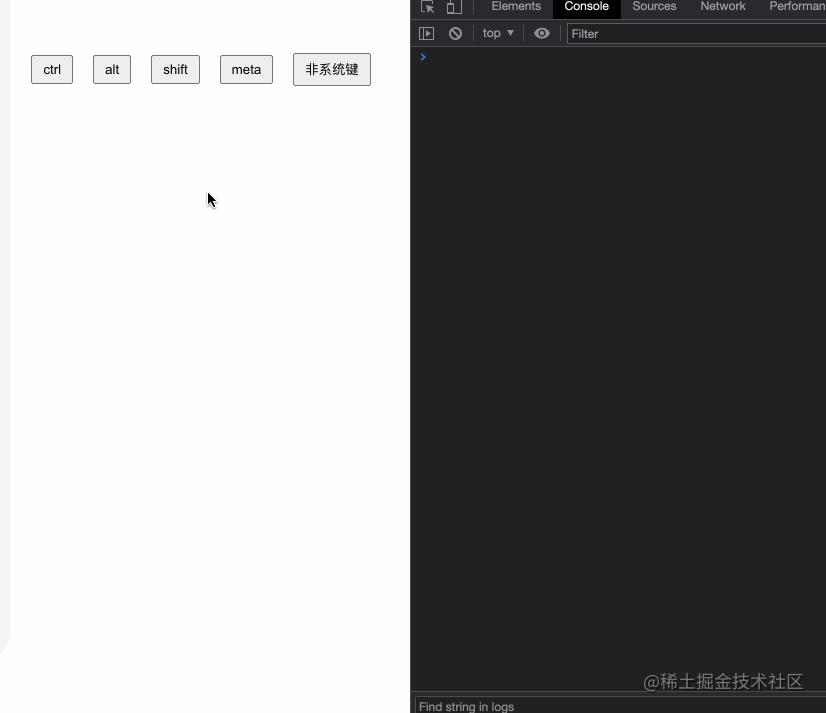
When the click event or keyboard event needs to be triggered by pressing the system key at the same time. ctrl,. alt,. shift,. meta can be of great help!
The following code
- Listen to the keydown event globally and try to see if. ctrl,. alt,. shift,. meta are pressed
- Add. ctrl,. alt,. shift,. meta modifiers to the four buttons respectively, and cooperate with the click event to verify whether the specified key is pressed at the same time, and then click again to take effect
Note: the computer ctrl + click estimation conflicts with the browser shortcut configuration, resulting in no trigger
<template>
  <div class="system">
    <p>{{ msg }}</p>
    <div class="buttons">
      <button @click.ctrl="onClickButon('ctrl')">ctrl</button>
      <button @click.alt="onClickButon('alt')">alt</button>
      <button @click.shift="onClickButon('shift')">shift</button>
      <button @click.meta="onClickButon('meta')">meta</button>
    </div>
  </div>
</template>

export default {
  name: 'system',
  data () {
    return {
      msg: ''
    }
  },
  mounted () {
    this.onListenSystemKeyDown()
  },
  methods: {
    onListenSystemKeyDown () {
      document.addEventListener('keydown', (event) => {
        let msg = 'Pressed'

        if (event.ctrlKey) {
          msg += 'ctrl key'
        } else if (event.altKey) {
          msg += 'alt key'
        } else if (event.shiftKey) {
          msg += 'shift key'
        } else if (event.metaKey) {
          msg += 'meta key'
        } else {
          msg += 'Other keys'
        }

        this.msg = msg
      }, false)
    },
    onClickButon (key) {
      console.log(`Only press simultaneously ${key}Key, click the event will occur`)
    }
  }
}
17 .ctrl
A listener that triggers mouse or keyboard events only when the ctrl key is pressed. See the above for a detailed example
18 .alt
A listener that triggers mouse or keyboard events only when alt is pressed. See the above for a detailed example
19 .shift
A listener that triggers mouse or keyboard events only when the shift key is pressed. See the above for a detailed example
20 .meta
A listener that triggers mouse or keyboard events only when the meta button is pressed. See the above for a detailed example
21 .exact
Strictly speaking, this. exact does not belong to the system modifier, but there is a phenomenon in the writing of the above example. Pressing several system modifier keys (such as alt and shift) at the same time can trigger. alt or. Shift.
Using the above example, take a look at the gif below. At this time, I press alt and shift at the same time, and the corresponding two events can be triggered
- Click is triggered only when a system modifier key is pressed
- Click is triggered when no system modifier is pressed
To realize the above requirements, exact will come in handy. Use the above example to make some modifications
<template>
  <div class="extra">
    <p>{{ msg }}</p>
    <div class="buttons">
      <button @click.ctrl.exact="onClickButon('ctrl')">ctrl</button>
      <button @click.alt.exact="onClickButon('alt')">alt</button>
      <button @click.shift.exact="onClickButon('shift')">shift</button>
      <button @click.meta.exact="onClickButon('meta')">meta</button>
      <button @click.exact="onClickButon('Non system key')">Non system key</button>
    </div>
  </div>
</template>

export default {
  name: 'extra',
  data () {
    return {
      msg: ''
    }
  },
  mounted () {
    this.onListenSystemKeyDown()
  },
  methods: {
    onListenSystemKeyDown () {
      document.addEventListener('keydown', (event) => {
        let msg = 'Pressed'

        if (event.ctrlKey) {
          msg += 'ctrl key'
        } else if (event.altKey) {
          msg += 'alt key'
        } else if (event.shiftKey) {
          msg += 'shift key'
        } else if (event.metaKey) {
          msg += 'meta key'
        } else {
          msg += 'Other keys'
        }

        this.msg = msg
      }, false)
    },
    onClickButon (key) {
      console.log(`Only press simultaneously ${key}Key, click the event will occur`)
    }
  }
}
Key modifier
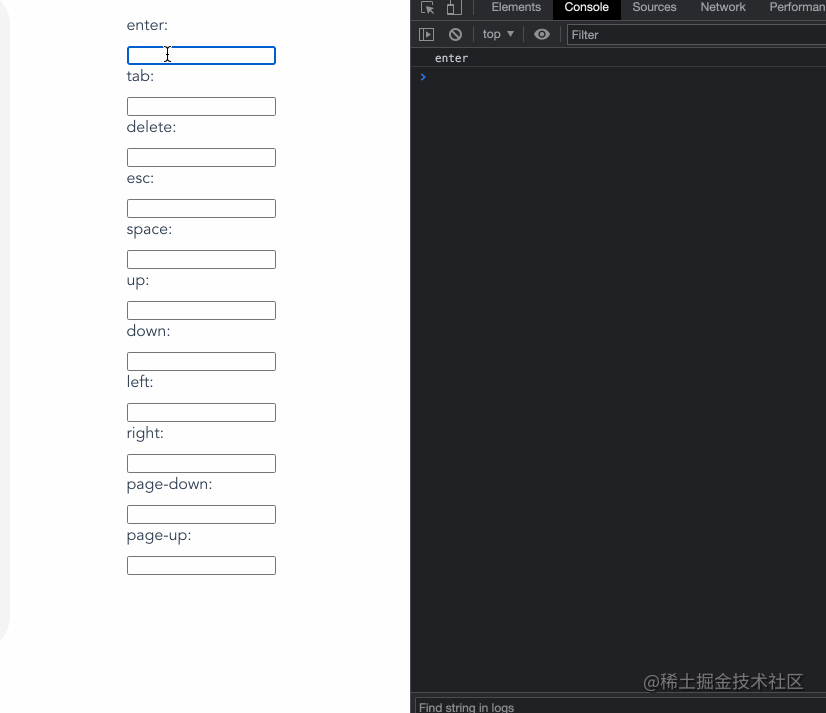
When monitoring keyboard events, we often need to check the detailed keys and then execute the corresponding logic. vue also has built-in key modifiers of at least 11 +.
In the following code, we assign keydown events to enter, tab, delete and other keys respectively. When the specified keyboard is pressed in the specified input box, enter, tab, delete, etc. will be printed. Other keys cannot trigger the console in the input box
<template>
  <div class="key-modifiers">
    <div class="key-modifiers-item">
      enter:
      <input type="text" @keydown.enter="onKeydown('enter')">
    </div>
    <div class="key-modifiers-item">
      tab:
      <input type="text" @keydown.tab="onKeydown('tab')">
    </div>
    <div class="key-modifiers-item">
      delete:
      <input type="text" @keydown.delete="onKeydown('delete')">
    </div>
    <div class="key-modifiers-item">
      esc:
      <input type="text" @keydown.esc="onKeydown('esc')">
    </div>
    <div class="key-modifiers-item">
      space:
      <input type="text" @keydown.space="onKeydown('space')">
    </div>
    <div class="key-modifiers-item">
      up:
      <input type="text" @keydown.up="onKeydown('up')">
    </div>
    <div class="key-modifiers-item">
      down:
      <input type="text" @keydown.down="onKeydown('down')">
    </div>
    <div class="key-modifiers-item">
      left:
      <input type="text" @keydown.left="onKeydown('left')">
    </div>
    <div class="key-modifiers-item">
      right:
      <input type="text" @keydown.right="onKeydown('right')">
    </div>

    <div class="key-modifiers-item">
      page-down:
      <input type="text" @keydown.page-down="onKeydown('page-down')">
    </div>
    <div class="key-modifiers-item">
      page-up:
      <input type="text" @keydown.page-up="onKeydown('page-up')">
    </div>
  </div>
</template>

export default {
  name: 'keyModifiers',
  methods: {
    onKeydown (keyName) {
      console.log(keyName)
    }
  }
}
22 .enter
A listener that triggers mouse or keyboard events when you press the enter button. See the above for a detailed example
23 .tab
A listener that triggers mouse or keyboard events only when the tab key is pressed. See the above for a detailed example
24 .delete
A listener that triggers mouse or keyboard events only when the delete key is pressed. See the above for a detailed example
25 .esc
A listener that triggers mouse or keyboard events only when pressing the esc key. See the above for a detailed example
26 .space
A listener that triggers mouse or keyboard events only when the space button is pressed. See the above for a detailed example
27 .up
A listener that triggers mouse or keyboard events only when the up button is pressed. See the above for a detailed example
28 .down
A listener that triggers mouse or keyboard events only when the down button is pressed. See the above for a detailed example
29 .left
A listener that triggers mouse or keyboard events when the left button is pressed. See the above for a detailed example
30 .right
A listener that triggers mouse or keyboard events only when you press the right button. See the above for a detailed example
31 .page-down
A listener that triggers mouse or keyboard events only when the (fn + down) key is pressed. See the above for a detailed example
32 .page-up
A listener that triggers mouse or keyboard events only when pressing the (fn + up) key. See the above for a detailed example
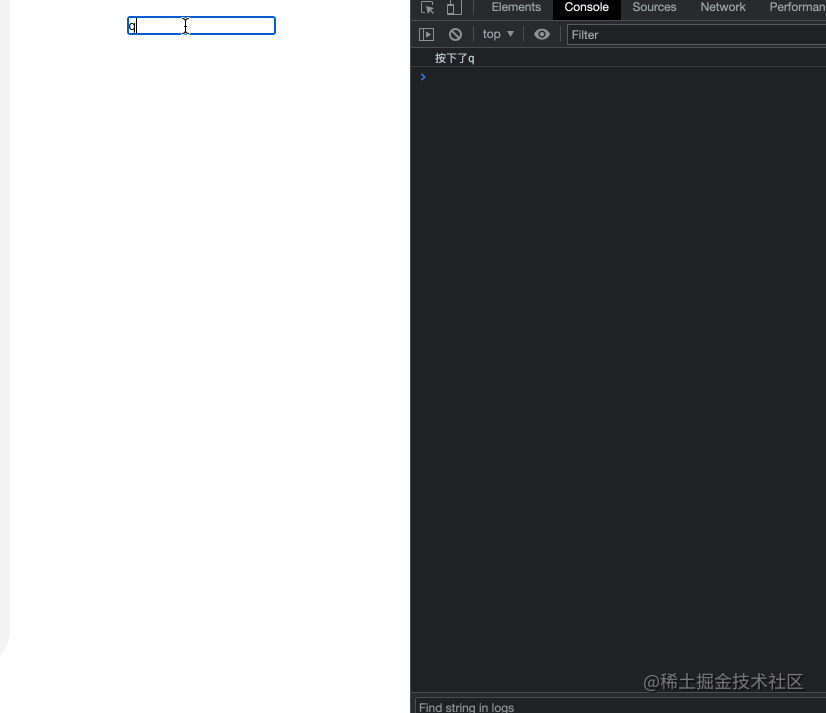
How to customize key modifiers
vue itself has built us many practical key modifiers, which can meet our daily needs in most cases. Is there any way to customize the key modifiers?
We can define our own key modifier through the following configuration. For example, we define q as the shortcut key to press q.
Vue.config.keyCodes = {
  q: 81
}

<div class="custom">
  <input type="text" @keydown.q="f1Keydown">
</div>

export default {
  name: 'custom',
  methods: {
    f1Keydown () {
      console.log('Pressed q')
    }
  }
}
Don't say goodbye
The above is what fat fish learned and understood about vue modifier! Welcome to add and exchange comments. O(∩ ∩) O ha ha~
The examples in the article are github source code On, you can also click Look directly at the example